
Related Manuals for GPX PD7711B


Summary of Contents for GPX PD7711B
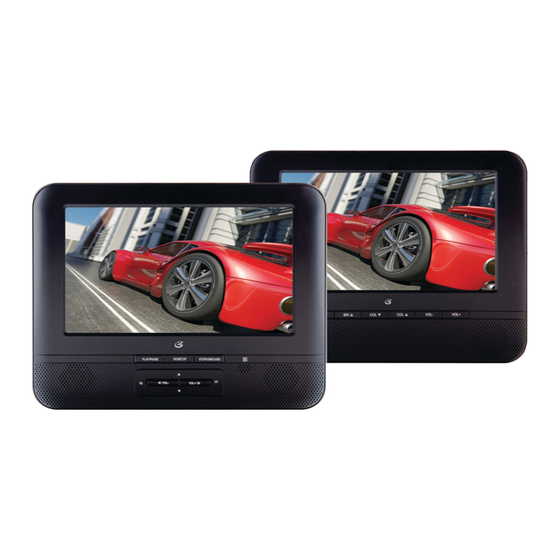
- Page 1 USER’S GUIDE V: 320-03 PD7711B Dual 7” DVD Player with Built-in Rechargeable Battery For the most up-to-date version of this User’s Guide, go to www.gpx.com...
-
Page 2: Warnings And Precautions
Warnings and Precautions • CAUTION: TO PREVENT ELECTRIC SHOCK, • WARNING: Lithium batteries, like all rechargeable MATCH WIDE BLADE OF PLUG TO WIDE SLOT, batteries are recyclable and should be recycled or FULLY INSERT. disposed of in normal household waste. Contact your local government for disposal or recycling practices in • WARNING: To reduce the risk of fire or electric shock, your area. -
Page 3: Important Safety Instructions
Important Safety Instructions Read these Instructions. FCC Warnings Keep these Instructions. WARNING: Changes or modifications to this unit not expressly approved by the party responsible for compliance could void the user’s Heed all Warnings. authority to operate the equipment. Follow all instructions. NOTE: This equipment has been tested and found to comply with the limits for a Class B digital device, pursuant to Part 15 of the FCC Do not use this apparatus near water. -
Page 4: Dvd Player
DVD Player Features Power - Primary Display • Two 7” LCD displays • DC power: requires a DC car adapter • DVD player: DVD, DVD±R/RW (included) • CD player: CD, CD-R/RW • AC power: requires an AC/DC power • JPEG CD adapter (included) •... -
Page 5: Table Of Contents
Table of Contents DVD Player . . . . . . . . . . . . . . . . . . . . . . . . . . . . . . . . . . . . . . . . . . . . . . . . . . . . . . . . . . . . . . . . . . . . . . . . 4 Features Included Power - Primary Display... -
Page 6: Introduction - Primary Display
Introduction - Primary Display LCD DISPLAY STOP/USB/CARD Press to stop a disc during play. Press and hold and use the ARROW/OK buttons to choose between DISC (DVD or CD), USB (USB thumb drive), and CARD (SD or MMC memory card). OK/SETUP Press to make selections in on-screen menus. -
Page 7: Introduction - Secondary Display
Introduction - Secondary Display BRIGHTNESS (▲▼) Press to adjust the brightness. COLOR (▼▲) Press to adjust the color. VOLUME (±) Press to adjust the volume. DC POWER INPUT POWER Adjust to turn the power off or on. STEREO HEADPHONE JACK AV INPUT Customer Support: 1-888-999-4215... -
Page 8: Introduction - Remote
Introduction - Remote SETUP SCREEN SET MUTE Press to mute the Press to access the Press to adjust the brightness and color volume. setup menu. on the primary display. Press and hold turn off DISPLAY the primary display. Press to view the on- VOLUME (±) screen display. -
Page 9: Setup
Setup Power - Primary Display DC power input: requires an AC/DC power adapter (included) or DC car adapter (included) DC battery power: built-in rechargeable battery POWER/CHARGE INDICATOR Off - Fully Charged or Powered Off Red - Charging Green - Powered On Power - Secondary Display DC power input: requires an AC/DC power adapter (included) or DC car adapter... -
Page 10: Dvd And Cd
DVD and CD Note: This unit is not compatible with MP3 CDs. Loading a Disc Manually open the disc door. Load a disc into the DVD player, label side facing up. Manually close the disc door. After a disc is loaded, it will begin playing automatically. -
Page 11: Programming A Loaded Disc
Programming a Loaded Disc Setup Menu Contents Follow the instructions for Loading a System Setup Disc and Playing a Loaded Disc. • TV System • Screen Saver While the loaded disc is playing, press • TV Type the PROGRAM button on the remote. •... - Page 12 In Car Setup Using the Headrest Straps Slide the primary and secondary display into their headrest strap cases. Run the headrest strap through the headrest strap connections on the back of both displays. Tighten the straps around the headrests of a vehicles seats. Primary Display Secondary Display This Class B digital apparatus complies with Canadian ICES-003.
-
Page 13: Memory Card Slot
Memory Card Slot Connecting a Memory Card Connect a SD or MMC memory card to the MEMORY CARD SLOT. Supports: JPEG, MP3, MPEG1, and MPEG2 Accessing Content on a Memory Card Follow the instructions for Connecting a Memory Card. Press and hold the STOP/USB/CARD button and press the ARROW and OK buttons to switch to SD mode. -
Page 14: Usb Port
USB Port Connecting a USB Thumb Drive Connect a USB Thumb Drive to the USB PORT. Supports: JPEG, MP3, MPEG1, and MPEG2 Accessing Content on a USB Drive Follow the instructions for Connecting a USB thumb drive. Press and hold the STOP/USB/CARD button and press the ARROW and OK buttons to switch to USB mode. -
Page 15: Audio/Video Output
Audio/Video Output Connecting the Displays Requires a 3.5mm A/V Cable (included) Plug the A/V cable into the A/V OUTPUT on the primary display and the A/V INPUT on the secondary display. The secondary display must be connected to a power source. Audio and video played on the primary display can now be seen on the secondary display. -
Page 16: Company Information
Para descargar este Manual del Usuario en inglés, español y francés, o para obtener respuestas a preguntas frecuentes, visite la sección de apoyo en www.gpx.com. Pour télécharger ce guide de l’utilisateur Environmental Commitment to ‘Protect for en anglais, espagnol ou français, ou pour Today and Sustain for Tomorrow’...