Table of Contents
Advertisement
Available languages
Available languages
®
HEDGE WIZARD™
ELECTRIC POLE TRIMMER
OWNER'S MANUAL
MODEL: 110946-01
If you have a question or problem,
CALL TOLL FREE 1-800-858-8501
or visit www.desatech.com
IMPORTANT: Read and understand this manual before assembling or
operating this Pole Trimmer. Improper use of Pole Trimmer can cause
severe injury or death. Keep this manual for future reference.
Advertisement
Table of Contents

Related Manuals for Remington HEDGE WIZARD 110946-01


Summary of Contents for Remington HEDGE WIZARD 110946-01
- Page 1 ® HEDGE WIZARD™ ELECTRIC POLE TRIMMER OWNER’S MANUAL MODEL: 110946-01 If you have a question or problem, CALL TOLL FREE 1-800-858-8501 or visit www.desatech.com IMPORTANT: Read and understand this manual before assembling or operating this Pole Trimmer. Improper use of Pole Trimmer can cause severe injury or death.
-
Page 2: Safety Warnings
® ELECTRIC POLE TRIMMER SAFETY • Always wear rubber gloves and sub- WHILE OPERATING POLE stantial foot wear when working TRIMMER WARNINGS outside. Watch what you are do- Stay Alert – • Always wear protective hair cover- ing. Use common sense. ing to contain long hair. -
Page 3: Product Identification
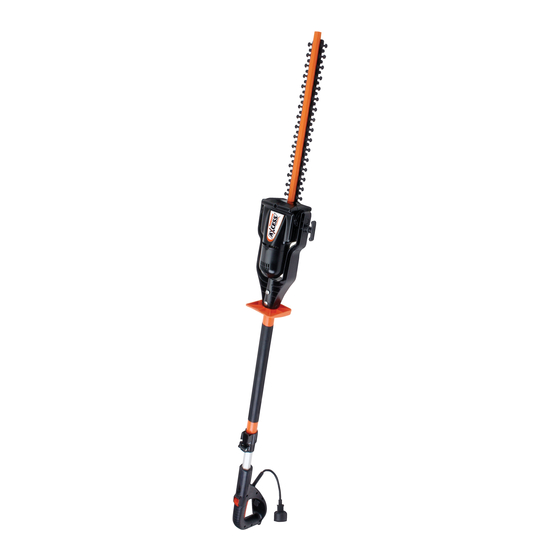
If the plug does not fit fully Figure 1 - Product Identification: Remington Pole Trimmer into the wall outlet, reverse the plug. If the plug still does not fit, contact a qualified electrician to install the proper For more information, visit www.desatech.com... -
Page 4: Pivoting The Power Head
® ELECTRIC POLE TRIMMER OPERATING POLE 2. Grasp the power head motor housing EXTENSION CORDS and rotate the power head to either the TRIMMER Use proper extension cord with this Pole 0, 45, or 90 degree position. Trimmer. Use only extension cords marked for outdoor use. - Page 5 OWNER’S MANUAL OPERATING POLE Note: An optional method of retaining the Unlocking the Trigger to Start extension cord is shown in Figure 8 for use the Pole Trimmer TRIMMER with larger-gage cords that may not fit into Using your thumb, push the trigger lock the extension cord retainer.
-
Page 6: Operating Positions
® ELECTRIC POLE TRIMMER OPERATING POLE OPERATING POSITIONS To use the Pole Trimmer for trimming the bottoms and sides of hedges and shrubs, TRIMMER To use the Pole Trimmer for trimming tall, hold the Pole Trimmer at the positions shown hard-to-reach hedges or shrubs, hold the in Figure 14. -
Page 7: Trimming A Hedge
OWNER’S MANUAL OPERATING POLE Do not force the Pole Trimmer through CLEANING AND dense growth. A slight back and forth saw- TRIMMER MAINTENANCE ing action may ease the cutting of larger, more dense growth. If the Pole Trimmer Continued begins to slow down, reduce the rate of WARNING: Disconnect Pole TRIMMING A HEDGE speed at which you are trying to cut. -
Page 8: Troubleshooting
® ELECTRIC POLE TRIMMER TROUBLESHOOTING WARNING: Unplug Pole Trimmer from power source before servicing. Severe injury or death could occur from fire, electrical shock, or body Note: For additional help, visit our contact with moving blades. technical service site www.desatech.com. OBSERVED FAULT POSSIBLE CAUSE REMEDY... -
Page 9: Replacement Parts And Accessories
OWNER’S MANUAL REPLACEMENT REPAIR SERVICE SERVICING POLE PARTS AND TRIMMER Note: Only use original replacement parts. This will protect your warranty coverage for ACCESSORIES (Continued) parts replaced under warranty. Remove screw that holds down cutter For original replacement parts and accesso- Each Authorized Service Center is indepen- blade assembly (see Figure 19). -
Page 10: Illustrated Parts Breakdown
® ELECTRIC POLE TRIMMER ILLUSTRATED Note: This assembly contains double-insu- lated parts. To maintain double insulation, PARTS service should be performed by an Autho- rized Service Center, except for the parts BREAKDOWN shown. See Servicing Pole Trimmer, pages 8 and 9. POLE TRIMMER MODEL 110946-01 For more information, visit www.desatech.com... -
Page 11: Parts List
OWNER’S MANUAL PARTS LIST POLE TRIMMER MODEL 110946-01 This list contains user replaceable parts used in your Pole Trimmer. When ordering parts, be sure to provide the correct model number (from the model plate), then the part number and description of the desired part. PART DESCRIPTION QTY. -
Page 12: Parts Central
® ELECTRIC POLE TRIMMER PARTS CENTRAL Ray’s Portable Heater Service Master Part Distributors 21st Century 3191 Myers Road 1251 Mound Avenue NW 2950 Fretz Valley Road Camino, CA 95709-9550 Grand Rapids, MI 49504-2672 Perkasie, PA 18944-4034 530-644-7716 616-791-0505 215-795-0400 1-800-446-1446 1-800-325-4828 Tool &... - Page 13 OWNER’S MANUAL NOTES ____________________________________ ___________________________________________ ___________________________________________ ___________________________________________ ___________________________________________ ___________________________________________ ___________________________________________ ___________________________________________ ___________________________________________ ___________________________________________ ___________________________________________ ___________________________________________ ___________________________________________ ___________________________________________ ___________________________________________ ___________________________________________ ___________________________________________ ___________________________________________ ___________________________________________ ___________________________________________ ___________________________________________ ___________________________________________ For more information, visit www.desatech.com 110939...
- Page 14 ELECTRIC POLE TRIMMER LIMITED WARRANTY Always specify model and serial numbers when writing the factory. We reserve the right to amend these specifications at any time without notice. The only warranty applicable is our standard written warranty. We make no other warranty, expressed or implied. DESA Specialty Products™...
- Page 15 ® HEDGE WIZARD™ PODADORA ELÉCTRICA DE PÉRTIGA MANUAL DEL PROPIETARIO MODELO: 110946-01 Si tiene preguntas o problemas, LLAME GRATIS al 1-800-858-8501 (sólo en inglés) o visite el sitio www.desatech.com IMPORTANTE: Lea y entienda este manual antes de ensamblar u operar esta podadora de pértiga. El uso inadecuado de esta podadora puede ocasionar graves lesiones o la muerte.
- Page 16 ® PODADORA ELÉCTRICA DE PÉRTIGA ADVERTENCIAS 6. Vístase correctamente cuando Longitud total del opere la podadora de pértiga. Voltaje cordón en pies DE SEGURIDAD • No use ropa floja ni joyería que pueda agarrarse en las cuchillas móviles o en las piezas de la podadora de pértiga.
-
Page 17: Advertencias De Seguridad
MANUAL DEL PROPIETARIO ADVERTENCIAS MANTENIMIENTO Y Para reducir el riesgo de sacudida eléc- trica, la podadora de pértiga tiene un ALMACENAJE DE LA DE SEGURIDAD enchufe polarizado (una cuchilla es más PODADORA DE PÉRTIGA ancha que la otra) y deberá usarse un Continuación 1. -
Page 18: Identificación Del Producto
1. Hale hacia fuera el mango en T ubica- do lateralmente en el soporte giratorio. Figura 1 - Identificación del producto: Podadora de pértiga Remington El mango en T tiene resorte de carga, de modo que sentirá alguna resistencia cuando lo empuje hacia fuera. -
Page 19: Cordones De Extensión
MANUAL DEL PROPIETARIO OPERACIÓN DE LA Use el tamaño de cordón apropiado para Haga un lazo en el cordón de extensión esta podadora de pértiga. El cordón debe ser e inserte el lazo por la parte inferior del PODADORA lo suficientemente grueso para que trans- mango. -
Page 20: Arranque De La Podadora De Pèrtiga
® PODADORA ELÉCTRICA DE PÉRTIGA OPERACIÓN DE LA Desbloqueo del gatillo para Bloqueo de la podadora de arrancar la podadora de pértiga pértiga en ON (encendido) PODADORA 1. Con su pulgar, empuje el botón de blo- Empuje el botón de bloqueo del gati- Continuación queo del gatillo hacia delante a la posi- llo hacia delante a la posición 2 y... - Page 21 MANUAL DEL PROPIETARIO OPERACIÓN DE LA Si usa la podadora de pértiga para podar Si usa la podadora de pértiga para podar pequeños setos o arbustos sostenga la follaje bajo o vegetación del suelo, sostenga PODADORA podadora en las posiciones mostradas en la la podadora en la posición mostrada en la Figura 13.
-
Page 22: Podado De Un Seto
® PODADORA ELÉCTRICA DE PÉRTIGA OPERACIÓN DE LA No fuerce la podadora de pértiga en vegeta- LIMPIEZA Y ción densa. Un movimiento ligero de corte PODADORA MANTENIMIENTO hacia atrás y adelante puede ayudar el corte de vegetación densa y grande. Si la podadora de Continuación pértiga empieza a bajar la velocidad, reduzca ADVERTENCIA: Desconecte... -
Page 23: Análisis De Averías
MANUAL DEL PROPIETARIO ANÁLISIS DE ADVERTENCIA: antes de dar servicio a la podadora de pértiga AVERÍAS desconéctela de la fuente de alimentación. Pueden ocurrir graves lesio- nes o la muerte por incendio, sacudida eléctrica o contacto del cuerpo Nota: Para obtener ayuda adicional visite con partes móviles. -
Page 24: Accesorios Y Piezas De Repuesto
® PODADORA ELÉCTRICA DE PÉRTIGA SERVICIO A LA SERVICIO ADVERTENCIA: Todos los PODADORA DE TÉCNICO componentes deben estar instalados y bien sujetos antes PÉRTIGA Usted puede tener más preguntas sobre cómo de enchufar la podadora de ensamblar, utilizar o mantener este producto. Continuación pértiga fuente... -
Page 25: Central De Piezas
MANUAL DEL PROPIETARIO CENTRAL DE PIEZAS Ray’s Portable Heater Service Hance Distributors, Inc. La Ports 3191 Myers Road 12795 16th Avenue North 2444 N 5th Street Camino, CA 95709-9550 Plymouth, MN 55441-4556 Hartsville, SC 29550-7704 530-644-7716 763-559-2299 843-332-0191 www.hanceco.com Tool & Equipment Service MTA Distributors Solutions, LLC Automotive Equipment... - Page 26 ® PODADORA ELÉCTRICA DE PÉRTIGA DESARME Nota: Este conjunto contiene partes con doble aislamiento. Para mantener el doble ILUSTRADO DE aislamiento, el servicio debe realizarse en centro de servicio autorizado, excepto para LAS PIEZAS las partes mostradas. Vea Servicio a la podadora de pértiga, páginas 23 y 24.
-
Page 27: Lista De Piezas
MANUAL DEL PROPIETARIO LISTA DE PIEZAS PODADORA ELÉCTRICA DE PIEZAS MODELO 110946-01 Esta lista contiene las partes usadas en su podadora de pértiga y que el usuario puede cambiarlas. Cuando solicite piezas, asegúre- se de facilitar el número correcto del modelo (de la placa de modelo), luego el número de parte y la descripción de la parte deseada. - Page 28 GARANTÍA LIMITADA DE LA PODADORA ELÉCTRICA DE PÉRTIGA Cuando escriba a la fábrica especifique siempre los números de modelo y serie. Nos reservamos el derecho de modificar en cualquier momento y sin previo aviso estas especificaciones. La única garantía aplicable es nuestra garantía estándar escrita.
- Page 29 ® HEDGE WIZARD™ TAILLE-HAIE ÉLECTRIQUE À PERCHE GUIDE DU PROPRIÉTAIRE MODÈLE 110946-01 Pour toute question ou problème, FAITES SANS FRAIS LE 1 800 858-8501 (en anglais seulement) ou visitez notre site Web à l’adresse www.desatech.com IMPORTANT : Vous devez lire et comprendre ce guide avant d’assembler ou d’utiliser ce taille-haie à...
-
Page 30: Consignes De Sécurité
® TAILLE-HAIE ÉLECTRIQUE À PERCHE Portez des vêtements appropriés CONSIGNES Longueur totale de la lors de l’utilisation du taille-haie Tension (V) rallonge en pieds DE SÉCURITÉ à perche • Évitez de porter des vêtements am- ples ou des bijoux qui pourraient se AVERTISSEMENT : Lors de Intensité... -
Page 31: Guide Du Propriétaire
GUIDE DU PROPRIÉTAIRE CONSIGNES ENTRETIEN ET perche s’insère d’une seule façon dans la prise de la rallonge électrique. Si vous ENTREPOSAGE DU DE SÉCURITÉ n’arrivez pas à insérer complètement la TAILLE-HAIE À PERCHE fiche dans la prise, inversez la fiche. Si Suite Prenez bien soin du taille-haie à... -
Page 32: Identification Du Produit
Cordon électrique Dispositif de retenue de la rallonge Figure 1 – Identification du produit : Taille-haie à perche Remington UTILISATION DU TAILLE-HAIE Figure 3 – Rotation du moteur AVERTISSEMENT : Lisez le guide du propriétaire et assurez-vous de bien le comprendre avant de vous servir du taille-haie à perche. -
Page 33: Rallonge Électrique
GUIDE DU PROPRIÉTAIRE UTILISATION DU Assurez-vous que la rallonge ne se trouve pas dans la zone de coupe. Assurez-vous TAILLE-HAIE également que la rallonge ne se prend pas dans les branches pendant la coupe. Inspec- Suite tez souvent la rallonge et remplacez les Relâchez la poignée en T. -
Page 34: Démarrage Du Taille-Haie À Perche
® TAILLE-HAIE ÉLECTRIQUE À PERCHE UTILISATION DU Déverrouillage de la gâchette Verrouillage du taille-haie en pour faire démarrer le taille-haie position « MARCHE » TAILLE-HAIE Au moyen du pouce, appuyez sur le Au moyen du pouce, appuyez sur le Suite bouton de verrouillage de la gâchette bouton de verrouillage de la gâchette pour le faire passer en position 2. -
Page 35: Positions De Fonctionnement
GUIDE DU PROPRIÉTAIRE UTILISATION DU Pour vous servir du taille-haie à perche pour Pour vous servir du taille-haie à perche pour tailler des buissons ou des haies de petite tailler le feuillage ou les couvre-sol, tenez le TAILLE-HAIE taille, tenez le taille-haie dans la position taille-haie dans la position illustrée à... -
Page 36: Taille D'une Haie
® TAILLE-HAIE ÉLECTRIQUE À PERCHE UTILISATION DU N’appuyez pas fortement sur le taille-haie NETTOYAGE ET pour le faire passer à travers des zones de TAILLE-HAIE ENTRETIEN feuillage de plus forte densité. Un léger mouvement de scie, d’avant vers l’arrière, Suite peut faciliter la taille des zones de feuillage AVERTISSEMENT : TAILLE D’UNE HAIE... -
Page 37: Dépannage
GUIDE DU PROPRIÉTAIRE DÉPANNAGE AVERTISSEMENT : Débranchez le taille-haie à perche de la source d’alimentation avant d’en faire l’entretien. De graves blessures, voire le Note : Pour plus de détails ou pour obte- décès, pourraient découler d’un incendie, d’un choc électrique ou du nir de l’aide, visitez notre site Web à... -
Page 38: Pièces De Rechange Et Accessoires
® TAILLE-HAIE ÉLECTRIQUE À PERCHE ENTRETIEN DU SERVICE MISE EN GARDE : Tous les TAILLE-HAIE À TECHNIQUE éléments doivent être installés et bien serrés avant de rebrancher PERCHE Peut-être aurez-vous d’autres questions sur le taille-haie à perche dans une l’assemblage, le fonctionnement ou l’entre- Suite prise électrique, sinon vous tien de ce produit. -
Page 39: Dépôt De Pièces
GUIDE DU PROPRIÉTAIRE DÉPÔT DE PIÈCES Ray’s Portable Heater Service Master Part Distributors 21st Century 3191 Myers Road 1251 Mound Avenue NW 2950 Fretz Valley Road Camino, CA 95709-9550 Grand Rapids, MI 49504-2672 Perkasie, PA 18944-4034 530-644-7716 616-791-0505 215-795-0400 1-800-446-1446 1-800-325-4828 Tool &... - Page 40 ® TAILLE-HAIE ÉLECTRIQUE À PERCHE Note : Cet appareil comporte des pièces à LISTE ILLUSTRÉE double isolation. Pour conserver les carac- DES PIÈCES téristiques antichoc, l’appareil doit être en- tretenu par un centre de service autorisé, TAILLE-HAIE À PERCHE sauf pour ce qui est des pièces illustrées ci- après.
-
Page 41: Liste De Pièces
GUIDE DU PROPRIÉTAIRE LISTE DE PIÈCES TAILLE-HAIE À PERCHE MODÈLE 110946-01 Cette liste comprend les pièces du taille- haie à perche pouvant être remplacées par le propriétaire. Lors de la commande de piè- ces, assurez-vous de fournir le numéro de modèle approprié... - Page 42 ® TAILLE-HAIE ÉLECTRIQUE À PERCHE NOTES/NOTAS____________________________ ___________________________________________ ___________________________________________ ___________________________________________ ___________________________________________ ___________________________________________ ___________________________________________ ___________________________________________ ___________________________________________ ___________________________________________ ___________________________________________ ___________________________________________ ___________________________________________ ___________________________________________ ___________________________________________ ___________________________________________ ___________________________________________ ___________________________________________ ___________________________________________ ___________________________________________ ___________________________________________ ___________________________________________ Pour plus de renseignements, 110939 visiter www.desatech.com...
- Page 43 GUIDE DU PROPRIÉTAIRE NOTES/NOTAS____________________________ ___________________________________________ ___________________________________________ ___________________________________________ ___________________________________________ ___________________________________________ ___________________________________________ ___________________________________________ ___________________________________________ ___________________________________________ ___________________________________________ ___________________________________________ ___________________________________________ ___________________________________________ ___________________________________________ ___________________________________________ ___________________________________________ ___________________________________________ ___________________________________________ ___________________________________________ ___________________________________________ ___________________________________________ Pour plus de renseignements, 110939 visiter www.desatech.com...
- Page 44 GARANTIE LIMITÉE DU TAILLE-HAIE ÉLECTRIQUE À PERCHE Précisez toujours le numéro de modèle et le numéro de série lorsque vous écrivez à l’usine. Nous nous réservons le droit de modifier les présentes caractéristiques en tout temps, sans aucun préavis. La seule garantie qui s’applique est notre garantie écrite standard.