Rheem Solar Premier Loline Owner's Manual And Installation Instructions
Electric boost water heater
Hide thumbs
Also See for Solar Premier Loline:
- Owner's manual (60 pages) ,
- Owner's manual and installation instructions (72 pages)
Table of Contents
Advertisement
Quick Links
Owner's Guide
and
Installation Instructions
Solar Premier Loline
Electric Boost Water Heater
WARNING: Plumber – Be Aware
Use copper pipe ONLY. Plastic pipe MUST NOT be used.
It is a requirement of a solar water heater installation that all pipe work be in
copper and not plastic, due to the effects of high water temperatures.
This water heater must be installed and serviced by an authorised person.
Please leave this guide with the householder.
Advertisement
Table of Contents

Related Manuals for Rheem Solar Premier Loline


Summary of Contents for Rheem Solar Premier Loline
-
Page 1: Installation Instructions
Owner’s Guide Installation Instructions Solar Premier Loline Electric Boost Water Heater WARNING: Plumber – Be Aware Use copper pipe ONLY. Plastic pipe MUST NOT be used. It is a requirement of a solar water heater installation that all pipe work be in copper and not plastic, due to the effects of high water temperatures. - Page 2 Rheem Australia Pty Ltd. TRADE MARKS ® Registered trademark of Rheem Australia Pty Ltd. ™ Trademark of Rheem Australia Pty Ltd. Note: Every care has been taken to ensure accuracy in preparation of this publication. No liability can be accepted for any consequences, which may arise as a result of its application.
-
Page 3: Table Of Contents
CONTENTS HOUSEHOLDER – We recommend you read pages 4 to 16. The other pages are intended for the installer but may be of interest. About Your Water Heater ......................4 Regular Care ..........................10 Water Supplies ........................... 11 Save A Service Call ........................14 Installation –... -
Page 4: About Your Water Heater
The electric boosted solar storage tank is suitable for installation either outdoor or indoor and with either Rheem S200 or T200 solar collectors. The system is suitable for installation in areas subject to frost or freeze conditions. Freeze conditions occur below 6°C. - Page 5 The closed circuit fluid is non-toxic and not hazardous to health. Phone Rheem Service or their nearest Accredited Service Agent to arrange for an inspection.
- Page 6 If the electrical conduit to the solar storage tank is damaged, it must be replaced by an authorised person in order to avoid a hazard. Phone Rheem Service or their nearest Accredited Service Agent to arrange for an inspection.
- Page 7 ABOUT YOUR WATER HEATER BOOSTER CONTROL An isolating switch is installed in the electrical meter box for the solar storage tank. This should be left switched on to allow the booster heating unit to operate if required. The booster heating unit is for heating the water at times of low solar energy gain, such as during very cloudy or rainy weather, or during the colder months.
- Page 8 ABOUT YOUR WATER HEATER PIPE WORK AND INSULATION The solar hot and solar cold pipes between the solar storage tank and the solar collectors MUST BE of copper. The full length of the solar hot and solar cold pipes MUST BE insulated. The insulation must: be of a closed cell type or equivalent, suitable for a solar water heating application and capable of withstanding the temperatures of the fluid generated by the solar collectors under stagnation conditions be at least 13 mm thick, however thicker insulation may be required to comply with the requirements of...
- Page 9 ABOUT YOUR WATER HEATER TO TURN OFF THE WATER HEATER If you plan to be away from home for a few nights, we suggest you leave the water heater switched on. If it is necessary to turn off the water heater: Switch off the electrical supply at the isolating switch to the solar storage tank.
-
Page 10: Regular Care
Have any trees trimmed which may shade the solar collectors. Rheem solar collectors have passed the AS/NZS 2712 requirements for resistance to hailstone damage, so it is not normally necessary to fit a guard to a collector. Stone Guards are available to provide a level of protection to the collectors against vandalism or accidental damage. -
Page 11: Water Supplies
WATER SUPPLIES This water heater must be installed in accordance with this advice to be covered by the warranty. This water heater is manufactured to suit the water conditions of most public reticulated water supplies. However, there are some known water chemistries which can have detrimental effects on the water heater and its operation and / or life expectancy. - Page 12 Refer to the Saturation Index chart on page 13. Contact Rheem Service or their nearest Accredited Service Agent if a replacement heating unit is required. Refer to the cold water connection detail on page 30 for the position of the expansion control valve.
- Page 13 WATER SUPPLIES SATURATION INDEX (SI) SOLAR WATER HEATERS - ELECTRIC BOOST WITHIN WARRANTY SPECIFICATION -1.0 +0.4 +0.8 SATURATION INDEX (calculated @ 80°C water temperature) scaling very corrosive corrosive very scaling SUMMARY OF WATER CHEMISTRY ADVICE AFFECTING WARRANTY The warranty of this water heater does not apply on the components listed below if the water heater is connected at any time to a water supply with water chemistry of: Water Chemistry Component...
-
Page 14: Save A Service Call
If the green LED remains off or the red LED recommences to flash, then count the number of flashes and phone Rheem Service or their nearest Accredited Service Agent to arrange for an inspection. Insufficient sunlight Insufficient sunlight due to cloudy weather during hotter months or low solar energy contribution in colder months may mean the booster water heater operates more often. - Page 15 Heavy flows of hot water until the water heater is cold - then stops until water reheats The water heater must be switched off at the isolating switch or switchboard. Phone Rheem Service or their nearest Accredited Service Agent to arrange for an inspection.
- Page 16 Warning: No attempt should be made to remove or replace broken collector glass. The collector glass is not offered as a replacement part. Should the solar collector require replacement, contact Rheem Service or their nearest Accredited Service Agent. HIGHER THAN EXPECTED ELECTRICITY BILLS With the installation of your new solar hot water system, maximum electrical energy savings can be achieved with careful planning of hot water usage.
-
Page 17: Installation - Solar Storage Tank
THIS WATER HEATER IS NOT SUITABLE FOR POOL HEATING. The system is suitable for installation with Rheem S200 or T200 solar collectors. The solar circuit must be installed with a continuous fall of a minimum 5° (1 in 10 grade) in the pipe work... - Page 18 INSTALLATION – SOLAR STORAGE TANK SAFE TRAY It is a requirement of AS/NZS 3500.4 that for a new installation, a water heater be installed in a safe tray where in the event of a leak, property may otherwise be damaged. Construction, installation and draining of a safe tray must comply with the above mentioned Standard.
- Page 19 INSTALLATION – SOLAR STORAGE TANK RAIN WATER TANK If the solar collectors and solar pipe work are to be installed on a section of roof which is part of a rain water runoff collection system, then it is recommended this section of roof and its gutter be isolated from the rain water collection system.
- Page 20 INSTALLATION – SOLAR STORAGE TANK HOT WATER DELIVERY This water heater can deliver water at temperatures which can cause scalding. It is necessary and we recommend that a temperature limiting device be fitted between the water heater and the hot water outlets in any ablution area such as a bathroom or ensuite, to reduce the risk of scalding. The installing plumber may have a legal obligation to ensure the installation of this water heater meets the delivery water temperature requirements of AS/NZS 3500.4 so that scalding water temperatures are not delivered to a bathroom, ensuite or other ablution area.
- Page 21 INSTALLATION – SOLAR STORAGE TANK CIRCULATED HOT WATER FLOW AND RETURN SYSTEM A solar water heater should not be installed as part of a circulated hot water flow and return system in a building. The benefits of solar gain will be significantly reduced and energy gained from the sun lost through the pipe work.
- Page 22 INSTALLATION – SOLAR STORAGE TANK REDUCING HEAT LOSSES The cold water line to and the hot water lines from the water heater must be insulated in accordance with the requirements of AS/NZS 3500.4. The insulation must be weatherproof and UV resistant if exposed. The full length of the solar hot and solar cold pipes between the solar storage tank and the solar collectors MUST BE insulated.
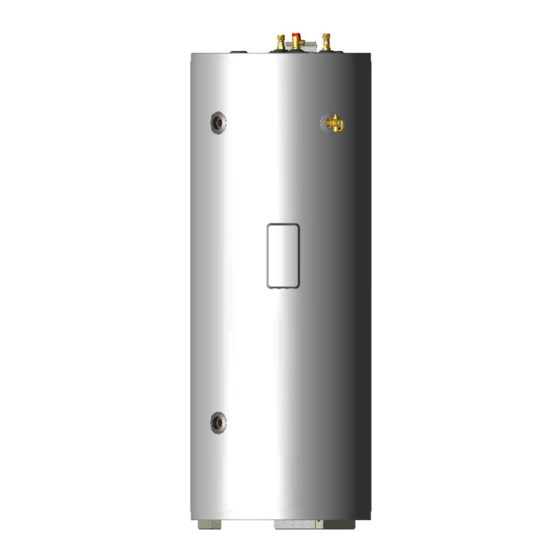
- Page 23 INSTALLATION – SOLAR STORAGE TANK DIMENSIONS AND TECHNICAL DATA Electric Boosted Solar Drain Back Storage Tank Model 591 270 Capacity 270 litres Mass 146 kg (empty) 416 kg (full) Dimensions Technical data is subject to change.
- Page 24 INSTALLATION – SOLAR STORAGE TANK TYPICAL INSTALLATION – OUTDOOR LOCATION TYPICAL INSTALLATION – INDOOR LOCATION...
-
Page 25: Installation - Solar Collectors
INSTALLATION – SOLAR COLLECTORS SOLAR COLLECTOR LOCATION Consideration must be given to the position of the solar collectors in relation to the solar storage tank. There are limitations on both the maximum length of the solar hot and solar cold pipes and the maximum height between the solar storage tank and the solar collectors. - Page 26 INSTALLATION – SOLAR COLLECTORS LATITUDE OF SOME AUSTRALIAN CITIES Adelaide 35°S Cairns 17°S Hobart 42°S Port Hedland 20°S Alice Springs 24°S Canberra 35°S Mildura 34°S Rockhampton 24°S Brisbane 27°S Darwin 12°S Melbourne 38°S Sydney 34°S Broken Hill 31°S Geraldton 28°S Perth 32°S Townsville...
- Page 27 INSTALLATION – SOLAR COLLECTORS WARNING: Plumber – Be Aware The solar hot and solar cold pipes between the solar storage tank and the solar collectors MUST BE of copper. All compression fittings must use brass or copper olives. The full length of the solar hot and solar cold pipes MUST BE insulated. The insulation must: ...
- Page 28 INSTALLATION – SOLAR COLLECTORS Maximum Height To Collectors The solar collectors must be the highest point of the system. The maximum height of the solar installation, from the base of the solar storage tank to the top of the solar collectors, is 9 m. The pump supplied with the solar storage tank will not circulate closed circuit fluid through heights greater than 9 m and solar gain will not be achieved.
- Page 29 INSTALLATION – SOLAR COLLECTORS Pressure Testing The solar water heater, including the collector circuit and solar collectors, is to be isolated during the testing and commissioning of the heated water reticulation system in a building, in accordance with Clause 11.1 and 11.3 (a) of AS/NZS 3500.4.
-
Page 30: Connections - Plumbing
CONNECTIONS – PLUMBING CONNECTION SIZES Hot water connection: RP¾/20. Cold water connection: RP¾/20. Solar hot (from collector) connection: DN15 compression fitting. Solar cold (to collector) connection: DN15 compression fitting. Temperature Pressure Relief valve connection: RP½/15. Solar circuit pressure relief valve connection: R½/15. ... - Page 31 CONNECTIONS – PLUMBING TEMPERATURE PRESSURE RELIEF VALVE The temperature pressure relief valve is shipped behind the lower front cover of the water heater. The temperature pressure relief valve must be fitted before the water heater is operated. Before fitting the relief valve, make sure the probe has not been bent.
- Page 32 CONNECTIONS – PLUMBING SOLAR INLET AND OUTLET All pipe work must be cleared of foreign matter before connection and purged before attempting to operate the water heater. All olive compression fittings must use brass or copper olives. Use thread sealing tape or approved thread sealant on all fittings.
-
Page 33: Connections - Electrical
CONNECTIONS – ELECTRICAL The power supply to the water heater must not be switched on until the solar storage tank is filled with water and a satisfactory megger reading is obtained. Note: AS 3498 requires that a water heater provides the means to inhibit the growth of Legionella bacteria in potable water. - Page 34 CONNECTIONS – ELECTRICAL Continuous Power Supply A single active is required from the switchboard if the solar Switchboard storage tank is connected to a continuous power supply. Switchboard The active from the continuous circuit must be connected to the active terminal marked A1 (marked “Controller” on the wiring diagram) on the terminal block of the solar storage tank.
- Page 35 CONNECTIONS – ELECTRICAL BOOSTER CONTROL The isolating switch installed in the electrical meter box for the solar storage tank should be left switched on. Leaving the isolating switch switched on will also provide a sufficient period of time each day for the booster heating unit to operate, if required, to satisfy the requirements of AS 3498.
- Page 36 For reasons of safety and economy, we advise the thermostat be set at the lowest temperature that will provide sufficient hot water during periods when boosting is required. Rheem recommends the thermostat is set at 60°C to maximise solar contribution. Discuss the thermostat setting requirements with the householder.
-
Page 37: Wiring Diagram
CONNECTIONS – ELECTRICAL WIRING DIAGRAM Wiring Diagram Wiring Diagram Electric Boosted Closed Circuit Solar Water Heater Robertshaw “ST” Thermostat ric Closed Circuit Solar Water Heater... -
Page 38: Auxiliary Pump
AUXILIARY PUMP The solar collectors must be the highest point of the system. The maximum height of the solar installation from the base of the solar storage tank to the top of the solar collectors is 9 m. The pump supplied with the solar storage tank will not circulate closed circuit fluid through heights greater than 9 m and solar gain will not be achieved. - Page 39 AUXILIARY PUMP Auxiliary Pump Installation Auxiliary Pump Typical Installation Solar Drain Back...
- Page 40 AUXILIARY PUMP AUXILIARY PUMP – ELECTRICAL CONNECTION The auxiliary pump, if installed, must be wired to the control board. The flexible cord supplied with the pump must be housed in a 20 mm flexible conduit. The flexible conduit should be secured to the insulated pipe work with the cable ties provided, to the side of the solar storage tank using the adhesive backed cable tie mounts and cable ties provided and to the penetration in the solar storage tank jacket using the cable gland provided.
-
Page 41: Commissioning
COMMISSIONING TO FILL AND TURN ON THE WATER HEATER The power supply to the water heater must not be switched on until the solar storage tank is filled with water. To fill the solar storage tank with water and turn on the water heater: Open all of the hot water taps in the house (don‟t forget the shower). - Page 42 COMMISSIONING SOLAR CIRCUIT It is necessary to commission and check the operation of the solar circuit as part of the installation. The water heater is supplied charged with closed circuit fluid. The commissioning procedure includes checking the: circulation of closed circuit fluid through the solar circuit. drain back function of the solar circuit.
- Page 43 COMMISSIONING Warning: Although non-toxic, the following first aid advice and procedures should be followed if the closed circuit fluid concentrate comes into human contact or is spilt: Swallowed - give milk or water and seek medical attention. Eyes - wash with running water. Skin - remove contaminated clothing and wash skin with water and soap.
- Page 44 COMMISSIONING Commissioning the Solar Circuit To commission and check the solar circuit: Switch off the electrical supply at the isolating switch to the solar storage tank. If the pump has been operating, wait five minutes to allow the drain back of the closed circuit fluid in the solar circuit.
- Page 45 COMMISSIONING Disconnect the drain line from the solar circuit relief valve at the top of the solar storage tank. Remove the spring clip from the solar circuit relief valve and remove the valve. Warning: The solar circuit may be under pressure. disconnect Take care when removing the solar circuit relief valve, as drain line...
- Page 46 COMMISSIONING Check the closed circuit fluid is circulating around the solar circuit. To check circulation: Listen for the trickling sound of the closed circuit fluid returning into the heat exchanger by placing your ear against the side toward the top of the solar storage tank. If the fluid is circulating around the solar circuit, a trickling sound will be heard as the fluid returns back into the heat exchanger.
- Page 47 COMMISSIONING Drain Back Function Switch off the electrical supply at the isolating switch to the solar storage tank. The red LED on the solar monitor label will stop flashing. The pump will deactivate. The closed circuit fluid will drain back down to the heat exchanger and the level of the closed circuit fluid in the clear hose will rise.
- Page 48 COMMISSIONING Closed Circuit Fluid Level Measure the distance from the text marking “MINIMUM FLUID LEVEL WITH PUMP OPERATING” to the closed circuit fluid dynamic level marked on the side of the solar storage tank during step 12. The correct closed circuit fluid dynamic level for efficient operation of the system when the pump is operating is between the “MINIMUM FLUID LEVEL WITH PUMP OPERATING”...
- Page 49 COMMISSIONING Determine the correct amount of water to be added to or closed circuit fluid to be drained from the heat exchanger if the dynamic level is either below the text marking “MINIMUM FLUID LEVEL WITH PUMP OPERATING” or more than 150 mm above this mark. Each 100 mm of fluid level height is equivalent to three (3) litres of closed circuit fluid.
- Page 50 COMMISSIONING Add water to top up the level of the closed circuit fluid in the heat exchanger if required. To add water to the closed circuit fluid: If not already removed, disconnect the drain line and remove the spring clip from the solar circuit relief valve at the top of the solar storage tank and remove the valve (refer to step Warning: The solar circuit may be under pressure.
- Page 51 COMMISSIONING Pressure Testing the Solar Circuit Close the heat exchanger drain valve. heat exchanger drain valve Refit the solar circuit relief valve, orientating the valve closed outlet to the rear of the solar storage tank. Secure with the spring clip. Reconnect the drain pipe to the valve. Switch on the electrical supply at the isolating switch to the solar storage tank.
- Page 52 COMMISSIONING Remove Closed Circuit Fluid Level Hose Remove the clear hose from the solar storage tank when satisfied the commissioning procedure is complete. To remove the hose: Ensure the heat exchanger drain valve is closed. heat exchanger Remove the hose from the side of the storage tank drain valve and place the end into a container to collect the closed...
- Page 53 COMMISSIONING DIAGNOSTIC FEATURES OF THE SOLAR CONTROLLER The solar storage tank incorporates a solar monitor which is connected to the solar control module by a ribbon cable. The solar monitor is located on the lower front cover and houses both a green and a red LED. The green LED, marked “Solar”, indicates the current operational mode of the solar water heater and the red LED, marked “Attention”, indicates a fault mode.
-
Page 54: Draining The Water Heater
DRAINING THE WATER HEATER Solar Storage Tank To drain the solar storage tank: Turn off the water heater (refer to “To Turn Off The Water Heater” on page 53). Close all hot water taps. Operate the relief valve release lever - do not let the lever snap back or you will damage the valve seat. Operating the lever will release the pressure in the water heater. -
Page 55: Warranty
Rheem Service or a Rheem Accredited Service Agent. ways of a solar Premier Loline water heater system: due to b) Where it is found there is nothing wrong with the water non Rheem approved or incorrectly mixed closed circuit fluid heater;... - Page 56 WARRANTY – SOLAR PREMIER LOLINE WATER HEATER MODEL 591270 Rheem will repair or replace, at Rheem’s sole discretion and subject to the warranty conditions and exclusions, any component, the storage tank or the solar collector if it fails within the warranty period below.