
Related Manuals for Zanussi FLS 821 C


Summary of Contents for Zanussi FLS 821 C
- Page 1 LAVADORAS AUTOMATICAS WASHING MACHINES FLS 821 C FLS 822 C FLS 826 C FLS 868 C INSTRUCCIONES INSTRUCTIONS 35.292.575 0...
-
Page 2: Table Of Contents
CONTENTS Warnings Description of the controls Technical specifications Operating sequence Installation Programs 29 and 30 Transit security bars Washing hints Levelling Table of symbols Hydraulic connection Maintenance Electrical connection Servicing Your washing machine About the symbols The following symbols will guide you in the reading of this instruction book. - Page 3 WARNINGS THESE WARNINGS ARE PROVIDED IN THE Before washing ensure that all pockets are INTEREST OF SAFETY. YOU MUST READ empty and buttons and zips are fastened. THEM CAREFULLY BEFORE INSTALLING OR Any objects such as coins, safety pins, nails, USING THE APPLIANCE.
-
Page 4: Technical Specifications
TECHNICAL SPECIFICATIONS DIMENSIONS Width 60 cm Height 85 cm Depth 55 cm ELECTRICAL CONNECTION Voltage 220V 50Hz Max.Power Absorbed 1.975 W(10A) WATER PRESSURE Minimum 5N/cm Maximum 80N/cm MAXIMUM RECOMMENDED LOAD Cotton, Linen 4,5 kg Synthetics delicate fabrics 2 kg Wool 1 kg SPIN SPEED Maximum... -
Page 5: Installation
Installation Transit security bars Before starting the machine up, the transport security bars must be removed as follows: You are advised to keep all the transport security bars in case the appliance has to be transported again. Unscrew and remove the three rear screws by means of a key. -
Page 6: Levelling
Levelling Level the appliance by loosening or tightening the feet. Once in the right position fix the feet by pushing the nuts against the base of the case. Accurate levelling will prevent vibration, noise and displacement of the appliance during operation. -
Page 7: Electrical Connections
IMPORTANT: The distance from the floor to the highest part of the hose should be between 60 to 90 cm. (It is advisable to be between 60 and 70 1,5 m. Max. cm). The hose must not be bent nor twisted to avoid clogging. -
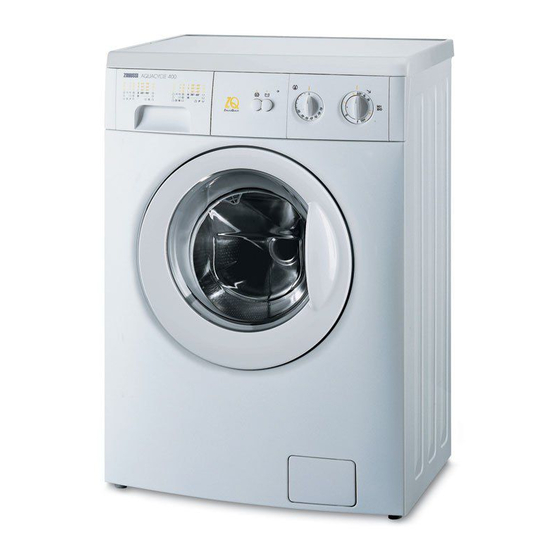
Page 8: Your Washing Machine
YOUR WASHING MACHINE 1 Detergent dispenser drawer 2 On/off lamp 3 Option buttons 4 Temperature selector 5 Program selector 6 The door 7 Filter 8 Adjustable feet Detergent dispenser drawer Symbols Prewash Wash Fabric softener Bleach AL020... -
Page 9: Description Of The Controls
DESCRIPTION OF THE CONTROLS Control panel 1. Detergent dispenser drawer button The dispenser is provided with 4 compartments If your washing machine is provided with this marked with the following symbols: push button, press it to reduce the spinning speed from 800 to 550 r.p.m. Prewash: symbol shows the compartment for 6. -
Page 10: Operating Sequence
OPERATING SEQUENCE Before executing the first wash with clothes we recommend to carry out the cleaning of the drum and the barrel by a special wash, without clothes. 1. Pour a dose of detergent in the tray compartment corresponding to “Wash”. 2. -
Page 11: Start
6. Start Before pulling the program selector check if: The door is properly closed. The appliance is plugged in. The water supply tap is turned on. The drain filter is tight. The drain hose is adequately positioned. Pull the program selector towards you till it clicks. The on/off lamp comes on and the program will begin. -
Page 12: Programs
PROGRAMS Programs for cotton and linen Recommended load: max. 4,5 kg. MAXIMUM DEGREE COMPARTMENTS PROGRAM PROGRAM WATER DESCRIPTION OF SOIL POSITION TO USE TEMP. Prewash Wash at 90°C WHITES heavy with prewash soil 4 rinses Spin Wash at 90°C WHITES normal without 4 rinses... - Page 13 Programs for synthetics, mixed and wool Recommended load: max. 2 kg (wool max. 1 kg.) MAXIMUM DEGREE COMPARTMENTS PROGRAM PROGRAM WATER DESCRIPTION OF SOIL POSITION TO USE TEMP. Prewash at 30°C MIXED heavy Wash at 60°C FABRICS soil 3 rinses Short spin Wash at 60°C NON-FAST...
-
Page 14: Washing Hints
WASHING HINTS Sort the laundry according to the type of fabric, Load the washing machine colour fastness and how dirty it is. Check the quantity you are going to wash for When washing curtains remove the hooks. each cycle. It is essential to wash new coloured items It is rather difficult to weigh all the pieces to be separately when washing them for the first time. -
Page 15: Table Of Symbols
TABLE OF SYMBOLS The symbols on the labels are of great help for the wash, care and treatment. STRONG WASH Max. wash Max. wash Max. wash Max. wash temp. 95°C temp. 60°C temp. 40°C temp. 30°C Do not Hand wash wash DELICATE WASH at all... -
Page 16: Maintenance
MAINTENANCE Before any maintenance or cleaning is carried out you must DISCONNECT the appliance from the electricity supply. External cleaning Clean the exterior cabinet of the appliance with neutral soap and water only, and then dry thoroughly. Cleaning the detergent dispenser drawer and the recess Pull the drawer to remove (slightly at first till the stop, then pull hard). -
Page 17: Cleaning The Filters
Cleaning the filters The drain filter A clean filter is important for correct functioning of the washing machine, and it should therefore be cleaned regularly. Small objects left in the pockets and yarn is retained here. AL010 AL012 Unscrew the filter completely turning it counterclockwise. -
Page 18: Servicing
SERVICING Before contacting your local Service Force Centre, check your machine against the simple maintenance guidelines given below. Problem Possible solution The appliance does not start up • Check if the door is closed properly. • Check if the appliance is plugged in. •... - Page 19 EPESL/Z - 3 4 5 6 7 8 9 10 11 12/98...