Table of Contents
Advertisement
Quick Links
Advertisement
Table of Contents

Related Manuals for Planet WL-8316


Summary of Contents for Planet WL-8316
- Page 1 802.11g Wireless PCI Adapter WL-8316 User Manual Version: 1.00...
-
Page 2: Federal Communication Commission Interference Statement
Further, PLANET reserves the right to revise this publication and to make changes from time to time in the contents hereof without obligation to notify any person of such revision or changes. - Page 3 Do not dispose of WEEE as unsorted municipal waste and have to collect such WEEE separately. Revision User’s Manual for PLANET 802.11g Wireless PCI Adapter Model: WL-8316 Rev: 1.0 (December. 2006) Part No. EM-WL8316...
-
Page 4: Table Of Contents
1.4 Minimum System Requirements............3 1.5 Installation Considerations ..............3 Chapter 2 Designing Your Wireless Network ............. 4 2.1 PLANET WL-8316................. 4 Chapter 3 Installation Procedure ................ 5 3.1 Configuration Utility & Driver Installation ..........5 Chapter 4 Configuration Utility................8 4.1 Network Status.................. -
Page 5: Chapter 1 Introduction
Chapter 1 Introduction Complying with the IEEE802.11b/g standard, the WL-8316 provides simple, reliable, and high-speed wireless connectivity for the desktop users. The WL-8316 is capable of offering up to 54Mbps at 2.4GHz frequency bands. Support of WEP / WPA / WPA2 encryption keep your wireless communications away from unauthorized access and ensures secure data transfer. -
Page 6: Specification
Doctors, nurses, retailers, white-collar workers who need access to database while roaming in the hospital, retail store or office. 6. SOHO (Small Office and Home Office) users SOHO users who are in need of easy-to-install and wide coverage networking. 1.2 Specification Complaint with PCI v2.2 standard Interface Standards Conformance... -
Page 7: Package Contents
1.3 Package Contents Before installation, please check the items of your package. The package should include the following items: 1 x WL-8316 1 x Driver and User’s manual CD 1 x Quick Installation Guide 1 x External Antenna If any of the above items is missing, contact your supplier for support. -
Page 8: Chapter 2 Designing Your Wireless Network
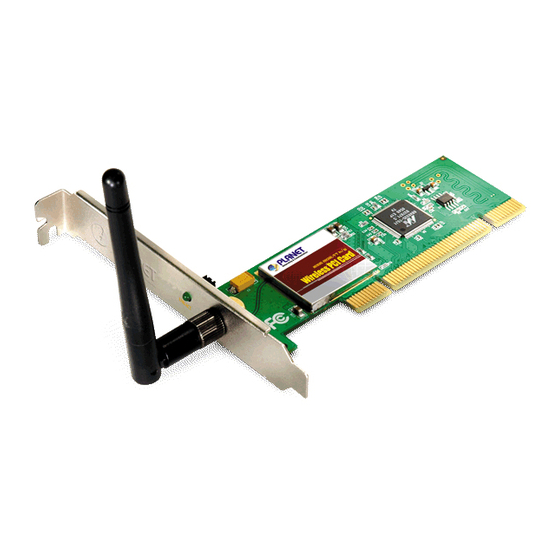
Chapter 2 Designing Your Wireless Network The PLANET WL-8316 supports up to 54 Mbps connections. This card is fully compliant with the specifications defined in IEEE802.11g standard. It is designed to complement PCI slot computers and supports Windows 98SE/Me/2000/XP 2.1 PLANET WL-8316 The status LED indicators of the PCI wireless adapter are described in the following. -
Page 9: Chapter 3 Installation Procedure
Note 1: If you had ever installed the other Wireless Cards before, please uninstall the existed drivers and utilities first. Note 2: Please install the configuration utility before insert WL-8316 into the PCI slot of the computer. Insert the bundled CD into the CD-ROM driver. - Page 10 Figure 3-3 Now turn off your PC or notebook Insert the WL-8316 to an available PCI slot firmly. Turn on the computer. The system will automatically detect the card and display “Found New Hardware Wizard” screen. Click “Install Software Automatically” to continue.
- Page 11 Figure 3-4 When the “Hardware Installation” screen appears, click “Conution Anyway” to proceed. Figure 3-5 Click “Finish” to complete “Found New Hardware Wizard”. Figure 3-6...
-
Page 12: Chapter 4 Configuration Utility
Chapter 4 Configuration Utility The Configuration Utility is a powerful application that helps you configure the WL-8316 and monitor the link status and statistics during the communication process. When the WL-8316 is installed, the configuration utility will be displayed automatically. This card... -
Page 13: Network Status
4.1 Network Status The Network Status tab displays signal strength and link information, Internet Protocol (TCP/IP). Figure 4-3 Link Information Status: The status of the wireless network connection. Network SSID: The unique name of the wireless network. Network Type: The mode of the wireless network currently in use. ... -
Page 14: Profile Manager
4.2 Profile Manager Figure 4-4 On the Profile Manager tab, click the Create button to create a new profile. 4.2.1 Infrastructure Mode When the Network Info screen appears, enter a name for the new profile. Enter the Network SSID. Choose the Infrastructure Mode in the Network Type drop-down box if you want your wireless computers to communicate with computers on your wired network via a wireless access point. - Page 15 Choose the Authorization Modes and Encryption Method in the drop-down box. Figure 4-5 Click the Configure WEP Keys button to continue. Figure 4-6 Enter Key Value for the Key1, click OK to continue. Figure 4-7...
-
Page 16: Ad-Hoc Mode
Click Next to continue. Figure 4-8 Figure 4-9 4.2.2 Ad-Hoc Mode When the Network Info screen appears, enter a name for the new profile. Enter the Network SSID. Choose the Ad-Hoc Mode in the Network Type drop-down box if you want multiple wireless computers to communicate directly with each other. - Page 17 Figure 4-10 Select the correct operating channel for your network form the Prefer Channel drop-down menu. Click the Next button. Figure 4-11 Choose the Authorization Modes and Encryption Method in the drop-down box.
- Page 18 Figure 4-12 Click the Configure WEP Keys button to continue. Figure 4-13 Enter Key Value for the Key1, click OK to continue. Figure 4-14 Click Next to continue.
- Page 19 Figure 4-15 Figure 4-16...
-
Page 20: Profile Setting
4.2.3 Profile Setting Figure 4-17 Parameter Description Network Info tab This tab enable you to view and to change setting the network information including Profile Name, Network SSID, Network Type, Wireless Mode. Security tab This tab enable you to view and change setting the security information including Authentication Mode, Encryption. -
Page 21: Site Survey
4.3 Site Survey The Site Survey tab, displays a list of infrastructure and ad-hoc networks available for connection Figure 4-18 Filter button – It can filter Network SSID, Network BSSID and Select Channel. Network SSID and Network BSSID can filter any one or only one. Select Channel can filter all channel, only one channel or channel of in a certain range. - Page 22 available for connection Associate button -- The section of the window displays the Available Networks. Highlight the network to which you wish to connect. Figure 4-20 Choose the Authorization Modes and Encryption Method in the drop-down box. If the wireless network uses a Passphrase, enter the Passphrase in the Passphrase field.
- Page 23 WPA-PSK takes over automatically from that point, keeping unauthorized users that don't have the matching password from joining the network, while encrypting the data traveling between authorized devices WPA2-PSK – WPA2-PSK is also for home and small business. The difference between WPA-PSK and WPA2-PSK is that WPA2-PSK provides data encryption via the AES.
-
Page 24: Statistics
EAP protocols but not easy to use. It requires that digital certificates be exchanged in the authentication phase. The server presents a certificate to the client. After validating the server’s certificate, the client presents a client certificate to the server for validation. -
Page 25: Advance
4.5 Advance The Advance tab enables you to configure more advanced setting, for example: power save mode, preamble and etc. Figure 4-22 Parameter Description Power Save Mode The power saving function is only available when the network type is in infrastructure. Continuous Access –... -
Page 26: Admin
in the network, the shorter distance is allowed between the device and wireless stations. When the wireless mode is “802.11 b”, the maximum data rate is 11Mbps(11b) so that there are only “Auto/1/2/5.5/11Mbps” options you can select. Fragment Threshold The value defines the maximum size of packets; any packet size larger that the value will be fragmented. - Page 27 Figure 4-23 Export Profile To save the profile(s) in a different location, click the Export Profile button. On the screen that appear , direct Windows to the appropriate folder and click the SAVE button. Figure 4-24 Import Profile Click the Import Profile button to import a profile that has been saved in another location. From the screen that appears, select the appropriate file, and click the Open button.
-
Page 28: About
Figure 4-25 4.7 About The About tab enables you to view the information of the PLANET WL-8316 including MAC Address, Regulatory Domain, Firmware Version and etc. Figure 4-26... -
Page 29: Chapter 5 Troubleshooting
Chapter 5 Troubleshooting This chapter provides solutions to problems that may occur during the installation and operation of the PLANET WL-U356M. Read the descriptions below to solve your problems. The PLANET WL-U356M does not work properly. Reinsert the PLANET WL-U356M into your PC’s USB port. - Page 30 BSS with multiple clients associated to it. Check that the Network Connection for the wireless client is configured properly. If Security is enabled, make sure that the correct encryption keys are entered on both the Adapter and the access point.