Table of Contents
Advertisement
Quick Links
WARNING:
Improper installation, adjustment, alteration, service or maintenance can cause
injury or property damage. Refer to this manual. For assistance or additional
information consult a qualified installer, service agency, or the gas supplier.
-
Do not store or use gasoline or other flammable vapors and liquids in the vicinity of this or any
other appliance.
-
Installation must be performed by a qualified installer, service agency or the gas supplier
IF YOU SMELL GAS
• Do not try to light any appliance.
• Do not touch any electrical switch; do not use any phone in your building.
• Immediately call gas supplier from a neighbor's phone. Follow the gas supplier's instructions.
• If you cannot reach your gas supplier, call the fire department.
Installer:
After installation give this manual to the home-owner
and explain operation of this heater.
Copyright 2005, Travis Industries, Inc.
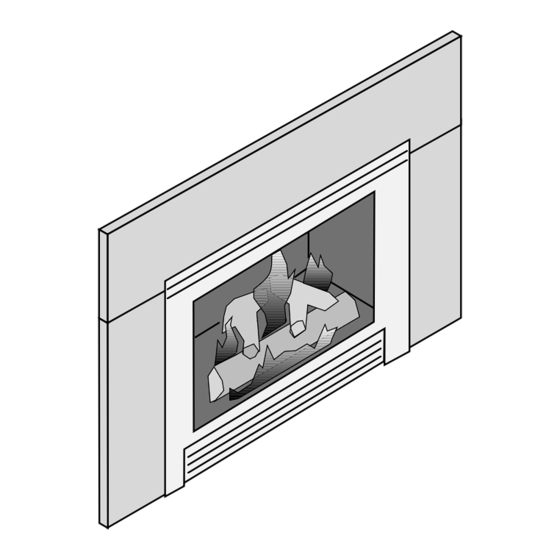
DVS EF Insert
Owner's Manual
Featuring the
Tested and Listed by
OMNI-Test Laboratories, Inc.
ANSI Z21.88 1998 CSA 2.33 M98
CAN/CGA 2.17 M81, U.L. 307b
• Direct Vent Fireplace Insert
• Masonry or Factory Built (Metal) Fireplace
• Residential or Mobile Home
$10.00
100-01150
Burner
Beaverton, Oregon
Travis Industries, Inc.
4800 Harbour Pointe Blvd. SW
Mukilteo, WA 98275
Advertisement
Table of Contents

Related Manuals for Travis Industries DVS EF Insert

Summary of Contents for Travis Industries DVS EF Insert
- Page 1 • If you cannot reach your gas supplier, call the fire department. Installer: After installation give this manual to the home-owner Travis Industries, Inc. and explain operation of this heater. 4800 Harbour Pointe Blvd. SW Mukilteo, WA 98275 Copyright 2005, Travis Industries, Inc. $10.00 100-01150...
-
Page 2: Introduction & Important Information
Introduction Introduction We welcome you as a new owner of a Travis Industries gas fireplace insert. In purchasing this fireplace insert you have joined the growing ranks of concerned individuals whose selection of an energy system reflects both a concern for the environment and aesthetics. The Travis Industries DVS EF Insert is one of the finest home heaters the world over. -
Page 3: Table Of Contents
Log, Twig, and Ember Installation ......18 Purge and Leak Test the Gas Line ......19 Pilot Flame Inspection..........19 Air Shutter Adjustment ...........20 Flame Inspection ..........20 Explain Heater Operation to Owner ......20 © Travis Industries 1 0 0 - 0 1 1 5 0 4041213... -
Page 4: Safety Precautions
• Do not operate if any portion or other flammable liquids in of the heater was the vicinity of this heater. submerged in water or if any corrosion occurs. © Travis Industries 1 0 0 - 0 1 1 5 0 4041213... - Page 5 If the fiber logs become damaged, replace with Travis Industries log set. • Children and adults should • Travis Industries, Inc. grants be alerted to the hazards of no warranty, implied or high surface temperature stated, for the installation or...
-
Page 6: Features & Specifications
This unit has passed the ANSI Z21.88 – 1998, CSA 2.33 M98 Vented Gas Fireplace Compliance: Heater Standard as tested by OMNI-Test Laboratories, Inc. Beaverton, Oregon. Electrical: 120 Volts, 1.3 Amps, 60 Hz (150 watts on high) © Travis Industries 1 0 0 - 0 1 1 5 0 4041213... -
Page 7: Installation Warning
Connect the gas line and gas vent to the appliance. Install the optional surround panels and trim. Attach the on/off switch. Follow the instructions under "Finalizing the Installation" on pages 17 through 20. © Travis Industries 1 0 0 - 0 1 1 5 0 4041213... -
Page 8: Insert Placement
(local codes may require a larger hearth). The hearth must also extend to both sides of the face (see the table above for the exact width of the face). © Travis Industries 1 0 0 - 0 1 1 5 0... -
Page 9: Insert Clearances
33-1/8” 2” 2-3/8” 5-3/8” 5-7/8” 2-1/2” Avalon 2-1/4” Craftsman Face FPX Rectangular DVS Lopi Architectural Faces 21-1/2” Discovery 23-5/8” 11-1/8” 21-9/16” 22” 22-3/4” 32” 30” 32” 29-7/8” © Travis Industries 1 0 0 - 0 1 1 5 0 4041213... -
Page 10: Gas Line Installation
The supply regulator (the regulator that attaches directly to the residence inlet or to the propane tank) should supply gas at the suggested input pressure listed above. Contact the local gas supplier if the regulator is at an improper pressure. © Travis Industries 1 0 0 - 0 1 1 5 0 4041213... -
Page 11: Vent Requirements
Rotate the adjustment plate clockwise until the correct index hole is below the pivot point. restrictor setting). Insert the screw into the correct index hole and tighten. © Travis Industries 1 0 0 - 0 1 1 5 0 4041213... -
Page 12: Vent Installation
Inlet Masonry Fireplace Z.C. (Metal) firebox NOTE: You may use either re-line configuration with a masonry or zero-clearance fireplace. © Travis Industries 1 0 0 - 0 1 1 5 0 4041213... -
Page 13: Installation Without Surround Panels
Line up each side surround installing the side panel and insert two screws from surround panels - the outside to secure in place. do not damage the gas line or vents. © Travis Industries 1 0 0 - 0 1 1 5 0 4041213... -
Page 14: Control Panel
Re-attach the red and brown wires (orientation does not matter). Make sure the wires do not contact the burner pan or other hot surfaces (secure with lock ties if necessary). © Travis Industries 1 0 0 - 0 1 1 5 0 4041213... -
Page 15: Manifold Removal And Installation
After removing any slack from the flex vent, attach the manifold to the appliance. Remove any excess slack in the flex line then attach the vent termination. © Travis Industries 1 0 0 - 0 1 1 5 0 4041213... -
Page 16: Electrical Connection
Electrical Connection • Plug the power cord into a grounded 120 Volt outlet (do not remove the grounding pin). © Travis Industries 1 0 0 - 0 1 1 5 0 4041213... -
Page 17: Finalizing The Installation
Face of Heater Glass Gasket Glass Clip (3/4" self-adhesive channel gasket) Glass Tighten the nuts on the bottom glass clip first, then the top, then the sides. © Travis Industries 1 0 0 - 0 1 1 5 0 4041213... -
Page 18: Log, Twig, And Ember Installation
Place the ember chunks around the perimeter of the burner to conceal the gap. © Travis Industries 1 0 0 - 0 1 1 5 0 4041213... -
Page 19: Purge And Leak Test The Gas Line
To adjust the pilot flame, turn this screw. Clockwise thermopile (see the illustration below). Adjust the pilot up or lowers the flame while counter-clockwise raises it. down as necessary. Standard Screwdriver © Travis Industries 1 0 0 - 0 1 1 5 0 4041213... -
Page 20: Air Shutter Adjustment
The flames should burn off of each burner hole. If the heater does not work correctly, contact the Travis Dealer for instructions. Give this manual to the home owner and fully explain the operation of this heater. © Travis Industries 1 0 0 - 0 1 1 5 0 4041213... -
Page 21: Before You Begin
If using a remote control or thermostat, the On/Off Switch must be left "ON". Turning the On/Off Switch "OFF" will keep the heater off always. © Travis Industries 1 0 0 - 0 1 1 5 0 4041213... -
Page 22: Starting The Pilot Flame
“f”. Replace the glass. Turn the gas control knob counter-clockwise to "ON". The pilot is now lit and the heater can be turned on and off. © Travis Industries 1 0 0 - 0 1 1 5 0 4041213... -
Page 23: Starting The Heater For The First Time
“HI – LO” dial on the gas control valve. Index Mark Flame Height Adjustment Knob Turn counter-clockwise to adjust the flame higher, clockwise to lower. © Travis Industries 1 0 0 - 0 1 1 5 0 4041213... -
Page 24: Adjusting The Blower Speed
This is normal during start-up. You may notice the smell is more acute if the appliance was left idle for a long period. © Travis Industries 1 0 0 - 0 1 1 5 0... -
Page 25: Maintaining Your Heater's Appearance
If the pilot or main burners do not burn correctly, contact your dealer for service. Monitor the blower operation. Remove any debris or vegetation near the vent termination. Contact your dealer if any sooting or deterioration is found near the vent termination. © Travis Industries 1 0 0 - 0 1 1 5 0 4041213... -
Page 26: Troubleshooting Table
The logs or coals are placed incorrectly See "Log Set Installation and Removal" Covers the Glass Improper air shutter adjustment Adjust Air Shutter - contact your dealer © Travis Industries 1 0 0 - 0 1 1 5 0 4041213... -
Page 27: How This Heater Works
If the pilot flame tested to be extremely resistant to goes out, the gas valve automatically breakage from temperature changes. shuts off all gas. © Travis Industries 1 0 0 - 0 1 1 5 0 4041213... -
Page 28: Wiring Diagram
Green Motor Black White 120 Volt Black Grounded A.C. Power Supply Black White White Black Black 120 V. Blower Blower Blower Circuit Thermodisk Rheostat Replacement Parts List © Travis Industries 1 0 0 - 0 1 1 5 0 4041213... -
Page 29: Safety Label
Safety Label The safety (listing) label is on a plate chained to the gas control valve. A copy of the safety label is shown to the right. © Travis Industries 1 0 0 - 0 1 1 5 0 4041213... -
Page 30: Warranty
At that time, you may be asked to ship your appliance, freight charges prepaid, to TRAVIS INDUSTRIES, INC. TRAVIS INDUSTRIES, INC., at its option, will repair or replace, free of charge, your TRAVIS appliance if it is found to be defective in material or workmanship within the time frame stated within this 7 year warranty. -
Page 31: Optional Equipment
Make sure this pin inserts into the hole in the bottom of must hang down behind the right rear the burner when re-installing. log pin when re-installing. © Travis Industries 1 0 0 - 0 1 1 5 0 4041213... - Page 32 Replace the pilot assembly (follow the instructions in step 6 in reverse order). Make sure the pilot assembly gasket is placed correctly. Install the logs and embers. Replace the glass. © Travis Industries 1 0 0 - 0 1 1 5 0 4041213...
- Page 33 Clockwise thermopile (see the illustration below). Adjust the pilot up or lowers the flame while counter-clockwise raises it. down as necessary. Standard Screwdriver © Travis Industries 1 0 0 - 0 1 1 5 0 4041213...
-
Page 34: Travis Industries
Glass Installation and Removal ......17 What Turns the Main Burners On and Off....27 Glass, Glass Gasket...........17 Wiring Diagram..........28 Hearth Requirements........8 Yearly Service Procedure........25 Heating Specifications ........6 How this Heater Works ........27 © Travis Industries 1 0 0 - 0 1 1 5 0 4041213...