Table of Contents
Advertisement
Quick Links
Advertisement
Table of Contents

Related Manuals for Harman Kardon AVR 160


Summary of Contents for Harman Kardon AVR 160
- Page 1 AVR 160 AUDIO/VIDEO RECEIVER OWNER’S MANUAL...
-
Page 2: Safety Information
Important Safety InformatIon Verify Line Voltage Before use Your AVR 160 has been designed for use with 230-240 volt AC current. Connection to a line voltage other than that for which it is intended can create a safety and fire hazard and may damage the unit. - Page 3 • Due to the weight of the AVR 160 and the heat generated by the amplifiers, there is the remote possibility that the rubber padding on the bottom of the unit’s feet may leave marks on certain wood or veneer materials.
-
Page 4: Table Of Contents
Step Six – Plug in AC Power Cords Step Seven – Insert Batteries in Remote Step Eight – Program Sources Into the Remote Step Nine – Turn On the AVR 160 INITIAL SETUP Using the On-Screen Menu System Configure the AVR 160, Using EzSet/EQ™ Technology... -
Page 5: Introduction
Over the years, Harman Kardon products have become easier to use, while offering more features and sounding better than ever. The AVR 160 7.1-channel digital audio/video receiver continues this tradition with some of the most advanced audio and video processing capabilities in its class, and a wealth of listening and viewing options. -
Page 6: Audio Inputs
Lip Sync Delay (up to 180msec) • System upgradeable from USB device Supplied accessories The following accessory items are supplied with the AVR 160. If any of these items are missing, please contact Harman Kardon customer service at www. harmankardon.com. •... -
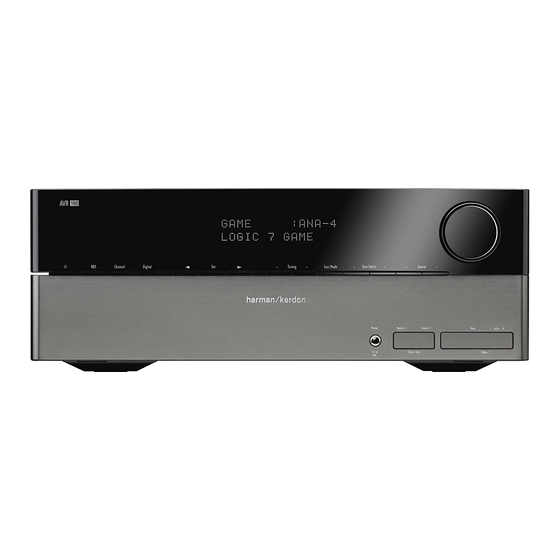
Page 7: Front-Panel Controls
It is important to ensure that it is not blocked. If covering the sensor is unavoidable, use an optional Harman Kardon HE 1000, or other infrared receiver, connecting it to the Remote IR Input on the AVR 160’s rear panel. - Page 8 FRONT-PANEL CONTROLS Surround Mode: Press this button to select a surround sound (e.g., multichannel) mode. Each press changes the surround mode category: AUTO SELECT, VIRTUAL, STEREO, MOVIE, MUSIC, VIDEO GAME. To change the specific mode within the category, use the Surround Select Buttons. See the Advanced Functions section for more information on surround modes.
-
Page 9: Rear-Panel Connections
Connect up to three HDMI-equipped source devices to the HDMI inputs using a single-cable connection. When you connect the HDMI Output to your video display, the AVR 160 will automatically transcode component video source signals to the HDMI format, but they will be passed through at the original resolution and will not be scaled. - Page 10 REAR-PANEL CONNECTIONS AC Power Cord: After you have made all other connections, plug the AC power cord into this receptacle and into an unswitched wall outlet. Main Power Switch: This mechanical switch turns the power supply on or off. It is usually left on, and cannot be turned on or off using the remote control.
- Page 11 Track Skip Transport Controls The AVR 160 remote is capable of controlling up to 11 devices, including the AVR itself and a device connected to the Auxiliary Input. During the installation process, you may program the codes for each of your source components into the remote.
- Page 12 Program Indicator: This LED lights up or flashes in one of three colors as the remote is programmed with codes. Power Off Button: Press to turn off the AVR 160 or another device. AVR Selector: Press to switch the remote to AVR device mode.
- Page 13 Direct: Press this button before using the Numeric Keys to directly enter a radio station frequency. Clear: Press this button to clear a radio station frequency you have started to enter. Preset Stations Selector: Press these buttons to select a preset radio station.
-
Page 14: Introduction To Home Theater
“surround sound.” Surround sound immerses you in the presentation for increased realism. The AVR 160 may have up to seven speakers connected directly to it plus a subwoofer. Each main speaker is powered by its own amplifier channel inside the receiver. -
Page 15: Connections
The Consumer Electronics Association has established the CEA® color-coding standard. Some of these connectors are not used on the AVR 160, although they may be found on other components in your system. See Table 1. -
Page 16: Digital Audio
(RCA) Figure 8 – Multichannel Analog Audio The AVR 160 has an Auxiliary Audio Input on the rear panel in the form of a stereo 1/8" (3,5 mm) mini jack. Connect the headphone output of any audio source, such as an MP3 player or portable CD player, to the Auxiliary Audio Input. -
Page 17: Video Connections
Figure 13 – AM Antenna uSB port The USB Port on the AVR 160 is used only for software upgrades. If an upgrade for the receiver’s operating system is released in the future, it may be downloaded to the AVR using this port. Complete instructions will be provided at that time. -
Page 18: Speaker Placement
The center speaker should be no more than approx. 60 cm above or below the left/right speakers. If you’re using only two speakers with the AVR 160, place them in the front left and right positions. -
Page 19: Getting Started
DVD and Video 1/2/3 sources also use dedicated composite video inputs. The AVR 160 also features six digital audio inputs (two each coaxial and optical on the rear panel, and one of each type on the front panel). The digital... - Page 20 GETTING STARTED NOTES: • For multichannel disc players, if both the device and the TV use HDMI connections for video, then check the owner’s manual for the device to determine whether it transmits multichannel audio via its HDMI output. If it does, then no separate audio connection is required. If not, write down the multichannel analog audio connection in addition to any other audio type.
-
Page 21: Installation
You are now ready to begin installing the AVR. Before beginning to connect the various components to the receiver, turn off all devices, including the AVR 160, and unplug their power cords. Don’t plug in any of the power cords until you have finished making all of your connections. -
Page 22: Step Eight - Program Sources Into The Remote
If you are unable to locate a code set that correctly operates your source device, it will not be possible to use the AVR remote to control that device. You may still connect the source to the AVR 160 and operate it using the device’s original remote control. -
Page 23: Initial Setup
In this section, you will configure the AVR 160 to match your actual system. A video display must be connected to one of the video monitor outputs on the receiver. uSInG tHe on-Screen menu SyStem Although it’s possible to configure the AVR using only the remote and the front-panel messages, it is easier to use the full-screen menu system. -
Page 24: Set Up Sources
Auto Poll: The Auto Poll feature is used when both an analog audio and digital audio connection have been made for one source device. If no digital signal is available, the AVR 160 will switch to the analog input for the source. This situation can occur with some cable or satellite television broadcasts, where some channels are broadcast with digital audio and others with analog audio, or when a DVD player is paused or stopped. -
Page 25: System Settings
System Settings The AVR 160 offers system settings that make the receiver easier to use. Access these settings by pressing the OSD Button and navigating to the SYSTEM SETUP line of the Master menu. Press the OK Button to display the submenu. -
Page 26: Operation
Volume Control on the remote. The volume is displayed as a negative number of decibels (dB) below the 0dB reference point. 0dB is the maximum recommended volume for the AVR 160. Although it’s possible to turn the volume to a higher level, doing so may damage your hearing and your speakers. -
Page 27: Headphones
Numeric Keys. rDS operation The AVR 160 is equipped with RDS (Radio Data System), which brings a wide range of information to FM radio. Now in use in many countries, RDS is a system for transmitting station call signs or network information, a description of station program type, text messages about the station or specifics of a musical selection, and the correct time. -
Page 28: Recording
OPERATION RDS Display Options The RDS system is capable of transmitting a wide variety of information in addition to the initial station call sign that appears when a station is first tuned. In normal RDS operation the display will indicate the station name, broadcast network or call letters. -
Page 29: Selecting A Surround Mode
SeLectInG a SurrounD moDe Surround mode selection can be as simple or sophisticated as your individual system and tastes. Feel free to experiment, and you may find a few favorites for certain sources or program types. More detailed information on surround modes may be found in the Advanced Functions Section. -
Page 30: Advanced Functions
For any incoming signal, only a limited number of surround modes are available. Although there is never a time when all of the AVR 160’s surround modes are available, there is usually a wide variety of modes available for a given input. -
Page 31: Dolby Surround Settings
The second number indicates whether any surround channels are present: “0” indicates that no surround information is present. “1” indicates that a matrixed surround signal is present. “2” indicates discrete left and right surround channels. “3” is used with DTS-ES bitstreams to represent the presence of the discrete surround back channel, in addition to the side surround left and right channels. -
Page 32: Manual Speaker Setup
: More compression is applied. manuaL SpeaKer Setup The AVR 160 is flexible and may be configured for most speakers, and to compensate for the acoustic characteristics of your room. The EzSet/EQ process automatically detects the capabilities of each speaker, and optimizes the AVR 160’s performance. -
Page 33: Number Of Speakers
number of Speakers Move the cursor to the Number of Speakers line and press the OK Button. See Figure 27. Figure 27 – Number of Speakers Menu Program the correct setting for each speaker group: ON when the speakers are present in the system, and OFF for positions where no speakers are installed. -
Page 34: Audio Settings
Buttons to adjust the level as desired. If you would like to set your levels using the AVR 160’s internal test tone, adjust the TEST TONE SEQ and TEST TONE lines as follows. Test Tone SEQ: When this setting reads AUTO, the test tone will automatically circulate to all channels, pausing for a few moments at each channel for several seconds, as indicated by the blinking cursor. -
Page 35: Advanced Remote Control Functions
The remote control not only operates the AVR 160, but it also serves as a universal remote that may be programmed to operate many of your other home theater components, as described in the Installation section. -
Page 36: Appendix
Tape Note: The AVR 160 is equipped with a total of six digital audio inputs, four on the rear panel (Coaxial 1 and 2, Optical 1 and 2) and two on the front panel (Coaxial 3 and Optical 3), which may be assigned to any of the nine source inputs (DVD, Video 1 through 3, HDMI 1 through 3, CD and Tape). - Page 37 Table A2 – Source Setting Defaults Source HDMI 1 HDMI 2 Title Component COMP V 1 Video Input Audio Input COAX 1 HDMI HDMI Auto Poll Surround LOGIC 7 LOGIC 7 LOGIC 7 Mode MOVIE MOVIE MOVIE Table A3 – Speaker/Channel Setting Defaults Source All Sources, Except 6-/8-Channel Left/Right Speaker...
- Page 38 APPENDIX Table A5 – Source Input Settings Source HDMI 1 HDMI 2 Title Video Input Component Video Input Digital Audio Input Analog Audio Input Auto Poll Table A6 – Speaker/Channel Settings Source HDMI 1 HDMI 2 Left/Right Speaker Center Speaker Surround Speaker Surround Back Speaker...
- Page 39 Table A7 – Remote Control Codes Source Input Product Type (circle one) Video 1 VCR, PVR, DMC Video 2 Cable, Satellite Video 3 HDMI 1 DVD, Harman Kardon Blu-ray Disc HDMI 2 DVD, VCR/PVR/DMC, Cable/Satellite HDMI 3 DVD, VCR/PVR/DMC, Cable/Satellite DVD, Harman Kardon Blu-ray Disc CD, CD-R Tape...
- Page 40 The Dolby Pro Logic IIx modes may be selected not only with Dolby Digital bitstreams, but thanks to the AVR 160’s post-processor, they may also be used with some DTS bitstreams to add a surround back channel to 5.1 modes.
- Page 41 Movie encoding, Logic 7 Movie mode increases center channel intelligibility. Logic 7 The AVR 160 is programmed at the factory to default to this mode for Music 2-channel signals. Logic 7 Music mode is well suited to conventional 2-channel music recordings.
- Page 42 APPENDIX Figure 31 – Remote Control Function List Reference Refer to the numbered buttons in this image when using the Function List. Table A10 – Remote Control Function List Button Name Power On Power On Power Off Power Off Mute Mute AVR Power On VID1(VCR)
- Page 43 Table A10 – Remote Control Function List continued Bluray(001) DVD(002) DVD(003) Power On Power On Power On Power Off Power Off Power Off Mute(AVR) Mute(AVR) Mute(AVR) AVR Power On AVR Power On AVR Power On AVR Power On VID1 VID1 VID1 VID1 HDMI 1...
- Page 44 SETUP CODE TABLES Refer to Tables A11 through A17 when programming the codes for your components into the remote. Table A11 – Remote Control Product Codes: TV Manufacturer/Brand Setup Code Number ADMIRAL ANAM 045 106 109 112 122 037 122 123 128 AUDIOVOX BLAUPUNKT BROKSONIC...
- Page 45 DENON 187 188 213 EMERSON 052 093 108 FISHER 055 095 FUNAI HAITAI 099 214 HARMAN KARDON 001 002 025 054 190 HITACHI INKEL JC PENNEY 098 147 JENSEN 176 195 196 KENWOOD 030 062 078 079 148 151 176 178 181 LG/GOLDSTAR 016 087 LOTTE...
-
Page 46: Troubleshooting Guide
Intermittent buzzing in tuner Local interference Additional information on troubleshooting possible problems with your AVR 160, or installation-related issues, may be found in the list of “Frequently Asked Questions”, which is located in the Product Support section at www.harmankardon.com. proceSSor reSet If the unit behaves erratically after a power surge, first turn off the Main Power Switch and unplug the AC power cord for at least 3 minutes. -
Page 47: Technical Specifications
Image Rejection 80dB IF Rejection 90dB Please register your AVR 160 at www.harmankardon.com. NOTE: You’ll need the product’s serial number. At the same time, you can choose to be notified about new products and/or special promotions. TECHNICAL SPECIFICATIONS AM Tuner Section... - Page 48 8500 Balboa Blvd., Northridge, CA 91329 www.harmankardon.com © 2009 Harman International Industries, Incorporated. All rights reserved. Part No. CQX1A1432Z...