Table of Contents
Advertisement
IMPORTANT!
IN ORDER TO PRESERVE THE APPEARANCE AND ENHANCE THE RESIDUAL VALUE OF YOUR
TRIUMPH MOTORCYCLE, MANY COMPONENTS INCORPORATED IN ITS CONSTRUCTION REQUIRE
CLEANING AND PROTECTION EACH TIME THE MOTORCYCLE IS USED. SUCH ITEMS INCLUDE:--
•
UNTREATED ALUMINIUM ITEMS
•
CHROME PLATED ITEMS
•
EXHAUST SYSTEM
IT IS ESSENTIAL THAT THE MOTORCYCLE IS CLEANED AND DRIED EACH TIME IT IS USED AS THE
APPEARANCE OF THE MOTORCYCLE WILL RAPIDLY DETERIORATE IF CLEANING IS NEGLECTED.
THIS IS PARTICULARLY IMPORTANT IF THE MOTORCYCLE IS USED IN INCLEMENT WEATHER
CONDITIONS.
WARRANTY CLAIMS FOR COSMETIC DETERIORATION OF PARTS WILL NOT BE ALLOWED IF IT IS
APPARENT THAT THIS IMPORTANT ADVICE HAS BEEN NEGLECTED.
FOR FURTHER INFORMATION ON CLEANING THE MOTORCYCLE, PLEASE REFER TO THE
MAINTENANCE AND ADJUSTMENT SECTION OF THIS OWNER'S HANDBOOK.
REMARQUE IMPORTANTE!
POUR CONSERVER LA BELLE APPARENCE DE VOTRE MOTO TRIUMPH ET AMELIORER SA VALEUR
A SA REVENTE, PLUSIEURS DE SES COMPOSANTS DOIVENT ETRE NETTOYES ET PROTEGES
APRES CHAQUE UTILISATION DE LA MOTO. PARMI CES COMPOSANTS, CITONS:--
•
PIECES EN ALUMINIUM NON TRAITE
•
COMPOSANTS CHROMES
•
SYSTEME D'ECHAPPEMENT
IL EST INDISPENSABLE DE NETTOYER LA MOTO ET DE LA SECHER APRES CHAQUE UTILISATION
CAR SON APPARENCE SERA AFFECTEE SI ON NEGLIGE SON NETTOYAGE. CELA EST
PARTICULIEREMENT IMPORTANT LORSQUE LA MOTO EST UTILISEE DANS DES CONDITIONS
ATMOSPHERIQUES DEFAVORABLES.
LES REVENDICATIONS SOUS GARANTIE CONCERNANT UNE DETERIORATION D'APPARENCE
ESTHETIQUE DES PIECES SERONT REFUSEES S'IL EST EVIDENT QUE CES CONSEILS
IMPORTANTS ONT ETE NEGLIGES.
PRIERE DE CONSULTER LA SECTION D'ENTRETIEN ET DE REGLAGE DE CE MANUEL DU
CONDUCTEUR POUR TOUT COMPLEMENT D'INFORMATION CONCERNANT L'ENTRETIEN DE LA
MOTO.
ACHTUNG!
ZUR
BEWAHRUNG
RÜCKKAUFWERTES IST BEI ZAHLREICHEN TEILEN NACH JEDER FAHRT REINIGUNGS-- UND
KONSERVIERUNGSMASSNAHMEN DURCHZUFÜHREN:
•
UNBEHANDELTE ALUMINIUMTEILE
•
CHROMTEILE
•
AUSPUFFANLAGE
ES IST WICHTIG, DAS MOTORRAD NACH JEDER FAHRT ZU REINIGEN UND ZU TROCKNEN. WIRD
DIE REINIGUNG VERNACHLÄSSIGT, VERLIERT DAS FAHRZEUG SCHNELL AN OPTISCHEM WERT.
DAS GILT BESONDERS FÜR FAHRTEN BEI SCHLECHTEM WETTER.
GEWÄHRLEISTUNGSANSPRÜCHE WEGEN MINDERUNG DES OPTISCHEN ERSCHEINUNGSBILDS
VON
TEILEN
WERDEN
REINIGUNGSARBEITEN OFFENSICHTLICH NICHT REGELMÄSSIG DURCHGEFÜHRT WURDEN.
WEITERE HINWEISE ZUR REINIGUNG DES MOTORRADES SIND DEM ABSCHNITT WARTUNG UND
EINSTELLUNGEN DER BEDIENUNGSANLEITUNG ZU ENTNEHMEN.
DER
OPTIK
IHRES
NICHT
ANERKANNT,
•
WHEELS
•
BOLTS, SCREWS ETC.
•
ALL BODYWORK
•
ROUES
•
BOULONS, VIS, ETC.
•
TOUTE LA CARROSSERIE
TRIUMPH--MOTORRADES
•
RÄDER
•
SCHRAUBEN USW.
•
ALLE KAROSSERIETEILE
SOFERN
SOWIE
SEINES
DIE
ERFORDERLICHEN
Advertisement
Chapters
Table of Contents

Related Manuals for Triumph DAYTONA 650


Summary of Contents for Triumph DAYTONA 650
- Page 1 MAINTENANCE AND ADJUSTMENT SECTION OF THIS OWNER’S HANDBOOK. REMARQUE IMPORTANTE! POUR CONSERVER LA BELLE APPARENCE DE VOTRE MOTO TRIUMPH ET AMELIORER SA VALEUR A SA REVENTE, PLUSIEURS DE SES COMPOSANTS DOIVENT ETRE NETTOYES ET PROTEGES APRES CHAQUE UTILISATION DE LA MOTO. PARMI CES COMPOSANTS, CITONS:-- •...
-
Page 2: Foreword
Foreword This handbook contains information on the Triumph Daytona 650 motorcycle. Always store this owner’s handbook with the motorcycle and refer to it for information whenever necessary. WARNING, CAUTION AND NOTE NOTE: Throughout this owner’s handbook This note symbol indicates points... - Page 3 INFORMATION The information contained in this publication is based on the latest information available at the time of printing. Triumph reserves the right to make changes at any time without prior notice, or obligation. Not to be reproduced wholly or in part without the written permission of Triumph Motorcycles Limited.
-
Page 4: Table Of Contents
Foreword OWNER’S HANDBOOK Thank you for choosing a Triumph motorcycle. This motorcycle is the product of Triumph’s use of proven engineering, exhaustive testing, and continuous striving for superior reliability, safety and performance. Please read this owner’s handbook before riding in order to become thoroughly familiar with the correct operation of your motorcycle’s controls, its features,... - Page 5 Foreword - - Safety First THE MOTORCYCLE FUEL & EXHAUST FUMES WARNING: This motorcycle WARNING: PETROL is designed for on-road use HIGHLY FLAMMABLE: only. It is not suitable for off-road use. Always turn off the engine when Off-road operation could lead to loss refuelling.
- Page 6 Foreword - - Safety First CRASH HELMET & CLOTHING HANDLEBARS & FOOTRESTS WARNING: When riding the WARNING: The rider must motorcycle both rider and maintain control passenger must always wear a crash vehicle by keeping hands on the helmet, protection, gloves, handlebars at all times.
- Page 7 Foreword - - Safety First RIDING WARNING: This Triumph motorcycle should WARNING: Never ride the operated within the legal speed limits motorcycle when fatigued or for the particular road travelled. under the influence of alcohol or Operating a motorcycle at high other drugs.
- Page 8 When parking the motorcycle, always remember the following:- - Triumph does not accept any liability whatsoever for defects caused by the The engine and exhaust system will fitting non- - approved parts, be hot after riding.
- Page 9 WARNING: Ensure equipment which is required WARNING: Consult your by law is installed and functioning authorised Triumph dealer correctly. whenever there is doubt as to the correct or safe operation of this The removal or alteration of the Triumph motorcycle.
- Page 10 Foreword - - Safety First This page is intentionally free from information. Page 9...
-
Page 11: Warning Labels
Warning Labels WARNING LABELS Warning Label Locations - - Daytona 650 The labels detailed on this and the following pages draw your attention to important safety information in this handbook. Before riding, ensure that all riders have understood and complied with all the information to which these labels relate. - Page 12 Warning Labels Warning Label Locations - - Daytona 650 (continued) Windscreen Cleaning Running In Coolant (page 63) (page 30) (page 51) R.P.M. Gear Position Drive Chain Tyres (page 35) (page 57) (page 69) Page 11...
-
Page 13: Parts Identification
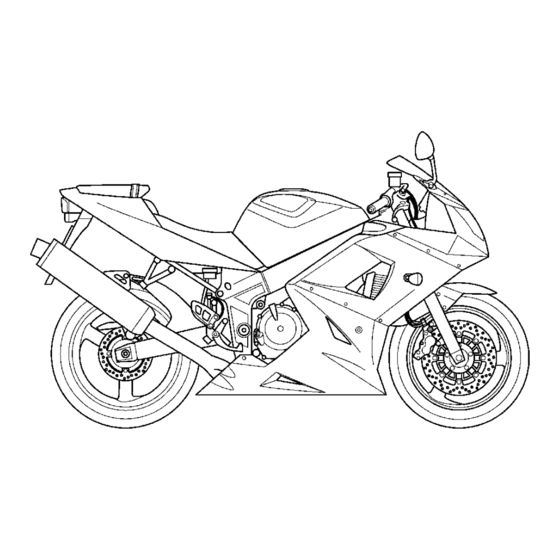
Parts Identification PARTS IDENTIFICATION - - DAYTONA 650 1. Front Indicator 9. Front Brake Disc 2. Headlamp 10. Front Brake Caliper 3. Rear Lamp 11. Fuel Tank 4. Radiator 12. Fuel Filler Cap 5. Drive Chain 13. Seat Lock 6. Rear Indicator 14. - Page 14 Parts Identification PARTS IDENTIFICATION - - DAYTONA 650 (continued) 17. Tool Kit 23. Clutch Cable 18. Rear Brake Disc 24. Front Fork 19. Rear Brake Caliper 25. Rear Suspension Unit 20. Rear Brake Fluid Reservoir 26. Engine Management ECM (beneath seat) 21.
- Page 15 Parts Identification PARTS IDENTIFICATION - - DAYTONA 650 (continued) 1. Clutch Lever 9. Engine Stop Switch 2. Passing Button 10. Starter Button 3. Headlamp Dipswitch 11. Tachometer 4. Horn Button 12. Speedometer 5. Indicator Switch 13. Warning Lights 6. Ignition Switch 14.
-
Page 16: Serial Numbers
Serial Numbers 1. V.I.N. Number 1. Engine Serial Number Vehicle Identification Number (V.I.N.) Engine Serial Number vehicle identification number The engine serial number is stamped on the stamped into the steering head. It is also crankcase, immediately above the clutch displayed on a plate, riveted to the frame, cover. - Page 17 Serial Numbers This page is intentionally free from information. Page 16...
-
Page 18: General Information
General Information Contents Instruments ............. . . Warning Lights . -
Page 19: Instruments
General Information INSTRUMENT PANEL LAYOUT 1. Tachometer 8. Engine Management Malfunction 2. Tachometer ‘Red Zone’ Indicator Light 3. Speedometer 9. Low Fuel Level Indicator Light 4. Odometer/Trip Meters/Clock Display 10. Neutral Indicator Light 5. Select/Reset Buttons 11. High Beam Indicator Light 6. - Page 20 General Information TEC0007 TEC0006 1. Odometer Display 1. Clock Display 2. Trip Meter 1 Display 2. Hours Read-out 3. Trip Meter 2 Display 3. Minutes Read-out 4. Select Button 4. Select Button 5. Reset Button 5. Reset Button ODOMETER/TRIP METER/CLOCK CLOCK ADJUSTMENT The odometer shows the total distance that To reset the clock, select the clock display...
- Page 21 General Information TEC0008 TEC0009 1. Low Oil Pressure Display 1. Coolant Temperature Gauge LOW OIL PRESSURE WARNING COOLANT TEMPERATURE GAUGE If sufficient oil pressure is present, the The coolant temperature gauge indicates display will not appear. the temperature of the engine coolant. With the engine running, if the oil pressure When the ignition is switched on, with the becomes dangerously low, the low oil pressure...
-
Page 22: Warning Lights
In this case the system will switch approximately 5.0 litres of fuel remaining in to ‘limp- -home’ mode so that riding may the tank. continue. Contact an authorised Triumph dealer as soon as possible to have the fault NEUTRAL: The neutral warning checked out and rectified. -
Page 23: Ignition Key
‘LOCK’ position. Your authorised Triumph dealer can supply a replacement key cut from details of the key ‘PARKING’: Turn the key from the ‘LOCK’ number or can cut a new key using the position to the ‘P’... -
Page 24: Brake Lever Adjuster
General Information Ignition Switch Positions Engine off. All electrical circuits off. Engine on. All electrical equipment can be used. Steering locked. Engine off. All electrical circuits off. Steering locked. Engine off. Position and licence plate lights on, all other electrical 1. -
Page 25: Right Handlebar Switches
General Information Starter Button The starter button operates the electric starter. For the starter to operate, the transmission must be in neutral and the clutch lever pulled to the handlebar. NOTE: Even if the clutch lever is pulled in, the starter will not operate if the side stand is down and a gear is engaged. -
Page 26: Left Handlebar Switches
General Information Horn Button When the horn button is pushed, with the ignition switch turned to the ‘ON’ position, the horn will sound. Pass Button PASS When the pass button is pressed, the headlight main beam will be switched on. It will remain on as long as the button is held in and will turn off as soon as the button is released. -
Page 27: Fuel Requirement
General Information FUEL REQUIREMENT REFUELLING Your Triumph engine is designed to use WARNING: To help reduce unleaded fuel and will give optimum hazards associated with fuel performance if the correct grade of fuel is handling, always observe used. Always use unleaded fuel with an following fuel safety instructions: octane rating of 95 RON. -
Page 28: Fuel Tank Cap
General Information TEC015 1. Ignition Switch Key 1. Fuel level 2. Fuel Tank Cap 2. Filler neck 3. Air space Fuel Tank Cap tank expands through absorption of heat To open the fuel tank cap, lift up the key hole from the engine or from direct sunlight. -
Page 29: Stand
General Information 1. Side Stand 1. Handbook Location TOOL KIT STAND The tool kit is strapped into a recess beneath Side Stand the seat. The motorcycle is equipped with a side HANDBOOK STORAGE stand on which the motorcycle can be parked. -
Page 30: Seat Lock Operation/Seat Removal
General Information 1. Front Seat Fixing Locations 1. Rear seat/cover lock To detach the rear seat/cover, lift the rear of SEAT LOCK the seat/cover and slide it rearwards. NOTE: To refit the rider seat, engage the front section of the seat to the fuel tank and When delivered from the factory, secure the rear with the two fixings. -
Page 31: Running In
General Information RUNNING IN Both during and after running in has been completed:- - Do not over- -rev the engine when cold. R.P.M. Do not let the engine labour. Always Running-in is the name given to the process downshift before the engine begins that occurs during the first hours of a new to ‘struggle’. -
Page 32: Safe Operation
If any irregularities are found during these checks, refer to the Maintenance and Adjustment section or see your authorised Triumph dealer for the action required to return the motorcycle to a safe operating condition. WARNING: Failure to perform these checks every day before you ride may result in serious motorcycle damage or an accident causing serious injury or death. - Page 33 General Information Coolant ..No coolant leakage. Check the coolant level in the expansion tank (when the engine is cold) (Page 51). Electrical equipment ..All lights and horn function correctly (Page 22). Engine stop .
-
Page 34: How To Ride The Motorcycle
How to Ride the Motorcycle Contents To Stop the Engine ............To Start The Engine . - Page 35 How to Ride the Motorcycle 1. Engine Stop Switch Ensure that the transmission is in neutral. 2. Starter Button 3. Neutral Indicator Light Pull the clutch lever fully in to the 4. On Position handlebar. 5. Ignition Switch 6. Tachometer Turn the ignition switch on.
- Page 36 How to Ride the Motorcycle CAUTION: Do not operate the starter continuously for more than 5 seconds as the starter motor will overheat and battery power will drop. Wait 15 seconds between each operation of the starter to allow for cooling and recovery of battery power.
- Page 37 - free area. motorcycle. Triumph strongly recommend that all Change down one gear at a time such riders take a course of instruction that the transmission is in first gear...
- Page 38 How to Ride the Motorcycle WARNING: For your safety, WARNING: When always exercise extreme descending a long, steep caution when braking, accelerating or gradient use engine braking by turning as any incautious action can down- - changing and use the brakes cause loss of control and an accident.
- Page 39 How to Ride the Motorcycle WARNING: Do not park on a soft or on a steeply inclined surface as parking under these conditions may cause the motorcycle to fall over. Ensure that the stand is fully retracted before riding off. Petrol is extremely flammable and can explosive under...
- Page 40 Steering conditions. Check that the handlebar turns smoothly WARNING: Only operate this without excessive free play or tight spots. Triumph motorcycle at high Ensure that the control cables do not restrict speed closed-course on-road the steering in any way. competition or on closed course race tracks.
- Page 41 How to Ride the Motorcycle Fuel Have sufficient fuel for the increased fuel consumption that will result from high speed operation. Engine Oil Make certain that the oil level is correct. Ensure that the correct grade and type of oil is used when topping- -up.
-
Page 42: Accessories, Loading And Passengers
This maximum weight is made up authorised closed course conditions. from the combined weight of the rider, passenger and any load carried. WARNING: Only operate this Triumph motorcycle at high WARNING: Do not install speed closed-course on-road accessories or carry luggage... - Page 43 Accessories, Loading and Passengers WARNING: The handling and WARNING: Do not carry a braking capabilities passenger unless he or she is motorcycle will be affected by the tall enough to reach the footrests presence of a passenger. The rider provided. must make allowances for these A passenger who is not tall enough to changes...
- Page 44 Accessories, Loading and Passengers This page is intentionally free from information. Page 43...
-
Page 45: Maintenance And Adjustment
Maintenance and Adjustment Your Triumph Motorcycle is a quality engineered product which has been carefully built and tested to exacting standards. Triumph Motorcycles are keen ensure that enjoy optimum performance from your machine and with this objective in mind have tested many of the engine lubricants currently available to the limits of their performance. -
Page 46: Maintenance And Adjustment
Maintenance and Adjustment Contents Scheduled Maintenance ........... . . Side Panel . -
Page 47: Scheduled Maintenance
WARNING: In order to correctly carry out the maintenance items listed in the scheduled maintenance chart, special tools and specialist knowledge will be required. Only an authorised Triumph dealer will have this knowledge and equipment. Since incorrect or neglected maintenance can lead to a dangerous riding condition, always have an authorised Triumph dealer carry out the scheduled maintenance of this motorcycle. - Page 48 Maintenance and Adjustment Scheduled Maintenance Chart (Continued) Odometer Reading in Miles (Kms) or time period, whichever comes first. Operation Description Every 6000 12000 18000 24000 (800) (10000) (20000) (30000) (40000) 1 month 1 year 2 years 3 years 4 years Fuel Filter - - renew Steering - - check for free operation Headstock bearing - - check/adjust...
-
Page 49: Side Panel
Tighten the panel threaded fixings to • riding condition, always have an 3 Nm. authorised Triumph dealer carry out Tighten the rear seat lock mechanism the scheduled maintenance of this • fixings to 9Nm. -
Page 50: Engine Oil
Maintenance and Adjustment 1. Filler Oil Level Inspection Stop engine, then wait for at least • 2. Filler Plug/Dipstick 10 minutes to allow the oil to settle. 3. Hash Marked Area Remove the filler plug/dipstick, wipe • the dipstick clean and screw the plug fully home in the clutch cover. - Page 51 Remove the lower fairings. • Unscrew and remove the oil filter • using the Triumph service tool T3880312. Discard the oil filter. Pre-fill the replacement oil filter with • new engine oil. Apply a smear of clean engine oil to •...
-
Page 52: Cooling System
OIL SPECIFICATION & GRADE If coolant containing corrosion and rust CAUTION: Triumph high inhibitor chemicals is not used, the cooling performance fuel injected system will accumulate rust and scale in the engines are designed to use semi or water jacket and radiator. - Page 53 Maintenance and Adjustment Coolant Level Adjustment WARNING: Do not remove the expansion tank or radiator pressure cap when the engine is hot. When the engine is hot, the coolant inside the expansion tank is hot and also under pressure. Contact with this hot, pressurised coolant will cause scalds and skin damage.
- Page 54 Have your authorised Triumph dealer replace any defective items. the fan. Contact with the rotating fan can cause injury. CAUTION: A year-round type of antifreeze is installed in the...
-
Page 55: Throttle Grip
-play when lightly turning the throttle grip back and forth. If there is an incorrect amount of • free- -play, Triumph recommend that you have adjustments made by your 1. Throttle Grip authorised Triumph dealer. However, 2. 2- - 3 mm in an emergency, throttle adjustment 3. - Page 56 5. Closing cable - - measurement point Remove the seats. • Ride carefully to your nearest • authorised Triumph dealer and have Disconnect the battery, negative • him check the throttle system (black) lead first. thoroughly before riding again.
-
Page 57: Clutch
Maintenance and Adjustment CLUTCH The motorcycle is equipped with a cable operated clutch. If the clutch lever has excessive free- -play, the clutch may not disengage fully which will cause difficulty in changing gear and may cause the engine to stall. Conversely, if the clutch lever has insufficient free- -play the clutch may not engage fully, causing the clutch to slip which will reduce performance... -
Page 58: Drive Chain
Maintenance and Adjustment DRIVE CHAIN Chain Lubrication For safety and to prevent excessive wear, Lubrication is necessary every 500 miles the drive chain must be checked, adjusted, and also after riding in wet weather, on wet lubricated accordance with roads, or any time that the chain appears scheduled maintenance requirements. - Page 59 Maintenance and Adjustment Chain Free- - movement Inspection TEC0032 1. Adjuster Bolt 2. Adjuster Bolt Locknut 1. Maximum Movement Position 3. Rear Wheel Spindle Nut (25- - 35 mm) Support the motorcycle on a firm, When the correct amount of chain •...
- Page 60 Stretch the chain taut by hanging a • 10- -20 kg (20- -40 lb) weight from it. For safety, use a genuine Triumph supplied chain as specified in the Measure the length of 20 links on the •...
-
Page 61: Brakes
Triumph WARNING: Brake pads must dealer to investigate and rectify the fault. - Page 62 Triumph dealer for advice, opened. before riding. Contaminated brake Do not mix different brands or grades fluid may cause the brakes to become of brake fluid.
- Page 63 The brake fluid level in the reservoirs • consult your authorised Triumph must be kept between the upper and dealer before riding. Riding with lower level lines (reservoir held depleted brake fluid levels or with a horizontal).
-
Page 64: Steering/Wheel Bearings
Maintenance and Adjustment WINDSCREEN CAUTION: Corrosive CLEANING chemicals such as battery electrolyte will damage Always clean windscreen. Never allow corrosive windscreen with clean chemicals to contact the windscreen. water and a soft cloth. Dry after cleaning with a soft, lint free cloth. Minor scratches STEERING/WHEEL BEARINGS can be removed using a commercial Steering Inspection... - Page 65 If the wheel bearings in the front or rear wheel allow play in the wheel hub, are noisy, or if the wheel does not turn smoothly, have your authorised Triumph dealer inspect the wheel bearings. The wheel bearings must be inspected at the intervals specified in the scheduled maintenance chart.
-
Page 66: Front Suspension
Refer to the roughness excessive • chart overleaf for further information stiffness is detected, consult your or consult your Triumph dealer. authorised Triumph dealer. WARNING: Ensure that the WARNING: Riding adjusters are set to the same motorcycle with defective or setting on both forks. - Page 67 The spring pre-load adjuster cannot be reset specialist knowledge, or without with the suspension unit in the frame. access to the necessary specialist Please refer to your authorised Triumph tools and safety equipment could dealer for adjustment of this item. cause...
- Page 68 Maintenance and Adjustment TEC 0039 TEC0038 1. Spring Pre- - load Adjuster 3. Compression Damping Force 2. Rebound Damping Force Adjuster Adjuster Front spring Pre- - load Adjustment NOTE: To change the spring pre- -load, rotate the The motorcycle is delivered from •...
-
Page 69: Rear Suspension Adjustment
Maintenance and Adjustment TEC0040 1. Rebound Damping Adjuster 1. Compression Damping Adjuster REAR SUSPENSION ADJUSTMENT Rear Compression Damping Adjustment The compression damping adjuster is The rear suspension unit is rider-adjustable situated on the rear suspension unit for both compression and rebound damping. reservoir. -
Page 70: Tyres
Check tyre pressures daily and adjust if necessary. See the specification section for details of correct inflation pressures. Alternatively, ask your authorised Triumph dealer to inspect your wheels and tyres. Page 69... - Page 71 (80 mph) Always consult your authorised Front 2 mm (0.08 in) Triumph dealer for tyre replacement, or for a safety inspection of the tyres. WARNING: This motorcycle must not be operated above the legal road speed limit except in authorised closed course conditions.
- Page 72 Always have tyres fitted and balanced by required, consult your authorised your authorised Triumph dealer who has the Triumph dealer who will arrange for necessary training and skills to ensure safe, the tyres to be selected, in a correct effective fitment.
- Page 73 100 such as after tyre replacement, see miles have been travelled after fitting. your authorised Triumph dealer. Use of a motorcycle with incorrectly Only use self- - adhesive weights. Clip seated tyres, incorrectly adjusted tyre...
-
Page 74: Battery
Maintenance and Adjustment Battery Disposal BATTERY WARNING: Under some circumstances, the battery can give off explosive gases; keep sparks, flames and cigarettes away. Provide adequate ventilation when charging or using the battery in an enclosed space. The battery contains sulphuric acid (electrolyte). - Page 75 Maintenance and Adjustment Battery Removal Battery Maintenance WARNING: battery electrolyte is corrosive and poisonous and will cause damage to unprotected skin. Never swallow battery electrolyte or allow it to come into contact with the skin. To prevent injury, always wear eye and skin protection when handling the battery.
-
Page 76: Fuses
Maintenance and Adjustment Battery Installation FUSE BOXES WARNING: Ensure that the battery terminals do not touch the motorcycle frame as this may cause a short circuit or spark which would ignite battery gases causing a risk of personal injury. Place the battery in the battery case. •... - Page 77 Maintenance and Adjustment Fuse Identification A blown fuse is indicated when all of the systems protected by that fuse become inoperative. When checking for a blown fuse, use the table below to establish which fuse has blown. Front fuse box Fuse Circuits Fuse...
-
Page 78: Headlights
Maintenance and Adjustment HEADLIGHTS WARNING: Adjust road speed to suit the visibility and weather conditions in which the motorcycle is being operated. Ensure that the beam is adjusted to illuminate road surface sufficiently ahead without dazzling oncoming traffic. incorrectly adjusted headlight may impair visibility causing an accident. - Page 79 Maintenance and Adjustment Headlight/Position Light Bulb Replacement It is not necessary to remove the headlight to gain access to either bulb. Remove the front seat. • Disconnect the battery, negative • (black) lead first. Remove the cockpit infill panels to •...
-
Page 80: Rear Light
Maintenance and Adjustment TEC0050 1. Rear Light Bulb Retainer 1. Indicator Lens 2. Securing Screw 2. Seat catch fixings. INDICATOR LIGHTS REAR LIGHT Bulb Replacement Bulb Replacement The lens on each indicator light is held • in place by a securing screw located Remove the rear seat and the rear •... -
Page 81: Cleaning
Maintenance and Adjustment CLEANING Where to be Careful Frequent, regular cleaning is an essential Avoid spraying water with any great force part of the maintenance of your motorcycle. near the following places: If regularly cleaned, the appearance will be Instruments. •... - Page 82 Maintenance and Adjustment Wash the exhaust system with a soft • WARNING: Never wax or cloth. Do not use an abrasive lubricate the brake discs. scouring pad or steel wool. They will Loss of braking power and an damage the finish. accident could result.
-
Page 83: Storage
Storage Preparation for Storage: cold weather so that the electrolyte does not freeze and crack the battery. Clean the entire vehicle thoroughly. • The more discharged the battery becomes, the more easily it freezes. Empty the fuel from the fuel tank into •... -
Page 84: Specifications
Specifications Contents Engine ..............Performance . -
Page 85: Engine
Specifications DAYTONA 650 ENGINE Type ............ -
Page 86: Cooling
Specifications DAYTONA 650 COOLING Coolant Type ........... -
Page 87: Tyres
Specifications DAYTONA 650 TRANSMISSION (continued) Final Drive .......... -
Page 88: Alphabetical Index
Specifications DAYTONA 650 ELECTRICAL EQUIPMENT Battery ............ - Page 89 Alphabetical Index BATTERY, Page 73 Miscellaneous, Page 40 Battery Disposal., Page 73 Steering., Page 39 Battery Installation., Page 75 Tyres., Page 39 Battery Maintenance, Page 74 COOLING, Page 85 Battery Removal., Page 74 COOLING SYSTEM, Page 51 BRAKES, Page 60 Coolant Change., Page 53 Brake Fluid Level Inspection And Coolant Level Adjustment., Page 52...
- Page 90 Alphabetical Index ELECTRICAL EQUIPMENT, Page 87 Coolant Tempurature Gauge., Page ENGINE, Page 84 Low Oil Pressure Warning., Page 20 Engine Serial Number., Page 15 Odometer/Trip Meter/Clock, Page 19 Vehicle Identification Number (V.I.N.), Page 15 INSTRUMENTS Instrument Panel layout., Page 18 ENGINE OIL, Page 49 Tachometer., Page 18 Diposal Of Used Engine Oil., Page 51...
- Page 91 Alphabetical Index RUNNING IN, Page 30 SUSPENSION, Page 65, Page 66 0 - - 500 miles (800 kms), Page 30 Adjuster Location. Front., Page 66 500 - - 1000 miles (800 - - 1500 kms), Rear., Page 66 Page 30 Front Compression Damping After running in, Page 30 Adjustment., Page 67...
- Page 92 Alphabetical Index WARNING LABELS Warning Label Locations., Page 11 Warning Labels., Page 10 WARNING LIGHTS, Page 21 Engine Management System malfunction Indicator Light., Page High Beam., Page 21 Indicators, Page 21 Low Fuel., Page 21 Neutral., Page 21 WARNINGS Information., Page 2 Maintenance., Page 2 Owners handbook., Page 3 Warning labels, Page 2...