Table of Contents
Advertisement
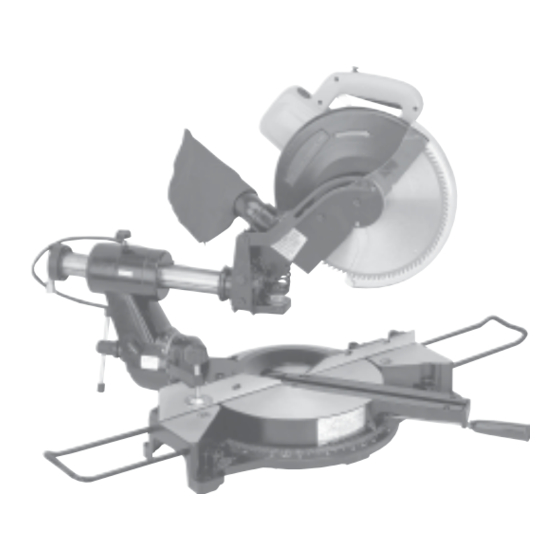
COMPOUND SLIDE MITER
COMPOUND SLIDE MITER
COMPOUND SLIDE MITER
COMPOUND SLIDE MITER
COMPOUND SLIDE MITER
ASSEMBLY AND OPERATING INSTRUCTIONS
3491 Mission Oaks Blvd., Camarillo, CA 93011
Visit our Web site at http://www.harborfreight.com
Copyright © 2002 by Harbor Freight Tools
this manual or any artwork contained herein may be reproduced in any shape or
form without the express written consent of Harbor Freight Tools.
For technical questions and replacement parts, please call 1-800-444-3353
SA
SA
W - 12 INCH
W - 12 INCH
SA
SA W - 12 INCH
SA
W - 12 INCH
W - 12 INCH
42818
®
. All rights reserved. No portion of
Advertisement
Table of Contents

Related Manuals for Chicago Electric 42818


Summary of Contents for Chicago Electric 42818
- Page 1 Copyright © 2002 by Harbor Freight Tools this manual or any artwork contained herein may be reproduced in any shape or form without the express written consent of Harbor Freight Tools. For technical questions and replacement parts, please call 1-800-444-3353...
-
Page 2: Specifications
Observe work area conditions. Do not use machines or power tools in damp or wet locations. Don’t expose to rain. Keep work area well lighted. Do not use electrically powered tools in the presence of flammable gases or liquids. SKU 42818 Specifications DESCRIPTION 110 VAC, 60 Hz, 1500 Watts, 2 HP No load: 3A;... - Page 3 Guard against electric shock. Prevent body contact with grounded surfaces such as pipes, radiators, ranges, and refrigerator enclosures. Maintenance. For your safety, service and maintenance should be performed regularly by a qualified technician. Check for damaged parts. Before using any tool, any part that appears damaged SKU 42818 Page 3...
- Page 4 Check for tightness on all saw adjustments before using. Keep hands away from moving saw blade. If the workpiece to be cut is less than 4 inches long, do not hold with your hand, use a clamp. Do not remove jammed or cutoff pieces until the saw blade has stopped and the Line Cord is unplugged.
-
Page 5: Installation
5/8” to 1” arbor adapter. If any parts are missing or broken, please call Harbor Freight Tools at the number on the cover of this manual as soon as possible. Place the Miter Saw on the solid workbench capable of supporting the weight of the unit and all work pieces. - Page 6 (Hardware and wood not supplied.) Start the saw and make a 90 degree cut all the way through the auxiliary wood fence. The saw can now be safely used to cut small pieces of stock at 90 degrees to the table.
- Page 7 If making miter cuts, raise the Handle (65) fully then loosen the handle Grip (128). Push the handle Grip to adjust the Saw Blade to the desired angle ranging from 0 to 45 degrees, left or right (positive stops at 0 and 45 degrees). When adjusted, tighten the handle Grip (128) again.
-
Page 8: Slide Cutting
When the cut is finished, release the Switch (70) trigger button. Wait for the Saw Blade to stop turning before reaching for the cut stock. When you are finished using the saw, press the cutting head down until it locks into position. - Page 9 Pull the carriage all the way forward with the Handle (65). Turn on the saw by pressing down on the Lock-off Switch Button (64), then squeeze the Switch (70) trigger button. When the Saw Blade comes to full speed, bring the Saw Blade down and begin cutting slowly down through the stock until the Saw Blade is completely lowered.
-
Page 10: Maintenance
Remove the existing Saw Blade and replace with another 12 inch blade. The new Saw Blade has an arrow on it that must be pointing in the same direction as the large arrow on the outside of the Blade Case (31). - Page 11 Turn the Blade by hand and verify the Blade teeth are not touching any metal surfaces. Loosen the Hex Lock Nut (53) counterclockwise to lower the Saw Blade slightly. Retighten Hex Lock Nut. Lower the Saw Blade as far as possible and turn the Saw Blade. It should not touch anything while turning. SKU 42818...
- Page 12 Table. If it is not square, continue with the next step. Push the Bevel Knob and adjust Saw Blade angle until the Saw Blade touches the Left Kerf Plate and is at 90 degrees to Table. Retighten Level Rod.
-
Page 13: Parts List
Note: The Vertical Clamp is not listed on this parts list nor shown in the diagrams on the following pages. SKU 42818 Parts List i l e c t i c t i... -
Page 14: Assembly Drawing
Assembly Drawing Note: The Vertical Clamp is not shown. SKU 42818 Page 14 REV 11/02 REV 05/04... - Page 15 Note: The Vertical Clamp is not shown. REV 05/04 SKU 42818 Page 15...