Table of Contents
Advertisement
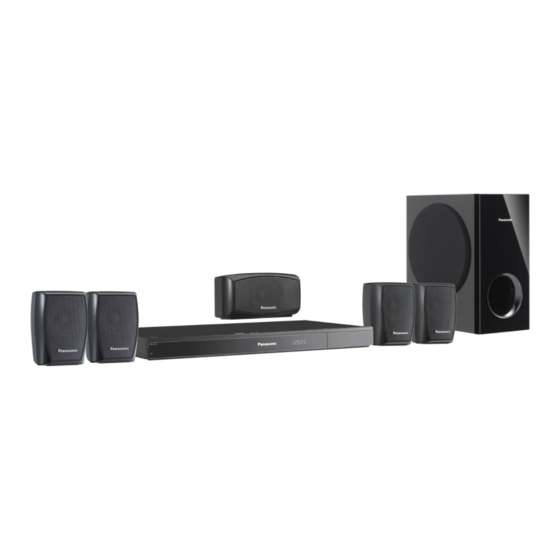
The illustration shows SC-PT70.
Obrázek představuje model SC-PT70.
Na rysunku przedstawiono model SC-PT70.
Dear customer
Thank you for purchasing this product. For optimum performance and safety, please read these instructions carefully.
Before connecting, operating or adjusting this product, please read the instructions completely.
Please keep this manual for future reference.
The illustrations shown may differ from your unit.
Region number
The player plays DVD-Video marked with labels containing the region number "2" or "ALL".
Example:
2
ALL
Model number suffix "EB" denotes UK model.
[EB]
2
3
5
Operating Instructions
DVD Home Theater Sound System
Model No.
SC-XH150
RQTX1234-B
Advertisement
Table of Contents

Related Manuals for Panasonic SC-XH150


Summary of Contents for Panasonic SC-XH150
- Page 1 Obrázek představuje model SC-PT70. Na rysunku przedstawiono model SC-PT70. Operating Instructions DVD Home Theater Sound System SC-XH150 Model No. Dear customer Thank you for purchasing this product. For optimum performance and safety, please read these instructions carefully. Before connecting, operating or adjusting this product, please read the instructions completely.
-
Page 2: Accessories
≥Most major credit and debit cards accepted. Figure A Figure B ≥All enquiries transactions and distribution facilities are provided directly by Panasonic UK Ltd. Fuse cover ≥It couldn’t be simpler! ≥Also available through our Internet is direct shopping for a wide range of finished products, take a browse on our website for further details. - Page 3 INPUT 10 10 MUTE CANCEL RADIO EXT-IN SEARCH SEARCH PLAY SLOW SKIP SKIP PAUSE STOP FUNCTIONS EXIT RETURN PLAY MODE –REPEAT SOUND SURROUND W.SRD FL DISPLAY –CH SELECT –SLEEP The circled numbers indicated in the operating instructions (e.g. Press [Í]1) correspond to the circled numbers shown on the above diagrams.
-
Page 4: Control Reference Guide
≥To confirm the remaining time, press and hold the button again. 6 Stop < TV operations 7 Connect USB device ( Aim the remote control at the Panasonic TV and press 8 Start play the button. 9 Remote control signal sensor [TV, Í]:... -
Page 5: Table Of Contents
TABLE OF CONTENTS Getting Started Playing Discs Accessories ....... . . 2 Basic play. -
Page 6: Step 1 Installation
If this occurs, turn the TV off for about 30 minutes. step 1 Installation The demagnetising function of the TV should correct the problem. If it persists, move the speakers further away How you set up your speakers can affect the bass and from the TV. -
Page 7: Audio And Video Connections
OPTICAL quality. This unit (rear) VIERA Link “HDAVI Control” If your Panasonic TV is VIERA Link compatible, you can [\\\\\\\\\AUX\\\\\\\\] operate your TV synchronising with home theater Use this connection when the TV does not have an OPTICAL operations or vice versa (... -
Page 8: Step 3 Ac Mains Lead Connection
≥Use alkaline or manganese batteries. Set Top Box (cable/satellite/Blu-ray Disc player, ≥Do not heat or expose to flame. etc) connection ≥Do not leave the battery(ies) in an automobile Use this connection when you want to output the original exposed to direct sunlight for a long period of time with surround audio from your STB, etc. -
Page 9: Listening To The Radio
Press [OK]8 to finish the “Easy setup”. Presetting stations manually Up to 30 stations can be set. ≥You can perform this setup anytime by selecting “Easy setup” 1 While listening to the radio broadcast in the Setup menu. ( Press [OK]8. ≥If this unit is connected to a “HDAVI Control 3 or later”... -
Page 10: Selecting The Source Using The Remote Control
“Enjoying sound effects from all speakers” You can change the settings for this unit. ( 11). When “Sound” is selected ≥If your Panasonic TV is VIERA Link compatible, refer to You can select sound quality settings ( 11, EQ “Linked operations with the TV” ( 15) for other related (Equaliser)). -
Page 11: Enjoying Sound Effects From All Speakers
Stereo source is output as 2.1-channel audio. When playing surround sources, you can enjoy 5.1-channel The device must be connected to the Panasonic TV via surround-like effect even with all the speakers at the an HDMI cable and to this unit with an optical digital front. -
Page 12: Adjusting The Speaker Level During Playback
– If there are MP3, JPEG and DivX contents in the current Adjusting the speaker level during playback group, only one content type will be played. Only when “Surround layout (Recommended)” mode (Priority: MP3 # JPEG # DivX) is selected in “Speaker layout” ( 8, Easy setup) You can select an item of your desired content type to start play. -
Page 13: Playing From The Selected Item
Playing from the selected item Other modes of play Using navigation menu Program and Random play [CD] [MP3] [JPEG] [DivX] [CD] [MP3] [JPEG] [DivX] You can select to play from your desired item while the Preparation navigation menu screen is displayed. While stopped, press [PLAY MODE]9 to select the e.g. -
Page 14: Repeat Play
[MP3] [JPEG] [DivX] Audio Press [3, 4]8 to select the desired content § press [OK]8. [DVD-V] [DivX] (with multiple soundtracks) § If there are MP3, JPEG and DivX contents, random To select audio soundtrack play will be based on the selected content type. [VCD] Press [1 PLAY]5 to start play. -
Page 15: Linked Operations With The Tv
Normal, 1, 2, 3 ≥This unit supports “HDAVI Control 5” function. “HDAVI Control 5” is the newest standard (current as of December, 2010) for Panasonic’s HDAVI Control compatible Menu 3 (Audio) equipment. This standard is compatible with Panasonic’s Dialogue Enhancer conventional HDAVI equipment. -
Page 16: Easy Control Only With Viera Remote Control
Only after the TV automatically switched to the HDMI input §5 ≥The TV will automatically switch to TV tuner mode mode for this unit. when: –you press [EXIT]A. §4, 5 Easy control only with VIERA remote control –you press [RETURN]D to exit the START menu. §4, 5 (For “HDAVI Control 2 or later”) –you select “AV”... -
Page 17: Playing From An Usb Device
Language menu Playing from an USB device Display You can connect and play tracks or files from USB mass Choose the language for the on-screen messages. storage class devices ( 20). ≥[English] ≥Français ≥Español ≥Deutsch Devices which are defined as USB mass storage class: ≥Italiano ≥Nederlands ≥Polski ≥Svenska... - Page 18 Video Resolution Dynamic Range This works only when the HDMI connection is being ≥On: Adjusts for clarity even when the volume is low. used. Convenient for late night viewing. (Only works Select suitable picture quality with your TV. with Dolby Digital) (Video recordings will be converted to, and output as, ≥[Off] high-definition video.)
-
Page 19: Divx Information
≥Dim: The display is dimmed. HDMI menu ≥Auto: The display is dimmed, but brightens when you VIERA Link perform some operations. ≥[On]: The VIERA Link “HDAVI Control” function is Screen Saver available ( 15). This is to prevent burn marks on the TV screen. ≥Off ≥Off Audio Out... -
Page 20: Displaying Divx Subtitles Text
≥After playing DivX VOD content for first time, “DivX Media that can be played Registration” is not selectable until this unit is deregistered. Commercial discs ≥If you purchase DivX VOD content using a registration code different from this unit’s code, you will not be able Type of Indicated Remarks... -
Page 21: Maintenance
≥There may be differences in the display order on the Note about using a DualDisc menu screen and computer screen. The digital audio content side of a DualDisc does not ≥This unit cannot play files recorded using packet write. meet the technical specifications of the Compact Disc Digital Audio (CD-DA) format so playback may not be DVD-R/RW possible. -
Page 22: Speaker Installation Option
∫ To prevent speakers from falling Speaker installation option Front speaker, Surround speaker, Center speaker Attaching to a wall e.g. Front speaker You can attach all of the speakers (except subwoofer) to String (not supplied) Screw eye a wall. (not supplied) ≥The wall or pillar on which the speakers are to be attached should be capable of supporting 10 kg per screw. - Page 23 “DVD U11” No on-screen menus/displays. Disc may be dirty. Wipe it clean. [JPEG] This is normal during HD JPEG playback. “ERROR” You have forgotten your ratings password. Incorrect operation performed. Read the instructions and Reset all the settings to Factory Preset. try again.
- Page 24 ≥Video images converted to 1920k1080 resolution may Sound look different from the true native 1080p full-HD Sound is distorted. sources. This is not a malfunction of this unit. When using the HDMI output, audio may not output from ≥When the HDMI cable is connected, there will be no other terminals.
-
Page 25: Licenses
HDMI, the HDMI Logo, and High-Definition Multimedia Interface are trademarks or registered trademarks of HDMI Licensing LLC in the United States and other countries. HDAVI Control is a trademark of Panasonic Corporation. “DVD Logo” is a trademark of DVD Format/Logo Licensing Corporation. DivX... -
Page 26: Specifications
VIDEO SECTION Specifications Video system PAL, NTSC Composite video output AMPLIFIER SECTION Output level 1 Vp-p (75 ≠) RMS Output Power: Dolby Digital Mode Terminal SCART (1 system) Front Ch 160 W per channel (3 ≠), 1 kHz, 10 % THD S-video output Surround Ch 160 W per channel (3 ≠), 1 kHz, 10 % THD... -
Page 27: Safety Precautions
GENERAL Safety precautions Power supply AC 220 V to 240 V, 50 Hz Power consumption This unit 75 W Placement Dimensions (WtHtD) 430 mmk38 mmk279 mm Mass This unit 2.6 kg Set the unit up on an even surface away from direct sunlight, high temperatures, high humidity, and excessive Operating temperature range 0 oC to r40 oC... - Page 28 Information for Users on Collection and Disposal of Old Equipment and used Batteries These symbols on the products, packaging, and/or accompanying documents mean that used electrical and electronic products and batteries should not be mixed with general household waste. For proper treatment, recovery and recycling of old products and used batteries, please take them to applicable collection points, in accordance with...
- Page 30 To completely disconnect this apparatus from the AC Mains, disconnect the power supply cord plug from AC receptacle. Pursuant to at the directive 2004/108/EC, article 9(2) Panasonic Testing Centre Panasonic Marketing Europe GmbH Winsbergring 15, 22525 Hamburg, Germany Panasonic Corporation Web Site: http://panasonic.net...