Table of Contents
Advertisement
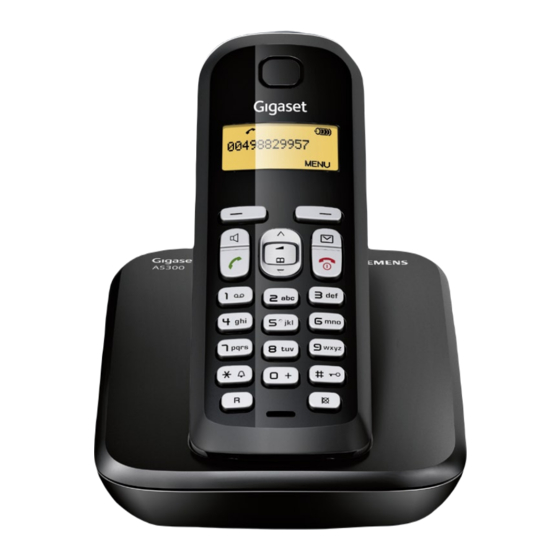
Gigaset AS200/AS200A/AS300
The handset at a glance
1 Charge status of
the batteries
2 Answer machine icon
(AS200A only)
3 Display keys
4 Message key
Flashes: new messages
received
5 AS200/AS200A:
h
Directory key
AS300:
d
Handsfree key
6 Control key (u)
7 Talk key
8 AS300:
h
Directory key
(press down)
9 End call and
On/Off key
10 Ringer on/off
(press and hold
in idle status)
11 Keypad lock on/off
(press and hold)
12 Recall key
- Consultation call
(flash)
- Dialling pause
(press and hold)
13 Microphone
14 "Microphone off" key
The base station at a glance
AS200A base station
2
5
6
3
AS200/AS300 base station
1
2
11.12.
INT
3
4
5
6
7
8
9
10
11
12
13
14
1 Registration/paging key:
Search for handsets (press briefly, "Paging"
Register handsets (press and hold
1
2 On/Off key: activate and deactivate answer machine.
Lights up: answer machine is activated.
3 Volume keys: (– = quieter; + = louder)
During message playback: adjust the speaking volume.
7
While phone is ringing: adjust ringer volume.
4
4 Play/Stop key:
Play back messages from the answer machine, or cancel playback.
Flashes: there is at least one new message or message is in the process
of being recorded.
Flashes very quickly: memory is full.
During message playback:
5 Delete current message.
6 Skip to the start of the current message (press once) or go to the pre-
vious message (press twice).
1
7 Skip to next message.
1
Display keys on handset:
Pressing a key launches the function that
appears above that key in the display.
Display
icon
INT
±
V
MENU
11:56
"
MENU
U
T
˜
OK
AS200/AS200A
Function when pressed
¢
Call other registered handsets
page 11.
¢
Open main/submenu (see
Menu tree
page 16).
Go back one menu level.
Scroll up/down or adjust
volume with u.
Move cursor to left/right
with u.
Backspace deletes one charac-
ter at a time from right to left.
Confirm menu function or save
entry.
AS300
¢
¢
page 10)
page 10).
Advertisement
Table of Contents

Related Manuals for Siemens Gigaset AS300


Summary of Contents for Siemens Gigaset AS300
- Page 1 Gigaset AS200/AS200A/AS300 The handset at a glance 1 Charge status of Display keys on handset: the batteries Pressing a key launches the function that 2 Answer machine icon appears above that key in the display. (AS200A only) Display Function when pressed 3 Display keys icon 4 Message key...
-
Page 2: Safety Precautions
Safety precautions Care Wipe down the base station and handset with a Read this user guide and the safety precautions carefully before use. Explain their content and the potential hazards damp cloth (no solvents) or an antistatic cloth. Never associated with using the telephone to your children. use a dry cloth. -
Page 3: First Steps
First steps Check the pack contents ◆ one Gigaset AS200/AS200A/AS300 base station, ◆ one mains adapter, ◆ one Gigaset AS200/AS300 handset, ◆ one phone cord, ◆ two batteries, ◆ one battery cover, ◆ one user guide. If you have purchased a model with multiple handsets, the package should contain two bat- teries, a battery cover and a charging cradle with mains adapter for each additional handset. -
Page 4: Connecting The Charging Cradle (If Included)
Connecting the charging cradle (if included) ¤ Connect the flat plug from the power supply 1. ¤ Plug the mains adapter into the plug socket 2. If you need to disconnect the plug from the charging cradle, press the release button and disconnect the plug 2. - Page 5 Placing the handset in the base station and registering Before you can use the phone, you must first register the handset to the base station. Put into base MENU ¤ Place the handset with the display facing up in the base station. The handset registers automatically.
- Page 6 Please note ◆ After the first battery charge and discharge you may replace your handset in the base station or charging cradle after every call. ◆ Always repeat the charging and discharging procedure if you remove the batteries from the handset and reinsert them. ◆...
-
Page 7: Making Calls
Making calls Handsfree talking (AS300 only) Making external calls and ending To activate while dialling: calls Enter the number and press the handsfree key Switching between earpiece and handsfree mode: External calls are calls using the public telephone net- During a call , press the handsfree key to activate work. -
Page 8: Last Number Redial List
Calls list/voicemail (network mailbox) ¢ Send List Send the complete list to another list handset ( page 8). Shortcut For shortcuts, assign the current An advisory tone sounds and the message key entry to a key. flashes as soon as a new entry appears in the calls list/voicemail list. - Page 9 Answer machine operation Voicemail list (AS200A) You can use the voicemail list to listen to the mes- (AS200A) sages that are on the answer machine. The voicemail list is displayed as follows: The answer machine can be operated from the hand- ¢...
-
Page 10: Locating A Handset ("Paging")
¢ Deleting individual messages (Enter your own number and allow the phone to ring ˜ until you hear the message: "Please enter PIN") While playback is paused, press the display key. enter system PIN Deleting all old messages Your answer machine is activated. It tells you how During playback or pause: ¢... -
Page 11: Using Several Handsets
Using several handsets When the alarm clock rings, press any key to switch it off for 24 hours. If the alarm clock is set, the wake-up icon will appear on the screen and the wake-up Making internal calls time will be displayed instead of the date. Internal calls are free calls to other handsets that are Setting the wake-up time ¢... -
Page 12: Restoring The Base Station To The Factory Settings
Operating the base station on Restoring the base station to the factory settings the PABX When restoring factory settings: The following settings are only necessary if your PABX ◆ All handsets are de-registered requires them, see the user guide for your PABX. ◆... -
Page 13: Entering Letters/Characters
Appendix Questions and answers Entering letters/characters If you have any queries about the use of your telephone, visit our website at www.gigaset.com/service Press the relevant key the number of times indicated. for 24-hour support. The table below contains a list of Briefly press the hash key to switch from "Abc"... -
Page 14: Customer Service & Assistance
Customer Service & Assistance You have questions? As a Gigaset customer, you can take advantage of our comprehensive service offerings. You can find help quickly in this User Manual and in the service pages of our Gigaset online portal. Please register your phone right after purchase on www.gigaset.com/ie/service thus enabling us to provide you with even better service in case of questions or in case of a warranty claim. -
Page 15: Guarantee Certificate
European Union. For Products sold in the Republic of Ireland the Guarantee is issued by Gigaset Communications UK Limited, Faraday House, Sir William Siemens Square, Frimley, Cam- berley, Surrey, GU16 8QD. ◆ Any other claims resulting out of or in connection... -
Page 16: Menu Tree
Menu tree Your phone has an extensive range of features. These To return to idle status: press and hold the key. are offered in the form of menus. As an alternative to selecting functions using the To select a function while the phone is in idle status, buttons, you can also enter the digit combina- press MENU... - Page 17 3-5 Message Length 3-5-1 Maximum Do not limit the recording time for each call. 3-5-2 1 Minute Limit the recording time to 1 minute per call. 3-5-3 2 Minutes Limit the recording time to 2 minutes per call. 3-5-4 3 Minutes Limit the recording time to 3 minutes per call.
- Page 24 D-46395 Bocholt Rights of modification reserved. Manufactured by Gigaset Communications GmbH www.gigaset.com under trademark license of Siemens AG. As of 1 Oct. 2011 Gigaset products bearing the trademark "Siemens" will exclusively use the trademark "Gigaset". This user guide is made from 100 % recycled paper.