Table of Contents
Advertisement
Quick Links
Advertisement
Table of Contents

Related Manuals for Crestron Isys TPS-6


Summary of Contents for Crestron Isys TPS-6
- Page 1 Crestron TPS-6 Isys™ 5.7” Tilt Touchpanel Operations Guide...
-
Page 2: Regulatory Compliance
Rockleigh, NJ 07647 1-888-CRESTRON Regulatory Compliance As of the date of manufacture, the TPS-6 has been tested and found to comply with specifications for CE marking and standards per EMC and Radiocommunications Compliance Labelling. Federal Communications Commission (FCC) Compliance Statement This device complies with part 15 of the FCC rules. -
Page 3: Table Of Contents
Crestron TPS-6 Isys™ 5.7” Tilt Touchpanel Contents Isys™ 5.7” Tilt Touchpanel: TPS-6 Introduction ..........................1 Features and Functions ....................2 Specifications ......................4 Physical Description....................7 Setup ............................10 Network Wiring......................10 Identity Code ......................10 Configuring the Touchpanel..................11 Hardware Hookup ..................... -
Page 5: Isys™ 5.7" Tilt Touchpanel: Tps-6 • 1
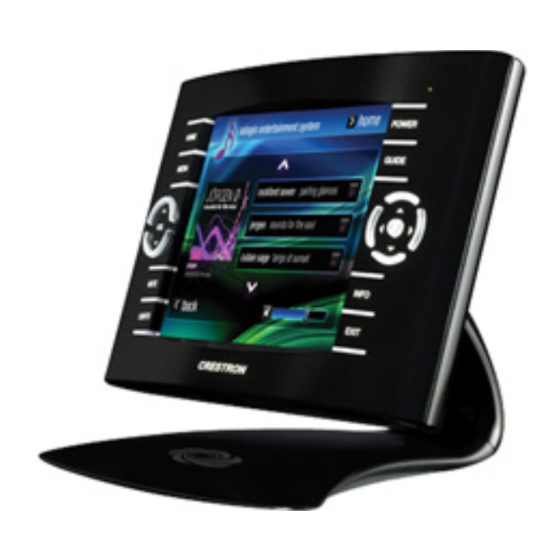
The Crestron Isys TPS-6 Tilt Touchpanel delivers high-end style and performance in a striking tabletop design. Sleek and compact, the TPS-6 does away with piles of remotes and cryptic control panels, affording true "one-touch" control over a broad range of complex devices and systems. Featuring a bright, beautiful, high-contrast... -
Page 6: Features And Functions
Crestron Engraver software. A no-button front bezel is also included with the TPS-6, which may be installed in place of the button bezel for a very clean appearance with no front panel pushbuttons. - Page 7 Balanced AV distribution systems. TableTop Tilt Base With its sleek and innovative tilting base, the TPS-6 functions as a stylish tabletop tilt touchpanel, providing full-time wired communications and video capability. Both high-speed Ethernet and Cresnet connectivity are available. The screen tilt can be freely adjusted or locked down at up to a 45 degree angle for optimal viewing and operation.
-
Page 8: Specifications
Isys™ 5.7” Tilt Touchpanel Crestron TPS-6 Specifications Specifications for the TPS-6 are listed in the following table. TPS-6 Specifications SPECIFICATION DETAILS Touchscreen Display Display Type TFT Active matrix color LCD Size 5.7 inch (145 mm) diagonal Aspect Ratio 4:3 VGA... - Page 9 (specify color) 1. May be powered by 24 Volts DC or Cresnet network power but not both. 2. Item is included with the TPS-6; refer to individual product specifications for additional information. ® 3. The latest software versions can be obtained from the Crestron website.
- Page 10 Isys™ 5.7” Tilt Touchpanel Crestron TPS-6 NOTE: Crestron software and any files on the website are for authorized Crestron dealers and Crestron Authorized Independent Programmers (CAIP) only. New users may be required to register to obtain access to certain areas of the site (including the FTP site).
-
Page 11: Physical Description
Isys™ 5.7” Tilt Touchpanel Physical Description This section provides information on the connections, controls and indicators available on your TPS-6. TPS-6 Physical View (Front) TPS-6 Overall Dimensions (Front and Side Views) Isys™ 5.7” Tilt Touchpanel: TPS-6 • 7 Operations Guide – DOC. 6945A... - Page 12 Isys™ 5.7” Tilt Touchpanel Crestron TPS-6 TPS-6 Overall Dimensions (Tilt View) TPS-6 Overall Dimensions (Top View) 8 • Isys™ 5.7” Tilt Touchpanel: TPS-6 Operations Guide – DOC. 6945A...
- Page 13 (sold separately); default engraving included THUMBPAD (5) Optional programmable pushbuttons for 4-way directional navigation and “enter”, backlit Text engraving on the TPS-6-W-S white model is not backlit. Isys™ 5.7” Tilt Touchpanel: TPS-6 • 9 Operations Guide – DOC. 6945A...
-
Page 14: Setup
Identity Code Net ID The Net ID of the TPS-6 has been factory set to 03. The Net IDs of multiple TPS-6 devices in the same system must be unique. The Net ID is set using the internal setup menu (refer to “CRESNET” on page 17). Net ID may also be set from a personal computer (PC) via Crestron Toolbox™... -
Page 15: Configuring The Touchpanel
NOTE: The only connection required to configure the touchpanel is power. Refer to “Hardware Hookup” which starts on page 27 for details. To configure the TPS-6 it may be necessary to access a series of setup menus prior to viewing run-time screens that are loaded into the touchpanel for normal operation. - Page 16 Touch the center of the crosshair in the corner of the screen to conclude calibration and return to the MAIN MENU. 12 • Isys™ 5.7” Tilt Touchpanel: TPS-6 Operations Guide – DOC. 6945A...
- Page 17 The CRESNET section displays Cresnet connection status and ID. The ETHERNET section displays Ethernet Link status, along with the IP and MAC address. The COMMUNICATION section displays the Crestron Swirl logo , which illuminates to indicate the status of your connection to the control system(s): •...
- Page 18 To remove an IP address (or hostname), select the appropriate CIP ID and type in the IP address (or hostname), then touch REMOVE IP. To clear the entry area just above the keypad on the screen, touch Clear IP/Host. 14 • Isys™ 5.7” Tilt Touchpanel: TPS-6 Operations Guide – DOC. 6945A...
- Page 19 Toggles the key click sound for touchpanel hard key presses. After audio parameters have been set, touch RETURN to go back to the SETUP MODE menu or MAIN MENU. Isys™ 5.7” Tilt Touchpanel: TPS-6 • 15 Operations Guide – DOC. 6945A...
- Page 20 Translucency controls. NOTE: Preview Translucency requires an actual video signal input to the touchpanel in order to show the effects of the Translucency controls. 16 • Isys™ 5.7” Tilt Touchpanel: TPS-6 Operations Guide – DOC. 6945A...
- Page 21 Connection Status indicator to show when the Cresnet connection is active. After communications parameters have been set, touch RETURN to go back to the SETUP MODE menu or MAIN MENU. Isys™ 5.7” Tilt Touchpanel: TPS-6 • 17 Operations Guide – DOC. 6945A...
- Page 22 DNS Servers buttons. A new Reboot required for settings to take effect. Reboot Now button will appear, as shown in the following illustration. ETHERNET SETUP Menu (DHCP Disable) 18 • Isys™ 5.7” Tilt Touchpanel: TPS-6 Operations Guide – DOC. 6945A...
- Page 23 + and – buttons on each menu are provided for setting the numbers. In each case, touch RETURN to go back to the previous menu. ETHERNET SETUP (EDIT IP ADDRESS Menu) Isys™ 5.7” Tilt Touchpanel: TPS-6 • 19 Operations Guide – DOC. 6945A...
- Page 24 From the main ETHERNET SETUP menu, in the Static IP Settings section, touch DNS Servers to enter the STATIC DNS SETTINGS menu, as shown in the following illustration. 20 • Isys™ 5.7” Tilt Touchpanel: TPS-6 Operations Guide – DOC. 6945A...
- Page 25 Secondary WINS, as shown in the following illustrations. + and – buttons on each menu are provided for setting the numbers. In each case, touch RETURN to go back to the previous menu. ETHERNET SETUP (EDIT PRIMARY DNS Menu) Isys™ 5.7” Tilt Touchpanel: TPS-6 • 21 Operations Guide – DOC. 6945A...
- Page 26 Isys™ 5.7” Tilt Touchpanel Crestron TPS-6 ETHERNET SETUP (EDIT SECONDARY DNS Menu) ETHERNET SETUP (EDIT PRIMARY WINS Menu) ETHERNET SETUP (EDIT SECONDARY WINS Menu) 22 • Isys™ 5.7” Tilt Touchpanel: TPS-6 Operations Guide – DOC. 6945A...
-
Page 27: Touch Panel
When enabled, Display on from Hardkey causes the display to turn on along with the touchpanel at the press of any key on the front of the touchpanel. Isys™ 5.7” Tilt Touchpanel: TPS-6 • 23 Operations Guide – DOC. 6945A... - Page 28 (on top of the touchpanel). When ON, the right trigger key will toggle display brightness between high, medium, low and standby. NOTE: The right trigger key can toggle screen brightness when the TPS-6 is displaying a project. It will not toggle screen brightness in the setup menus.
- Page 29 The Press To Trigger Level Now buttons allow for immediate setting of key brightness level to HIGH, MEDIUM or LOW. Touch RETURN to go back to the BACKLIGHT SETUP menu. Isys™ 5.7” Tilt Touchpanel: TPS-6 • 25 Operations Guide – DOC. 6945A...
- Page 30 Press RETURN to go back to the TOUCHPANEL menu. After touchpanel parameters have been set, touch RETURN to go back to the SETUP MODE menu or the MAIN MENU. 26 • Isys™ 5.7” Tilt Touchpanel: TPS-6 Operations Guide – DOC. 6945A...
-
Page 31: Hardware Hookup
DIAGNOSTICS Menu Hardware Hookup The TPS-6 comes in a soft felt bag to protect it during shipping. For Cresnet or Ethernet connection or to upgrade touchpanel firmware, the TPS-6 must be connected to the TPS-6X IMCW Interface Module (included), which in turn must be connected to a control system via Cresnet or Ethernet. -
Page 32: Recommended Cleaning
For best cleaning results, use a clean, damp, non-abrasive cloth with any commercially available non-ammonia glass cleaner. Bezels may not provide a complete watertight seal. Therefore, apply cleaning solution to the cloth rather than 28 • Isys™ 5.7” Tilt Touchpanel: TPS-6 Operations Guide – DOC. 6945A... - Page 33 Doing so can crack the screen and damage the touchpanel. Enclosure The soft felt bag the TPS-6 came shipped in can be used to clean the bezel and the rest of the touchpanel enclosure. Isys™ 5.7” Tilt Touchpanel: TPS-6 • 29...
-
Page 34: Programming Software
Have a question or comment about Crestron software? Answers to frequently asked questions (FAQs) can be viewed in the Online Help section of the Crestron website. To post a question or view questions you have submitted to Crestron’s True Blue Support, log in at http://support.crestron.com. -
Page 35: Programming With Simpl Windows
Crestron TPS-6 Isys™ 5.7” Tilt Touchpanel Programming with SIMPL Windows NOTE: While SIMPL Windows can be used to program the TPS-6, it is recommended to use SystemBuilder for configuring a system. SIMPL Windows is Crestron’s premier software for programming Crestron control systems. - Page 36 Crestron TPS-6 C2Net Device, Slot 8 and 9 (Net ID and IP ID) 3. Additional TPS-6 devices are assigned different Net ID, or IP ID numbers as they are added. 4. If necessary, double click a device to open the “Device Settings” window and change the Net ID, or IP ID as shown in the following figure(s).
-
Page 37: Programming With Visiontools Pro-E
The single most advanced VT Pro-e high performance programming technique performance programming! involving the TPS-6 is the concept of multi-mode objects. A multi-mode object (i.e. button, legend, etc.) is an object drawn on a VisionTools Pro-e page that can have one or more active and inactive visible settings (modes). - Page 38 Read this section to learn about bit depth and how to maximize the quality and performance of a TPS-6 project. Bit depth refers to the number of memory bits used to store color data for each pixel in a raster image.
- Page 39 Dithering type selection can be accessed from the “Page Properties” or “Image Properties” windows in VT-Pro-e. Refer to the following illustrations. VT Pro-e “Page Properties” Window – Bit Depth Selection VT Pro-e “Image Properties” Window – Bit Depth Selection Isys™ 5.7” Tilt Touchpanel: TPS-6 • 35 Operations Guide – DOC. 6945A...
- Page 40 NOTE: Join numbers 16 and 17 are fixed for the two “trigger” keys, the top-mounted pushbuttons on the TPS-6. The left trigger key toggles power when the unit is undocked and initiates Sleep mode when docked. In addition, when held for five seconds, it initiates a touchpanel reset.
- Page 41 Windows XP, Vista and 7 are available in many international languages and add-on software is available for other versions of Windows. Isys™ 5.7” Tilt Touchpanel: TPS-6 • 37 Operations Guide – DOC. 6945A...
-
Page 42: Uploading And Upgrading
Ethernet Crestron Toolbox The TPS-6 connects to PC via Ethernet: 1. Enter the IP address, IP mask and default router of the TPS-6 via the Crestron Toolbox (Functions | Ethernet Addressing); otherwise enable DHCP. NOTE: Use the Device Discovery Tool in Crestron Toolbox to detect all Ethernet devices on the network and their IP configuration. -
Page 43: Programs, Projects And Firmware
3. A defined IP table can be saved to a file or sent to the device. Edit the control system’s IP table to include an entry for the TPS-6. The entry should list the TPS-6’s IP ID (specified on the TPS-6’s IP table) and the internal gateway IP address 127.0.0.1. -
Page 44: Problem Solving
Isys™ 5.7” Tilt Touchpanel Crestron TPS-6 Problem Solving Troubleshooting The following table provides corrective action for possible trouble situations. If further assistance is required, please contact a Crestron customer service representative. TPS-6 Troubleshooting TROUBLE POSSIBLE CAUSE(S) CORRECTIVE ACTION Device does not... -
Page 45: Check Network Wiring
Cresnet power usage of the entire chain. If the unit is home-run from a Crestron system power supply network port, the Cresnet power usage of that unit is the Cresnet power usage of the entire run. The wire gauge and the Cresnet power usage of the run should be used in the following equation to calculate the cable length value on the equation’s left side. -
Page 46: Reference Documents
Crestron's award winning customer service team by calling Crestron at 1-888-CRESTRON [1-888-273-7876]. You can also log onto the online help section of the Crestron website (www.crestron.com/onlinehelp) to ask questions about Crestron products. First-time users will need to establish a user account to fully benefit from all available features. -
Page 47: Software License Agreement
This Agreement may only be modified by a writing signed by an authorized officer of Crestron. Updates may be licensed to You by Crestron with additional or different terms. This is the entire agreement between Crestron and You relating to the Software and it supersedes any prior representations, discussions, undertakings, communications or advertising relating to the Software. - Page 48 “applets” incorporated into the Software), the accompanying media and printed materials and any copies of the Software are owned by Crestron or its suppliers. The Software is protected by copyright laws and international treaty provisions. Therefore, you must treat the Software like any other copyrighted material, subject to the provisions of this Agreement.
-
Page 49: Return And Warranty Policies
Purchasers should inquire of the dealer regarding the nature and extent of the dealer's warranty, if any. CRESTRON shall not be liable to honor the terms of this warranty if the product has been used in any application other than that for which it was intended or if it has been subjected to misuse, accidental damage, modification or improper installation procedures. - Page 50 Isys™ 5.7” Tilt Touchpanel Crestron TPS-6 This page is intentionally left blank. 46 • Isys™ 5.7” Tilt Touchpanel: TPS-6 Operations Guide – DOC. 6945A...
- Page 51 Crestron TPS-6 Isys™ 5.7” Tilt Touchpanel This page is intentionally left blank. Isys™ 5.7” Tilt Touchpanel: TPS-6 • 47 Operations Guide – DOC. 6945A...
- Page 52 Crestron Electronics, Inc. Operations Guide – DOC. 6945A 15 Volvo Drive Rockleigh, NJ 07647 (2026851) Tel: 888.CRESTRON 01.10 Fax: 201.767.7576 Specifications subject to www.crestron.com change without notice.