Table of Contents
Advertisement
Advertisement
Table of Contents

Related Manuals for Singer Stylist II Serger


Summary of Contents for Singer Stylist II Serger
- Page 1 14J250 INSTRUCTION MANUAL MANUEL D’INSTRUCTION MANUAL DE INSTRUCCIONES...
-
Page 2: Important Safety Instructions
- Unplug the foot controller of the appliance when leaving it unattended: - Unplug the foot controller of the appliance before carrying out any maintenance.” SINGER is a registered trademark of The Singer Company Limited or its affiliates. ©2010 The Singer Company Limited or its affiliates. All rights reserved. - Page 3 é l e c t r i q u e s / électroniques. En cas de doute, veuillez SINGER est une marque enregistrée de The Singer Company Limited ou de ses sociétés affiliées. contacter votre distributeur agréé.
- Page 4 - Desconecte el pedal del aparato antes de realizar cualquier tipo de mantenimiento.” nacional referente a productos eléctricos y SINGER es una marca registrada de The Singer Company Limited o sus filiales. electrónicos. Si tiene alguna duda al respecto, por favor contacte con el distribuidor.
-
Page 5: Table Of Contents
TABLE OF CONTENTS TABLE DES MATIERES 1. KNOWING YOUR SEWING MACHINE 1. VOTRE MACHINE A COUDRE Identification chart ------------------------------------------------------------------------------------ 6 - 7 Description de la machine ---------------------------------------------------------------------------6 - 7 Accessories -------------------------------------------------------------------------------------------- 8 - 9 Accessoires ---------------------------------------------------------------------------------------------8 - 9 Setting up your machine ------------------------------------------------------------------------- 10 - 11 Branchement de la machine ---------------------------------------------------------------------10 - 11 Preparation for threading ------------------------------------------------------------------------- 12 - 15 Préparation à... - Page 6 INDICE DE CONTENIDOS 1. PRINCIPALES PARTES DE LA MAQUINA Nomenclatura de identificación --------------------------------------------------------------------6 - 7 Accesorios -----------------------------------------------------------------------------------------------8 - 9 Montaje de su máquina ---------------------------------------------------------------------------10 - 11 Preparación para el enhebrado ---------------------------------------------------------------- 12 - 15 Indicador de anchura de corte, Cortador de hilo, ------------------------------------------ 16 - 17 Cambio del pie prensatelas, Montar la(s) aguja(s) ---------------------------------------- 16 - 17 Materials, hilos y agujas ------------------------------------------------------------------------- 18 - 19 2.
-
Page 7: Knowing Your Sewing Machine Identification Chart
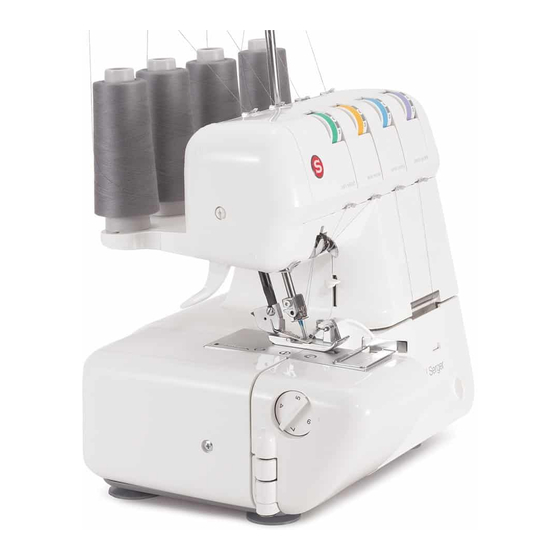
1. KNOWING YOUR SEWING MACHINE IDENTIFICATION CHART 1. Cord guide 2. Foot pressure regulator 3. Sewing light 4. Presser foot lever 5. Thread cutter 6. Needle plate 7. Standard foot 8. Overedge cutting width dial 9. Working table 10. Thread guide pole 11. -
Page 8: Principales Partes De La Maquina
1. VOTRE MACHINE A COUDRE 1. PRINCIPALES PARTES DE LA MAQUINA DESCRIPTION DE LA MACHINE NOMENCLATURA DE IDENTIFICACION 1. Guide-fil cordonnet 1. Guía del cordón 2. Réglage de la pression du pied 2. Regulador de presión de pie 3. Ampoule d’éclairage 3. -
Page 9: Accessories
ACCESSORIES 1. Two-thread converter 2. Stitch finger (B) (See page 44) 3. Needle threader 4. Brush 5. Screw driver (small) 6. Tape measure (option) 7. Package of needles 8. Screw driver (large) 9. Oiler 10. Extra cutter 11. Wrench 12. Thread nets 13. -
Page 10: Accesorios
ACCESSOIRES ACCESORIOS 1. Convertisseur à 2 fils 1. Convertidor de dos-hilos 2. Doigt mailleur (B) (voir page 45) 2. Dedo de puntada (B) (Ver página 45) 3. Enfileur d’aiguille 3. Enhebrador aguja 4. Brosse 4. Cepillo 5. Petit tournevis 5. Destornillador (pequeño) 6. -
Page 11: Setting Up Your Machine
SETTING UP YOUR MACHINE 1. Wipe off excess oil in the needle plate and bed areas. 2. FOOT CONTROL Push foot control plug into plug connector socket and connect the power cord plug to power supply outlet. 3. POWER/ LIGHT SWITCH Your machine will not operate unless the power/light switch is turned on. -
Page 12: Montaje De Su Máquina
BRANCHEMENT DE LA MACHINE MONTAJE DE SU MAQUINA 1. Nettoyer l’excès d’huile sur la plaque-aiguille et ses 1. Asegúrese de limpiar la zona de la placa de la aguja y alentours. la placa base antes de coser un vestido. 2. RHEOSTAT 2. -
Page 13: Preparation For Threading
PREPARATION FOR THREADING THREAD GUIDE POLE Pull up thread guide pole to the highest point until you hear it click. Place spool discs on the pins. Then place thread spools on pins on the spool stand and draw thread through thread guides on the pole from rear to front. -
Page 14: Preparación Para El Enhebrado
PREPARATION A L’ENFILAGE PREPARACION PARA EL ENHEBRADO SUPPORT GUIDE-FILS TELESCOPIQUE BARRA DEL PORTA CARRETES Tirer vers le haut le support jusqu’à son point maximum Extender la barra guía del hilo a su punto más alto hasta signalé par un “clic”. Plaçer les bobines de fil sur les que escuche un click. - Page 15 SPOOL CAPS FOR DOMESTIC TYPE SPOOLS SPOOL DISC AND SPOOL HOLDERS FOR CONE SPOOLS For large cone spools, use rubber spool holders with the wide end at the top. For smaller spools, use the same rubber spool holders but with the narrow end at the top. SPOOL NETS Polyester or bulky nylon threads become loose while unwinding.
- Page 16 CHAPEAUX POUR MISE EN TAPAS PARA CARRETES DE HILO PLACE DES BOBINES DE TYPE DOMESTICO DOMESTIQUES PLAQUETTES D’EXTENSION POUR PLACAS DE PROLONGACION Y CONES ET SUPPORTS POUR CONES PORTA CARRETES PARA CONO DE HILO INDUSTRIAL Pour les cônes de fil les plus hauts, utiliser les supports pour cône avec la partie large vers le haut.
-
Page 17: Cutting Width Gauge, Thread Cutter, Changing Presser Feet, Changing Needle
CUTTING WIDTH GAUGE Use the cutting width gauge to assure the fabric is cut and sewn consistently. Adjust the width gauge for the desired seam allowance. THREAD CUTTER Thread cutter is built in needle plate. Trim thread near the end of fabric by pushing down the lever as illustrated. -
Page 18: Indicador De Anchura De Corte, Cortador De Hilo
GUIDE DE LARGEUR DE COUPE INDICADOR DE ANCHURA DE CORTE Lorsque vous utilisez ce guide de coupe, le tissu est coupé et cousu à la même distance Cuando use el indicador de anchura de corte, el tegido se cortará y coserá a la misma par rapport au bord du tissu. -
Page 19: Needle, Thread And Fabric Chart
NEEDLE, THREAD AND FABRIC CHART TABLEAU DES FILS ET MATIERES Utiliser SINGER Cat. No. 2022. Use SINGER Cat. No. 2022. Grosseur Etoffes Type de fil FABRIC THREAD NEEDLE d'aiguille Light weight: Tissus légers: Cotton No. 100 Organdy, Lawn, Organdi, mousseline,... -
Page 20: Materials, Hilos Y Agujas
MATERIALS, HILOS Y AGUJAS Usar SINGER Cat. No. 2022. MATERIAL HILO AGUJA Género ligero Organdina, Lino, Algodón N Carraclan MEDIO LINO Género fuerte Poliester Oxford, Mahón, 60 - 50 Gabardina de algodón Algodón N Género ligero Poliester N Tropical, Lana, Algodón N... -
Page 21: Starting To Sew
2. STARTING TO SEW THREADING YOUR MACHINE Wrong threading may cause skipped stitches, breaking threads, or other problems. Try to master the correct threading before test sewing. Threading must be carried out in the sequence of Lower Looper-Upper Looper-Needle. Open the front cover and the working table. Raise needle to its highest point by turning hand wheel towards you, and raise the presser foot. -
Page 22: Empezar A Coser
2. COMMENCER A COUDRE 2. EMPEZAR A COSER ENFILAGE DE LA MACHINE ENHEBRAR SU MAQUINA Un mauvais enfilage causera des points de manque, des Un mal enhebrado puede originar puntos sueltos, rotura del casses de fil ou autres problèmes. hilo y otros problemas. Essayer de bien maîtriser l’enfilage avant de poursuivre Trate de dominar el enhebrado correcto antes de moverse avec le test de couture. - Page 23 THREADING UPPER LOOPER 1. Feed the thread through the thread guide as illustrated. 2. Pull the upper thread through the slot. Holding the thread with your left hand, pull down with right hand firmly. 3. Draw the thread through the thread guide as illustrated. (When threading according to the instructions, upper looper thread passes the thread guide (A) automatically after turning the hand wheel.) 4.
- Page 24 ENFILAGE DU BOUCLEUR ENHEBRAR EL ANCORA SUPERIOR SUPERIEUR 1. Avanzar el hilo a través de la guía del hilo como se ilustra. 1. Passer le fil dans le guide-fil comme illustré. 2. Conducir el hilo a través de la ranura, asegurándose de 2.
- Page 25 THREADING NEEDLES 1. Feed the thread through the thread guide as illustrated. 2. Draw the needle threads through tension slot. Holding the thread with your left hand, pull down with right hand firmly. 3. Draw the thread through the thread guides as illustrated. 4.
-
Page 26: Enfilage Des Aiguilles
ENFILAGE DES AIGUILLES ENHEBRAR AGUJAS 1. Passer le fil dans le guide-fil comme illustré. 1. Avanzar el hilo a través de la guía del hilo como se ilustra. 2. Tirer le fil dans les tensions en le soutenant de la main gauche et en le tirant vers le bas avec la main droite. -
Page 27: Needle Threader
NEEDLE THREADER For right needle / Pour aiguille droite / Para la aguja derecha 1. Feed the thread through the thread guide of needle clamp as illustrated. Raise the presser foot. Raise the needle bar to highest position, and pull the thread leaving about 4”... -
Page 28: Enhebrador De La Aguja
ENFILEUR D’AIGUILLE ENHEBRADOR DE LA AGUJA 1. Passer le fil par le passe-fil du serre-aiguille comme 1. Avanzar el hilo a través de la guía del hilo de grapa montré. Lever le pied presseur. Lever la barre-aiguille de aguja dejando unos 10 cms extra. Levantar el pie dans sa position la plus haute, puis tirer environ 10 cm prensatelas. -
Page 29: Helpful Hints
HELPFUL HINTS REPLACING THREAD SPOOLS When replacing thread spools, the following steps may be helpful for quick changeover. 1. Cut off existing threads near the spools. Tie the cut ends thread from new spools as illustrated (seamen’s knot). 2. Raise presser foot. 3. -
Page 30: Sugerencias De Ayuda
CONSEILS D’UTILISATION SUGERENCIAS DE AYUDA REMPLACER LES BOBINES DE FIL REEMPLAZAR LOS CARRETES DE HILO Les conseils suivants seront utiles pour changer rapidement Cuando se reemplacen los carretes de hilo, para un cambio et facilement les fils de bobine. rápido, los siguientes pasos pueden ser utiles. 1. -
Page 31: Testing Stitch Overlock Stitches
TESTING STITCH OVERLOCK STITCHES After threading is completed, use a scrap of fabric that you plan to sew and test sew in the following order: 1. Gently pulling all the threads to the left, lower the presser foot. Rotate the hand wheel toward you a few times to see if the lock stitches are properly formed. -
Page 32: Comprobar Los Sobrehilados
TESTER LA FORMATION DU POINT COMPROBAR LOS SOBREHILADOS Après avoir terminé l’enfilage, utiliser une chute du tissu à Después de que el enhebrado se complete, usar un utiliser pour tester la couture dans l’ordre suivant : material similar que piense coser y verifique las puntadas en el 1. -
Page 33: Setting Chart
SETTING CHART Number of threads ← 6 → 4 → ← 5 → ← 6 → 4 - 6 4 - 6 Overedge cutting width dial Left and Right Left and Right Needle to use Left Right Left Right Right Left Right Stitch finger... - Page 34 TABLEAU DE REGLAGE DE LA MACHINE Nombre de fils Bouton de réglage de largeur de ← 6 → 4 → ← 5 → ← 6 → 4 - 6 4 - 6 coupe Gauche et Gauche et Aiguille à utiliser Gauche Droit Gauche...
-
Page 35: Tabla De Fijación
TABLA DE FIJACION ← 6 → 4 → ← 5 → ← 6 → 4 - 6 4 - 6 Dial de anchura de costura Izquierda y Izquierda y Aguja que se usa Izquierda Derecha Izquierda Derecha Derecha Izquierda Derecha derecha derecha ... -
Page 37: Three-Thread Overlock With One Needle
THREE-THREAD OVERLOCK WITH ONE NEEDLE By threading the LEFT needle only, a seam allowance width of 0.24 inches (6 mm) will be produced. By threading the RIGHT needle only, a seam allowance width of 0.15 inches (3.8mm) will be produced. Please remove the unused needle and place it in the needle pad as illustrated. -
Page 38: Sobrehilados De Tres Hilos Con Una Aguja, Convertir A Empleo De Dos Hilos
OVERLOCK A 3 FILS AVEC UNE SOBREHILADOS DE TRES HILOS AIGUILLE CON UNA AGUJA En conservant pour seule aiguille l’aiguille gauche, on Enhebrando sólo la aguja IZQUIERDA se producirá una obtient une largeur de surjet de 6 mm, en ne conservant anchura de 6 mm. -
Page 39: Narrow And Rolled Hem, Picot Stitch
NARROW AND ROLLED HEM, PICOT STITCH The narrow and rolled edge stitches are ideal for use on light weight fabrics such as georgette, crepe, crepe de chine, silk etc. The picot stitch can be used when sewing on fine scarf-like fabrics. These hems are unsuitable for use on hard or heavy fabrics. -
Page 40: Dobladillados Enrollados, Estrechos Y De Forro
OURLETS ETROITS ET OURLETS ROULES, POINT PICOT DOBLADILLADOS ENROLLADOS, ESTRECHOS Y DE FORRO Les ourlets étroits ou roulés conviennent particulièrement bien pour finir les tissus fins tels Son ideales para usarlos en materiales delgados tales como: crespón georgette, crespón que la soie, le voile, le crêpe de chine, etc. de chino, seda etc. -
Page 41: Adjusting Thread Tensions
ADJUSTING THREAD TENSIONS TWO-THREAD USE Turning thread tension control dial to a higher number Just right. Lower looper thread pulled to under Needle thread pulled to top side. gives a tighter thread tension. Turning the thread control side. dial to a lower number gives a looser thread tension. The Under side Under side Under side... - Page 42 REGLAGE DES TENSION UTILISATION A DEUX FILS Tourner le bouton de tension sur un chiffre supérieur (vers Tension correcte Fil du boucleur inférieur tiré vers Needle thread pulled to top side. l’envers le bas) augmente la tension. Tourner le bouton de tension sur un chiffre inférieur (vers le haut) la diminue.
-
Page 43: Ajustar Las Tensiones De Los Hilos
AJUSTAR LAS TENSIONES DE LOS EMPLEO DE DOS HILOS HILOS Cosido correcto. Lower looper thread pulled to under side. Needle thread pulled to top side. Girando el dial de tensión hacia arriba da una tensión del hilo mayor. Girando el dial de la tensión hacia abajo nos da Lado de abajo Lado de abajo Lado de abajo... -
Page 45: Adjusting Stitch Length, Adjusting Overedge Cutting Width, Stitch Finger (B)
ADJUSTING STITCH LENGTH Turn the Stitch length dial until the required length is obtained. ADJUSTING OVEREDGE CUTTING WIDTH Overedge cutting width can be adjusted from 0.16 inches to 0.28 inches (4 to 7 mm) by simply turning the Overedge cutting width dial to accommodate your fabric. Decrease the cutting width by turning it towards 5 if fabric edge curls while sewing. -
Page 46: Ajustar La Longitud De Puntada, Ajustar La Anchura De Costura, Dedo De Puntada (B)
REGLAGE DE LA LONGUEUR DU AJUSTAR LA LONGITUD DE PUNTADA POINT Girar el dial de longitud de puntada hasta obtener la puntada deseada. Tourner le bouton de longueur de point jusqu’à la position requise. REGLAGE DE LA LARGEUR DE AJUSTAR LA ANCHURA DE LA COSTURA COUPE La anchura de la costura se puede ajustar sólo girando el dial de anchura de costura según la clase de material. -
Page 47: Differential Feed
DIFFERENTIAL FEED The differential feed has two independent feed dogs, one front (A) and one rear (B). Each feed dog has an individual feed mechanism which enables fabric to feed at different ratios. POSITIVE DIFFERENTIAL FEED WHEN SET FOR POSITIVE DIFFERENTIAL FEED, the front feed dog (A) makes a longer stroke than the rear feed dog (B). -
Page 48: Transporte Diferencial
ENTRAINEMENT DIFFERENTIEL TRANSPORTE DIFERENCIAL L’entraînement différentiel est constitué de deux griffes El transporte diferencial tiene 2 transportadores de avance indépendantes, une frontale (A) et une arrière (B). independientes, frontal (A) y posterior (B). Chacune des griffes est animée par un mécanisme Cada transportador tiene un mecanismo de avance indépendant qui entraîne le tissu de manière différente individual que facilita el transporte del material a longitudes... -
Page 49: Foot Pressure Regulator
SETTING DIFFERENTIAL FEED Set by simply moving the differential feed control dial in the direction desired, referring to the chart below. The adjustment can be made between 0.7 (negative effect) and 2 (positive effect). These settings give the best ratio of feeding. For normal sewing without differential feed, set the dial on 1. -
Page 50: Reglador De Presion De Pie
REGLAGE DE L’ENTRAINEMENT DIFFERENTIEL FIJAR EL TRANSPORTE DIFERENCIAL Règler le différentiel en déplaçant le levier de réglage comme indiqué dans le schéma ci-dessous. Se fija moviendo el control del transporte diferencial en la dirección deseada refiriéndose a la gráfica de abajo. Le règlage peut être fait entre 0,7 (entraînement négatif) et 2 (entraînement positif). -
Page 51: Basic Techniques
BASIC TECHNIQUES TURNING OUTSIDE CORNERS WITHOUT CUTTING THREADS 1. When you reach the fabric edge, stop stitching with the needle above the fabric. 2. Raise the presser foot and gently pull on the thread chain just enough to clear the stitch finger. 3. -
Page 52: Techniques De Base
TECNICAS BASICAS TECHNIQUES DE BASE GIRAR EL MATERIAL SIN CORTAR LOS HILOS PIQUER UN ANGLE SANS COUPER LES FILS 1. Cuando alcance el borde de material, pare el pespunte con la aguja sobre el material. 1. Lorsque vous arrivez au bord de l’angle, stoppez la couture avec l’aiguille hors du tissu. 2. -
Page 53: Removing Stitches From Sewn Fabric, Corded Overlock
REMOVING STITCHES FROM SEWN FABRIC To remove stitches already sewn, snip off needle thread(s) at intervals and pull out looper thread(s). CORDED OVERLOCK Corded overlock can be used to strengthen shoulder, sleeve or side seams when making knitted garments. As a decorative feature, you can use knitting yarn of contrasting colors to further enhance your garment. -
Page 54: Eliminar Los Sobrehilados Del Material Cosido, Pespunte Acordonado
DECOUDRE UNE COUTURE ELIMINAR LOS SOBREHILADOS DEL MATERIAL COSIDO Pour découdre les fils déjà cousus, coupez le(s) fil(s) d’aiguille(s) par intervalle, en retirant Para eliminar los sobrehilados una vez cosido, recortar el hilo(s) de la aguja a intervalos y les fils des boucleurs. La chaînette se défait alors. tirar hacia fuera del hilo(s) de las ancoras. -
Page 55: Decorative Effects
DECORATIVE EFFECTS In addition to normal overlocking, which is fully described in this instruction book, your machine can also be used for a number of decorative applications such as decorative top stitching, flatlock seams, pin-tucking or making lengths of decorative braid. For these techniques, lower the cutter by pushing in the Cutter release knob and turning it all the way toward you until the cutter snaps into the “down”... -
Page 56: Effets Décoratifs
EFFETS DECORATIFS EFECTOS DECORATIVOS En plus de leur efficacité pour l’assemblage, les surjeteuses-raseuses peuvent aussi Además del sobrehilado normal que está totalmente descrito en este libro de instrucciones, s’employer pour de nombreux travaux décoratifs comme les coutures à plat, les plis dressés su máquina también puede ser utilizada para aplicaciones decorativas tales como costuras ou les bandeaux décoratifs. -
Page 57: Differential Feed Applications
DIFFERENTIAL FEED APPLICATIONS Please refer to pages 46 - 49 DIFFERENTIAL FEED. Differential feed is designed to minimize puckering and wavering. It is also very effective for gathering. 1. Puckering Puckering tends to occur on woven or sheer fabrics. To obtain pucker-free seams, set the differential feed control dial at less than 1. -
Page 58: Utilisations Du Différentiel
UTILISATIONS DU DIFFERENTIEL APLICACIONES DEL TRANSPORTE DIFERENCIAL Veuillez consulter la page 46 - 49 ENTRAINEMENT DIFFERENTIEL. Referir la página 46 - 49 TRANSPORTE DIFERENCIAL. Le différentiel est conçu pour minimiser les effets de vague El avance diferencial está diseñado para minimizar los ou de fronçes. -
Page 59: Caring For Your Machine Replacing Moving Cutter, Disengaging Moving Cutter
3. CARING FOR YOUR MACHINE REPLACING THE CUTTER Replace the Moving cutter if it becomes blunt. A spare cutter can be found in your accessories. NOTE: You should not need to replace the fixed cutter which is made of a special hard alloy material. -
Page 60: Entretien De La Machine
3. ENTRETIEN DE LA MACHINE 3. CUIDADOS PARA SU MAQUINA REMPLACEMENT DU COUTEAU MOBILE CAMBIAR LA CUCHILLA MÓVIL Si le tranchant du couteau mobile est émoussé, il faut le changer aussitôt avec un neuf (fourni Reemplazar la cuchilla móvil cuando llega a estar gastada o despuntada. Encontrará una avec les accessoires standards) de repuesto en sus accesorios. -
Page 61: Cleaning And Oiling
CLEANING AND OILING To keep the machine running smoothly, keep it clean and lubricated at all times. FIRST DISCONNECT THE MACHINE FROM THE POWER SUPPLY BY REMOVING THE POWER CORD PLUG FROM THE POWER SUPPLY OUTLET. 1. Open the front cover and working table. Using the brush provided, remove dust and ling that has accumulated. -
Page 62: Nettoyage Et Lubrification
NETTOYAGE ET LUBRIFICATION LIMPIEZA Y ENGRASE Pour conserver votre machine en bon état de fonctionnement, Para conservar la máquina funcionando suavemente, il est nécessaire de la nettoyer et la huiler régulièrement. mantenerla limpia y lubricada. D’ABORD DEBRANCHER LA MACHINE DE LA PRISE PRIMERO DESCONECTAR LA MAQUINA DEL SUMINISTRO EXTERIEURE DE COURANT ELECTRIQUE. -
Page 63: Checking Performance Problems
4. CHECKING PERFORMANCE PROBLEMS 4. REMEDES A D’EVENTUELS PROBLEMES PROBLEM PROBABLE CAUSE CORRECTION PROBLEME CAUSE PROBABLE CORRECTION Tensions mauvaises Corriger les tensions Incorrect thread tensions Reset thread tension (s) Taille d’aiguille mauvaise Choisir une aiguille adaptée Incorrect size needle Insert correct size needle for thread au tissu et au fil Irregular and fabric... -
Page 64: Verificando Los Problemas De Ejecucion
4. VERIFICANDO LOS PROBLEMAS DE EJECUCION Problema Causa probable Tension(es) de hilo incorrecta. Volver a fijar la(s) tension(es) del hilo. Tamaño de la aguja incorrecta. Elegir el tamaño correcto de la aguja para el hilo y el material. Puntadas Enhebrado inadecuado. Volver a enhebrar la máquina. -
Page 65: Optional Accessories
5. OPTIONAL ACCESSORIES PIPING FOOT Prepare a piece of ready-made piping. Place piping between seam edges with piping extending beyond the seam line, toward the garment. Pin or baste and stitch the seam. Flat or folded braid or ribbon can be used in straight seams. Use for decorating edges of collars, cuffs, pockets, etc. -
Page 66: Accessoires Optionnels
5. ACCESSOIRES OPTIONNELS 5. ACCESORIOS OPCIONALES PIED POUR CORDONNET ENROBE PIE PRENSATELAS PARA TRENZAS DECORATIVAS Permet de confectionner un bord avec un cordonnet enrobé. Plaçer le bord de façon à ce Preparar una pieza de trencilla (cinta plegada sesgada con o sin cordón interior). Colocar la que le bord enroulé... - Page 67 ENGLISH / FRANÇAIS / ESPAÑOL © Part No. 82338 1/10...