Axis 540+ User Manual
High performance multi-protocol print servers for virtually all networks
Hide thumbs
Also See for 540+:
- User manual (156 pages) ,
- Quick installation manual (12 pages) ,
- Specification (6 pages)

Related Manuals for Axis 540+


Summary of Contents for Axis 540+
- Page 1 Axis Print Servers AXIS ONLINE CD High Performance Multi-Protocol Print Servers for Virtually All Networks A X I S 5 4 0 + / 5 4 2 + , 6 4 0 / 6 4 2 v 3 . 2...
- Page 2 AXIS 540/640 User’s Manual AXIS 540+, 542+, 640, 642 Network Print Server User’s Manual...
-
Page 3: Safety Notices
Axis office. AXIS Communications AB cannot be held responsible for any technical or typographical errors and reserves the right to make changes to the product and manuals without prior notice. Axis Communications AB makes no warranty of any kind with regard to the material contained within this document, including, but not limited to, the implied warranties of merchantability and fitness for a particular purpose. -
Page 4: About Axis
Unless stated otherwise, the AXIS 540+, AXIS 542+, AXIS 640 and AXIS 642 are collectively described as the AXIS 540/640 throughout this manual. Similarly, the AXIS 540+ and AXIS 542+ are simply referred to as the AXIS 540+/542+ and the AXIS 640 and AXIS 642 are referred to as the AXIS 640/642. -
Page 5: Support Services
Support services Should you require any technical assistance, please contact your Axis dealer. If your questions cannot be answered immediately, your Axis dealer will forward your queries through the appropriate channels to ensure you a rapid response. -
Page 6: Table Of Contents
AXIS Print System Overview ........57... - Page 7 Using AXIS ThinWizard ........
- Page 8 AXIS 540/640 User’s Manual Appendix A Test Button ............148 Appendix B The Parameter List .
-
Page 9: Section 1 Introduction
Section 1: Introduction AXIS 540/640 User’s Manual Section 1 Introduction Based on the ThinServer technology, the AXIS 540/640 allows you to share your available printer resources with everyone on your network. You can connect your AXIS 540/640 directly to any standard printer. -
Page 10: Where To Use It
AXIS 540/640 User’s Manual Section 1: Introduction Where to use it The AXIS 540/640 is the ideal print server in mixed environments as Supported it can communicate with all the major computer systems and network Environments protocols including: • NetWare •... -
Page 11: How To Use It
The AXIS 540+ and the AXIS 542+ can be installed in the Macintosh environment without any Axis client software. The AXIS 540+ and the AXIS 542+ can be installed in NetWare - Pure IP environments with NetWare Administrator. As the AXIS 540/640 comprises a built-in Web server, it can be... -
Page 12: Features And Benefits
The AXIS 540/640 print server provides high performance and Reliability reliability combined with low power consumption. The electronic circuits are based on the proven AXIS ETRAX chip, which comprises an integrated 32 bit RISC processor and associated network controllers. It supports printing in all the major computer systems and... - Page 13 AXIS 540/640 User’s Manual The provided AXIS Print System software, the AXIS NetPilot Monitoring software and the internal AXIS 540/640 Web pages allow you to continuously monitor printer status. The AXIS Print System and the AXIS Print Monitor can be configured to display pop-up messages that show the status of peer-to- peer print jobs.
-
Page 14: Section 2 Product Overview
AXIS 540+, part no: 0058-3, AXIS 542+, part no: 0058-4, AXIS 640, part no: 0059-1, AXIS 642, part no: 0059-2 AXIS Online CD, revision 5.3 or higher AXIS 540/640 User Guide part no: 17148, Rev. 3.2 Power Supply: AXIS 540+ AXIS Part no. -
Page 15: The Axis Online Cd
White Papers, User Documentation, Technical References, etc. It is compatible for use within all of the supported Axis computing environments. The AXIS Online CD starts automatically from a local CD drive on Start-up procedures Windows 95/98, NT and 2000 platforms. -
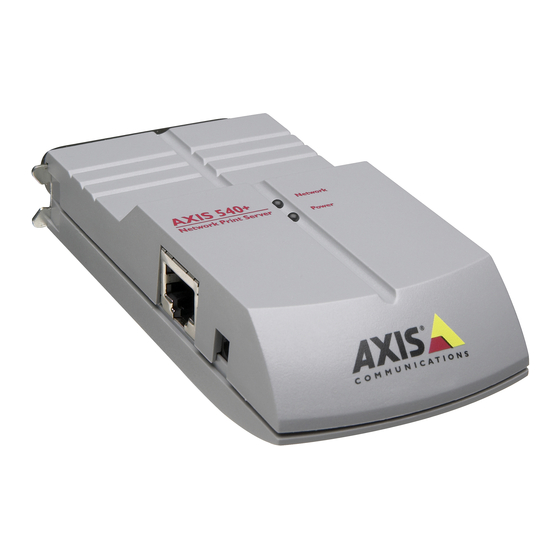
Page 16: Axis 540+/542+ Physical Description
External Power Supply Connector Plan view of the AXIS 540+/542+ The AXIS 540+ is designed for 10 Mbps Ethernet networks and Network Connectors connect to the network via a twisted pair (10baseT) cable. The AXIS 542+ is designed for 10 Mbps Ethernet networks and connect to the network via a thin wire (10base2) cable. - Page 17 Section 2: Product Overview AXIS 540/640 User’s Manual Centronics-to-Centronics and Centronics-to-mini Centronics extension cables may be obtained from your local distributor for use with printers physically unable to accommodate the AXIS 540+/542+.
- Page 18 Network Indicator The network indicator flashes to indicate network activity. Power Indicator The power indicator is lit while power is applied. If it is not lit, or it flashes, there is a problem with the AXIS 540+/542+ or its power supply.
-
Page 19: Axis 640/642 Physical Description
Power Indicator External Power Supply Connector Plan view of the AXIS 640/642 The AXIS 640 is designed for 4 and 16 Mbps Token Ring networks Network Connectors and connect to the network via an unshielded twisted pair (UTP) cable. The AXIS 642 is designed for 4 and 16 Mbps Token Ring networks and connect to the network via a shielded twisted pair (STP) cable. - Page 20 The network indicator flashes to indicate network activity. Network Indicator The power indicator is lit while power is applied. If it is not lit, or it Power Indicator flashes, there is a problem with the AXIS 640/642 or its power supply.
-
Page 21: Section 3: Basic Installation
Section 3 Basic Installation Getting Started After you have verified that no items presented in Package Contents, on page 13, are missing, you are now ready to install your AXIS 540/640. Follow the instructions below to install the AXIS 540/640 in your environment: 1. -
Page 22: Connecting A Printer To The Ethernet Network
Refer to Package Contents, on page 13. 1. Make sure that the printer is switched off and that the AXIS 540+/542+ external power supply is disconnected. 2. Locate the serial number, found on the underside label of the AXIS 540+/542+, and write it down. - Page 23 The AXIS 540+/542+ uses high speed Centronics Communication. For use with older printers not supporting high speed, this function can be disabled by using AXIS NetPilot, or any standard Web browser. Please refer to Section 9 Management & Configuration, on page 108, for more information.
-
Page 24: Connecting A Printer To The Token Ring Network
AXIS 640/642 is successfully connected to the network. 7. Press and release the test button on the AXIS 640/642 to print a test page. If the printer and the AXIS 640/642 are correctly connected, the AXIS 640/642 internal test page will be printed. - Page 25 The AXIS 640/642 uses high speed Centronics Communication. For use with older printers not supporting high speed, this function can be disabled by using AXIS NetPilot, or any standard Web browser. Please refer to Section 9 Management & Configuration, on page 108, for more information.
-
Page 26: Installation Guide
See Section 7 Setting Up - Macintosh, on page 87 See Assigning an IP address, on page 31 UNIX TCP/IP Proceed with Section 8 Setting Up - UNIX, on page 93 Macintosh is not supported by the AXIS 640 and AXIS 642 models. - Page 27 UNIX TCP/IP axinstall Recommended installation tools for the AXIS 540/640 A shareware LPR spooler is available for Windows for Workgroups. You can download this software from ftp://ftp.axis.com/pub/axis/software/prt_srv/utility/wlprs/. ** Macintosh is not supported by the AXIS 640 and AXIS 642 models.
-
Page 28: Basic Setup With Axis Netpilot
1. Start AXIS NetPilot by double-clicking the NetPilot icon, which is located in the folder where you installed AXIS NetPilot. 2. Locate the AXIS 540/640 in the ‘New Axis Units’ folder. Select it and click the Install button on the AXIS NetPilot toolbar. If your network is large, it could take a few seconds before the print server appears in the folder. - Page 29 AXIS 540/640 for, i.e. NetWare, TCP/IP, Windows & OS/2 or Macintosh. If your network comprises various different platforms, you can enable any combination of environments. Macintosh is not available for the AXIS 640 and the AXIS 642 Note: models. Place NetWare Print Queues on a specific bindery server, or NetWare NDS alternatively into an NDS Tree.
- Page 30 AXIS 540/640 User’s Manual Section 3: Basic Installation The AXIS 540/640 uses the print server name followed by the printer Print Queues port as the default Print Queue name and print server port name. If you want to change the default printer queue names, just type the new names in the available text fields.
- Page 31 For information on advanced functions, please refer to the AXIS Network Print Server Technical Reference. You can download this or other technical information over the Internet by accessing the Axis WWW Home Page at http://www.axis.com/ or the...
-
Page 32: Assigning An Ip Address
Windows NT server to set the IP address using RARP, BOOTP or DHCP. You need to know the Ethernet address of your AXIS 540+/542+ to Ethernet address perform the installation. The Ethernet address is based upon the serial number of your AXIS 540+/542+. - Page 33 Section 3: Basic Installation AXIS 540/640 User’s Manual You can set the IP address using one of the following methods, Methods for setting depending on your network operating environment: the IP Address Method Network environments See ... AXIS IP Installer...
- Page 34 Host Names supported. It is recommended that at least one of these methods should be used if you are setting the IP address of the AXIS 540/640 using DHCP. The host name of the AXIS 540/640 is specified by the PS_NAME parameter.
- Page 35 Follow the instructions below to set the IP address of your AXIS Using 540/640 using the AXIS IP Installer: AXIS IP Installer You should not use AXIS IP Installer to set the IP address of the Important! AXIS 540/640, if you have an active DHCP server in your network.
- Page 36 TFTP server. Just add the name of the config file and the TFTP server’s IP address to your DHCP scope. The config file is downloaded immediately after the AXIS 540/640 receives its IP address. Note: You do not have to restart the AXIS 540/640 to download the IP address.
- Page 37 AXIS 540/640 User’s Manual Follow the instructions below to set the IP address using ARP. Using ARP in Windows and OS/2 AXIS 540+/542+ Ethernet Print Servers: 1. Start a DOS window. 2. Type the following commands: arp -s <IP address> <Ethernet address>...
- Page 38 AXIS 540/640 User’s Manual Section 3: Basic Installation AXIS 640/642 Token Ring Print Servers: 1. Start a DOS window. 2. Type the following commands: arp -s 802.5 <IP address> <Ethernet address> ping <IP address> arp -d <IP address> Example arp -s 802.5 192.168.3.191 00-02-31-48-00-61 ping 192.168.3.191...
- Page 39 AXIS 540/640 User’s Manual Follow the instructions below to set the IP address using ARP. Using ARP in UNIX AXIS 540+/542+ Ethernet Print Servers: Type the following commands in the shell window: arp -s <host name> <Ethernet address> temp ping <host name>...
- Page 40 -s 802.5 <host name> <node address> temp ping <host name> The node address is either the serial number found on the underside label of the AXIS 640/642 or a Locally Administrated Address. Example: arp -s 802.5 npsname 00:02:31:48:00:61 temp...
- Page 41 -a 4. Restart the AXIS 540+/542+ to download the IP address. If the host name has not been mapped to an IP address, simply Notes: replace the host name entry with the IP address in the example above.
- Page 42 /etc/ethers <Node address> <host name> The node address is the serial number found on the underside label of the AXIS 640/642 or a Locally Administrated Address. Example: 00:02:31:48:00:61 npsname 2. Update, if necessary, your host table and alias name databases, as required by your system.
- Page 43 2. If necessary, update your host table and alias name databases, as required by your system. 3. If it is not already running, start the BOOTP daemon. This is typically performed using the command. bootpd 4. Restart the AXIS 540/640 to download the IP address, default router address, and subnet mask.
- Page 44 AXIS 540/640 User’s Manual Section 3: Basic Installation The AXIS 540/640 can automatically download a customized config file from a TFTP server. Just add the name of the config file and the TFTP server’s IP address to your boot table. The config file is downloaded immediately after the AXIS 540/640 receives its IP address.
-
Page 45: Section 4 Setting Up - Netware
AXIS NetPilot, on page 27, the AXIS 540/640 is already installed for printing in the NetWare environment. Queue based printing IPX/SPX If you need a more advanced installation that is not covered by the AXIS NetPilot Installation Wizard, continue with Advanced Installation using AXIS Advanced NetPilot, on page 48. configuration... -
Page 46: Setup Using Ndps
You can run NDPS over Pure IP (TCP/IP) or IPX/SPX. Before the AXIS 540/640 can be installed, make sure that NDPS and an NDPS gateway are installed on your NetWare file server. AXIS 540/640 uses the AXIS NDPS Gateway for printing in networks using either IP or IPX as transport protocols. -
Page 47: Installing The Axis 540/640 In Ndps Environments
AXIS 540/640 User’s Manual Installing the AXIS 540/640 in NDPS environments Having assigned an IP address to the AXIS 540/640 as described in Assigning an IP address, on page 31, you are now ready to install the AXIS 540/640 for NDPS printing. You can select to install the connected printers as Public or Controlled Access printers. - Page 48 To use the Axis Gateway with earlier versions of NetWare, you can download the Axis Gateway Configuration utility from www.axis.com. To print using TCP/IP, Axis print server firmware 6.1 or later is required. In order to print using IPX/SPX, Axis print server firmware 5.51 or later is needed.
-
Page 49: Advanced Installation Using Axis Netpilot
NetPilot main window. The NetWare Network Environment window allows you to connect NetWare Network additional print queues to your AXIS 540/640 as well as create new Environment Window ones. Follow the steps below to gain access to the NetWare Network Environment window: 1. - Page 50 AXIS 540/640 User’s Manual Section 4: Setting Up - NetWare The AXIS NetPilot NetWare Network Environment window The AXIS 540/640 periodically updates the configuration by scanning the NDS tree or, in the case of NetWare versions 3.x, the designated file servers.
- Page 51 Section 4: Setting Up - NetWare AXIS 540/640 User’s Manual The AXIS NetPilot Connect NetWare Print Queues window 4. Select the tree or server location of the print queue from the Resources box. 5. Select an existing print queue to connect to the server port, or create a new print queue by clicking on Create Queue...
- Page 52 AXIS 540/640 User’s Manual Section 4: Setting Up - NetWare 9. Select an appropriate NetWare Print Server name, that will be associated with the AXIS 540/640 print server, by using the Browse... button. You cannot type or edit the name manually.
-
Page 53: Basic Queue-Based Printing (Pure Ip)
AXIS 540/640 User’s Manual Basic Queue-based Printing (Pure IP) Axis print servers with software version 6.0 or later allow users to print in a Pure IP environment using traditional queue-based printing. If you prefer using NDPS as your printing method, please refer to Setup using NDPS, on page 45. - Page 54 52, the PSERVER_NDS parameter specifies which NDS tree or file server the AXIS 540/640 will login to. It also specifies the path to the print server object in the tree. The syntax of the PSERVER_NDS parameter is displayed in the following examples: Example 1: TREE:NW5_TREE DevDept.acme...
-
Page 55: Queue-Based Printing Methods
The following overview explains the advantages and limitations of the two supported queue-based printing methods. The AXIS 540/640 logs in to a file server(s) and repeatedly polls the Print Server Mode print queues for print jobs. In this fashion, the AXIS 540/640 emulates a NetWare print server, which is a workstation running PSERVER. -
Page 56: Setting Up - Windows
Section 5: Setting Up - Windows Section 5 Setting Up - Windows Having connected the AXIS 540/640 to your network, as described in Connecting a printer to the Ethernet Network, on page 21, this section describes how to install the AXIS 540/640 in the Windows environment. - Page 57 Section 5: Setting Up - Windows AXIS 540/640 User’s Manual If you intend to use the AXIS 540/640 in a multiprotocol environment, you should also refer to the following sections: Section 4 Setting Up - NetWare, on page 44 Section 6 Setting Up - OS/2, on page 81...
-
Page 58: Axis Print System Overview
You can easily monitor the status of your printers • You do not have to rely on a server. AXIS Print System needs only to be installed on one server to perform Client-Server Printing client-server printing. The installed printers must be configured to be shared to allow clients to use them. -
Page 59: Windows 95 And Windows 98
Installing TCP/IP Printer Ports, on page 60. • If your AXIS 540/640 is not assigned with a valid IP address, you should follow the installation instructions presented in Installing TCP/IP Printer Ports and Setting the IP Address, on page 58. - Page 60 Finish. The printer is now installed on your computer. The printer will feature in the My Printers window of AXIS Print System as well as in the Printers folder of the Windows operating system. If you want to change the default name or the password of the AXIS 540/640, use the Configuration Wizard that is available from the User mode of the Web interface.
- Page 61 Finish. The printer is now installed on your computer. The printer will feature in the My Printers window of AXIS Print System as well as in the Printers folder of the Windows operating system. If you want to change the default name or the password of the AXIS 540/640, use the Configuration Wizard that is available from the User mode of the Web interface.
- Page 62 OK. 5. Select the printer driver you want to install and click Next>. 6. Select the AXIS Printer Port from the Available Ports list. The port name appears as <name>.LP1, where <name> is AX followed by the last six digits of the AXIS 540/640 serial number, e.g.
- Page 63 Section 5: Setting Up - Windows AXIS 540/640 User’s Manual Follow the instructions below to install shared printers on your Installing Shared Windows 95 or Windows 98 client: Printers on your Windows 95/98 client 1. Start the Add Printer Wizard by selecting Settings - Printers from the Start menu and double-click the Add Printer icon.
-
Page 64: Windows Nt4.0 And Windows 2000
Installing TCP/IP Printer Ports, on page 65. • If your AXIS 540/640 is not assigned with a valid IP address, you should follow the installation instructions presented in Installing TCP/IP Printer Ports and Setting the IP Address, on page 63. - Page 65 Finish. The printer is now installed on your computer. The printer will feature in the My Printers window of AXIS Print System as well as in the Printers folder of the Windows operating system. If you want to change the default name or the password of the AXIS 540/640, use the Configuration Wizard that is available from the User mode of the Web interface.
- Page 66 Finish. The printer is now installed on your computer. The printer will feature in the My Printers window of AXIS Print System as well as in the Printers folder of the Windows operating system. If you want to change the default name or the password of the AXIS 540/640, use the Configuration Wizard that is available from the User mode of the Web interface.
-
Page 67: Installing Netbios/Netbeui Printers In Windows Nt 4.0/2000
5. Select NetBIOS/NetBEUI as your choice of network protocol and click OK. 6. Select the AXIS Port you want to add. The port appears as <name>.LP1, where <name> is AX followed by the last six digits of the AXIS 540/640 serial number, e.g. AX100086. Click OK. - Page 68 AXIS 540/640 User’s Manual Section 5: Setting Up - Windows 11. Select the printer driver you want to install and click Next>. 12. Enter an appropriate name for your printer and click Next>. 13. Choose whether you want to share the printer with other network users and click Next>.
- Page 69 New Port. 4. In Add LPR compatible printer, enter the host name or IP address of the AXIS 540/640 as the print server to provide LPD. 5. Enter 'pr1', 'pr2', ... 'pr8' as the name of printer or print queue on that server.
-
Page 70: Axis Print Monitor Overview
TCP/IP (LPR). To enable printing in these environments, please ensure that the desired printing protocols are running on your client. The AXIS Print Monitor needs to be installed on each workstation to Peer-to-Peer Printing perform peer-to-peer printing. Once installed, the AXIS Print Monitor allows you to access all network printers, just as if they were connected directly to your workstation. -
Page 71: Windows Nt 3.5X
Windows NT 3.5x Install the AXIS Print Monitor software on your Windows NT3.5x Installing TCP/IP client, if you have not already done so. AXIS Print Monitor can be Printers in downloaded from the AXIS Online CD or from the Axis WWW Windows NT 3.5x... - Page 72 Logical printer name. Click OK to return to the Create Printer dialog. 10. Select the AXIS LPR port you wish to use from the “Print to” drop-down list. The ports appear as <port name>@<IP address>...
- Page 73 6. Select Other... in the “Print to” list box. 7. Select Axis Port from the list of available Print Monitors and click 8. Select the AXIS Port you wish to add and then click OK. The port appears as <name>.LP1, where <name> is AX followed by the last six digits of the AXIS 540/640 serial number, e.g.
- Page 74 AXIS 540/640 User’s Manual Section 5: Setting Up - Windows This section describes how to set up a Windows NT Server Using the Microsoft v3.5 and v3.51 for LPD printing over the TCP/IP protocol, using the LPD monitor with built-in Microsoft LPD monitor.
- Page 75 7. In the Name or Address field, type the IP address or the host name of your AXIS 540/640. If you use a host name, this must be defined in the hosts file on your server prior to the installation.
-
Page 76: Axis Print Utility For Windows Overview
Section 5: Setting Up - Windows AXIS Print Utility for Windows Overview AXIS Print Utility for Windows is the tool to use for network printing in Windows for Workgroups and Windows 3.1 environments. AXIS Print Utility for Windows can be downloaded from the software\prt_srv\utility\axpuw\latest folder on the AXIS Online CD or from the Axis WWW home page at http://www.axis.com/. - Page 77 Section 5: Setting Up - Windows AXIS 540/640 User’s Manual If you want to change the default name of your AXIS 540/640 or amend any of the default parameters, you can do so using the AXIS NetPilot, or any standard Web browser. Refer to Section 9 Management &...
-
Page 78: Windows 3.1 And Windows For Workgroups
1. Double-click the AXIS Print Utility icon. 2. In the Port menu, click Add. 3. In the NPS Port list, select the AXIS 540/640 port. The port appears as <name>.LP1, where <name> is AX followed by the last six digits of the AXIS 540/640 serial number, e.g. AX100086. - Page 79 Section 5: Setting Up - Windows AXIS 540/640 User’s Manual AXIS Print Utility for Windows must be running when you print Notes: through your AXIS 540/640. It is strongly recommended that you copy the AXIS Print Utility icon into your StartUp folder.
- Page 80 AXIS 540/640 User’s Manual Section 5: Setting Up - Windows Follow these steps to use your AXIS 540/640 for client-server printing Client-Server Printing: at a Windows for Workgroups client: Client Setup 1. In the Control Panel, select Printers. 2. Select a printer driver from the list of Installed Printers, or click Add>>...
-
Page 81: Windows Clients Using Lantastic
Section 5: Setting Up - Windows AXIS 540/640 User’s Manual Windows Clients using LANtastic From any Windows client, the AXIS 540/640 can also be used for network printing in LANtastic environments. LANtastic users can use the AXIS Utilities in exactly the same manner... -
Page 82: Setting Up - Os/2
Having connected the AXIS 540/640 to your network, as described in Connecting a printer to the Ethernet Network, on page 21, this section now describes how to set up your AXIS 540/640 for printing in the OS/2 environment. Continue with the instructions presented in the table below: Printing See ... -
Page 83: Tcp/Ip Printing
2. Select a printer driver and double-click a free Output port, for instance \PIPE\LPD0. 3. Enter the host name or the IP address of the AXIS 540/640 in the LPD server field. 4. Enter one of the AXIS 540/640 logical printer names, for example... -
Page 84: Netbios/Netbeui Printing
Install this utility now if you have not already done so. If you want to change the default name or any of the AXIS 540/640 default parameters, you can do so using any standard Web browser or AXIS NetPilot from any Windows platform that is connected to your network, or WinOS/2 window under OS/2. - Page 85 TCP/IP, we recommend that you use the IBM TCP/IP for OS/2 product. It supports the LPD and interactive FTP print methods. Installing the 1. When AXIS Print Utility for OS/2 is running, click Install to install your AXIS 540/640. The port appears in the list as AXIS 540/640 <name>.LP1, where <name>...
- Page 86 AXIS 540/640 User’s Manual Section 6: Setting Up - OS/2 1. Double-click the Templates folder, then drag the Printer icon out Creating to the Workplace Shell (or into a folder) while holding the right a Print Queue mouse button down.
- Page 87 3. Drag and drop a printer from the template. 4. Enter the Alias name, select a Server name and the previously created Spooler Queue Name. 5. Click OK. The setup is completed and you can now print through your AXIS 540/640.
-
Page 88: Section 7 Setting Up - Macintosh
Basic configuration in AppleTalk is performed simply by opening the Basic Configuration Chooser window and selecting a printer. You can change the default name of your AXIS 540+/542+ or any of default parameters by editing the config file. To access the config file from a Macintosh, you can use: •... -
Page 89: Choosing A Printer
3. If your network has more than one zone, click on the zone you want. If your network has no zones, this box does not appear. 4. Click the name of the printer you want. The default AXIS 540+/542+ printer name is shown as: AXIS<nnnnnn>_<port>, where <nnnnnn>... - Page 90 3. If your network has more than one zone click on the zone you want. If your network has no zones, this box does not appear. 4. Click the name of the printer you want. The default AXIS 540+/542+ printer name is shown as: AXIS<nnnnnn>_<port>, where <nnnnnn>...
- Page 91 Verifying the Setup to verify communication to the chosen printer. The basic installation can be considered complete if the print test is satisfactory. The AXIS 540+/542+ is now ready to use as a print server. For information on advanced AppleTalk functions such as non-...
- Page 92 AppleTalk printer type • set the IP address However, by assigning an IP address to your AXIS 540+/542+, you have access to all of print server’s parameters via any standard Web browser or via FTP. Refer to Section 9 Management & Configuration, on page 108 for more information.
- Page 93 8. Open the Chooser and select the printer port you wish to use for printing documents. 9. Close the Chooser. The _CFG port disappears 60 minutes after the AXIS 540+/542+ Note: has been powered on. If you want it to reappear, you must restart...
-
Page 94: Section 8 Setting Up - Unix
Assigning an IP address, on page 31 and onwards, you are now able to print in interactive mode using LPR, FTP or Reverse Telnet protocols. However, should you require to integrate the AXIS 540/640 into your host spooler, you can use the Axis automatic installation script axinstall. - Page 95 Section 8: Setting Up - UNIX AXIS 540/640 User’s Manual To integrate the AXIS 540/640 into the host printer spooler, you can Integration into the use the auto installation script axinstall, resident in the AXIS 540/640. Host Printer Spooler Follow the instructions below to install axinstall onto your host using FTP: 1.
- Page 96 AXIS 540/640 User’s Manual Section 8: Setting Up - UNIX The axinstall script has now been downloaded to your host. Execute the script with this command: sh axinstall You will be guided through the installation by a step-by-step procedure. During the installation you will be asked to select a print method;...
-
Page 97: Print Methods On Tcp/Ip Networks
This is the recommended method for UNIX systems, but some System V versions do not support LPD. Advantages: Easy to set up – install the AXIS 540/640 as a remote queue in System V, or add a remote printer to using the /etc/printcap fields (BSD). - Page 98 (PROS A) and filter (PROS B). PROS A - Advantages: PROS A The AXIS 540/640 appears as a device to the system. This makes all filter and model options available. It provides accounting and status logging. Supports bi-directional printing. The printer information read back can be viewed in a log file.
- Page 99 A sample JCL script, , is available in the directory of the IBM MVS Systems jclex AXIS 540/640. It gives an example of how to print a file from an MVS mainframe to an AXIS 540/640 using FTP.
-
Page 100: Using Logical Printers To Customize Your Printing
Section 8: Setting Up - UNIX Using Logical Printers to Customize your Printing The AXIS 540/640 has a powerful facility for altering the print data. This means that your desired print format can be realized on any type of printer. The following actions can be invoked from the AXIS 540/640: •... - Page 101 In B - The Parameter List, on page 150, you can find a complete list of the AXIS 540/640 parameters. Refer to Section 9 Management & Configuration, on page 108, for more information about the available management tools.
- Page 102 Conversion specific characters (such as å ü ô ñ) are sometimes printed incorrectly. The AXIS 540/640 solution to this problem is to assign a character set conversion filter to a logical printer, and then link that logical printer to the host causing the problem.
- Page 103 Section 8: Setting Up - UNIX AXIS 540/640 User’s Manual These string functions provide a way to send printer control Adding Strings Before commands before and after each print job. They may be specified and After Print Jobs individually for each logical printer.
- Page 104 AXIS 540/640 User’s Manual Section 8: Setting Up - UNIX The string substitution function performs search and replace String Substitutions operations on the print data. The primary application is to replace printer control commands. Up to twenty string substitutions may be specified individually for each logical printer.
- Page 105 1B 47 31 the replaced printer command length of the new printer command 1B 59 the new printer command 3. Click the Submit Printer2 settings button. Extensive use of string substitutions will naturally decrease the Note: throughput rate of the AXIS 540/640.
- Page 106 AXIS 540/640 User’s Manual Section 8: Setting Up - UNIX The AXIS 540/640 logical printers can translate ASCII print data into ASCII to Postscript PostScript format. This makes it possible to print with a PostScript Conversion printer from a host that does not support PostScript. The conversion is selected by activating a filter that converts ASCII data into Postscript.
- Page 107 Section 8: Setting Up - UNIX AXIS 540/640 User’s Manual The default page size is A4 and the default page orientation is Portrait, while the page format parameters are: Page Format Parameter Default Value Lines per page Characters per line...
- Page 108 AXIS 540/640 User’s Manual Section 8: Setting Up - UNIX The AXIS 540/640 supports bi-directional printing. The information Read-back of from the printer is read back on the parallel port when the parameter information Read Back Port (PRx_IN) has the default setting of AUTO. However, it is required that the printer also supports bi-directional printing.
-
Page 109: Section 9 Management & Configuration
Reset the AXIS 540/640 • Upgrade the AXIS 540/640 firmware (Refer to Section 11 Upgrading the Software, on page 144) The method you should use to manage and configure your AXIS Configuration 540/640 is depending on the operating system protocols of your Overview network. -
Page 110: Using A Web Browser
Once you have established the AXIS 540/640 in the TCP/IP environment, as described in Assigning an IP address on page 31, you are free to access the AXIS 540/640 Web pages from any Java enabled Web browser. The Web interface of the AXIS 540/640 is divided into two modes of operation, User mode and Admin mode. - Page 111 Section 9: Management & Configuration AXIS 540/640 User’s Manual 3. Type the host name or the IP address of your AXIS 540/640 in the Open Page dialog, as detailed below: You can alternatively type the host name or the IP address directly into the Web browser’s Location text field.
- Page 112 The following services are available from the User mode. An Available Services additional link to the Axis home page is available from this mode. from the User Mode The Printer Overview page contains a section that allows you to view...
- Page 113 The General Help page presents you with basic information about the AXIS 540/640 and the Web user interface. A short description of the Axis installation tools, you should use when installing a printer on your PC, is also included.
- Page 114 From the Network Settings page you can set all parameters that control the network traffic to and from the AXIS 540/640. You can enable or disable any of the supported network protocols and fine- tune the parameter settings.
-
Page 115: Using Axis Thinwizard
Web browser. The AXIS ThinWizard software is available on the AXIS Online CD and can also be downloaded from the Axis WWW home page at http://www.axis.com/. You cannot install the AXIS ThinWizard server software on a Notes: Windows 3.1 or a Windows for Workgroups server. - Page 116 Follow the instructions below to start the AXIS ThinWizard: Starting AXIS ThinWizard 1. Make sure that the computer where you installed the AXIS ThinWizard is up and running on your network. 2. Start a Web browser from a client in your network.
- Page 117 Network Group print servers more efficiently. The scope of each network group is determined by the Axis server types and IP address ranges that are included. You can create as many network groups as you want. Follow the instructions below to create a network group: 1.
- Page 118 All AXIS servers included in the network group appear in the window. 3. Click the link of the AXIS 540/640 to access its internal Web page 4. The ‘Srv’ and ‘Dev’ columns show the status of your print servers and printers.
-
Page 119: Using Axis Netpilot
Section 9: Management & Configuration AXIS 540/640 User’s Manual Using AXIS NetPilot AXIS NetPilot is the recommended tool to use for configuring the AXIS 540/640 in networks that support communication via the IPX/SPX or the NetBIOS/NetBEUI protocols. AXIS NetPilot allows you to: •... - Page 120 Follow the instructions below to open and edit an arbitrary Property Page: 1. Select the AXIS 540/640 from the ‘Network Print Servers’ folder. 2. Click the Properties button on the AXIS NetPilot toolbar or choose Properties from the Setup menu.
- Page 121 To gain access to the Network Environment window, follow the instructions below: 1. Select the AXIS 540/640 from the ‘Network Print Servers’ folder. 2. Click on the Network button on the toolbar or select Network from the Setup menu.
- Page 122 Section 9: Management & Configuration To simplify printer monitoring, you can create logical groups of Monitoring Printers printers. The printer status of each printer is displayed in the AXIS NetPilot window. AXIS NetPilot’s Monitoring Window Follow the instructions below to create a printer group:...
- Page 123 1. Select the printer group folder, located in the ‘Monitoring Printers’ folder. The printer status appear in the right-hand frame of AXIS NetPilot. 2. If you want the status to appear in a new window, click the Monitoring button on the AXIS NetPilot toolbar.
- Page 124 AXIS 540/640 User’s Manual Section 9: Management & Configuration AXIS NetPilot allows you to create logical groups of print servers in Grouping logically order to simplify administration. Installed print servers are displayed connected in the ‘Network Print Servers’ folder and shortcuts to these print Print Servers together servers can be added to the print server groups.
- Page 125 The extent of the detailed printer information is depending on your printer model. 1. Select the desired printer folder, located in the ‘Monitoring Printers’ folder. 2. Click the desired printer icon and choose Printer Information from the File menu. AXIS NetPilot Printer Information window...
- Page 126 You can also view the detailed printer information in the Summary window. AXIS NetPilot Summary window You can use the AXIS NetPilot Upgrade Wizard to upgrade the AXIS Upgrading the Print 540/640 software. Please refer to Section 11 Upgrading the Software, Server on page 144, for details.
-
Page 127: Using Ftp
Using FTP Having assigned an IP address to your AXIS 540/640, as described in Assigning an IP address on page 31, you can change the AXIS 540/640 parameter settings using the File Transport Protocol (FTP). Follow the instructions below to edit the config file using FTP: Editing the config file 1. - Page 128 AXIS 540/640 User’s Manual Section 9: Management & Configuration Example: > ftp npserver connected to npserver. 220 AXIS 540/640 FTP Print Server v6.00 Jun 17 1999 ready. Name (npserver:thomas): root 331 User name ok, need password (not visible) Password: pass 230 User logged in ftp>...
- Page 129 Viewing assigned to, and their current status. the Status File Follow the instructions below to view the status file using FTP: 1. Log in to the AXIS 540/640 by typing: in a DOS windows ftp <host name> ftp <IP address>...
-
Page 130: Using Telnet
AXIS 540/640 User’s Manual Section 9: Management & Configuration Using Telnet Having assigned an IP address to your AXIS 540/640, as described in Assigning an IP address on page 31, you can manage your AXIS 540/640 using the telnet protocol. - Page 131 Example: > telnet npserver Trying 192.36.253.96... Connected to npserver. Escape character is ‘^]’. AXIS 540/640 TELNET Print Server v6.00 Jun 17 1999 AXIS 540/640 network login: root (not visible) Password: pass AXIS 540/640 TELNET Print Server v6.00 Jun 17 1999 Root>...
- Page 132 Viewing assigned to, and their current status. the Status file Follow the instructions below to view the status file using telnet: 1. Log in to the AXIS 540/640 by typing: in a DOS telnet <host name> telnet <IP address> windows (Windows and OS/2) or in a UNIX shell window.
-
Page 133: Using Snmp
Objects are contained in data bases called MIBs (Management Information Base), where MIB-II is a standard database. The AXIS 540/640 supports all relevant parts of MIB-II and of the host resources MIB. The AXIS 540/640 also includes a private enterprise MIB, the AXIS MIB. - Page 134 AXIS 540/640 User’s Manual Section 9: Management & Configuration In order to make full use of the AXIS 540/640 SNMP support, you The AXIS MIB are required to use NMS software that allows you to install private enterprise MIBs, like the AXIS MIB.
-
Page 135: Using Hp Administration Tools
AXIS 540/640 User’s Manual Using HP Administration Tools The AXIS 540/640 is fully compatible with the HP JetAdmin and the HP Web JetAdmin printer management software. You can use either tool to install and configure your printer devices, and to monitor the current status of your AXIS 540/640 and the connected printers. -
Page 136: Using Novell Utilities
The Printer Status menu, detailed below, shows the status of an active Printer Status print job serviced by an AXIS 540/640 network print server. It displays detailed information concerning the active job including, Print Queue, print job description, size of print file, percentage of job completed, etc. - Page 137 Busy, Off-line, Out of paper, Paper jam, etc. You can also add or remove print job owners and administrators from the list of persons to be notified. You can view installed AXIS 540/640 Network Print Servers and their Print Layout relative print queues for any NetWare Organizational Unit. You can also display summary information by right-clicking on the printer object you want to examine.
-
Page 138: Section 10 Ipp
Section 10: IPP Section 10 IPP Overview IPP is only supported by AXIS 640 and AXIS 642! IPP (Internet Printing Protocol) is a TCP/IP based client-server protocol. IPP enables printing over any LAN or WAN supporting TCP/IP. The most prevalent example of this is IPP printing over the Internet, which is illustrated below. -
Page 139: User Requirements
IPP Compliance The Axis print server with integrated IPP is compatible with any 1.0 and 1.1 - compliant IPP client. The AXIS 640/642 Print Server presents IPP Printer objects to the client, one for each printer port. -
Page 140: Address Schemes
Server supports the http: address scheme (which is used in the IPP 1.0 standard), and the ipp: adress scheme (used in the IPP 1.1 standard). The examples given below assume that the host name of the Axis print server is axisps and that the corresponding IP adress is 12.100.110.2. -
Page 141: How It Works
When using IPP printing over the Internet with the AXIS 640/642, the host name used for the Axis print server could be “axisps”, for example. The port number used is 631, followed by the local printer name (Ex. - Page 142 AXIS 540/640 User’s Manual Section 10: IPP Adding an IPP printer in Windows ‘95 for printing with the Example Microsoft IPP Client: In this example we will assume the printers’ http: address is http://axisps:631/LPT1 : To add a destination printer for IPP printing in Windows ‘95: 1.
- Page 143 Section 10: IPP AXIS 540/640 User’s Manual Adding an IPP printer in Windows ‘98 for printing with the Example Microsoft IPP Client: In this example we will assume the printers’ http: address is http://axisps:631/LPT1 : To add a destination printer for IPP printing in Windows ‘98: 1.
- Page 144 AXIS 540/640 User’s Manual Section 10: IPP Adding an IPP printer in Windows 2000 for printing with the Example Microsoft IPP Client: In this example we will assume the printers’ http: address is http://axisps:631/LPT1. If you want to print via IPP from Windows 2000: 1.
-
Page 145: Section 11 Upgrading The Software
AXIS Print System • AXIS Print Utility for Windows • AXIS Print Utility for OS/2 • The AXIS 540/640 print server software held in Flash Memory • The axinstall script • The AXIS MIB file Obtaining the Updated Software You can obtain all the print server software as well as the latest utility software from the following locations: •... -
Page 146: Upgrading The Firmware Software
AXIS ThinWizard TCP/IP networks. You must assign the AXIS 540/640 with an IP address, as described in Assigning an IP address, on page 31, before you can use this upgrading method. - Page 147 You can use any of the previously mentioned methods to obtain the new file. You must assign the AXIS 540/640 with an IP address, as described in Assigning an IP address, on page 30, before you can use this upgrading method.
- Page 148 1. Obtain the firmware file, using one of the methods presented on page 144. 2. Put the file in the AXIS NetPilot ‘Upgrade’ folder. This folder resides in the same folder as the AXIS NetPilot program and was created when AXIS NetPilot was installed on your client.
-
Page 149: Appendix A Test Button
Appendix A: Test Button AXIS 540/640 User’s Manual Appendix A Test Button The test button is located on the front right hand side of the AXIS 540/640 and is used for: • Printing a test page, checking the connection to the printer. - Page 150 AXIS 540/640 User’s Manual Appendix A: Test Button Follow the instructions below to reset the AXIS 540/640 to the factory Factory Default default settings: Settings 1. Remove the external power supply to switch off the AXIS 540/640. 2. Press and hold down the test button, while you plug the external power supply back in.
-
Page 151: Appendix B The Parameter List
The password parameters, ROOT_PWD and PROS_PWD only Note: appear when you are logged in to the AXIS 540/640 using root. The password parameters will not be printed when you are printing the parameter list using the test button. - Page 152 : 0 0 0 0 Secondary DNS Server Address DNS_ADDR2. : 0 0 0 0 Domain Name (Defines the domain to which the AXIS 540/640 belongs) DOMAIN_NAME. Defines the SLP scope to which the AXIS 540/640 belongs. SLP_SCOPE_LIST.: DEFAULT Reverse Telnet Options Enabled RTN_OPT.
- Page 153 Appendix B: The Parameter List AXIS 540/640 User’s Manual NETWARE MENU NetWare Enabled NETW_ENB. : YES NetWare Transport protocols Enabled NETW_TRANSPORT_PROTOCOL. : DUAL_STACK (IPX_ONLY, IP_ONLY, DUAL_STACK) Job Check Delay JOB_CHECK_DELAY. (Print Server queue polling interval) Configuration Check Delay CONF_CHECK_DELAY. : 300 (Interval between automatic configuration checks) IEEE 802.3 Frame Type Enabled...
- Page 154 Name Printer 8 LPRINT_8. Logical Printer for Printer 8 LLOGIC_8. : PR8 (PR1, PR2, PR3, PR4, PR5, PR6, PR7, PR8, LPT1) --- APPLETALK MENU (AXIS 540+ and AXIS 542+ only) AppleTalk Enabled ATLK_ENB. : YES AppleTalk Zone ATK_ZONE. HP Zoner Enabled ZONER_EN.
- Page 155 Appendix B: The Parameter List AXIS 540/640 User’s Manual PRINTER1 MENU Read Back Port PR1_IN. : AUTO (NONE, AUTO) (Read-Back of information) String Before Print Job PR1_BEF. String Substitutions PR1_STR. Character Set Conversion PR1_CSET. : NONE (NONE, ISO>IBM, 7UK>IBM, 7SW>IBM, 7GE>IBM, 7FR>IBM, 7ND>IBM, DEC>IBM)
- Page 156 AXIS 540/640 User’s Manual Appendix B: The Parameter List PRINTER4 MENU Read Back Port PR4_IN. : AUTO (NONE, AUTO) (Read-Back of information) String Before Print Job PR4_BEF. String Substitutions PR4_STR. Character Set Conversion PR4_CSET. : NONE (NONE, ISO>IBM, 7UK>IBM, 7SW>IBM, 7GE>IBM, 7FR>IBM, 7ND>IBM, DEC>IBM)
- Page 157 Appendix B: The Parameter List AXIS 540/640 User’s Manual PRINTER7 MENU Read Back Port PR7_IN. : AUTO (NONE, AUTO) (Read-Back of information) String Before Print Job PR7_BEF. String Substitutions PR7_STR. : 010A020D0A Character Set Conversion PR7_CSET. : NONE (NONE, ISO>IBM, 7UK>IBM, 7SW>IBM, 7GE>IBM, 7FR>IBM, 7ND>IBM, DEC>IBM)
- Page 158 AXIS 540/640 User’s Manual Appendix B: The Parameter List --- LPT1 Menu Centronics Interface Timing LPT1 L1_CENTR. : HISPEED (IBM_PC, STNDRD, FAST, HISPEED) Busy Status Time-Out LPT1 L1_BSYTM. : 60 (All status reporting disabled if set to 0) Printer Management Information LPT1 L1_MGM_INFO.
-
Page 159: Appendix C Technical Specifications
Silicon Graphics IRIX, DEC Alpha OSF/1, BULL (BOS, AIX). IBM (MVS, VM, VSE, OS/400), DEC VMS, guidelines for other systems. Other Systems: LPD, FTP, PROS (named pipe & filtered), Reverse Telnet, IPP (AXIS 640/642). Print Methods: (AXIS 540+/AXIS 542+ only) Print Method: AppleTalk Phase 2. - Page 160 Sustained throughput of up to 400 kbytes/s using NetWare. Bi- directional support for Apple, Reverse Telnet, PROS. ECP support. 2 LED indicators: Power and Network. Front Panel Test button for information printouts. Slide switch for Token Ring speed (AXIS 640/642 only)
- Page 161 Appendix C: Technical Specifications AXIS 540/640 User’s Manual Power provided by external supply: Power Consumption Maximum 170 mA at 12 VDC. (Type PS-A, 9V, 300 mA). Power can AXIS 540+ optionally be provided by the printer (Centronics pin 18: 5 VDC, 300 mA).
-
Page 162: Appendix D Glossary
This is a file that resides in the print server’s memory and contains all the parameters that determine the AXIS 540/640 functionality. By editing the config file (changing the parameter settings), you can configure the AXIS 540/640 to meet the printing needs of your network. - Page 163 IP address to the requesting print server. It also provides validation data that defines how long the IP addresses will remain valid. To fully benefit from this method, the AXIS 540/640 also supports the WINS host name resolution protocol, which is available in Windows NT networks.
- Page 164 AXIS 540/640 User’s Manual Appendix D: Glossary Logical Printer A logical printer acts as a filter between the network and the physical printer. It appears to the user as a normal printer with additional characteristics. For example a UNIX workstation may only send a line feed (LF) to a shared printer that needs carriage return (CR) and LF.
- Page 165 Appendix D: Glossary AXIS 540/640 User’s Manual TFTP Trivial File Transport Protocol. A simpler version of the FTP protocol that is used by the print server for automatic downloading of config files. UNIX A 32-bit multi-tasking, multi-user operating system originally developed by AT&T.
-
Page 166: Index
AXIS MIB 133 AXIS NetPilot 118 Ethernet Address 31 AXIS Print Monitor 69 AXIS Print System 57 AXIS Print Utility for OS/2 84 Factory default settings 149 AXIS Print Utility for Windows 75 Flash memory 144 FTP 126 Basic setup... - Page 167 Network indicator LED 17 SNMP 132 Status file 128, 131 String Functions 102 OS/2 String Substitutions 103 AXIS Print Utility for OS/2 84 Support services 4 Installing the print server 84 Test Button 19 Parameter List 150 Test button 17, 148...
- Page 168 AXIS 540/640 User’s Manual Installing Printer Ports 63 Windows 3.1 AXIS Print Utility for Windows 75 Peer-to-peer printing 77 Windows 95 Installing printer ports 58 Windows 98 Installing printer ports 58 Windows for Workgroups AXIS Print Utility for Windows 75...