Table of Contents
Advertisement
Quick Links
Advertisement
Table of Contents

Related Manuals for Doro 60


Summary of Contents for Doro 60
- Page 1 60/61+1/70/70+1 English Cordless telephone User guide...
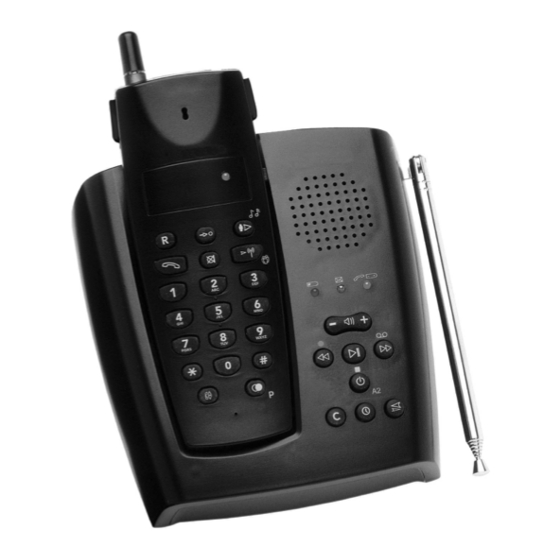
- Page 2 The figure shows 61+1, 70 and 70 +1 1 Telescopic aerial 7 Redial/Pause button 2 Memory button 8 Mute button 3 Recall (R) button 9 Channel scan button 4 Talk button 10 Transfer/Ringer selection button 5 Earpiece volume control 11 Ringer volume control 6 Microphone 12 Talk/Battery indicator...
- Page 3 9 10 11 12 Figure shows 70 and 70+1 1 Telescopic aerial 8 Previous message/Repeat/OGM button 2 Memory Full indicator 9 Delete button 3 On/Off / New Message indicator 10 Time Set/Check button 4 In-use/Charge indicator 11 Page button 5 Volume control 12 On/Off / Stop button 6 Next message/Memo button 7 Play/Pause button...
-
Page 4: Table Of Contents
Handset locator/paging ..9 Transferring calls between handsets ......9 Registering Belt clips ......9 Other Settings Troubleshooting ....21 Handset ringer signal..10 Guarantee......23 Base unit ringer signal ..10 Optional network services .. 10 Recall........10 Memory....... 11 www.doro.com... -
Page 5: Installation
8. Connect the mains adapter to an electrical wall socket, and to the socket on the charger. 9. Place the additional handset in the charger, with the keypad facing outwards and charge without interruption for 24 hours initially before using, (thereafter fully discharged batteries will take up to 12 hours to recharge). www.doro.com... -
Page 6: Wall Mounting
For electrical safety do NOT use an alternate manufacturers mains adaptor. Use of an unauthorised non original DORO mains adaptor may cause damage to your unit, and will invalidate any guarantee. -
Page 7: Battery Charge Indicator
This is normal, and will not harm the equipment. When the telephone is installed for the first time, the battery must be charged for 24 hours before using the telephone. Use DORO original batteries only. The guarantee does not cover any damage caused by incorrect batteries being installed. -
Page 8: Operation
The handset microphone can be muted during a call by pressing the mute button . Press the mute button again to re-activate the microphone. The red Talk/Battery indicator on the handset will flash while the Mute function is active. www.doro.com... -
Page 9: Handset Locator/Paging
To remove the belt clip carefully pry the clip away from one of the indents located on either side of the handset. To re-attach the clip, simply line up the attachment points and press it firmly into place over the back of the handset. www.doro.com... -
Page 10: Settings
5 seconds, the chosen melody is now stored. Important Note! It is possible to select the base unit and handset/s to the ringer off condition. Please check and reset the units to a ringer on condition if problems are experienced where the units will not ring. www.doro.com... -
Page 11: Recall
Dialling using speed dial memories 1. Extend the handset aerial. 2. Press and wait for the tone. 3. Press and release 4. Press and release the desired memory location on the telephone 0- 9 keypad. 5. Press again to terminate the call. www.doro.com... -
Page 12: The Answering Machine
1. Ensure the answering machine is switched on. 2. Select the required outgoing message by repeatedly pressing . The answering machine will respond with "announcement one" when OGM 1 is selected, or "Announcement two" when OGM 2 is selected. www.doro.com... -
Page 13: Recording Ogm 1
3. Record your message, speaking clearly, approximately 15 cm (6”) from the front of the base unit. 4. When you have finished recording your message press . OGM2 will n / ! automatically playback. You can listen to the outgoing message again by pressing Ä / < < www.doro.com... -
Page 14: Monitoring Incoming Messages
< < / > > Press H to confirm. 5. The current setting will now be announced. Note! After a power failure the day/time stamp will not operate until the function has been reprogrammed. www.doro.com... -
Page 15: Number Of Rings
Voice control The answering machine uses VOX control to maximise its recording time. If the caller were to pause or stop speaking for a 8 second period the answering machine will disconnect from the line. www.doro.com... -
Page 16: Playback Of Messages
Message playback and pause during playback. << Repeat/skip to previous message >> Skip to next message. Stop playback. Delete. During message playback press and hold to erase the current message. To erase all old messages press and hold. Volume adjustment. www.doro.com... -
Page 17: Personal Memo
When the memory is full, the indicator on the base unit flashes, and OGM 2 will be used as the outgoing message. When playing back messages and the memory is full, the voice prompt ”Answering machine full” will be heard. www.doro.com... -
Page 18: Remote Password Code
< < / > > & to confirm the second digit change. 4. Scroll using until the number you desire is announced. Press < < / > > & to confirm the third digit change. 5. Your new setting will now be announced. www.doro.com... -
Page 19: Remote Control
In normal cases, the answering machine should react to tones approximately 0.5 – 1 seconds in length, but longer tones may be necessary in certain telephone networks. If you do not enter any remote control command, the answering machine will disconnect after a few seconds. www.doro.com... -
Page 20: Registering
Audioline 60 can not register extra handsets. Both handsets must be registered together with the base unit, not the charger pod. Ensure the batteries are charged. -
Page 21: Other
Check that the base ringer switch is not set to the off position The answering machine is not answering Check that the unit is switched on Check that the telephone cable and the mains adaptor are correctly connected Memory may be full. Listen to your messages and erase them. www.doro.com... - Page 22 If OGM 2 has been selected, the caller cannot leave a message. The call will then be disconnected when the OGM has been played. If the caller pauses for a long time, the call may be terminated, since the voice control function believes that the caller has hung up. www.doro.com...
-
Page 23: Guarantee
9AM - 5PM Monday-Friday excluding Bank Holidays. Alternatively, E-mail on: tech@doro-uk.com You can contact us in writing: Consumer Support Group, Doro UK Ltd., 22 Walkers Road, North Moons Moat, Redditch, Worcestershire, B98 9HE, (regarding any Spares or Technical query), or Telephoning (Spares only): 01527 584377 Web site: www.doro-uk.com... -
Page 24: Australia And New Zealand
(As a matter of precaution, we recommend disconnecting the telephone during a thunderstorm). This guarantee does not affect your statutory rights. AUSTRALIA NEW ZEALAND DORO Australia Pty Ltd Atlas Gentech (NZ) Limited PO Box 6760 Private Bag 14927 Baulkham Hills BC NSW 2153... - Page 28 www.doro.com...