Table of Contents
Advertisement
Advertisement
Table of Contents

Related Manuals for Doro PHONEEASY 611


Summary of Contents for Doro PHONEEASY 611
- Page 1 Doro PhoneEasy ® English...
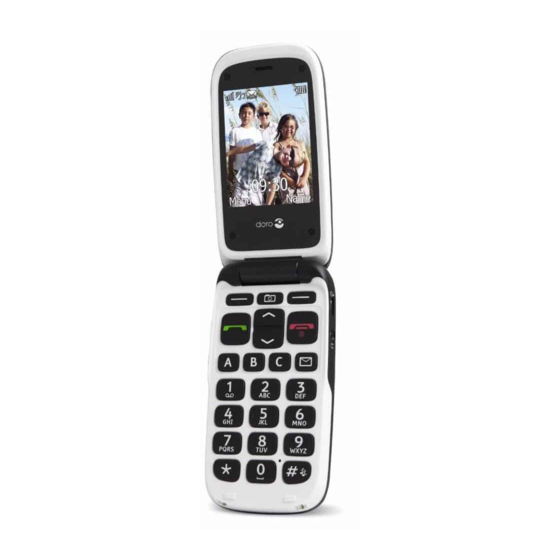
- Page 3 English Earpiece 13. Camera lens Camera shortcut 14. Charging socket Left selection button 15. Headset socket Call button 16. LED light (Red=Battery level low / charging, Green=New Speed dial message / Missed call) Voice mail 17. Emergency button Silent/Input method 18.
-
Page 4: Table Of Contents
English Contents Installation ................1 Installing the SIM card, memory card and the battery ..... 1 Charging ..................3 Symbols ..................4 Assistive functions ............... 4 Phone indicators ..............4 Display status symbols ............4 Display main symbols............5 Operation................... 6 Activating the phone ............ - Page 5 English Camera, options..............21 Camera adjustments.............21 Image viewer................22 Image viewer, options............22 Connecting the phone to a computer ..........23 Drag and drop content between phone and a computer ...24 Disconnect the USB cable safely...........24 Settings ..................24 General ................24 Sound .................28 Display................30 Calls ...................31 Messages ................35 Camera ................39 Assistance...
- Page 6 English Hearing aid .................61 Specific Absorption Rate (SAR) ..........61 Declaration of Conformity .............61...
-
Page 7: Installation
English Installation IMPORTANT! Turn off the phone and disconnect the charger before removing the battery cover. Installing the SIM card, memory card and the battery The SIM and memory card holders are located inside the battery compartment. Remove the battery cover and the battery if it is already installed. Insert the SIM card by gently sliding it into the holder. - Page 8 English IMPORTANT! Use only compatible memory cards for use with this device. Compatible card type: microSD, microSDHC. Incompatible cards may damage the card itself, the device and corrupt data stored on the card. Depending on the market some phones may have a pre-installed memory card.
-
Page 9: Charging
English Charging CAUTION Only use batteries, charger and accessories that have been approved for use with this particular model. Connecting other accessories may be dangerous and may invalidate the phones type approval and guarantee. When the battery is running low, is displayed and a warning signal is heard. -
Page 10: Symbols
English Symbols Assistive functions The following symbols indicate information in the manual about assistive functions for: Seeing Handling Hearing Safety Phone indicators LED light on the phone will: flash green when you have a new message or a missed call. After •... -
Page 11: Display Main Symbols
English Display main symbols Mute Charger connected Message sending Charger removed successful Message sending failed Headset in Error Headset out Warning Speaker on Query Speaker off Done (confirmed) Incoming call New message Outgoing call Battery level low Call ended Missed call. Press Read to Searching see the missed calls. -
Page 12: Operation
English Operation Activating the phone Press and hold the red button on the phone to turn it on/off. Confirm with Yes to power off. If the SIM card is valid but protected with a PIN code (Personal Identification Number), PIN is displayed. Enter the PIN code and press OK ( upper left corner of keypad). -
Page 13: Making A Call
English Changing the language, time and date The default language is determined by the SIM card. See General, p.24 on how to change language, time and date. Making a call Enter the phone number including the area code. Delete with Clear. -
Page 14: Entering Text
English environment, you can customise the phones audio settings, see Audio setup p.28. Entering text Press a numerical key repeatedly until the desired character is shown. Wait a few seconds before entering the next character. Press * for a list of special characters. Select the desired character and press OK to enter it. -
Page 15: Call Options
English Call options During a call the selection buttons ) give access to additional functions: Options (left selection button) A menu with the following options is displayed: Hold single Hold/retrieve the current call. call/Retrieve single End single End the current call (same as call New call Call another number (Conference). -
Page 16: Call Information
English Tip: Call waiting must be activated, see Call setup, p.33. Call information During a call, the outgoing or incoming phone number and the elapsed call time is displayed. If the identity of the caller is withheld, Unknown is displayed. Speed dial You can use keys A , B B and C and you can also use the numerical... -
Page 17: Assistance Button
English Assistance button IMPORTANT! Always inform recipients in the Number list that they are listed as your assistance contacts. CAUTION When an assistance call is activated the phone is pre-set to handsfree/speakerphone mode. Do not hold the device near your ear when the handsfree mode is in use, because the volume may be extremely loud. - Page 18 English Note! Some private security companies can accept automatic calls from their clients. Always contact the security company before using their phone number. IMPORTANT! Information to the receiver of an assistance call, when Confirm with "0" is activated: After receiving the assistance message, each number in the •...
-
Page 19: Phonebook
English Phonebook The phonebook can store 300 entries with 3 phone numbers to each entry. Creating a phonebook entry Press Menu, scroll to and press OK. Select -New contact- and press Add. Enter a Name for the contact, see Entering text , p. - Page 20 English Select a contact and press Options. Select one of the following options and press OK. View Show details for the selected contact. Edit to move the cursor. Delete with Clear. Press Save. Creating a phonebook entry, p.13. Call Press OK to call the contact. Send SMS Press OK to write a SMS message, see Creating and sending SMS,...
-
Page 21: Ice (In Case Of Emergency)
English Select From phone and press Select to copy all phonebook entries from the phone memory to the SIM card. Press Yes to confirm or No to abort. Send vCard Select Send by SMS and press OK to send the selected phonebook entry as a vCard via SMS. -
Page 22: Messages
English Insurance: Your insurance provider and policy number. Contact 1: Press Options and then OK to Add or Delete a Contact 2: contact from the phonebook, or Save to accept the Doctor: current entry. If possible, add your relationship to your ICE contacts in the phonebook, such as “ICE Wife Mary Smith”. -
Page 23: Creating And Sending Voice Message
English Note! If you choose to add multiple recipients, you will be charged for each recipient (maximum 10). For international calls, always use + before the country code for best operation. Press * twice for the international prefix +. Creating and sending voice message A voice message use the same technology as an MMS. - Page 24 English Select MMS and press OK. Type your message, see Entering text , p. 8 , then press Options. Add items to your message from the options Add subject, Add picture, Add sound and Add video. Add recipients with To and Send when ready. Add subject Select Add subject and press OK.
-
Page 25: Inbox, Sent, Outbox
English Add recipients (To) Select To and press OK to select recipient from Phonebook and press Add. Alternatively, select Enter number and press Select to add recipient manually and press Done. Select Add to add more recipients or select Send to send and then press OK. -
Page 26: Call Log
English Edit Edit the message, then press Send. Forward Forward a message. Edit the message (if desired), then press Send. Use number Displays all phone numbers contained in the message as well as the sender's number. Call Call the selected number. Save Save the number in the Phonebook. -
Page 27: Camera (Take Photos)
English Press to dial the number or press Options for the following settings: View Show details for the selected call. Delete Delete the call. Delete all Delete all calls in the Call log. Save Save the number in the Phonebook. Camera (take photos) To get sharp photos, wipe the lens clean with a dry cloth. -
Page 28: Image Viewer
English Use the side buttons +/– to adjust EV/Light sensitivity. • Note! Zoom may reduce image quality. For more camera settings, see Camera, p.39. Image viewer View your saved images. Press Menu, scroll to and press OK. Select an image, then press Options. Select one of the following options and press OK. -
Page 29: Connecting The Phone To A Computer
English Rename Rename image. Delete with Clear and press Done to confirm. Browse style You can change image view. Default is Large, you can also select List or Medium. In List the file name, the date and the size of the image is shown. Sort by Select if you want to sort your images by Name or Time. -
Page 30: Drag And Drop Content Between Phone And A Computer
English Drag and drop content between phone and a computer Connect your phone to a computer using a USB cable. Wait until the phone/memory card appears as external disks in the file explorer. Drag and drop selected files between the phone and the computer. Note! When the phone/memory card is mounted to the computer, the phone cannot access the memory card. - Page 31 English Select Set date and press OK. Enter the date (DD/MM/YYYY), then press OK. Setting the time/date format Press Menu, scroll to and press OK. Select General and press OK. Select Time & date and press OK. Select Set format and press OK. Select Time format and press OK.
- Page 32 English Press Yes to change Language, Time & date, Ring tone, Volume, Text size. Press No if you do not want to change. Owner number The phone numbers assigned to your SIM card are saved if this is allowed by the card. To view/edit the numbers: Press Menu, scroll to and press OK.
- Page 33 English Select network To view available networks, press Select network. A list of available network operators is displayed (after a short delay). Select desired operator and press OK. Network mode To select another network, select Network mode and then select one of the following options.
-
Page 34: Sound
English Select Phonebook picture and press OK. Select On or Off and press OK. Sound Note! Silent needs to be set to Off to access Tone setup, Volume, Alert type and Extra tone. See Silent, p.29. Audio setup If you use a hearing aid or have hearing difficulties when using the telephone in a noisy environment, you can customise the phones audio settings. - Page 35 English Silent Press Menu, scroll to and press OK. Select Sound and press OK. Select Silent and press OK. Select On or Off and press OK. Tip: Press and hold shortcut button # to activate/deactivate Silent mode. Alert type Incoming calls can be signalled by a ring tone and/or vibration. Press Menu, scroll to and press OK.
-
Page 36: Display
English Display Wallpaper You can select different display backgrounds. Press Menu, scroll to and press OK. Select Display and press OK. Select Wallpaper and press OK. Scroll to display available wallpapers. Press OK to confirm or Back to discard changes. Text size You can customise the text size for messages and the phonebook. -
Page 37: Calls
English Press Menu, scroll to and press OK. Select Display and press OK. Select LCD backlight and press OK. Select 15 sec., 30 sec. or 1 min and press OK. Brightness You can customise the phones brightness settings. Press Menu, scroll to and press OK. - Page 38 English Select Call voice mail and press OK to call the voice mailbox. Tip: Press and hold shortcut button 1 to call your voice mail. Speed dial A , B , C and the numerical keys 0 and 2 – 9 can be used for speed dialling.
- Page 39 English Press OK to save the selected entry, or press Back to discard changes. To delete a Top 10 entry, select the entry in the Top 10 list and press Options, then Delete. Call time During a call, the duration of the call is shown. You can check the duration of your calls.
- Page 40 English Select Caller ID and press OK. Select one of the following options and press OK. Set by Use default setting by the network. network Hide ID Never show your number. Send ID Always show your number. Call waiting You can handle more than one call at a time. An alert tone will be heard if there is an incoming call while talking.
-
Page 41: Messages
English No reply Diverts incoming calls if unanswered. If busy Diverts incoming calls if the line is busy. Cancel Do not divert calls. diverts Call barring Your phone can be restricted to disallow certain types of calls. Note! A password is needed to apply Call barring. Contact your service provider to get the password. - Page 42 English Write speed You can change the speed at which keypad characters repeat (before the cursor moves onto the next character). Select Fast, Normal or Slow and press OK. SMS settings Memory status Displays the percentage of memory space used on the SIM card and in the phone memory.
- Page 43 English Languages Select language On/Off and press Done. Channel Select from which channels you want to receive/subscribe settings messages. Use the options Subscribe, Cancel subscription, Add, Edit and Delete to define your channels. MMS settings Memory status Displays the percentage of memory space used in the phone memory. Phone memory can store up to 100 messages.
- Page 44 English User name Add proxy user name. Password Add proxy password. Press OK and press Yes to save or No to exit without saving. Select your new profile and press Options. Select Activate and press OK. You can also activate/modify a MMS profile by selecting one and press Options to Activate/Edit/Delete the account.
-
Page 45: Camera
English Delete Select Inbox to delete all messages in the Inbox. Press Yes confirm or No to discard changes. Select Outbox to delete all messages in the Outbox. Press Yes confirm or No to discard changes. Select Sent to delete all messages in Sent. Press Yes confirm or No to discard changes. - Page 46 English On Normal To activate, press and hold button for approximately 3 seconds, or press twice within 1 second. On (3) To activate, press button 3 times within 1 second. Assistance button disabled. Number list The list of numbers that will be called when theAssistance button is pressed.
-
Page 47: Bluetooth
English The phone will dial the first number on the list. If the call is not answered within 25 seconds, the next number is dialled. Dialling is repeated 3 times or until the call is answered, or until is pressed. The function will work as above AND: If the receiver doesn’t press 0 within 60 seconds the call will be disconnected and the next number in the sequence will... - Page 48 English Select Bluetooth and press OK for the following settings: Function on/off Select On/Off and press OK to enable/disable Bluetooth. Visibility Select On/Off to make your phone visible/invisible to other devices. Note! To prevent other devices from finding your device, select Off. Even if you select Off, paired devices can still detect your device.
-
Page 49: Security
The default Phone code is 1234. Remote configuration Allow persons that you trust, usually a family member or friend, to send information to your Doro PhoneEasy 611. You can receive ® phonebook contacts and contacts for speed dial keys, calendar tasks and settings for the assistance button. - Page 50 Remote configuration enabled. Remote configuration disabled. Number list You need to add the name and number of the people who are allowed to send information from their phone to your Doro PhoneEasy 611. ® Select Number list and press OK.
-
Page 51: File Manager
English Enter the current code and confirm with OK. Enter a new code and confirm with OK. Enter the new code again and confirm with OK. Reset settings If you select Reset settings, the changes that you have made to the phone settings will be reset to default settings. - Page 52 English View (photos/images) Single view. Press Back when done. Send Select an option, then press OK: Send by Send by MMS. Press OK to create a message, see Creating and sending MMS, p.17. Send by Send to other Bluetooth devices, see Bluetooth p.41.
-
Page 53: Additional Functions
English Select Phone/Memory card and press Options. Select Open and press OK. Select a folder, eg Photos and press Options. Select Paste and press OK. Additional functions Alarm Press Menu, scroll to and press OK. Select On and press OK. Enter the alarm time using the keypad, then press OK. -
Page 54: Calculator
English Jump to date Enter the date and press OK. View all Select a task and press Options for the following options: Edit Edit selected task. Delete Delete selected task. Delete all Delete all tasks. Note! The calendar will work even when the phone is switched off. Do not press Yes to power on if mobile phone use is prohibited or when it may cause interference or danger. -
Page 55: Fm Radio
English FM radio The FM radio has a frequency range from 87.5 to 108.0 MHz and 9 preset channels. Turning the radio on Connect the headset to the headset socket Press Menu, scroll to and press OK. The radio is turned on. The tuned frequency is displayed. -
Page 56: Games
English Play Play the selected channel. Delete Delete the channel. Press Yes to confirm or No to return to the channel list. Edit Edit the channel name, then press to edit the frequency, use # to enter the decimal point. Press Save. Selecting channels Press keys 1 - 9 to quick-select a preset channel while the radio is playing. -
Page 57: Instructions For The Remote User
Use the side buttons +/– to adjust the sound volume, then press OK. Instructions for the REMOTE USER Sending remote control commands by text message. Activation must be set to On and the remote user must be entered in Number list on the Doro PhoneEasy 611. ® Menu Security Remote config. - Page 58 English *#phonebook#Jeff Jackson#0700393939#0462805011#046280 5083# The number will be saved in the 611 Phonebook as: Jeff Jackson 0700393939 0462805011 0462805083 Note! Only use numerals for parameters 2, 3 and 4. If you use letters in these parameters it will be stored as empty/blank in the Phonebook. Contacts already saved in the Phonebook, will not be replaced.
- Page 59 English alert confirm with 0=Off “0” 1=On alert 0/1/2 signal type 0=High 1=Low 2=Silent Example: You want to activate the assistance function. *#alert#a#1# You want Jeff Jackson to be stored in Number list in position one (1) with phone number: 0700-393939. *#alert#n#1#Jeff Jackson#0700393939# You want the SMS message to be sent out when the assistance button is pressed.
- Page 60 Date Time max. length = 35 Example 1: You want to send a new calendar task to Doro PhoneEasy 611. It is ® for a dentist appointment on December 1, 2010 at 10:30. *#task#20101201#1030#dentist appointment#...
-
Page 61: Troubleshooting
English Troubleshooting Phone cannot be switched on Battery charge low Connect the power adapter and charge the battery for 3 hours. Full battery capacity is reached after the battery has been charged 3–4 times. Battery incorrectly Check the installation of the battery. installed Failure to charge the battery Battery or charger... -
Page 62: Safety Instructions
English SIM card error SIM card damaged Check the condition of the SIM card. If it is damaged, contact your service provider. SIM card incorrectly Check the installation of the SIM card. Remove installed the card and reinstall it. SIM card dirty or damp Wipe the contact surfaces of the SIM card with a clean cloth. -
Page 63: Network Services And Costs
English Network services and costs Your device is approved for use on the networks. To use the device, you need a subscription with a service provider. Using network services may result in traffic costs. Some product features require support from the network, and you may need to subscribe to them. Operating environment Follow the rules and laws that apply wherever you are, and always turn off the unit whenever its use is prohibited or can cause interference or hazards. -
Page 64: Areas With Explosion Risk
English Areas with explosion risk Always turn off the unit when you are in an area where there is a risk of explosion. Follow all signs and instructions. There is a risk of explosion in places that include areas where you are normally requested to turn off your car engine. In these areas, sparks can cause explosion or fire which can lead to personal injury or even death. -
Page 65: Emergency Calls
English WARNING Excessive exposure to loud sounds can cause hearing damage. Exposure to loud sounds while driving may distract your attention and cause an accident. Listen to a headset at a moderate level, and do not hold the device near your ear when the loudspeaker is in use. -
Page 66: Care And Maintenance
As a matter of precaution, we recommend disconnecting the charger during a thunderstorm. Batteries are consumables and are not included in any guarantee. This guarantee does not apply if batteries other than DORO original batteries are used. Specifications... -
Page 67: Hearing Aid
® The maximum limit according to WHO is 2.0 W/kg measured over 10 g tissue. Declaration of Conformity Doro hereby declares that Doro PhoneEasy 611 conforms to the essential ® requirements and other relevant regulations contained in the Directives 1999/5/EC (R&TTE) and 2002/95/EC (RoHS). - Page 68 PhoneEasy 611 (3031) LAST PAGE English Version 1.1 0700 © 2012 Doro AB. All rights reserved. www.doro.com REV 5932 — STR 20120822...