Blaupunkt MEMPHIS MP66 Operating And Installation Manual
Radio cd sd usb mp3 wma
Hide thumbs
Also See for MEMPHIS MP66:
- Operating and installation instructions (77 pages) ,
- Operating and installation instructions (384 pages)

Related Manuals for Blaupunkt MEMPHIS MP66


Summary of Contents for Blaupunkt MEMPHIS MP66
- Page 1 Radio CD SD USB MP3 WMA Memphis MP66 7 646 520 310 Operating and installation instructions http://www.blaupunkt.com...
- Page 2 Inhalt...
-
Page 3: Table Of Contents
Contents Contents Selecting a menu item in the settings menu .......83 Changing and saving a setting ..84 About these instructions ....70 Exiting a menu item ......84 For your safety ........70 Operating the tuner ......85 Scope of delivery ......71 Searching for stations ......85 Manually searching for stations ..85 Warranty .........71 Automatically searching for... - Page 4 Contents Traffi c announcements (TA) ...93 Calling up a user-defi ned equalizer setting Receiving traffi c announcements ..93 (User Equalizer) ......106 Skipping a traffi c announcement ..93 Creating/changing a user- Permanently switching the priority defi ned equalizer setting of traffi c announcements on/off ..93 (Adjust) ........107 Operating the integrated Which equalizer setting is the...
- Page 5 Resetting the device to factory settings (Norm Set)....121 Blaupunkt stands for technical know-how in mobile radio reception, for precise navigation systems and fi rst-class sound. The blue dot made its debut in 1923 as a seal of quality that was assigned after rigourous functional –...
-
Page 6: About These Instructions
About these instructions About these instruc- If you are installing device your- self tions You may only install the device yourself if you are experienced in Please read these instructions installing car sound systems and and, in particular, the following are very familiar with the electri- chapter, "For your safety", before cal system of the vehicle. -
Page 7: Scope Of Delivery
Note: drive! Remote controls are available as optional equipment. You can Theft protection fi nd out from your Blaupunkt Carry the control panel with you dealer or on the Internet at in the supplied case whenever www.blaupunkt.com which re- you leave the vehicle. -
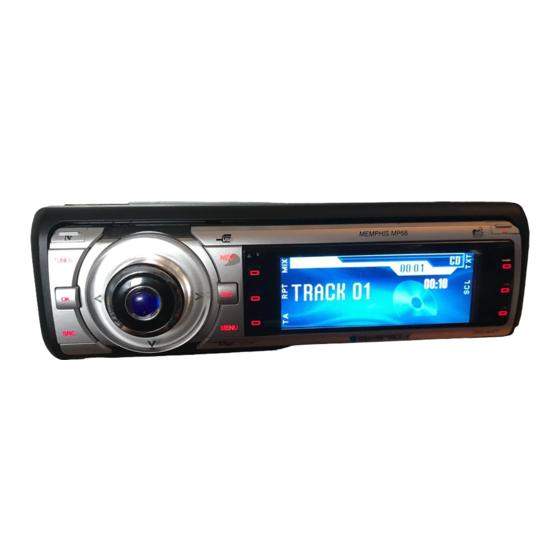
Page 8: Device Overview
Device Overview Device Overview Controls : ; < = > NEXT button button Tuner: Select memory bank for detaching the control panel (FM1, FM2, FM3, FMT) TUNER button Settings menu: Go to the next Selecting the tuner as audio menu page source MP3/WMA: Switch between Opening the "Tuner"... -
Page 9: Placing The Device In Operation
Device Overview MENU button Placing the device in to call up the settings menu operation ESC button Settings menu: Confi rm menu Detaching/attaching the item and change to the display of the audio source control panel Scan/Travelstore: Cancel You can detach the control panel OK button to protect against theft. -
Page 10: Switching The Device On/Off
General functions ➔ Do not touch the contacts on To switch off the device: the rear side with your fi ngers. ➔ Press and hold the On/Off but- ➔ Clean the contacts of the con- for approx. two sec- trol panel regularly using a soft onds. -
Page 11: Inserting An Mmc/Sd Card
USB 2.0 hard disk, the sup- plied USB cable must be con- Note: nected to the rear side of the de- Blaupunkt cannot guarantee vice before the installation as the correct functioning of all described in the installation in- MMC/SD card available on the structions. -
Page 12: Adjusting The Volume
(Beep), see matted using the FAT16 or FAT32 page 115 and 116. fi le system and contain MP3 or WMA fi les. Blaupunkt cannot Muting the device guarantee the proper function- ing of all USB media available on The device can be muted as fol- the market. -
Page 13: Selecting An Audio Source
General functions • The voice of the person calling To be able to select an external you is played back via the loud- audio source, it must be connect- speakers of the vehicle, ed and contain audio data. • ➔ The display shows "Phone call". -
Page 14: The Tuner Display
General functions The tuner display The audio CD display 16:13 16:13 Radio Sun 92,8 TRACK 06 02:19 Mix CD Madonna in concert tonight SONG: Bob Marley - No woman no cry TMC symbol¹) TMC symbol¹) TA symbol TA symbol see page 93 see page 93 Main line Main line... -
Page 15: The Cd Changer Display
General functions The CD changer display The MP3 display²) 16:13 16:13 02:19 02:19 TRACK 05 Bob Marley Mix All Mix All SONG: Bob Marley - No woman no cry DISC 01 ALICIAK TMC symbol¹) TMC symbol¹) TA symbol TA symbol see page 93 see page 93 Main line... -
Page 16: Overview Of The Operation
Overview of the operation Overview of the operation This chapter fi rst presents the buttons on the device. It is followed by a description of the audio functions MIX, REPEAT, TA and SCAN since their operation is identical for all audio sources. The operation of the device menus is described starting on page 82. -
Page 17: Overview Of The Functions Mix, Rpt, And Ta
Overview of the operation Overview of the functions MIX, RPT, and TA The display of the active audio source can show up to six functions at the left and right edge of the display which you always operate us- < ing the same six softkeys independent of the audio source. -
Page 18: Switching Repeat Title On/Off (Rpt)
Overview of the operation • "MIX OFF": The random track The selected repeat mode is dis- play is switched off. All ti- played on info line 2 and indi- tles are played in the order in cated by "RPT" at the side of the which they are found on the display. -
Page 19: Example Of A Menu Operation
Overview of the operation • The MENU button calls up Example of a menu the settings menu at any time. operation • If a menu consists of sever- The following example from the al pages, you can consecutive- settings menu (Changing the dis- ly scroll them using the NEXT play brightness) shows how to button... -
Page 20: Changing And Saving A Setting
Overview of the operation Display Night Day 16 Since you can adjust the display brightness separately for night and day, you must switch be- tween the menu items "Night" and "Day". ➔ For this purpose, press the rocker switch until the desired menu item is high- lighted. -
Page 21: Operating The Tuner
Operating the tuner Operating the tuner After selecting "Tuner" as the audio source, the tuner display appears (see page 78). The playback starts immediately with the previously played station if the vehicle is within the reception area of this station. Radio Kiss 94.6 Radio Kiss... -
Page 22: Automatically Searching For Stations
Operating the tuner sports, classic, etc.) in the Automatically searching for "Program Type" menu, the stations tuner automatically searches ➔ While the tuner display ap- the next station broadcast- pears, press on on the ing this program type in the rocker switch selected direction. -
Page 23: Storing Stations
Operating the tuner Storing stations station is played back provided that it can be received at the After locating a station, you can current vehicle position. store it as follows: ➔ Press the OK button or the ➔ Select the desired memory ESC button or wait for bank (see page 85). -
Page 24: Set The Device To The Region
Operating the tuner once, the search stops and the station located last is played back. You can do the following at any time: • store the currently scanned station (see page 87), • cancel the scan by briefl y press- ing the OK button Set the device to the region Europe, USA or Thailand... -
Page 25: Changing The Tuner Settings ("Tuner" Menu)
Operating the tuner Changing the tuner settings ( "Tuner" menu) The "Tuner" menu allows you to change the basic settings of the tuner. To open the "Tuner" menu: ➔ Press the TUNER button The "Tuner" menu appears. The "Tuner" menu consists of two pages which can be toggled with the NEXT button TUNER Band... -
Page 26: Toggle Between Mono And Stereo Operation (Mono)
Operating the tuner Toggle between mono and stereo Allowing alternative frequencies operation ( Mono) ( RDS) If you selected the "FM" wave- The device can automatically band, you can toggle between switch to an alternative frequency mono and stereo operation. (AF) of the same station if the re- ception becomes poor. -
Page 27: Activating/Deactivating Improved
Operating the tuner Stations that were previous- Allowing/preventing automatic ly stored in the FMT memory changing to other regional pro- bank are automatically deleted. grammes ( Regional) Some stations divide their pro- Activating/deactivating im- grammes into regional pro- proved reception ( Hicut) grammes with different contents The Hicut function improves re- at certain times. -
Page 28: Changing The Seek Tuning Sensitivity (Sensitivity)
Operating the tuner ➔ Changing the seek tuning sensi- Scroll through the pages of tivity ( Sensitivity) the programme types with the NEXT button The seek tuning sensitivity deter- ➔ mines whether the automatic Press the softkey next to the station seek tuning locates only desired programme type. -
Page 29: Traffi C Announcements (Ta)
Traffi c announcements • Traffi c announcements A traffi c information station must be set or it must belong (TA) to the same broadcasting net- work as the current station. The device uses the RDS servic- es TA and EON to play traffi c an- Skipping a traffi... - Page 30 Traffi c announcements ➔ First option (traffi c information Press the softkey (next to display) "Traffi c"). ➔ • Press the softkey (next to : Traffi c announcements "TA OFF") during the traffi c are automatically switched announcement. through. • The current traffi...
-
Page 31: Operating The Integrated Cd Player
Operating the integrated CD player • Operating the integrat- Bit rate: MP3: max. 320 kbit/s ed CD player WMA: max. 768 kbit/s • File extension: Must be ".MP3" The device can play the following or ".WMA" CD formats: • • ID3 tags: Version 1 or 2 CD audio (some CDs with copy protection cannot be played) -
Page 32: Functions Of The Integrated Cd Player If An Audio Cd Is Inserted
Operating the integrated CD player Functions of the integrated CD player if an audio CD is inserted After inserting an audio CD (see page 74) and selecting "CD" as the audio source for the fi rst time (see page 77), "CD Reading" appears on the display. -
Page 33: Switching The Cd Text Display
Operating the integrated CD player • Switching the CD text display "Scroll Off": CD text is not on/off ( TXT) displayed as scrolling text. If the CD text does not fi t on Some CDs support the display of info line 3 of the display, it text information about artist, al- appears incomplete. -
Page 34: Operating The Mp3/Wma Player
Operating the MP3/WMA player Operating the MP3/ WMA player After inserting a medium with MP3 or WMA fi les (CD, MMC/SD card, or USB medium) (see pages 74 and 75) and selecting them as audio source for the fi rst time (see page 77), "CD/MMC/USB Reading" ap- pears on the display. -
Page 35: Showing All The Information Of
Operating the MP3/WMA player Showing all the information of Selecting the title information to the current title ( ALL) be displayed ( INF) To show all the available infor- The device can display the mation about the current title following title information on (e.g. -
Page 36: Selecting A Title From A List (Browser Mode/Playlist)
Operating the MP3/WMA player Selecting a title from a list ( Browser mode/ playlist) During the MP3 or WMA playback, you can always switch between the following modes using the NEXT button • MP3 display (left part of the fi gure), •... - Page 37 Operating the MP3/WMA player In the browser mode and the playlist mode, you can select fi les or folders from the list as follows: ➔ On the rocker switch , press to scroll up or down. ➔ On the rocker switch , press to change up to a higher-level folder.
-
Page 38: Operating The Optional Cd Changer
Operating the optional CD changer Operating the optional CD changer After inserting at least one CD in the CD changer magazine and select- ing "CDC" as the audio source for the fi rst time (see page 77), "Mag- azine Scan" briefl y appears on the display. The CD overview appears next. -
Page 39: Changing The Name Of A Cd In The Magazine Of The Cd Changer (Cdn)
Operating the optional CD changer Selecting a CD from the CD Changing the name of a CD in magazine ( CD overview) the magazine of the CD chang- The CD overview shows: er ( CDN) • either the CD number You can assign a name to eve- (e.g. -
Page 40: Changing Basic Settings In The Settings Menu
Changing basic settings in the settings menu To delete the name of the cur- To delete the names of all the rent CD: CDs located in the magazine of the CD changer: < ➔ Press and hold the softkey ➔ (next to "Clear CD Name") for Press and hold the softkey longer than two seconds. -
Page 41: Adjusting Sound And Balance (Audio Settings)
Changing basic settings in the settings menu Adjusting sound and balance ( Audio Settings) The "Audio Settings" menu provides extensive possibilities for adjust- ing the sound to your specifi c needs. ➔ Press the MENU button . The settings menu appears. ➔... -
Page 42: Changing The Equalizer Setting (Digital Equalizer)
Changing basic settings in the settings menu Changing the equalizer setting ( Digital Equalizer) Your device features a digital 6-band equalizer. On the "Digital Equal- izer" menu, you can adjust the sound to your vehicle and your specifi c needs and eliminate problems, such as droning or poor voice compre- hension. -
Page 43: Creating/Changing A User- Defi Ned Equalizer Setting (Adjust)
Changing basic settings in the settings menu Creating/changing a user-defi ned equalizer setting ( Adjust) You can adjust the three different user-defi ned equalizer settings to different situations, e.g. for the driver alone, for driver and passenger or for passengers in the front and the rear. ➔... - Page 44 Changing basic settings in the settings menu ➔ Ensure that all passengers in Manual: the vehicle are sitting and re- As an alternative, you can maining quiet. manually create the equalizer ➔ Change to the "User Equaliz- setting without measurement er"...
-
Page 45: Which Equalizer Setting Is The Correct One
Changing basic settings in the settings menu ➔ The current centre frequency Select the desired quality fac- (Hz) is highlighted. tor Q by pressing on the rocker switch EQ 1 • "Q1": Low edge steepness, wide fi lter bandwidth 2000Hz -8dB High 4 •... -
Page 46: Selecting A Sound Preset (Presets)
Changing basic settings in the settings menu ➔ Selecting a sound preset On the rocker switch , press ( Presets) to raise the volume in- crease. This menu item allows you to se- ➔ lect one of the following sound On the rocker switch , press presets: Vocal, Disco, Rock, Jazz,... -
Page 47: Confi Guring The Preamplifi Er
Changing basic settings in the settings menu Confi guring the preamplifi er out- put for the subwoofer ( Subout) If you want to use an additional subwoofer, it can be adjusted to the other loudspeakers. You can adjust the level of the Subout preamplifi... -
Page 48: Changing Display Settings (Display Settings)
Changing basic settings in the settings menu Changing display settings ( Display Settings) In the "Display Settings" menu, you can adjust the display brightness and the display contrast, among other things. ➔ Press the MENU button . The settings menu appears. ➔... -
Page 49: Changing Images And Animations (Sd Browser/Usb Browser)
Changing basic settings in the settings menu ➔ Press the softkey (next to Animations consist of "Turn On Text"). max. 20 BMP fi les that are auto- matically displayed in succession • : The welcome text is just like single frames of a mov- shown after switch-on. -
Page 50: Adjusting The Display Viewing Angle (Angle)
Changing basic settings in the settings menu ➔ selected folder with the BMP Press the softkey (next to fi les of the animation. "Angle"). The "Picture Download" menu The "Angle" menu opens and appears. the current display contrast is shown. ➔... -
Page 51: Changing Volume Presettings (Volume Settings)
Changing basic settings in the settings menu Changing volume presettings ( Volume Settings) In the "Volume Settings" menu, select the volume presettings for traf- fi c announcements, the telephone, the signal tones, etc. ➔ Press the MENU button . The settings menu appears. ➔... -
Page 52: Changing The Volume Presetting Of The Signal Tone (Beep Volume)
Changing basic settings in the settings menu The volume presetting for "On Volume" menu item must be phone calls appears. highlighted. < ➔ Press the softkey (next to ➔ Adjust the desired volume us- "On Volume"). ing the volume control the rocker switch (incre- The presetting for the power-... -
Page 53: Changing Clock Settings (Clock Settings)
Changing basic settings in the settings menu Changing clock settings ( Clock Settings) In the "Clock Settings" menu, you can set the clock of the device as well as change the display options of the clock. ➔ Press the MENU button . -
Page 54: Confi Guring Audio Inputs (Aux Settings)
Changing basic settings in the settings menu Switching the RDS synchro- Switching the 24-hour time dis- nisation of the clock on/off play on/off ( 24 h Mode) ( Auto Sync) The time can be displayed using The clock can automatically be the 12-hour or 24-hour format. -
Page 55: Activating/Deactivating Audio Inputs (Auxiliary 1/2)
Changing basic settings in the settings menu ➔ Activating/deactivating audio On the rocker switch inputs ( Auxiliary 1/2) press to change to the next character. The name can have Audio inputs, to which you are up to 16 characters. connecting external audio sourc- ➔... -
Page 56: Changing Special Settings (Various Settings)
Changing basic settings in the settings menu Changing special settings ( Various Settings) In the "Various Settings" menu, you can change the scan time for the scan function and the welcome text. ➔ Press the MENU button . The settings menu appears. ➔... -
Page 57: Switching The Internal Amplifi Er
Changing basic settings in the settings menu • Switching the internal amplifi er : The internal amplifi er is on/off ( Internal Amp) switched off. Loudspeakers connected to the device al- If you connected the device to an ways remain mute. The loud- external power amplifi... -
Page 58: Displaying The Serial Number (Serial Number)
The internal amplifi er is Switch on the internal even though it is correctly switched off. amplifi er as described on connected. page 121. If problems still persist, please contact an authorised workshop or the Blaupunkt customer service (see the last page). -
Page 59: Specifi Cations
Specifi cations Specifi cations Weight approx. 1.5 kg Voltage supply Operating voltage: 10.5–14.4 V Current consumption In operation: max. 10 A 10 seconds after switch-off: < 3.5 mA Amplifi er output power acc. to DIN 45324: at 14.4 V: 4 x 25 W sine max. -
Page 60: Glossary
Glossary Glossary Quality factor Q It determines the fi lter quality of AF – Alternative frequency the equalizer, i.e. the edge steep- ness and fi lter bandwidth, de- The range of FM stations is lim- pendent upon the characteristic ited. For this reason, FM pro- frequency. - Page 61 Glossary They are created with an MP3 Root directory manager, such as WinAmp or Win- Main directory of a data carrier. dows Media Player. The root directory contains all PTY – Program Type other directories. The device searches only for sta- Subwoofer, Subout tions with preselectable pro- Separate low-bass loudspeaker.
- Page 62 Glossary Your device has a TMC output, which you can use for connect- ing Blaupunkt navigation systems. Please contact your authorised Blaupunkt dealer for additional information. T-STORE – Travelstore Automatic searching and storing of the six strongest radio stations received of the region.
-
Page 63: Index
Index Index Changing the name of a CD in the CD changer magazine 103 inserting 74 Symbole removing 74 24 h MODE 118 Selecting from the CD changer magazine 102 ADJUST 107 CD changer 102 ALL 99 Changing the name of a CD in the Alternative frequencies magazine 103 Allowing 90... - Page 64 Index Mono operation 90 EDIT AUXILIARY 119 EQUALISER 106, 110 Files on CD 95 Calling up a user-defi ned setting MP3 display 79 MP3 player 98 Creating a user-defi ned setting 107 Display 79 Settings recommendations 109 Functions 98 ESC button 73, 83 Muting 76 Factory settings 121 NEXT button 72, 83...
- Page 65 Index SCAN TIME 121 USB BROWSER 113 Scan time 121 SCL 97, 99 USB stick SCREEN SAVER 112 connecting 75 USER EQUALISER 106 Screen saver 112 SD BROWSER 113 SD card: see Memory card VARIOUS SETTINGS 120 Seek tuning sensitivity 92 Volume 76 SENSITIVITY 92 At switch-on 116...
-
Page 66: Installation Instructions
Sollten die hier aufgeführten Hin- weise für Ihren Einbau nicht pas- • You can obtain the adapter cable re- sen, so wenden Sie sich bitte an quired for your vehicle type from any Ihren Blaupunkt-Fachhändler, Ihren BLAUPUNKT dealer. Fahrzeughersteller oder unsere •... -
Page 67: Notice De Montage
Blaupunkt dealer, your vehicle Si les indications décrites ici ne s’ap- manufacturer or our telephone hot- pliquent au montage que vous voulez line. - Page 68 • Richiedete ad un negoziante specia- • De dwarsdoorsnede van de plus- lizzato in articoli BLAUPUNKT il cavo en minkabel mag niet minder dan di adattamento richiesto per il vostro 1,5 mm zijn. modello di autovettura. • Stekker aan de voertuigkant niet aan de radio aansluiten! •...
- Page 69 • Plus- och minuskabelns ledningsa- rea måste vara minst 1,5 mm • Fordonets stickkontakt får inte anslutas till radion! • Din BLAUPUNKT fackhandel tillhan- dahåller för resp fordonstyp erfor- derlig adapterkabel. • Beroende på konstruktionstyp kan fordonet avvika från denna beskriv- ning.
- Page 70 Mitgelieferte Montage- und Als Sonderzubehör erhältlich Anschlussteile Available as an optional accessory Supplied Mounting Hardware Disponible en option Materiel de montage fourni Reperibili come accessori extra Componenti di fi ssaggio comprese Als speciale accessoire verkrijgbaar nella fornitura Tillval Meegeleverde montagematerialen Medföljande monteringsdetaljer Preamp,/Sub,/Center - out cable 7 607 001 512...
- Page 71 Einbausätze Installation kits Kits de montage Set di montaggio Inbouwsets Monteringssatser 1 2 V ca. 10 mm 7 608 ..0°- 30° +/– 10° +/– 10°...
- Page 72 6. Ausbau / Removal / Démontage / Smontaggio / Demontage / Urmontering USB connection Antenna connection 8 613 150 002 1-20 1 2 V...
- Page 73 Aut. antenna 7 10 13 16 19 FB +12V / RC +12V 9 12 15 18 8 11 14 17 20 +12V Amplifier 10 Ampere max. 300 mA AUX 2 NF L No connection Speaker out RR+ AUX 2 NF R Radio Mute Speaker out RR- AUX 2 GND...
- Page 74 Preamp./Sub./Center - out cable 7 607 001 512 Relais +12V Amplifi er +12V Sub out 1 3 5 Kl. 15 +12V 2 4 6 Radio Mute 4 Ohm 4 Ohm 4 Ohm 4 Ohm 1 2 V Änderungen vorbehalten! Subject to changes! Sous réserve de modifi...
- Page 76 Bitte den ausgefüllten Gerätepass sicher aufbewahren! Please keep the fi lled-in radio pass in a safe place! Prière de conserver soigneusement la carte d’autoradio remplie ! Tenete per favore il libretto di apparecchio, debitamente riempito, in un posto sicuro! Bewaar de ingevulde apparaatpas op een veilige plaats! Vänligen förvara ifyllt apparatpass på...
- Page 77 +55-19 3745 2773 Malaysia (Asia Pacifi c) (MAL) +604-6382 474 +604-6413 640 Gerätepass Memphis MP66 Name: ..............7 646 520 310 Typ: ..............Serien-Nr: BP ..............Blaupunkt GmbH, Robert-Bosch-Straße 200, D-31139 Hildesheim 04/06 - CM-AS/SCS (dt, gb, fr, it, nl, sw) 8622404853...