
Related Manuals for VTech BM3100 Twin


Summary of Contents for VTech BM3100 Twin
- Page 1 ® Safe & Sound Video and audio monitor User guide Models: For product support BM3100/ please call: 1 300 369 193 BM3100 Twin...
- Page 2 Important safety instructions on pages iii and iv of this manual. This manual has all the feature operations and troubleshooting necessary to install and operate your new VTech product. Please review this manual thoroughly to ensure proper installation and operation of this innovative and...
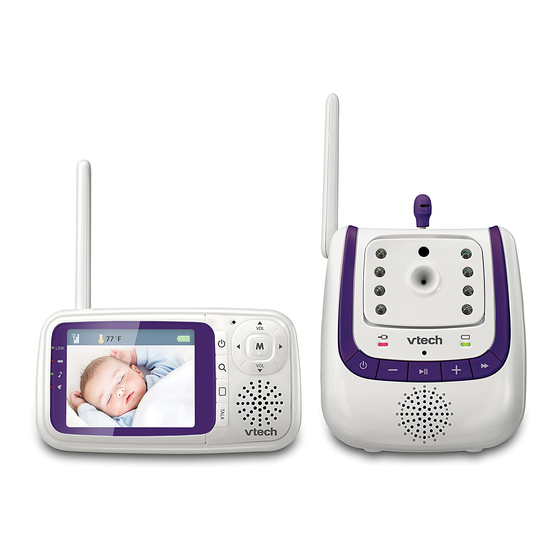
- Page 3 BM3100 is a video and audio monitor which consists of one parent unit (BM3100 PU) and one baby unit (BM3100 BU). BM3100 Twin is a video and audio monitor which consists of one parent unit (BM3100 Twin PU) and two baby units (BM3100 Twin BU).
- Page 4 Important safety instructions When using your equipment, basic safety precautions should always be followed to Follow all warnings and instructions marked on the product. Adult setup is required. This product is intended as an aid. It is not a substitute for responsible and proper adult supervision and should not be used as such.
- Page 5 Important safety instructions To reduce the risk of electric shock, do not disassemble this product, but take it to an authorized service facility. Opening or removing parts of the product other than reassembling can cause electric shock when the product is subsequently used. You should test the sound reception every time you turn on the units or move one of the components.
-
Page 6: Table Of Contents
Table of contents Getting started ......1 Appendix ....... 28 Parts checklist ........ 1 Parent unit screen messages ..28 Baby unit battery installation... 2 Parent unit battery ......29 Baby unit installation....... 4 Troubleshooting ......30 Parent unit battery installation ..5 Operating range...... -
Page 7: Getting Started
(1 for BM3100) (2 for BM3100 Twin) (2 for BM3100 Twin) User’s manual Baby unit User’s manual power adapter (1 for BM3100) (2 for BM3100 Twin) To purchase replacement batteries or power adapters, please call VTech on 1 300 369 193. . -
Page 8: Baby Unit Battery Installation
Getting started Baby unit battery installation You can power up the baby unit by connecting it to AC power or to four AA alkaline batteries. Even if the baby unit is connected to AC power, we recommend you also install four AA alkaline batteries. This guarantees continual operation in case of a power outage. - Page 9 Getting started Baby unit battery installation To replace batteries: Push on the tab of the compartment cover to release it from the baby unit. Then detach the compartment cover. Follow the steps on page 2 to install batteries. • Do not mix old and new batteries. Do not mix alkaline and standard (carbon-zinc) batteries.
-
Page 10: Baby Unit Installation
Baby unit • Use only the baby unit power adapters supplied with this product. To order a replacement, contact VTech on 1 300 369 193. • The baby unit power adapters are intended to be correctly oriented in a in place if it is plugged into a ceiling, under-the-table or cabinet outlet. -
Page 11: Parent Unit Battery Installation
Getting started Parent unit battery installation You can power up the parent unit by connecting it to AC power or to the rechargeable battery provided. Even if the parent unit is connected to AC power, we recommend you also install the battery. This guarantees continual operation in case of a power outage. - Page 12 If the parent unit will not be used for a long time, disconnect and remove the battery to prevent possible leakage. • Use only the battery supplied with this product. To purchase a replacement battery, contact VTech on 1300 369 193.
-
Page 13: Parent Unit Installation
Parent unit • Use only the parent unit power adapter supplied with this product. To order a replacement, contact VTech on 1300 369 193. • The parent unit power adapter is intended to be correctly oriented in a plug in place if it is plugged into a ceiling, under-the-table or cabinet outlet. -
Page 14: Parent Unit Battery Charging
Getting started Parent unit battery charging Once you have installed the parent unit (see page 7) and its battery (see page 5), press to turn it on. The battery icon indicates the battery status (see the table below). The parent unit battery is fully charged after 12 hours of continuous charging. -
Page 15: Baby Unit Overview
Getting started Baby unit overview 1 _ Camera lens 9 _ + (Volume up) 2 _ Infrared LEDs Increase the listening volume (page 25). Backup light for night vision 10 _ Antenna (page 25). 3 _ AC power indicator light 11 _ Light sensor 12 _ Microphone (On/off) -
Page 16: Baby Unit Lights
Getting started Baby unit lights (Battery indicator light) On in green when the baby unit is on and powered by batteries. Flashes in green when the baby unit battery is low. Off when the baby unit is off or powered by AC power. (AC power indicator light) On in red when the baby unit is on and powered by AC power. -
Page 17: Parent Unit Overview
Getting started Parent unit overview 6 _ MIC (Microphone) 1 _ Antenna 7 _ MENU/SELECT (On/Off) Enter the menu (page 17). Turn on or off (page 26). Choose an item, or save a (Zoom) setting while in a menu Zoom in or out while viewing in (page 17). - Page 18 Getting started Parent unit overview 11 _ /BACK Return to the previous menu Move rightward while viewing in while in a menu ( ( page 17). mode (page 26). Move leftward while viewing in Choose an item while in a menu mode ( mode ( (page 26).
-
Page 19: Parent Unit Lights
Getting started Parent unit lights LINK On when strong signal strength is detected between the parent unit and the selected baby unit. Flashes when the parent unit cannot link to the selected baby unit. Off when the parent unit is turned off. When the parent unit is powered by AC power: On in red when the parent unit is being charged. - Page 20 Getting started Parent unit screen icons Temperature alert - Displays when the temperature alert is set to on. Real-time temperature - Displays the real-time temperature of the selected baby unit. Sound level indicators - Displays the sound level according to the scales of loudness when there is sound transmitted from the baby unit.
-
Page 21: Positioning And Operating Range
Getting started Positioning and operating range Position the video and audio monitor Place the parent unit within the operating range (see below) of the baby unit. We recommend the parent unit is at least 1 metre away from the baby unit to avoid audio feedback. -
Page 22: Test Your Video And Audio Monitor Before Use
Getting started Test your video and audio monitor before use It is important to test the video and audio monitor when it is installed initially, and at regular times thereafter. Test your parent unit and baby units if they have not been used for a long time or you suspect they are defective. To test your video and audio monitor: Place the parent unit and the baby units in the same room to test the product. -
Page 23: Parent Unit Settings
Parent unit settings Using the menu To enter the parent unit menu: Press MENU when the parent unit is not in use. Press until the desired feature is highlighted on the left side. Press SELECT or to enter that feature menu. Press until the desired feature or option is highlighted on the right side. -
Page 24: No Link Alert
Parent unit settings Alert tone No link alert You can set whether the parent unit beeps whenever the link between the parent unit and the baby unit is lost. The no link alert is preset to On. To set the no link alert of the parent unit: Press MENU when the parent unit is not in use. -
Page 25: Sensitivity
Parent unit settings Sensitivity You can use the parent unit to change the sound sensitivity level of the baby units from Level 1 to Level 5 (Maximum). The higher the sound sensitivity level is set, the more sensitive the baby unit is in detecting sounds for transmitting to the parent unit. -
Page 26: Maximum Temperature
Parent unit settings Temperature Maximum temperature You can set the desired maximum room temperature of the baby unit. The maximum temperature can be set between 21 C and C. The maximum temperature is preset to 30 To set the maximum temperature of the baby unit: Press MENU when the parent unit is not in use. -
Page 27: Temperature Format
Parent unit settings Temperature Temperature format You can set the temperature scale of the baby unit. The temperature scale is preset to Celsius. To change the temperature scale: Press MENU when the parent unit is not in use. Press to choose TEMPERATURE, then press SELECT or Press to choose Format, then press SELECT or Press... -
Page 28: Sound-Activated Screen
Parent unit settings Sound-activated screen When the parent unit screen is turned off manually (see page 27), you can set the screen to be turned on automatically whenever there are sounds detected from the baby units after 20 seconds of silence. -
Page 29: Pair/Unpair Cam
Parent unit settings Pair/unpair CAM Pair new CAM The baby units and parent unit provided are already paired. You can add or replace baby units (BM3110, purchased separately) to your video and audio monitor system. You can pair a maximum of four baby units to your parent unit. Each new baby unit must be paired to the parent unit before use. -
Page 30: Language
Parent unit settings Pair/unpair CAM Unpair CAM Make sure you power on the baby unit and the parent unit before unpairing the baby unit. To unpair a baby unit: On the idle parent unit, press MENU. Press to choose PAIR/UNPAIR CAM, then press SELECT or Press to choose Unpair CAM, then press SELECT or Press... -
Page 31: Baby Unit Operation
Baby unit operation Baby unit operation Power on or off the baby unit • Press to turn on the baby unit. The AC power indicator light turns on when it is powered by AC power, or the Battery indicator light turns on when it is powered by batteries. -
Page 32: Parent Unit Operation
Parent unit operation Power on or off the parent unit • Press to turn on the parent unit. The display screen turns on. • Press for 2 seconds to turn off the parent unit. The display screen turns off. Speaker volume You can change the speaker volume from Volume 1 to Volume 7, or turn it off. -
Page 33: View
Parent unit operation View You can change the screen to view images from different baby units, or you can turn off the screen. To view different baby units: • Press to scroll to the desired baby units. They are shown in chronological order: CAM 1, CAM 2, CAM 3, CAM 4 and multi-CAM. -
Page 34: Appendix
Appendix Parent unit screen messages Battery low at CAM # When the baby unit is powered by batteries, the stated baby unit batteries need to be changed. It will be powered off after 30 seconds automatically. Battery low at Parent Unit When the parent unit is powered by the rechargeable battery and the battery level is low, it needs to be recharged. -
Page 35: Parent Unit Battery
Battery low at Parent Unit and displays on the parent unit. • CAUTION: • Use only the battery provided or equivalent. To order a replacement, contact VTech on 1 300 369 193. • for special disposal instructions. • Do not open or mutilate the battery. Released electrolyte is corrosive and may •... -
Page 36: Troubleshooting
Appendix Troubleshooting suggestions below. For customer service, contact VTech on 1 300 369 193. My video and audio monitor does not work at all. • Make sure the baby units, parent unit and the batteries are installed and charged correctly (pages 2 to 8). For optimum daily performance, charge the parent unit when it is not in use. - Page 37 Appendix Troubleshooting The parent unit plays any sounds from the baby unit and I think it is too noisy. • You may have set the sensitivity level to Level 5 (Maximum). If you do so, the baby sensitivity level to a lower level (page 19). •...
- Page 38 Appendix Troubleshooting The battery does not charge in the parent unit or the parent unit battery does not accept charge. • Make sure the battery is installed in the parent unit battery compartment correctly. light on the parent unit should be on when charging. •...
-
Page 39: Common Cure For Electronic Equipment
Appendix The link between the baby unit and the parent unit is lost every now and then, and I’m experiencing sound interruptions. • Move the parent unit closer to the baby unit (but not less than 1 metre). The baby units may be out of range. -
Page 40: Operating Range
Appendix Operating range This baby unit and parent unit can communicate over only a certain distance - which can vary with the locations of the baby unit, the parent unit, the weather, and the layout of your home. When the parent unit is out of range, the parent unit displays Waiting for linking... To improve reception, move closer to the baby unit (but not less than 1 metre). - Page 41 Information Line on 1300 369 193 or contact VTech by e-mail at: tcpsupport_au@vtech.com. Voluntary Product Warranty VTech warrants that this product will be free from any defect in materials or workmanship under conditions of normal use for a period of 24 months from date of purchase.
- Page 42 Statutory Rights. This Voluntary Product Warranty is given by: VTech Telecommunications (Australia) Pty Ltd ABN 70 136 672 627 Address: 24 Gilby Road, Mount Waverley 3149 IMPORTANT NOTE: THIS IS NOT A PRODUCT RETURN OR SERVICE ADDRESS –...
- Page 43 Appendix Frequency control Crystal controlled PLL synthesizer Transmit frequency Baby unit: 2402 - 2478.5 MHz Parent unit: 2402 -2478.5 MHz Channels 2.8” Color LCD (QVGA 320x240 pixel) Nominal effective range Maximum power allowed by FCC and IC. Actual operating range may vary according to environmental conditions at the time of use.
-
Page 44: Index
Index Add a baby unit 23 Night vision 25 Alert 17, 18, 20 No link alert 18 Alert tone 17–18 Audio settings 15 Operating range 15, 34 Operation 25, 26–27 Baby unit battery installation 2–3 Baby unit installation 4 Baby unit lights 10 Pair a baby unit 23 Battery 29 Pair CAM 23... - Page 45 Index Talk to the baby unit 27 Temperature 19–21 Test your video and audio monitor 16 Turn off the baby unit 25 Turn off the parent unit 25 Turn on the baby unit 25 Turn on the parent unit 25 Turn the parent unit screen on or off 27 Unpair a baby unit 24 Unpair CAM 24...
- Page 46 VTech is the registered trademark of VTech Holdings Limited. Copyright © 2013 for VTECH TELECOMMUNICATIONS LTD. All rights reserved. Printed in China.