Intermec 730 User Manual
700 series color mobile computer
Hide thumbs
Also See for 730:
- User manual (82 pages) ,
- Quick start manual (28 pages) ,
- Supplementary manual (6 pages)
Table of Contents
Advertisement
Quick Links
Advertisement
Table of Contents
Troubleshooting

Related Manuals for Intermec 730


Summary of Contents for Intermec 730
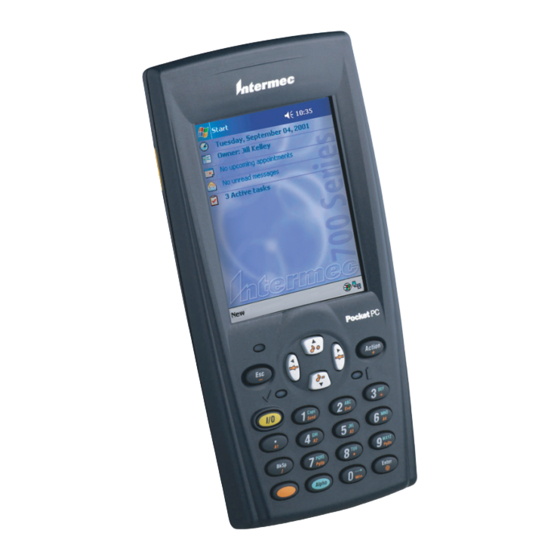
- Page 1 User's Manual 700 Series Color Mobile Computer...
- Page 2 The information contained herein is provided solely for the purpose of allowing customers to operate and service Intermec-manufactured equipment and is not to be released, reproduced, or used for any other purpose without written permission of Intermec Technologies Corporation.
- Page 3 04/2004 Updated 802.11 security supplicant information. Added new network selection APIs. Incorporated information about the Intermec Settings control panel applet for PSM Builds 3.00 or newer. Added information about the Pho- neUtility application. Revised Chapter 4, “Network Sup- port.” Added tethered scanner and internal scanner config- uration and troubleshooting information to Chapter 6, “Scanner Support.”...
- Page 4 700 Series Color Mobile Computer User’s Manual...
-
Page 5: Table Of Contents
............Intermec Settings Applet . - Page 6 ............. . . SmartSystemst Foundation Console (www.intermec.com/SmartSystems) .
- Page 7 Contents Writing on the Screen ........... Selecting the Writing .
- Page 8 Contents Inbox: Sending and Receiving E-mail Messages ....... Synchronizing E-mail Messages .
- Page 9 Contents Replicating 700 Color Settings Using the Registry ......Deleting the Old Registry File .
- Page 10 ......Copying CDMA Radio Module CAB Files from Intermec Web Site ..
- Page 11 ......... . . Configuring PB42 Printers Via Intermec Settings .
- Page 12 Contents Customization and Lockdown ..........FTP Server .
- Page 13 ............Intermec Settings Applet .
- Page 14 Contents Index Classes and Functions ............General Index .
-
Page 15: Before You Begin
Global Services and Support Warranty Information To understand the warranty for your Intermec product, visit the Intermec web site at www.intermec.com and click Service & Support. The Intermec Global Sales & Service page appears. From the Service & Support menu, move your pointer over Support, and then click Warranty. -
Page 16: Telephone Support
Before you work with the 700 Color, you should be familiar with your network and general networking terms, such as IP address. Related Documents This table contains a list of related Intermec documents and their part numbers. Document Title Part Number... -
Page 17: Patent Information
2 Click Service & Support > Manuals. 3 In the Select a Product field, choose the product whose documentation you want to download. To order printed versions of the Intermec manuals, contact your local Intermec representative or distributor. Patent Information Product is covered by one or more of the following patents: 4,882,476;... - Page 18 Before You Begin xviii 700 Series Color Mobile Computer User’s Manual...
-
Page 19: Introduction
Introduction This chapter introduces the 700 Series Color Mobile Computer, devel- oped by Intermec to enhance wireless connectivity needs. This chapter contains hardware and software configuration information to assist you in making the most out of your 700 Color Computer. -
Page 20: Ab10 Battery
If so, the 700 Color performs a cold-boot the next time power is applied. Note: The 730 I-Safe Computer performs a cold-boot every time its main battery is removed if it was not put in suspend mode prior to the removal. - Page 21 Chapter 1 — Introduction If you have at least one device in your 700 Color Computer (radio, scan- ner, imager, or Ethernet), the battery power fail level is set so that after the system shuts down in a low battery condition, there is still sufficient charge to allow the unit to remain configured, keep proper time, and maintain DRAM (Dynamic Random Access Memory) for at least 23 to 32 hours at room temperature if the main battery remains in the mobile computer.
-
Page 22: Ambient Light Sensor
— Introduction Ambient Light Sensor Note: This information does not apply to the 730 Computer. The ambient light sensor turns on the display lighting when conditions warrant but automatically turns if off again as surrounding light increases. This conserves your 700 Color battery power. -
Page 23: Speaker
1–8 KHz. Speaker Speaker 700 Color Computer 730 Computer Warning: Do not place the speaker next to your ear when the speaker volume is set to “Loud” (maximum), or you may damage your hearing. Microphone The built-in microphone is located on the bottom of the unit next to the Hirose docking connector. -
Page 24: External Headset Jack
Chapter — Introduction External Headset Jack The external headset jack connects a mobile phone style headset to your mobile computer for use in noisy environments. The jack is a 2.5 mm, three-conductor jack, with autosensing of the headset jack insertion which disables the internal speaker and microphone. -
Page 25: Beeper
“Silent” position. Tap ok to exit this applet. Disable the Scanner Mute Note: This information does not apply to the 730 Computer. 1 Tap Start > Settings > the System tab > the Audio icon, then select User defined audio settings. -
Page 26: Select A Beeper Volume
To select a beeper volume for the 700 Color Computer, tap Start > Set- tings > the System tab > the Intermec Settings icon. Tap the Device Set- tings option, tap (+) to expand Beeper, then tap (+) to expand Volume. -
Page 27: Disable The Beeper
Intermec web site at www.intermec.com/idl. Contact your Intermec representative for more information. Tap Start > Settings > the System tab > the Intermec Settings icon to ac- cess the applet. 700 Series Color Mobile Computer User’s Manual... -
Page 28: Keypads
Alphanumeric keypad Backlight for Keypad Note: This information does not apply to the 730 Computer. You can configure your keypad to turn on a backlight to assist you when you are working in low lighting. To adjust the backlight for the keypad, tap Start >... -
Page 29: Key Sequences
Chapter 1 — Introduction Key Sequences Use the following key sequences to enter characters into your 700 Color Computer using either a numeric keypad or an alphanumeric keypad. [Gold] or [Gold/White] Plane Keys The [Gold] b plane key (numeric keypad) or the [Gold/White] c plane key (alphanumeric keypad) provides you access to display controls, special characters, and Pocket PC options. -
Page 30: Alpha (Blue) Plane Keys
Chapter — Introduction Alphanumeric Keypad Note: This information does not apply to the 730 Computer. The following table lists sequences that use the [Gold/White] c plane key. See Chapter 2, “Windows Mobile 2003,” for information about the Pocket PC applications. - Page 31 Chapter 1 — Introduction To Enter Press the Keys To Enter Press the Keys F 1 2 F 2 2 F 1 2 2 F 2 2 2 F 1 2 2 2 F 1 3 F 3 3 F 1 3 3 F 3 3 3 F 1 3 3 3 F 1 4...
-
Page 32: Leds
Chapter — Introduction To Enter Press the Keys To Enter Press the Keys d g E d g F d g G d g H d g I d g J d g K d g L d g M d g N d g O d g P... -
Page 33: Modem Support
S AA8 snap-on modem, a stand-alone product, that attaches to the bot- tom of your 700 Color Computer. Note that you cannot place this mo- dem in a dock, printer, or other devices. Contact your Intermec repre- sentative for more information. -
Page 34: Resetting Your 700 Color Computer
3 Press the Reset button. 4 Reinstall the battery pack. Reset button Reset button This illustration shows the back of the 700 Color Computer on the left and of the 730 Computer on the right. 700 Series Color Mobile Computer User’s Manual... -
Page 35: Software Build Version
Software Build Version To check to see if your 700 Color Computer has the latest software build, select Start > Internet Explorer > the Intermec logo. The latest software build version is displayed beneath the Version Information title. Software Tools The following Intermec software tools are available as free downloads: SmartSystemst Foundation Console (www.intermec.com/SmartSystems) -
Page 36: Storage Media
CompactFlash card slot is embedded in the 730 Computer and cannot be removed. To access the Secure Digital card slot, locate the access door at the top of the 730 Computer, remove its screws, then remove the door. Storage Media Access Door Note that the keypad is to the bottom for this 730 Computer. -
Page 37: Internal Card Slots
Internal Card Slots Below is a view of the various card slots within your 700 Color Computer. Note that the 730 Computer only allows access to the Secure Digital and SIM card slots. S The CompactFlash card goes into the top card clot. -
Page 38: Vibrator
Do the following to enable the vibrator for the 700 Color Computer. Tap Start > Settings > the System tab > the Intermec Settings icon. Tap the Device Settings option, tap (+) to expand Beeper, then tap (+) to expand Vibrate. -
Page 39: Wireless Network Support
Accessories The following accessories are available for the 700 Color Computer. Note that this is not a complete list. Contact your Intermec representative for in- formation about these and other accessories that are not in this list. Accessory Descriptions... - Page 40 Chapter — Introduction Display: 740, 741, 750, 751, 760, 761 Diagonal 89mm (3.5 in) 97mm (3.8 in) Colors 64 K 256 K Environmental: 740, 741, 750, 751, 760, 761 Operating Temperature -10° to 55°C (14° to 131°F) -20° to 60°C (-4° to 140°F) Storage Temperature -20°...
- Page 41 Chapter 1 — Introduction Operating System: 740, 741, 750, 751, 760, 761 Microsoft® Windows® Mobile soft- ware for Pocket PC Physical Dimensions: 740, 741, 750, 751, 760, 761 Length 178 mm (7.0 in) 191 mm (7.53 in) Width 89 mm (3.5 in) 90 mm (3.5 in) Height 38 mm (1.5 in)
- Page 42 Chapter — Introduction 700 Series Color Mobile Computer User’s Manual...
-
Page 43: Windows Mobile 2003
Windows Mobile 2003 This chapter introduces Microsoft Windows Mobile 2003 for Pocket PC. While using your 700 Color Computer, keep these key points in mind: S Tap Start on the navigation bar, located at the top of the screen, to quickly move to programs, files, and settings. -
Page 44: Software Builds
Windows Mobile and many of the technologies supported by the 700 Col- or Computer are not from Intermec. Many of the utilities and features on a Windows Mobile device come directly from Microsoft without any mod- ification from Intermec. There may be certain Microsoft-specific issues that Intermec would not be able to support, so contact our front-line sup- port personnel to determine the best source of assistance. -
Page 45: Programs
Chapter 2 — Windows Mobile 2003 display it by tapping the Start flag (shown left) and then Today. On the Today screen, you can see important information for the day. Tap to start a program. Tap and hold to change time format. Tap to change date and time. -
Page 46: Navigation Bar And Command Bar
Chapter — Windows Mobile 2003 Send and receive e-mail messages. Browse Web and WAP (Wireless Application Protocol) sites, and down- load new programs and files from the Internet. Create handwritten or typed notes, drawings, and recordings. Keep track of your tasks. Play digital audio and video files that are stored on your 700 Series Com- puter or on a network. -
Page 47: Notifications
Chapter 2 — Windows Mobile 2003 Tap and hold to display the pop-up menu. Lift the stylus and tap the action you want. Tap outside the menu to close it without performing an action. Notifications When you have something to do, your device notifies you in a variety of ways. -
Page 48: Typing With The Onscreen Keyboard
Chapter — Windows Mobile 2003 Use the input panel to enter information in any program on your 700 Color Computer. You can either type using the onscreen keyboard or write using Block Recognizer, Letter Recognizer, or Transcriber. In either case, the characters appear as typed text on the screen. To show or hide the input panel, tap the Input Panel icon. -
Page 49: Using Block Recognizer
Chapter 2 — Windows Mobile 2003 S To backspace one character, drag the stylus to the left across at least two keys. S To insert a carriage return, tap and hold the stylus anywhere on the key- board and drag down. To use larger keys, tap the input panel arrow, tap Options, select “Key- board”... -
Page 50: Using Letter Recognizer
Chapter — Windows Mobile 2003 Using Letter Recognizer With Letter Recognizer, you can write letters using the stylus just as you would on paper. Tap the input panel arrow, then tap Letter Recognizer. Write a letter in the box. When you write a letter, it is converted to typed text that appears on the screen. -
Page 51: Selecting The Writing
Chapter 2 — Windows Mobile 2003 Tap to use your stylus like a pen. Selecting the Writing If you want to edit or format writing, you must select it first. 1 Tap and hold the stylus next to the text you want to select until the in- sertion point appears. - Page 52 Chapter — Windows Mobile 2003 Select the text you want to convert and tap Recognize on the pop-up menu. The writing is turned into text. Tap to disable the pen function. If the conversion is incorrect, you can choose different words from a list of alternates or return to the original writing.
-
Page 53: Drawing On The Screen
Chapter 2 — Windows Mobile 2003 S Write the letters of a word closely and leave big gaps between words so that the 700 Color Computer can easily tell where words begin and end. S Hyphenated words, foreign words that use special characters such as ac- cents, and some punctuation cannot be converted. -
Page 54: Recording A Message
Chapter — Windows Mobile 2003 Recording a Message In any program where you can write or draw onscreen, you can also cap- ture thoughts, reminders, and phone numbers by recording a message. In the Inbox program, you can add a recording to an e-mail message. In Calendar, Tasks, and Contacts, you can include a recording in the Notes tab. -
Page 55: Finding And Organizing Information
Chapter 2 — Windows Mobile 2003 S To edit a My Text message, tap Tools > Edit My Text Messages. Tap the message to edit and enter new text at the bottom of the screen. Tap to select a prewritten message. Finding and Organizing Information The Find feature helps you to quickly locate information. -
Page 56: Customizing Your 700 Color Computer
Chapter — Windows Mobile 2003 Customizing Your 700 Color Computer You can customize your 700 Color Computer by adjusting settings and installing additional software. Adjusting Settings You can adjust settings to suit the way you work. To see available options, tap Start >... - Page 57 Chapter 2 — Windows Mobile 2003 1 Determine your 700 Color Computer and processor type so that you know which version of the software to install. Tap Start > Settings > the System tab > About > the Version tab, then make a note of the information in Processor.
- Page 58 Chapter — Windows Mobile 2003 Adding a Program Directly from the Internet 1 Determine your 700 Color Computer and processor type so that you know which version of the software to install. Tap Start > Settings > the System tab > About > the Version tab, then make a note of the information in Processor.
-
Page 59: Microsoft Activesync
Chapter 2 — Windows Mobile 2003 Microsoft ActiveSync Visit the following Microsoft Web site for the latest in updates, technical information, and samples: www.microsoft.com/windowsmobile/resources/communities/default.mspx Using Microsoft ActiveSync, you can synchronize the information on the desktop with information on your 700 Color Computer. Synchronization compares the data on your 700 Color Computer with your desktop and updates both computers with the most recent information. -
Page 60: Microsoft Pocket Outlook
Chapter — Windows Mobile 2003 For information about using ActiveSync on your desktop, start ActiveSync on your desktop, and then see ActiveSync Help. View connection status. Tap to connect and synchronize. Tap to stop synchronization. View synchronization status. Tap to synchronize via IR or change synchronization settings. For more information about ActiveSync on your 700 Color Computer, switch to ActiveSync, then tap Start >... -
Page 61: Synchronizing Calendar
Chapter 2 — Windows Mobile 2003 If you use Outlook on your desktop, you can synchronize appointments between your device and desktop. Tap to go to Today Tap to display or edit the appointment details. Tap to create a new appointment Synchronizing Calendar Calendar items stored on your device can be synchronized with calendar items on your desktop or Microsoft Exchange Server. -
Page 62: What's An All Day Event
Chapter — Windows Mobile 2003 Note: In Month View, the day of an appointment assigned to the Holiday category appears in red. This day was assigned the Holiday category. Tap to access the Month view What’s an All Day Event? An appointment can either be a normal appointment or an all day event, which lasts the full day or spans many days. -
Page 63: What's A Recurrence Pattern
Chapter 2 — Windows Mobile 2003 Note: You cannot modify or create all-day events with attendees on the device. If you create all day events with attendees on your desktop, use Ac- tiveSync to copy such events to the device. Then, view them in Calendar. For more information on copying files, see ActiveSync Help. -
Page 64: Viewing Appointments
Chapter — Windows Mobile 2003 Viewing Appointments You can view appointments in one of several views (Agenda, Day, Week, and Month). In Agenda view, upcoming appointments are displayed in bold. To see detailed appointment information in any view, tap the ap- pointment. -
Page 65: Creating Or Changing An Appointment
Chapter 2 — Windows Mobile 2003 Creating or Changing an Appointment To create an appointment, tap New. To select a new date from a pop-up calendar, tap the display date. To enter or select a new time, tap the dis- play time. -
Page 66: Creating An All Day Event
Chapter — Windows Mobile 2003 Creating an All Day Event To create an all day event, tap New, then tap All Day, then select Yes. Tap to select either Yes or No whether this is an all day event. Note: To change an all day event, switch to Day or Agenda view, tap the event listed at the top of the calendar, and then tap Edit. -
Page 67: Adding A Note To An Appointment
Chapter 2 — Windows Mobile 2003 3 To change how many minutes before the appointment you are re- minded, tap the minutes displayed, then select the new minutes from a drop-down or enter the new minutes. Tap minutes to change hours, days, or weeks. -
Page 68: Making An Appointment Recurring
Chapter — Windows Mobile 2003 2 Tap the Notes tab to enter notes. For specific instructions, tap Start > Help > Notes to see Notes Help. These are controls for the recorder. Use your stylus to write or draw your informa- tion here. -
Page 69: Sending A Meeting Request
Chapter 2 — Windows Mobile 2003 3 On the Select tab, select the categories to which you want to assign the appointment. 4 To create a new category, tap the Add/Delete tab, enter the category name, then tap Add. The new category is automatically selected in the Select tab. -
Page 70: Finding An Appointment
Chapter — Windows Mobile 2003 4 Inbox automatically creates a meeting request and sends it to the atten- dees the next time you synchronize with your desktop. Textual notes entered in the Notes tab (excluding writing or recordings) are sent also. A check mark indicates a selected attendee. -
Page 71: Deleting An Appointment
Chapter 2 — Windows Mobile 2003 Deleting an Appointment In the calendar, tap and hold the appointment, then tap Delete Appoint- ment. When you synchronize next, this is also deleted from the desktop. Changing Calendar Options In the calendar, tap Tools > Options. S To see appointment indicators, select icons to display in Show icons. -
Page 72: Creating A Contact
Chapter — Windows Mobile 2003 If you use Microsoft Outlook on your desktop, you can synchronize contacts between your 700 Color Computer and your desktop. Select the category of contacts you want displayed in the list. Tap and enter part of a name to quickly find it in the list. -
Page 73: Synchronizing Contacts
Chapter 2 — Windows Mobile 2003 Synchronizing Contacts Contacts stored on your device can be synchronized with Outlook contacts stored on your desktop or with Mobile Information Server 2002 or later. New items entered in one location are copied to the other during synchro- nization. -
Page 74: Creating Or Changing A Contact
Chapter — Windows Mobile 2003 Creating or Changing a Contact S To create a contact, tap New. To enter notes, tap the Notes tab. When finished, tap ok to return to the contact list. S To change a contact, tap it in the contact list, and then tap Edit. To cancel edits, tap Edit >... -
Page 75: Assigning A Contact To A Category
Chapter 2 — Windows Mobile 2003 Note: To edit an existing note, tap the contact, tap Edit > the Notes tab. These are controls for the recorder. Use your stylus to write or draw your informa- tion here. Tap to activate the keyboard. Tap to activate the writing pad. -
Page 76: Sending A Message To A Contact
Chapter — Windows Mobile 2003 Sending a Message to a Contact 1 In the contact list, tap and hold the contact. To select multiple contacts, tap and drag. Then, tap and hold the selected contacts. 2 On the pop-up menu, select Send Email or Send SMS, depending upon the type of message to send. -
Page 77: Deleting A Contact
Chapter 2 — Windows Mobile 2003 S From Contacts, start typing a contact name until you see it displayed on the screen. To show all contacts again, tap the text box at the top of the screen and clear the text, or tap the arrow to the right of the text box. S In the contact list, tap the category list (labeled All Contacts by default) and tap the category to which you have assigned a contact. -
Page 78: Tasks: Keeping A To Do List
Chapter — Windows Mobile 2003 S To increase the available space for displaying contacts in the list, clear Show ABC tabs. Clear this to view more contacts per screen. Tap this to view larger text. Enter the three-digit area code. Select from a drop-down list. -
Page 79: Creating A Task
Chapter 2 — Windows Mobile 2003 Creating a Task S To quickly create a task, enter text in the Tap here to add a new task box at the top of the screen. If you do not see this box, tap Tools > Entry Bar. -
Page 80: Notes: Capturing Thoughts And Ideas
Chapter — Windows Mobile 2003 Notes: Capturing Thoughts and Ideas To switch to Notes on your 700 Color Computer, tap Start > Notes. Notes helps you quickly capture your ideas, notes, and thoughts. You can create a note using written and typed text, drawings, and recordings. You can also share your notes with others through e-mail, infrared, and syn- chronization with your desktop. -
Page 81: Synchronizing Notes
Chapter 2 — Windows Mobile 2003 Synchronizing Notes Notes can be synchronized between your desktop and device either through notes synchronization or file synchronization. Notes synchroniza- tion synchronizes the notes on your 700 Color Computer with Outlook Notes on your desktop. File synchronization synchronizes all notes on your 700 Color Computer with the My Documents folder for the 700 Color Computer on your desktop. -
Page 82: Synchronizing E-Mail Messages
Chapter — Windows Mobile 2003 With synchronization, messages are synchronized between the device In- box and the PC Inbox by using ActiveSync and Microsoft Exchange or Microsoft Outlook. For more information, see “Synchronizing E-mail Messages” below. When connecting to a POP3 or IMAP4 server, you use a modem to con- nect to your Internet service provider (ISP), or a modem or Ethernet card to connect to the local area network to which your e-mail server is connec- ted. -
Page 83: Connecting To A Mail Server
Chapter 2 — Windows Mobile 2003 move two messages from the Inbox folder to a folder named Family, and you have designated Family for synchronization, the server creates a copy of the Family folder and copies the messages into that folder. You can then read the messages while away from your desktop. -
Page 84: Composing And Sending Messages
Chapter — Windows Mobile 2003 Setting Up or Changing an Account S To set up a POP3 or IMAP4 e-mail account, tap Accounts > New Ac- count. Follow the instructions in the New Account Wizard. S To set up an SMS account, tap Accounts > Accounts, and then tap SMS. -
Page 85: Companion Programs
Chapter 2 — Windows Mobile 2003 2 To select an account, tap the From list and select “ActiveSync,” “SMS,” or the desired e-mail account. 3 Enter the e-mail address or SMS address of one or more recipients, sepa- rating them with semicolons. To access addresses and phone numbers from Contacts, tap To. -
Page 86: Pocket Word
Chapter — Windows Mobile 2003 Pocket Word Pocket Word works with Microsoft Word on your desktop to access copies of your documents. You can create new documents on your 700 Color Computer, or you can copy documents from your desktop to your 700 Color Computer. -
Page 87: Typing Mode
Chapter 2 — Windows Mobile 2003 You can insert the data in a document. First, make sure that no drawings are selected, tap and hold anywhere on the document, then tap Insert Date from the pop-up menu. Typing Mode Using the input panel, enter typed text into the document. For more in- formation on entering typed text, see “Basic Skills”... -
Page 88: Writing Mode
Chapter — Windows Mobile 2003 Writing Mode In writing mode, use your stylus to write directly on the screen. Ruled lines are displayed as a guide, and the zoom magnification is greater than in typing mode to allow you to write more easily. For more information on writing and selecting writing, see “Basic Skills”... -
Page 89: Synchronizing Pocket Word Documents
Chapter 2 — Windows Mobile 2003 Resize an object by dragging the selection handles. Tap to select formatting options, such as line weight, fill color, and line color. Tap an arrow to see your choices. Pen icon. Synchronizing Pocket Word Documents Pocket Word documents can be synchronized with Word documents on your desktop. -
Page 90: Creating A Workbook
Chapter — Windows Mobile 2003 Creating a Workbook Use Pocket Excel to create workbooks, such as expense reports and mileage logs. To create a new file, tap Start > Programs > Pocket Excel > New. A blank workbook appears. Or, if you have selected a template for new workbooks in the Tools >... -
Page 91: Msn Messenger
Chapter 2 — Windows Mobile 2003 S Freeze panes on a worksheet. First select the cell where you want to freeze panes. Tap View > Freeze Panes. You might want to freeze the top and leftmost panes in a worksheet to keep row and column labels visible as you scroll through a sheet. -
Page 92: Setting Up An Account
Chapter — Windows Mobile 2003 Setting Up an Account Before you can use MSN Messenger, you must set up the instant messag- ing accounts to use. For MSN Messenger Service, you must have a Micro- soft Passport or Hotmail account. For Exchange Instant Messaging, you must have an Exchange account. -
Page 93: Working With Contacts
Chapter 2 — Windows Mobile 2003 Working with Contacts The MSN Messenger window shows all of your messenger contacts at a glance, divided into Online and Not Online categories. From this view, while connected, you can chat, send e-mail, block the contact from chat- ting with you, or delete contacts from your list using the pop-up menu. -
Page 94: Sending A Message
Chapter — Windows Mobile 2003 S To see who has you listed as a contact, tap View. Sending a Message S Tap a contact to whom you want to send a message. Enter your message in the text entry area at the bottom of the screen and tap Send. To quickly add common messages, tap My Text and tap a desired message. -
Page 95: Microsoft Reader
Chapter 2 — Windows Mobile 2003 Use Microsoft Windows Media Player on your desktop to copy digital au- dio and video files to your 700 Color Computer. You can play Windows Media and MP3 files on your Windows Mobile. For information about using Windows Media Player for Windows Mobile, tap Start >... -
Page 96: Using The Library
Chapter — Windows Mobile 2003 Using the Library The Library is your Reader home page with a list of the books stored on your 700 Color Computer or storage card. To open the Library: S On the Reader command bar, tap Library. S On a book page, tap the book title, then tap Library. -
Page 97: Using Reader Features
Chapter 2 — Windows Mobile 2003 Using Reader Features Reading a book electronically gives you several options not available with paper books. These options are available from any book page. Select text by dragging across the text on the page. Then, tap an option on the pop-up menu, as described here: Find text in a book by tapping Find on the pop-up menu. -
Page 98: Mobile Favorites Folder
Chapter — Windows Mobile 2003 Mobile Favorites Folder Only items stored in the Mobile Favorites subfolder in the Favorites folder in Internet Explorer on your desktop are synchronized with your 700 Col- or Computer. This folder was created automatically when you installed ActiveSync. -
Page 99: Using Avantgo Channels
Chapter 2 — Windows Mobile 2003 7 To download the pages that are linked to the mobile favorite you just created, in Internet Explorer on the desktop, right-click the mobile favorite, then click Properties. On the Download tab, specify the number of links deep you want to download. -
Page 100: Using Pocket Internet Explorer
Chapter — Windows Mobile 2003 Using Pocket Internet Explorer You can use Pocket Internet Explorer to browse mobile favorites and chan- nels that were downloaded to your 700 Color Computer without connect- ing to the Internet. You can also connect to the Internet through an ISP or a network connection and browse the Web. -
Page 101: Browsing The Internet
Chapter 2 — Windows Mobile 2003 Browsing the Internet 1 Set up a connection to your ISP or corporate network. 2 To connect and start browsing, do one of the following: S Tap the Favorites icon, and then tap the favorite you want to view. S Tap View >... - Page 102 Chapter — Windows Mobile 2003 700 Series Color Mobile Computer User’s Manual...
-
Page 103: Installing Applications
There are multiple ways to get an application to your 700 Series Color Mobile Computer; just as there are multiple ways to package the applica- tion for delivery. Note: “700 Color” pertains to 730, 740, 741, 750, 751, 760, and 761 Computers unless otherwise noted. 700 Series Color Mobile Computer User’s Manual... -
Page 104: Packaging An Application
S The Secure Digital storage card creates the “\SDMMC Disk” folder. S The CompactFlash storage card creates the “\Storage Card” folder. Note: 730 Computers do not support Compact Flash storage cards. Instead, the “\Storage Card” folder is created for the Secure Digital storage card. -
Page 105: Using Microsoft Activesync
3 Click Explore to access the Mobile Device folder on your unit. 4 From your desktop, select Start > Windows Explorer, then browse the “C:\Intermec\700C Mgmt Tools\CabFiles” path for any CAB files needed for your 700 Color Computer. Select the appropriate file, right- click the file for a pop-up menu, then select Copy. -
Page 106: Using The Ftp Server
See Chapter 7, “Programming,” for more information. Using a Storage Card Note: The 730 Computer does not use the CompactFlash storage card, only Secure Digital storage cards. Use these instructions only if you are using either a 740 or a 741 Computer that does not have an 802.11 radio installed. -
Page 107: Deleting The Old Registry File
— Chapter 3 Installing Applications When you change the IP address using the Intermec Settings applet, the information is lost when you perform a warm-boot, and the original IP address is used. You must load the REGFLUSH.CAB file before running the Registry Save application. -
Page 108: Loading The Registry Save Application
Chapter — Installing Applications Loading the Registry Save Application 1 On the 700 Color Computer, double-click the REGFLUSH.CAB file to load the “Registry Save” application. 2 Set up the 700 Color Computer to your specifications using the Inter- mec Settings and other applets. 3 Select Start >... -
Page 109: Updating Other Computers In Your Network
— Chapter 3 Installing Applications 2 The new registry file should be on the root of the Flash File Store folder with today’s date. Updating Other Computers in Your Network These instructions assume you have Windows XP on your desktop. 1 Connect your 700 Color Computer to your desktop using Microsoft ActiveSync and a cradle. -
Page 110: Updating The System Software
You need to download the latest upgrade files from the Intermec web site to your desktop PC. 1 Start your web browser and go to the Intermec web site at www.inter- mec.com/wm2003. 2 Click the PPC 2003 OS link, fill out the appropriate information, then click Submit Information. -
Page 111: Using A Storage Card To Upgrade The 700 Color Computer
700 Color Computer 730 Computer This illustration shows the top of the 700 Color Computer on the left and of the 730 Computer on the right. Note that the keypad is to the bottom. 2 Place the storage card in your desktop PC card reader, then copy all re- quired upgrade files to the storage card. -
Page 112: Using The Smartsystems Console To Upgrade The 700 Color Computer
S the SmartSystems Foundation. To download SmartSystems Foundation, go to www.intermec.com/idl and open the Device Management page. S the device upgrade .exe file. This file is available from the Intermec web site at www.intermec.com. Go to Service & Support > Downloads. -
Page 113: Migrating From A 700 Monochrome Computer
— Chapter 3 Installing Applications Migrating from a 700 Monochrome Computer As you migrate from a 700 Monochrome Computer to a 700 Color Com- puter, you need to consider the following: When converting a 700 Mono- chrome Computer application to run on the 700 Color Computer, most APIs should work without changes. - Page 114 Chapter — Installing Applications 700 Series Color Mobile Computer User’s Manual...
-
Page 115: Network Support
Note that the 700 Color automatically installs the appropriate software for radio or phone use when the unit is turned on. Note: “700 Color” pertains to 730, 740, 741, 750, 751, 760, 761, and 761B Computers unless otherwise noted. -
Page 116: Understanding Your 700 Color Computer
Below and on the next page are the colors and their types. 761 Computers in the United States and Canada use the external antenna with no color in its tip. See your Intermec representative for more information. S Red (760 Computers) -
Page 117: Personal Area Networks
Bluetooth software is in the Bluetooth Resource Kit and the Bluetooth Resource Kit User’s Guide via the Intermec Developer Li- brary (IDL), which is available as a download from the Intermec web via www.intermec.com/idl. See your Intermec representative for information. -
Page 118: About The Application
Mode The default tab activates or deactivates Bluetooth. When Bluetooth is acti- vated, the 700 Color Computer discovers and connects to remote devices. 730 Screen 700 Color Screen Wireless Printing Use this tab to print via Bluetooth devices. Tap Device Discovery to dis- cover (or scan) for remote Bluetooth devices. - Page 119 Chapter 4 — Network Support Properties Select a COM Port from the Choose COM Port box to register for this device, then check Enable Wireless Printing to complete the COM port registration. To change your COM port selection, clear (uncheck) the En- able Wireless Printing box, select a new COM port, then check Enable Wireless Printing again.
-
Page 120: File Transfer
Use this page to enable your unit to receive files from another Bluetooth device, or from any device that supports this function. This does not apply to the 730 Computer. From this point, this transfer is similar to an IrDA file transfer. Tap Start > Programs > File Explorer, tap to hold the file to transfer, then select Beam File from its pop-up menu. -
Page 121: Connecting With Bluetooth
Chapter 4 — Network Support Connecting with Bluetooth Note: While these instructions apply to many Bluetooth devices, these in- structions use the Nokia 3650 for example purposes. Before you connect to the network, make sure Bluetooth is enabled on your 700 Color Computer before discovering and connecting to remote devices. - Page 122 Chapter — Network Support 2 Enter a name for the connection, such as “Nokia.” In the Select a mo- dem list, select “Bluetooth,” then tap Next to continue. 3 Tap New... if the phone is not listed in the known devices. Make sure your Bluetooth device is turned on before you start the search.
- Page 123 Chapter 4 — Network Support 4 When the discovery of devices is complete, select your Bluetooth device, then tap Next to continue. 5 Enter the correct Device PIN on both the Bluetooth device and the 700 Color Computer, then tap Next to continue. 700 Series Color Mobile Computer User’s Manual...
- Page 124 Chapter — Network Support 6 Enter a name for the device if needed, then tap Finish. 7 After bonding completes, select your Bluetooth device from the list of bonded devices, then tap Next. 700 Series Color Mobile Computer User’s Manual...
-
Page 125: Local Area Networks
Chapter 4 — Network Support 8 Enter the appropriate number as it should be dialed for your Bluetooth connection, then tap Next to continue. Enter the user name, password, and domain required for your Bluetooth device, then tap Finish. Now you can establish a connection to your network via the Internet Ex- plorer application. -
Page 126: Configuring 802.11 Radio Communications
802.11b/g radio module. Go to Appendix A, “Configurable Settings,” for information. The easiest way to configure the network parameters on the 700 Color Computer is to use the Intermec Settings applet. Go to Appendix A, “Configurable Settings.” for information. Network Adapters The 700 Color Computer can have up to three radios installed. -
Page 127: Ethernet Communications (740, 741, 750, 751, 760, 761 Computers)
When a warm boot is performed, the 700 Color Computer loads the network set just prior to the warm boot. The 730 Computer only has the 802.11b radio and Bluetooth. It does not have an external antenna. Other radios are not supported. -
Page 128: Wireless 802.11 Communications
Chapter — Network Support Wireless 802.11 Communications When “Wireless 802.11” is selected via the NDISTRAY pop-up menu, the Wireless 802.11 antenna icon shown to the left appears in the system tray as circled in the following illustration. No Networking When “No networking” is selected from the NDISTRAY pop-up menu, the disconnected icon shown to the left appears in the system tray as circled in the following illustration. -
Page 129: Network Connections
Chapter 4 — Network Support Network Connections From the 700 Color Computer, tap Start > Settings > the Connections tab > the Connections icon > the Advanced tab > Network Card or the Network Adapters tab to access the network connections for this unit. Make the changes necessary for your network, then tap ok when finished. - Page 130 Chapter — Network Support 2 Tap the Advanced tab > Network Card > the Wireless tab > Add New . 3 Tap the General tab, then enter a network name. If the network was detected, the network name is entered and cannot be changed. From Connects to, select to what your network is to connect.
- Page 131 Chapter 4 — Network Support b Set Data Encryption to “Disabled.” To Enable WEP Encryption a Set Authentication to either “Open” if WEP keys are not required; or “Shared” when WEP keys are required for association. b Set Data Encryption to “WEP.” c To change the network key, clear The Key is provided for me auto- matically box, then enter the new Network key and select the ap- propriate Key index.
- Page 132 Set Authentication to “WPA” (see page 236). b Set Data Encryption to either “WEP” or “TKIP” (see page 236). To Enable WPA Authentication Using a Preshared Key (730, 741, 751, 761 Computers) a Set Authentication to “WPA-PSK” (see page 236).
- Page 133 Chapter 4 — Network Support 5 Tap the 802.1x tab, select either “PEAP” or “Smart Card or Certificate” for the EAP type, then tap Properties to adjust its settings. 6 Tap ok to return to the Configure Wireless Network screen. 7 From the Networks to access drop-down list, select “All Available,”...
-
Page 134: Autoip/Dhcp
Chapter — Network Support AutoIP/DHCP Automatic Private IP Addressing (AutoIP) is enabled by default in Windows Mobile 2003. To remain compatible with other versions of Pocket PC, this setting needs to be enabled. You can configure the registry settings in the following to set the required AutoIP/DHCP behavior: S For Ethernet: HKEY_LOCAL_MACHINE\Comm\LAN9001\TcpIp S Fot 802.11:... -
Page 135: Microsoft Phone Application (761 Computers With Cdma Radios)
Chapter 4 — Network Support Microsoft Phone Application (761 Computers with CDMA Radios) With the WAN radio module installed in your 761 Computer, you can send and receive telephone calls. Use the speaker on the back of the com- puter as your earpiece and use the connector on the bottom of the com- puter for your mouthpiece. - Page 136 Chapter — Network Support 4 Enter your 6-digit activation code, then tap Next to continue. 5 Enter the phone number and MSID from Sprint, tap Next to continue. 6 The application prompts whether the information entered is correct. If so, tap Yes to continue, else tap No to return to the previous screen. 700 Series Color Mobile Computer User’s Manual...
-
Page 137: Data Provisioning (Verizon)
Chapter 4 — Network Support 7 Note that voice service is available immediately. Data service take a minimum of four hours of activation before you can use the service. If after four hours, a data connection is not established, see “Data Provi- sioning”... -
Page 138: Phone Application
Chapter — Network Support 3 Tap Auto to initiate the activation. 4 The application acknowledges that your phone is now in service. Tap Finish to close the wizard. Phone Application Note: Wait at least four hours after Sprint activation is complete before using this application. - Page 139 Chapter 4 — Network Support Tap the appropriate keys to enter a telephone number, then tap Talk to dial the number. Tap End to “hang up” the phone. Tap this to backspace one digit. Tap this to dial the phone number shown above the keypad.
- Page 140 Chapter — Network Support Call History Tap Call History to note the telephone numbers that were previously dialed from this 761 Computer. Tools Use the Tools menu to send a voice mail, access the Activation Wizard, send an SMS email message, or configure phone settings. S Tap Tools >...
- Page 141 Chapter 4 — Network Support S Tap Tools > Send SMS tab to access the Inbox application and send an SMS (Short Messaging Service) message. Be sure to have an SMS num- ber ready to send the message — this is usually the mobile phone num- ber.
- Page 142 Sprint network, by attempting to make a cellular line connection to the WAN before the 761 Computer is data provisioned, or by manually starting the connections through this screen. Intermec recommends that Sprint Network “push” the data provisioning to your unit. This should oc- cur shortly after the voice activation is complete.
-
Page 143: Microsoft Phone Application (761 Computers With Gsm Radios)
Chapter 4 — Network Support S Tap the System tab to select the applicable function. Sprint Networks Verizon Networks S Tap the Phone Info tab to view the phone settings. Sprint Networks Verizon Networks Microsoft Phone Application (761 Computers with GSM Radios) With the WAN radio module installed in your 761 Computer, you can send and receive telephone calls. -
Page 144: Activation
Chapter — Network Support Activation The GSM phone is activated via a SIM card that you can purchase from your network provider. Phone Application Tap the appropriate keys to enter a telephone number, then tap Talk to dial the number. Tap this to backspace one digit. - Page 145 Chapter 4 — Network Support Speed Dial Tap Speed Dial to select a telephone number with which the 761 Com- puter is to dial automatically. To add to this list, use the Contacts applica- tion. See Chapter 2, “Windows Mobile 2003,” for more information about the Contacts application.
- Page 146 Chapter — Network Support Phone Settings Either select Tools > Options from the Phone application or select Start > Settings > the Personal tab > the Phone icon to access the applet. S Tap the Phone tab to customize your phone settings such as the ring type and ring tone to use for incoming calls, and the keypad tone to use when entering phone numbers.
- Page 147 Chapter 4 — Network Support Tap any of the settings, then tap Get Settings. Make your changes, then tap ok to return to the Settings screen. Below is a sample Settings screen. S Tap the Network tab to find, set, or select the type of network on which this phone is to communicate.
-
Page 148: Phone Information
Chapter — Network Support Phone Information To learn the latest phone settings, including the manufacturer, model, firmware rev, and IMEI, select Start > Settings > the System tab, then tap the WAN Info desktop icon. Tap ok when finished. SB555 Watcher (760 Computers with CDMA Radios) The SB555 Watcher program is used on the 760 Computer with CDMA radios only. -
Page 149: Copying Cdma Radio Module Cab Files From Intermec Web Site
ActiveSync. See Chapter 2, “Windows Mobile 2003” for more infor- mation about ActiveSync. 1 Obtain software from the Intermec web site as described earlier. Down- load the software to any location on your 760 Computer, such as the Temp folder via the My Device root location. -
Page 150: Finishing The Installation
Chapter — Network Support 5 Install the CompactFlash or Secure Digital memory card into the card slot in your 760 Computer. Note that if you do not want the CAB files erased after installation, set the CAB file attributes to “read-only” after copy- ing them to the storage card. -
Page 151: Activation
Chapter 4 — Network Support Activation Note: Set the date and time before doing this activation. SB555 Watcher is for activation and data provisioning. Once you enable voice capability, data capability, or both depending on the carrier, remove this program from the system by cold-booting your computer. Do not use the SB555 Watcher to make data/voice calls on a daily basis: S The SB555 Watcher application is a third-party application unaware of certain power management methods used in your 760 Computer. - Page 152 Chapter — Network Support ESN of the modem Lock/Activation Code (may be termed one of the following): S MSL — Master Subsidy Lock S OTSL — OneTime Subsidy Lock S SPC — Service Provisioning Code S OTKSL — One Time Key Subsidy Lock SID (System ID) NID (Network ID) User Name...
-
Page 153: Verizon Automated Activation Process
Chapter 4 — Network Support 4 When you reach the Activation screen, select Manual Activation. 5 At the appropriate screen, enter the Activation Code (OTSL, MSL, OTKSL, or SPC) provided by your carrier and tap Next. 6 Enter the phone number provided when your 760 Computer was acti- vated and tap Next. - Page 154 Chapter — Network Support 2 Tap Yes, I accept to accept the license agreement, tap OK to continue. Note this license agreement does not appear again after this installation. 3 Select OK to initiate the warm-boot, then after the warm-boot, start the Watcher program again, select Automated Activation, then click Next.
-
Page 155: Sprint Automated Activation Process
Use the fol- lowing for establishing and maintaining connection to the WAN radio: S Custom application using Intermec WWAN Toolkit API S Custom customer application using Connection Manager Interface Note: When connecting to the WAN radio via Pocket PC Connection Manager, use the 10-digit phone number@vzw3g.com for the user... - Page 156 Chapter — Network Support 2 Perform a cold-boot on your 760 Computer, then go through the nor- mal Pocket PC set-up (i.e. Align Screen etc.). 3 Important! Set the Date and Time. 4 Tap the Sprint_Watcher_PPC_2002-03xxx.CAB file to perform the installation.
- Page 157 Chapter 4 — Network Support Using Sprint Watcher Before you start using the Sprint Watcher application, make sure you match the correct ESN with each 760 Computer and that you have at least 80% CDMA signal strength. The ESN that you give to your provider is either on the box or on a label inside the battery compartment.
- Page 158 Chapter — Network Support 3 Enter the MSL or lock code received from Sprint. 4 Enter the phone number (MIN) and MSID received from Sprint. These numbers may be the same. 5 After entering the phone number and MSID, the modem then resets and the Watcher application displays the screens shown here: Note: If the “searching for SB555”...
- Page 159 Chapter 4 — Network Support Data Provisioning At this point, the activation on the Sprint network is complete. It is rec- ommended by Sprint to wait before you launch data provisioning to allow time for the activation to propagate through your Sprint network. Before you manually launch data provisioning, wait at least 30 minutes.
- Page 160 S If after several attempts to complete the Data Provisioning over the air, it may be necessary to manually enter the data activation method. S Go to Intermec Knowledge Central www.intermec.com, then select Ser- vice & Support > Knowledge Central) to learn about manual activa- tion.
-
Page 161: Telus And Bell Mobility Activation
Watcher is intended for activation purposes only. Use the fol- lowing to establish and maintain connection to the WAN radio: S Custom application using Intermec WWAN Toolkit API S Custom customer application using Connection Manager Interface Telus and Bell Mobility Activation Activation of Bell Mobility and Telus are similar to the first portion of the Sprint activation process. - Page 162 Use the MC45, MC46, or MC75 AT command interface from Siemens AG to program the GPRS/GSM MC45, MC46, or MC75 radio module. The following documentation is available either from Intermec or from Siemens AG. Contact either your Intermec representative or the Siemens AG support personnel for information.
- Page 163 Chapter 4 — Network Support 2 Enter a name for the connection, select the appropriate modem (as listed here) from the Select a modem drop-down list, then tap Next to continue. S 760 Computers “WANA on COM4” S 761 Computers “WANB on COM5”...
- Page 164 Chapter — Network Support 4 Tap Advanced to adjust the baud rate. 5 Select the appropriate baud rate (as listed here) from the Baud rate drop-down list. S 760 Computers 115200 S 761 Computers 57600 S 761B Computers 700 Series Color Mobile Computer User’s Manual...
- Page 165 Chapter 4 — Network Support 6 Tap the Port Settings tab, check Enter dialing commands manually, tap ok, then tap Finish to return to the Connections screen. 7 Tap Manage existing connections from the Connections page, press and hold the new connection for a pop-up menu, then tap Connect to initiate the connection.
-
Page 166: Remote Access (Modems)
Chapter — Network Support Remote Access (Modems) You can set up connections to the Internet and corporate network at work to do such activities as browsing the Internet or intranet, sending and re- ceiving e-mail and instant messages, and synchronizing information using ActiveSync. - Page 167 Chapter 4 — Network Support 2 Enter a name for the connection, such as “ISP Connection.” If using an external modem with a cable, select “Hayes Compatible on COM1” from the Select a modem list. Tap Next to continue. 3 Enter the access phone number, then tap Next. 700 Series Color Mobile Computer User’s Manual...
- Page 168 5 Tap the Advanced tab from the Connections screen, then tap Select Location to specify your current location. These settings apply to all connections. Tap Use dialing rules, tap OK,then tap Edit to continue. 730, 740, 750, 760 Screens 741, 751, 761 Screens 700 Series Color Mobile Computer User’s Manual...
-
Page 169: Connecting To Work
Chapter 4 — Network Support 6 Specify your current phone type. If your phone type is pulse dialing, check the Pulse dialing box. If your type is tone dialing (as most phone lines are), then clear the Pulse dialing box. Continue to tap ok to close each page and return to the Settings page. - Page 170 Chapter — Network Support 1 Tap Start > Settings > the Connections tab > the Connections icon. In My ISP, tap Add a new modem connection. 2 Enter a name for the connection, such as “Company Connection.” In the Select a modem list, select your modem type, then tap Next to con- tinue.
- Page 171 Chapter 4 — Network Support 3 Enter the access phone number, using some of the following guidelines. If you know part of the phone number changes frequently as you travel, create dialing rules to avoid creating numerous modem connections for the same phone number.
-
Page 172: Creating A Vpn Server Connection To Work
Chapter — Network Support 4 If necessary, enter the user name, password, and domain (provided by an ISP or network administrator). If a domain name was not provided, try the connection without entering a domain name, then tap Finish. Creating a VPN Server Connection to Work A VPN connection connects securely to servers via the Internet. - Page 173 Chapter 4 — Network Support 2 In Name, enter a name for the connection, such as a company’s name. In Host name/ IP, enter the VPN server name or IP address. Next to VPN type, select the type of authentication to use with your device: “IPSec/L2TP”...
-
Page 174: Ending A Connection
You can also contact your Intermec representative for support. SmartSystemst Foundation Console (www.intermec.com/SmartSystems) This tool, available as a free download from Intermec, includes a manage- ment console that provides a default method to configure and manage In- termec devices “out-of-the-box,” without the purchase of additional soft- ware licenses. -
Page 175: Snmp Configuration On The Mobile Computer
Contact your Intermec repre- sentative for more information. Tap Start > Settings > the System tab > the Intermec Settings icon to ac- cess the applet, then tap to expand the SmartSystems Information option. SNMP Configuration on the Mobile Computer In short, SNMP is an application-layer protocol that facilitates the ex- change of management information between network devices. -
Page 176: Object Identifiers
Defines objects for Automated Data Collection (ADC), such as bar code symbologies. S ITCSNMP.MIB Defines objects for Intermec SNMP parameters and security methods, such as an SNMP security IP address. S ITCTERMINAL.MIB Defines objects for 700 Color parameters, such as key clicks. -
Page 177: Configuring With Snmp
The Intermec base OID is 1.3.6.1.4.1.1963. Use your SNMP management station to get and set variables that are de- fined in the Intermec MIBs. You can set the traps, identification, or secu- rity configuration parameters for SNMP. - Page 178 Chapter — Network Support 700 Series Color Mobile Computer User’s Manual...
-
Page 179: Printer Support
Printer Support The 700 Series Color Mobile Computer works with the following printers from Intermec. Contact an Intermec representative for information about these printers. S 6808 A 4-inch belt-mount printer. S 6820 A full-page, 80-column printer. S 782T A 2-inch workboard printer. -
Page 180: Printing Ascii
S Add port drivers to print ASCII directly to the port. S Use LinePrinter ActiveX Control from the Printing Resource Kit via the Intermec Developer Library (IDL) available as a download from the In- termec webs site at www.intermec.com/idl. Contact your Intermec rep- resentative for more information. -
Page 181: Npcp Printer Driver
About NPCP ® NPCP (Norand Portable Communications Protocol) is a proprietary protocol that provides session, network, and datalink services for Intermec mobile computers in the Intermec LAN environment used with printers and data communications. NPCP Driver Installation and Removal Use LPT9: for the NPCP printer device and COM1 for the last parame- ter. -
Page 182: Opening The Npcp Driver
Chapter — Printer Support Opening the NPCP Driver The application opens the NPCP driver by using the CreateFile() function. The call can be implemented as follows. The first parameter “LPT9:” must reflect the device name and index used in the RegisterDevice() function call and will fail for any of the following reasons: hFile = CreateFile(_T(”LPT9:”), GENERIC_WRITE | GENERIC_READ, 0, NULL, OPEN_ALWAYS, FILE_ATTRIBUTE_NORMAL,... -
Page 183: Npcp Printer Communications
Chapter 5 — Printer Support #define IOCTL_NPCP_CANCEL CTL_CODE(FILE_DEVICE_SERIAL_PORT,0x400,METHOD_BUFFERED,FILE_ANY_ACCESS) #define IOCTL_NPCP_BIND CTL_CODE(FILE_DEVICE_SERIAL_PORT,0x401,METHOD_BUFFERED,FILE_ANY_ACCESS) #define IOCTL_NPCP_CLOSE CTL_CODE(FILE_DEVICE_SERIAL_PORT,0x402,METHOD_BUFFERED,FILE_ANY_ACCESS) #define IOCTL_NPCP_ERROR CTL_CODE(FILE_DEVICE_SERIAL_PORT,0x403,METHOD_BUFFERED,FILE_ANY_ACCESS) #define IOCTL_NPCP_FLUSH CTL_CODE(FILE_DEVICE_SERIAL_PORT,0x404,METHOD_BUFFERED,FILE_ANY_ACCESS) #define IOCTL_NPCP_IOCTL CTL_CODE(FILE_DEVICE_SERIAL_PORT,0x405,METHOD_BUFFERED,FILE_ANY_ACCESS) #define IOCTL_NPCP_PRTVER CTL_CODE(FILE_DEVICE_SERIAL_PORT,0x406,METHOD_BUFFERED,FILE_ANY_ACCESS) S IOCTL_NPCP_CANCEL This cancels all printing at the printer. It flushes the printer buffers and reinitializes the printer to its default state. -
Page 184: Sample Code
Chapter — Printer Support 3 Use IOCTL_NPCP_FLUSH to poll the printer to free up printer buff- er resources. Use IOCTL_NPCP_FLUSH to poll the printer’s status. If an error is reported by the IOCTL, then use IOCTL_NPCP_ERROR to get the error and determine the correct recovery procedure. 4 Use WriteFile();... -
Page 185: O'neil Printer Driver
Chapter 5 — Printer Support O’Neil Printer Driver The DTR printer communications driver is a Stream Device Driver named ONEIL.DLL. All applications use WIN32 API functions to access drivers. Applications easily implement basic operations using the CreateFile(), WriteFile(), DeviceIOControl() and CloseHandle() Win32 APIs. The driver supports communications to 6804DM, 6804T, 6805A, 6806, 6808, 681T, PB20, and PB42 printers over a selected serial port. -
Page 186: Closing The Dtr Driver
3 Use CloseHandle() to close the driver. Configuring PB42 Printers Via Intermec Settings Tap Start > Settings > the System tab > the Intermec Settings icon to ac- cess the applet. Tap (+) to expand the Printers option, then tap (+) to ex- pand the PB42 Settings option and make your adjustments. -
Page 187: Scanner Support
Photography is a secondary application; the lens in the device favors bar code reading. Photos are 640x480, 256 gray-scale. 1D Laser Scanner: (not supported on 730 Computers) Traditional laser scanner that decodes 1D bar codes. — includes the SE900, SE900HS, SE900-S6, and... -
Page 188: Scanner Control And Data Transfer
You can configure scanner and reader settings for the 700 Color Comput- er via the Intermec Settings applet. From the 700 Color Computer, tap Start > Settings > the System tab > the Intermec Settings icon. See the Intermec Computer Command Reference Manual (P/N: 073529) for infor- mation about the settings you can configure with this applet. -
Page 189: Internal Scanners
Intermec Settings applet. Information about the settings you can configure with this applet is described in the Intermec Computer Command Reference Manual. The online manual is available from the Intermec web site at www.intermec.com. 1 From the 700 Color Computer, tap Start > Settings > the System tab >... -
Page 190: Scanner And Imager Settings
Depending on what is selected as the scanner model, image settings, de- code security, scanner settings, and virtual wedge are configured from the Intermec Settings applet. See the the Intermec Computer Command Refer- ence Manual, available from the Intermec web site at www.intermec.com, for more information about each enabled option. -
Page 191: Reading Distances
(4 lux). Minimum distances are measured in the dark (0 lux). Both reading distances are provided in respective scan engine integration guides. Contact your Intermec representative for more information. Below are minimum standard reading distances for 700 Color Computers built with integrated scan engines. - Page 192 Chapter — Scanner Support EA11 Standard Minimum Reading Distances with 0.04” Setbacks Symbology Density Minimum Distance Maximum Distance Code 39 0.125 mm/ 5 mil 7.26 cm/ 2.86” 12.09 cm/ 4.76” 0.20 mm/ 8 mil 3.96 cm/ 1.56” 20.98 cm/ 8.26” 0.25 mm/ 10 mil 3.45 cm/ 1.36”...
- Page 193 Chapter — Scanner Support EL10 Minimum Guaranteed Reading Distances with 0.25” Setbacks Symbology Density Minimum Distance Maximum Distance Code 39 0.1 mm/ 4 mil 8.51 cm/ 3.35” 12.30 cm/ 4.45” 0.125 mm/ 5 mil 7.75 cm/ 3.05” 14.35 cm/ 5.65” 0.25 mm/ 10 mil 6.99 cm/ 2.75”...
- Page 194 Chapter — Scanner Support EV10 Minimum Reading Distances with 0.04” Setbacks Symbology Bar Code Content Density Minimum Distance Maximum Distance Code 39 RESO 0.100 MM 0.1 mm/ 4 mil 10.8 cm/ 4.26” 13.87 cm/ 5.46” R 0.125 MM 0.125 mm/ 5 mil 9.80 cm/ 3.86”...
-
Page 195: Tethered Scanners
Intermec Settings applet. Information about the settings you can configure with this applet is described in the Intermec Computer Command Reference Manual. The online manual is available from the Intermec web site at www.intermec.com. 1 Connect your tethered scanner to the tethered scanner port. -
Page 196: E Or 1553 Selected For Scanner Model
2 stop bits and synchronizing the terminal’s configuration with the attached scanner. With “1551E” or “1553” selected, Symbologies, Symbology Options, Hardware Trigger, and Scanner Port settings are configured from the In- termec Settings applet. See the the Intermec Computer Command Reference 700 Series Color Mobile Computer User’s Manual... -
Page 197: Ascii Selected For Scanner Model
With “ASCII” selected, Symbology Options, Hardware Trigger, and Scan- ner Port settings are configured from the Intermec Settings applet. See the the Intermec Computer Command Reference Manual, available from the In- termec web site at www.intermec.com, for more information about each enabled option. -
Page 198: Reset Factory Defaults
Chapter — Scanner Support Reset Factory Defaults Scan the EasySet software bar code label “Reset Factory Default” to restore all of your scanner’s configurations to their factory defaults. When this command label is scanned, reinitialize the tethered scanner (such as disable the scanner port state, then enable it) on the 700 Computer. -
Page 199: Attached Rfid Readers
Note: The 700 Color Computer currently supports only the IP4 Intellitag Portable RFID Reader, a trigger handle accessory that lets you hold your 700 Color Computer like a reader or scanner. Contact your Intermec rep- resentative for more information. Radio frequency identification (RFID) systems evolved as a way to provide all the benefits of visual scanning systems, while overcoming many of their limitations. - Page 200 S Disable power to Bluetooth (go to page 183 for instructions). S Enable the IP4 Reader (go to page 184 for instructions). Use the Intermec Settings applet to configure at least one scan button. In- formation about the settings you can configure with this applet is de- scribed in the Intermec Computer Command Reference Manual.
-
Page 201: Disable Power To Bluetooth
Chapter — Scanner Support 3 Select RFID to change the trigger from the scanner to RFID, then select File > Save Settings. 4 Go to the next paragraph to disable power to Bluetooth. 5 Go to page 184 to enable the IP4 Reader. Disable Power to Bluetooth Note: Before you configure your attached IP4 Reader, make sure Blue- tooth is disabled on your 700 Color Computer. -
Page 202: Configure The Reader Using Intermec Settings
Scanner Support Configure the Reader Using Intermec Settings You should also adjust its settings using the Intermec Settings applet. In- formation about the settings you can configure with this applet is de- scribed in the Intermec Computer Command Reference Manual. The online manual is available from the Intermec web site at www.intermec.com. - Page 203 3 Under the Reader option, check Enable Reader to enable the attached reader. Once the IP4 reader is configured using the Intermec Settings applet, ap- plications can access the IP4 Reader using the Basic Reader Interface (BRI) protocol on the 700 Color TCP port “2189.”...
- Page 204 Chapter — Scanner Support 700 Series Color Mobile Computer User’s Manual...
-
Page 205: Programming
S Network Selection APIs (page 221) S Notifications (page 221) S Reboot Functions (page 222) S Remapping the Keypad (page 223) Note: “700 Color” pertains to 730, 740, 741, 750, 751, 760, and 761 Computers unless otherwise noted. 700 Series Color Mobile Computer User’s Manual... -
Page 206: Creating Cab Files
S Signature: “signature_name” “$Windows NT$” S Provider: “INF_creator” The company name of the application, such as “Microsoft.” S CESignature “$Windows CE$” Example [Version] Signature = “$Windows NT$” Provider = “Intermec” CESignature = “$Windows CE$” 700 Series Color Mobile Computer User’s Manual... - Page 207 No string_keys is okay. Example [Strings] reg_path = Software\Intermec\My Test App [CEDevice] Describes the platform for the targeted application. All keys are optional. If a key is nonexistent or has no data, Windows CE does not perform any checking except the UnsupportedPlatforms.
- Page 208 Chapter — Programming Example [CEDevice] UnsupportedPlatforms = pltfrm1 ; pltfrm1 is unsupported [CEDevice.SH3] UnsupportedPlatforms = ; pltfrm1 is still unsupported S VersionMin: minor_version Numeric value returned by OSVERSIONINFO.dwVersionMinor. The .CAB file is valid for the currently connected device if the version of this device is greater than or equal to VersionMin.
- Page 209 Chapter 7 — Programming [DefaultInstall] This describes the default installation of your application. Note that under this section, you will list items expanded upon later in this description. Required? Yes S Copyfiles: copyfile_list_section Maps to files defined later in the .INF file, such as Files.App, Files.Font, and Files.Bitmaps.
- Page 210 Chapter — Programming [SourceDiskFiles] This describes the name and path of the files in which your application resides. Required? Yes S filename: disk_number[,subdir] RPM.EXE = 1,c:\appsoft\... WCESTART.INI = 1 RPMCE212.INI = 1 TAHOMA.TTF = 2 Note: [,subdir] is relative to the location of the INF file. Example [SourceDisksFiles] ;...
- Page 211 Chapter 7 — Programming Contains the path to the target directory selected during installation. It is declared in the [CEStrings] section %AppName% Contains the application name defined in the [CEStrings] section. Example [DestinationDirs] Files.Common = 0,%CE1%\My Subdir ; \Program Files\My Subdir Files.Shared = 0,%CE2% ;...
- Page 212 Chapter — Programming S add_registry_section: registry_root_string String that specifies the registry root location. The following list shows the values supported by Windows CE. S HKCR Same as HKEY_CLASSES_ROOT S HKCU Same as HKEY_CURRENT_USER S HKLM Same as HKEY_LOCAL_MACHINE S add_registry_section: value_name Registry value name.
-
Page 213: Sample .Inf File
App,0,sample.exe,%InstallDir% ; The path is explicitly specified. Sample .INF File [Version] ; Required section Signature = “$Windows NT$” Provider = “Intermec Technologies Corporation” CESignature = “$Windows CE$” ;[CEDevice] ;ProcessorType = [DefaultInstall] ; Required section CopyFiles = Files.App, Files.Fonts, Files.BitMaps, Files.Intl, Files.TelecomNcsCE, Files.Windows, Files.Import, Files.Export, Files.Work,... - Page 214 ; Uses the path in DestinationDirs. ;Sample App,0,sample.exe,%InstallDir% ; The path is explicitly specified. [Files.App] rpm.exe,,,0 rpm.ini,rpmce212.ini,,0 mfcce212.dll,,,0 olece212.dll,,,0 olece211.dll,,,0 rdm45wce.dll,,,0 picfmt.dll,,,0 fmtctrl.dll,,,0 ugrid.dll,,,0 simple.dll,,,0 psink.dll,,,0 pslpwce.dll,,,0 npcpport.dll,,,0 ;dexcom.dll,,,0 [Files.DataBase] rpmdata.dbd,,,0 [Files.Fonts] tahoma.ttf,,,0 [Files.BitMaps] intermec.bmp,,,0 rpmlogo.bmp,,,0 rpmname.bmp,,,0 700 Series Color Mobile Computer User’s Manual...
-
Page 215: Using Installation Functions In Setup.dll
Chapter 7 — Programming import.bmp,,,0 export.bmp,,,0 clock.bmp,,,0 printer.bmp,,,0 filecopy.bmp,,,0 [Files.Intl] lang_eng.bin,,,0 [Files.TelecomNcsCE] ncsce.exe,,,0 nrinet.dll,,,0 [Files.Windows] readme.txt,,,0 [Files.Import] readme.txt,,,0 [Files.Export] readme.txt,,,0 [Files.Work] readme.txt,,,0 [Files.WinCE] wcestart.ini,,,0 [RegSettings.All] HKLM,”SOFTWARE\Microsoft\Shell\AutoHide”,,0x00010001,1 ; Autohide the taskbar HKLM,”SOFTWARE\Microsoft\Shell\OnTop”,,0x00010001,0 ; Shell is not on top HKLM,”SOFTWARE\Microsoft\Clock”,SHOW_CLOCK,0x00010001,0 ; Clock is not on taskbar Using Installation Functions in SETUP.DLL SETUP.DLL is an optional file that enables you to perform custom opera- tions during installation and removal of your application. -
Page 216: After The Cab File Extraction
Chapter — Programming After the CAB File Extraction Cab files that need to cause a warm reset after cab extraction will need to create the __RESETMEPLEASE__.TXT file in the “\Windows” directory. The preferred method to create this file is within the DllMain portion of the SETUP.DLL file. - Page 217 Chapter 7 — Programming thDeviceProcessID = 0; do { _tcslwr( peProcess.szExeFile ); if ( _tcsstr( peProcess.szExeFile, lpname ) ) { thDeviceProcessID = peProcess.th32ProcessID; break; } // end if } while ( Process32Next( hProcList, &peProcess ) ); if ( ( GetLastError() == ERROR_NO_MORE_FILES ) && ( thDeviceProcessID == 0 ) ) { CloseToolhelp32Snapshot( hProcList );...
- Page 218 Chapter — Programming exists, it is not fatal. // Otherwise, notify user of the inability to reset the device and they will have to // perform it manually after all of the installations are complete. } // end if else DWORD dret;...
-
Page 219: Creating Cab Files With Cab Wizard
Chapter 7 — Programming Creating CAB Files with CAB Wizard After you create the .INF file and the optional SETUP.DLL file, use the CAB Wizard to create the .CAB file. Below is the command-line syntax: cabwiz.exe “inf_file” [/dest dest_directory] [/err error_file] [/cpu cpu_type [cpu_type]] A batch file in <program>... -
Page 220: Customization And Lockdown
Test Laboratory. The ITL testing is done based on Microsoft require- ments. The test lab then reports the findings back to Microsoft Corpora- tion and Intermec. If the 700 Color Computer passed all tests, Intermec is allowed to ship the device with the Pocket PC logo. Each time the operat- ing system is modified, Intermec must resubmit to ITL testing. -
Page 221: Ftp Server
Sets the device name. Used by Intermec management software. –Fvalue Disables the default Intermec account. A value of “0” disables the account. Default is “1”. Note that disabling the default account without providing a working access control list on the server will result in a device that will not accept any FTP connections. -
Page 222: Configurable Parameters Via The Registry Editor
Valid Range None. Default None. DeviceURL This parameter configures the Intermec FTP Server to transmit the speci- fied URL in the IDNA. This can be used by Intermec management soft- ware for asset management. HKLM\Software\Intermec\IFTP Value Type REG_SZ Valid Range None. -
Page 223: Manifestname
ManifestName This parameter configures the Intermec FTP Server to transmit the speci- fied manifest name in the IDNA. This parameter is used by the Intermec 6920 Communications Server for communication transactions. See the 6920 Server documentation for proper use of this parameter. - Page 224 Chapter — Programming DELE Deletes a file. HELP Gives help information. LIST (This FTP request is the same as the ls -lgA command). Gives list files in a directory. Makes a directory. MODE (Always Uses Binary). Specifies data transfer mode. NLST (Not supported) Gives a name list of files in directory (this FTP request is the same as the ls command).
- Page 225 Chapter 7 — Programming If the flag exists in its position shown previously, it is set. Also, in addition to the values defined above, there is also defined: C Compressed file attribute. E Encrypted file attribute. INROM file attribute. X XIP file attribute (execute in ROM, not shadowed in RAM). BOOT Reboots the server OS.
-
Page 226: Stopping The Ftp Server From Your Application
700 Color Computer. This list will allow customers to restrict access via the FTP Server to users they wish and is in addition to default Intermec accounts that are disabled using the -F0 option at runtime. The access control list is named FTPDCE.TXT and is placed in the same directory on the 700 Color Computer as the FTPDCE.EXE... -
Page 227: Autostart Ftp
AutoFTP. The entry can be set from the NDISTRAY pop-up menu by selecting either AutoFTP On or AutoFTP Off. HKEY_LOCAL_MACHINE\Software\Intermec\Ndistray\StartupIFTP These new entries are located below the selections to load the network drivers. If the StartupIFTP registry key is not defined, the FTP Server is loaded by default, to provide “out-of-the-box”... -
Page 228: Kernel I/O Controls
“C” BOOL KernelIoControl(DWORD dwIoControlCode, LPVOID lpInBuf, DWORD nInBufSize, LPVOID lpOutBuf, DWORD nOutBufSize, LPDWORD lpBytesReturned); You can also see the Device Resource Kit in the Intermec Developer Li- brary (IDL) for information about these functions. The IDL is available as a download from the Intermec web site at www.intermec.com/idl. -
Page 229: Ioctl_Hal_Itc_Read_Parm
Must point to a buffer large enough to hold the return data of the function. If SPI_GETPLATFORMTYPE is specified in lpInBuf, then the “PocketPC\0” Unicode string is returned. If SPI_GE- TOEMINFO is specified in lpInBuf, then the “Intermec 700\0” Unicode string is returned. nOutBufSize The size of lpOutBuf in bytes. - Page 230 Bootstrap Loader firmware in system. String format is x.xx with terminating null character. ITC_NVPARM_INTERMEC_SOFTWARE_CONTENT Reads manufacturing flag bits from non-volatile data store dictating certain software parameters. BOOLEAN DWORD returned in buffer pointed to by lpOutBuffer indicating whether Intermec Content enabled in XIP regions. TRUE indicates enabled. FALSE is not enabled. ITC_NVPARM_ANTENNA_DIVERSITY Reads state of antenna diversity flag.
- Page 231 Maximum value returned is ITC_DEVID_SCANHW_MAX: S ITC_DEVID_SCANHW_NONE No scanner hardware installed. S ITC_DEVID_OEM2D_IMAGER OEM 2D imager installed. S ITC_DEVID_INTERMEC2D_IMAGER Intermec 2D imager installed. S ITC_DEVID_SE900_LASER SE900 laser installed. S ITC_DEVID_SE900HS_LASER SE900HS laser installed. S ITC_DEVID_INTERMEC_EVIO EVIO linear imager installed.
-
Page 232: Ioctl_Hal_Itc_Write_Sysparm
Chapter — Programming IOCTL_HAL_ITC_WRITE_SYSPARM Describes and enables the registry save location. Usage #include “oemioctl.h” Syntax BOOL KernelIoControl( IOCTL_HAL_ITC_WRITE_SYSPARM,LPVOID lpInBuf,DWORD nInBufSize, LPVOID lpOutBuf, DWORD nOutBufSize, LPDWORD lpBytesReturned ); Parameters lpInBuf A single byte that may be one of the id values. See “ID Field Values” on the next page. -
Page 233: Ioctl_Hal_Get_Deviceid
#define GOLD_A2 0x10 ITC_AMBIENT_KEYBOARD (does not apply to the 730 Computer) This IOCTL sets the threshold for the keypad ambient sensor. This can be a value from 0 (always off) to 255 (always on). lpOutBuf must point to a buffer that contains a byte value of the desired setting. -
Page 234: Ioctl_Hal_Get_Oal_Verinfo
Chapter — Programming IOCTL_HAL_GET_OAL_VERINFO Returns the HAL version information of the Pocket PC image. Usage #include “oemioctl.h” Syntax BOOL KernelIoControl( IOCTL_HAL_GET_OAL_VERINFO,LPVOID lpInBuf,DWORD nInBufSize,LPVOID lpOutBuf,DWORD nOutBufSize,LPDWORD lpBytesReturned ); Parameters lpInBuf Should be set to NULL. lpInBufSize Should be set to zero. lpOutBuf Must point to a VERSIONINFO structure as defined by OEMIOCTL.H. -
Page 235: Ioctl_Hal_Warmboot
Chapter 7 — Programming lpOutBuf Must point to a VERSIONINFO structure as defined by OEMIOCTL.H. The fields should have these values: S cboemverinfo Sizeof (tagOemVerInfo); S verinfover S sig; “ITC\0” S id; ‘B’ S tgtcustomer “” S tgtplat SeaRay S tgtplatversion Current build version number of the bootstrap loader S tgtcputype[8];... -
Page 236: Ioctl_Hal_Get_Reset_Info
Chapter — Programming Parameters lpInBuf Should be set to NULL. lpInBufSize Should be set to zero. lpOutBuf Should be NULL. nOutBufSize Should be zero. Return Values None. IOCTL_HAL_GET_RESET_INFO This code allows software to check the type of the most recent reset. Usage #include “oemioctl.h”... -
Page 237: Ioctl_Hal_Get_Boot_Device
Chapter 7 — Programming IOCTL_HAL_GET_BOOT_DEVICE This IOCTL code allows software to check which device CE booted from. Usage #include “oemioctl.h” Syntax BOOL KernelIoControl( IOCTL_HAL_GET_BOOT_DEVICE,LPVOID lpInBuf,DWORD nInBufSize,LPVOID lpOutBuf,DWORD nOutBufSize,LPDWORD lpBytesReturned ); Parameters lpInBuf Should be set to NULL. lpInBufSize Should be set to zero. lpOutBuf Must point to a buffer large enough to hold a DWORD (4 bytes) with the boot device. -
Page 238: Ioctl_Processor_Information
Chapter — Programming IOCTL_PROCESSOR_INFORMATION Returns processor information. Usage #include “pkfuncs.h” Syntax BOOL KernelIoControl( IOCTL_PROCESSOR_INFORMATION,LPVOID lpInBuf,DWORD nInBufSize,LPVOID lpOutBuf,DWORD nOutBufSize,LPDWORD lpBytesReturned ); Parameters lpInBuf Should be set to NULL. nInBufSize Should be set to zero. lpOutBuf Should be a pointer to the PROCESSOR_INFO structure. Its structure stores information describing the CPU more descriptively. -
Page 239: Network Selection Apis
Network Selection APIs change the network adapter configuration pro- grammatically. See the Communications Resource Kit in the IDL for in- formation about these APIs. The IDL is available as a download from the Intermec web site at www.intermec.com/idl. Contact your Intermec repre- sentative for more information. Notifications... -
Page 240: Nledsetdevice
You can also see the Device Resource Kit in the IDL for information about these functions. The IDL is available as a download from the Inter- mec web site at www.intermec.com/idl. Contact your Intermec representa- tive for information. S IOCTL_HAL_REBOOT This performs a warm-boot (page 219). -
Page 241: Remapping The Keypad
Chapter 7 — Programming Remapping the Keypad Note: Use caution when remapping the keypad. Improper remapping may render the keypad unusable. Data within the 700 Color Computer could also be lost, should any problems occur. Applications have the ability to remap keys on the 700 Color Numeric Keypad and 700 Color Alphanumeric Keypad. -
Page 242: Alpha (Blue) Plane
Chapter — Programming Alpha (Blue) Plane The alpha plane contains values from the keypad when the keypad has been placed in alpha mode by pressing the blue alpha key, such as: Press the Keys Numeric Keypad Alphanumeric Keypad To Enter This [Alpha] F Caps [Alpha]... -
Page 243: Change Notification
Mapping events to a button could be useful to change which buttons will fire the scanner, control volume, and allow for suspending and resuming the device. Con- tact Intermec Technical Support for more information. 700 Series Color Mobile Computer User’s Manual... -
Page 244: Scan Codes
Chapter — Programming Scan Codes At the lowest driver level, the 700 Color Numeric and Alphanumeric Key- pads identify keys as scan codes. The keypad microcontroller sends the codes and only the keypad firmware changes the codes. Numeric Keypad Scan Codes and Meanings Press Press this Key... - Page 245 Chapter 7 — Programming Alphanumeric Keypad Scan Codes and Meanings Press Press this Key Meaning ScanCode this Key Meaning ScanCode Reserved 0x00 0x17 I/O button 0x01 I/backlight 0x18 Scanner Handle Trigger 0x02 P/PgDn 0x19 Scanner Left 0x03 Q/, (comma) 0x1A Scanner Right 0x04 R/+ (plus sign)
-
Page 246: Sample View Of Registry Keys
Chapter — Programming Sample View of Registry Keys Below is a sample of the current default key mapping for the 700 Color Numeric Keypad. See your device registry for the latest key mappings. [HKEY_LOCAL_MACHINE\HARDWARE\DEVICEMAP\KEYBD] ”ResumeMask”=dword:7 ”Vkey”=hex: 00,00,0B,05,02,03,C1,07,04,03,BE,00,34,00,00,00,\ 25,00,00,00,08,00,03,02,00,00,1B,00,28,00,31,00,\ 37,00,01,02,00,00,26,00,27,00,32,00,38,00,30,00,\ 35,00,00,00,01,03,33,00,39,00,0D,00,36,00,00,00,\ 00,00,00,00,00,00,00,00,00,00,00,00,00,00,00,00,\ 00,00,00,00,00,00,00,00,00,00,00,00,00,00,00,00,\ 00,00,00,00,00,00,00,00,00,00,00,00,00,00,00,00,\... -
Page 247: A Configurable Settings
Note: “700 Color” pertains to 740, 741, 750, 751, 760, and 761 Com- puters unless otherwise noted. The contents of the Intermec Settings applet are dependent on what hard- ware configuration is done for each 700 Color Computer at the time of shipment. -
Page 248: Configuration Parameters
To execute configuration parameters, scan EasySet bar codes. You can use the EasySet bar code creation software from Intermec to print configura- tion labels. Scan the labels to change the scanner configuration and data transfer settings. -
Page 249: Intermec Settings Applet
Intermec web site at www.intermec.com. See the Data Collection Resource Kit in the Intermec Developer Library (IDL) for information about data collection functions. The IDL is avail- able as a download from the Intermec web site at www.intermec.com/idl. -
Page 250: Dock Switch
Appendix — Configurable Settings Dock Switch From the 700 Color Computer, tap Start > Settings > the System tab > Utilities > the Dock Switch tab to access the Dock Switch applet. Use this applet to control the position of the dock switch. This can be set either to a COM A (phone jack for a modem) position or to a COM B (serial) position. -
Page 251: Wakeup Mask
— Configurable Settings To ensure that the 700 Color Computer restores the real-time clock after a cold-boot, check the Enable RTC Restore option. Note that this does not apply to the 730 Computer. 700 Color Screen 730 Screen Wakeup Mask From the 700 Color Computer, tap Start >... -
Page 252: App Launch
Appendix — Configurable Settings Based on your setting, do the following to “wake up” the 700 Computer: Then do this on Then do this on If you select: Numeric Keyboard Alphanumeric Keyboard Middle Scanner Button Squeeze the button on the Scan Handle Squeeze the button on the Scan Handle Left Scanner Button Squeeze the left scanner button... -
Page 253: Wireless Network Applet
SSID) to allow multiple networks to coexist in the same area without in- fringement. Intermec recommends using security measures with wireless networks to prevent unauthorized access to your network and to ensure your privacy of transmitted data. The following are required elements for secure networks:... -
Page 254: Configuring Your Wireless Network
802.11b or 802.11b/g uses this protocol to perform authentication. This is not necessarily an authentication mechanism, but is a common framework for transporting actual authentication protocols. Intermec provides a number of EAP protocols to choose for your network. S TKIP (Temporal Key Integrity Protocol) This protocol is part of the IEEE 802.11i encryption standard for wire-... -
Page 255: Basic
Profiles page. S Enable Microsoft’s Wireless Zero Config Check this box to enable Microsoft’s Wireless Zero Config application. This effectively disables the Intermec software solution for 802.11b or 802.11b/g, including configuration via the Wireless Network applet. Basic Use the Basic page to set the network type, name, and manage battery power for this profile. -
Page 256: Security
Security The following are available from the 8021x Security drop-down list. Note the last four methods are available if you have purchased the security package. Contact your Intermec representative for information. S None (below) S TTLS (page 244) S PEAP (page 240) - Page 257 Appendix — Configurable Settings To Enable WEP Encryption 1 Set 8021x Security as “None.” 2 Set Association to either “Open” if WEP keys are not required; or “Shared” when WEP keys are required for association. 3 Set Encryption to “WEP” (see page 236). 4 If you had set Association to “Shared,”...
- Page 258 Appendix — Configurable Settings PEAP (Protected EAP) This protocol is suitable for performing secure authentication against Win- dows domains and directory services. It is comparable to EAP-TTLS (see page 244), both in its method of operation and its security, though not as flexible.
- Page 259 Appendix — Configurable Settings 5 Tap Additional Settings to assign an inner PEAP authentication and set options for server certificate validation and trust (see page 242). To Enable PEAP with Network EAP 1 Set 8021x Security as “PEAP.” 2 Set Association to “Network EAP” (see page 236). 3 Set Encryption to either “WEP”...
- Page 260 Appendix — Configurable Settings Additional Settings 1 Select an authentication method from the Inner PEAP Authentication drop-down list. EAP/MS-CHAP-V2 Authenticates against a Windows Domain Controller and other non-Windows user databases. This is Microsoft’s implementation of PEAP. EAP/Token Card Use with token cards. The password value entered is never cached.
- Page 261 Appendix — Configurable Settings 4 Tap Get Certificates to obtain or import server certificates (page 247). 5 Tap Additional Settings to set server certificate validation (page 244). To Enable TLS with WPA Encryption 1 Set 8021x Security as “TLS.” 2 Set Association to “WPA” (see page 236). 3 Enter unique Subject Name and User Name credentials for this profile.
- Page 262 Appendix — Configurable Settings Additional Settings 1 Check Validate Server Certificate to verify the identity of the authenti- cation server based on its certificate when using PEAP or TLS. 2 Enter the Common Names of trusted servers. Note that if these fields are left blank, the server certificate trust validation is not performed or required.
- Page 263 Appendix — Configurable Settings To Enable TTLS with WPA Encryption 1 Set 8021x Security as “TTLS.” 2 Set Association to “WPA” (see page 236). 3 Enter your unique user name and password to use this protocol. Select Prompt for password to have the user enter this password each time to access the protocol, or leave Use following password as selected to auto- matically use the protocol without entering a password.
- Page 264 Appendix — Configurable Settings Additional Settings 1 Select an authentication protocol from the Inner TTLS Authentication drop-down list: Password Authentication Protocol. A simple authentication protocol that sends security information in the clear. CHAP Challenge Handshake Authentication Protocol. Use of Radius to authenticate a terminal without sending security data in the clear.
- Page 265 Appendix — Configurable Settings To Get Certificates Certificates are pieces of cryptographic data that guarantee a public key is associated with a private key. They contain a public key and the entity name that owns the key. Each certificate is issued by a certificate authority. Use this page to import a certificate onto the 700 Color Computer.
- Page 266 Appendix — Configurable Settings 3 Select Prompt for password to have the user enter this password each time to access the protocol, or leave Use following password as selected to automatically use the protocol without entering a password. To Enable LEAP with WPA Encryption 1 Set 8021x Security as “LEAP”...
- Page 267 Appendix — Configurable Settings 3 Select Prompt for password to have the user enter this password each time to access the protocol, or leave Use following password as selected to automatically use the protocol without entering a password. EAP-FAST (EAP -Flexible Authentication via Secured Tunnel) The EAP-FAST protocol is a client-server security architecture that en- crypts EAP transactions with a TLS tunnel.
- Page 268 Appendix — Configurable Settings 4 Tap Additional Settings to set options for PAC management and assign an anonymous EAP-FAST name (see page 251). To Enable EAP-FAST with WPA Encryption 1 Set 8021x Security as “EAP-FAST” and Association to “WPA” (see page 236).
- Page 269 Appendix — Configurable Settings 2 Enter your unique Username to use this protocol. 3 Select Prompt for password to have the user enter this password each time to access the protocol, or leave Use following password as selected to automatically use the protocol without entering a password. 4 Tap Additional Settings to set options for PAC management and assign an anonymous EAP-FAST name.
-
Page 270: Advanced
Appendix — Configurable Settings 5 Check ok to return to the Security page. Advanced Use this page to configure additional settings for this profile. Tap ok or OK to return to the Profiles page. S Detect Rogue APs: Wireless NICs and APs associate based on the SSID configured for the NIC. -
Page 271: Other Configurable Parameters
Appendix — Configurable Settings S Enable Logging: Check this box to log what activity incurs for this profile. Other Configurable Parameters These can be configured by sending reader commands (next page) through the network or from an application. Audio Volume Changes the volume of all audio signals. -
Page 272: Using Reader Commands
Appendix — Configurable Settings Using Reader Commands After the 700 Color Computer is connected to your network, you can send the 700 Color Computer a reader command from an application to perform a task, such as changing the time and date. Some reader com- mands temporarily override the configuration settings and some change the configuration settings. -
Page 273: Set Time And Date
Appendix — Configurable Settings Set Time and Date This command sets the date and time on the 700 Color Computer. The default date and time is June 1, 1999 at 12:00 AM. From the network, send the following: /+ yyyymmddhhmmss where acceptable values for the date are: 0000–9999 Year... -
Page 274: Automatic Shutoff
Appendix — Configurable Settings Set Audio Volume to very quiet *$+BV1* *$+VB1* Set Audio Volume to quiet *$+BV2* *$+BV2* Set Audio Volume to normal (default) *$+BV3* *$+BV3* Set Audio Volume to loud *$+BV4* *$+BV4* Set Audio Volume to very loud *$+BV5* *$+BV5* Automatic Shutoff... -
Page 275: Key Clicks
Appendix — Configurable Settings Backlight Timeout 30 seconds *$+DF30* *$+DF30* Backlight Timeout 1 minute (default) *$+DF60* *$+DF60* Backlight Timeout 2 minutes *$+DF120* *$+DF120* Backlight Timeout 3 minutes *$+DF180* *$+DF180* Backlight Timeout 4 minutes *$+DF240* *$+DF240* Backlight Timeout 5 minutes *$+DF300* *$+DF300* Key Clicks Note: The Key Clicks parameter information is on page 253. -
Page 276: Preamble
Appendix — Configurable Settings Preamble For Virtual Wedge Preamble, the first part of the bar code is below, fol- lowed by a string of up to 31 characters (no <NUL>) and an asterisk. De- fault is no characters. *$+AD *$+AD Postamble For Virtual Wedge Postamble, the first part of the bar code is below, fol- lowed by a string of up to 31 characters (no <NUL>) and an asterisk. -
Page 277: B Troubleshooting
Troubleshooting This appendix contains a brief explanation of what you can do to trouble- shoot your 700 Color Mobile Computer. 700 Series Color Mobile Computer User’s Manual... - Page 278 — Appendix Troubleshooting Problem Solutions The 700 Color Computer does not respond when con- Make sure your ac adapter or dock is plugged in and is nected to a power supply. making good contact with your mobile computer. The 700 Color Computer will not turn on when the I/O The AB10 battery may be low and need recharging.
- Page 279 Index The Classes and Functions Index covers 700 Color classes and functions. The General Index covers all topics. Those in italics are figures, those in bold are tables. The Files Index is to assist you in locating descriptions for device drivers, applica- tions, utilities, batch files, or other files within this publication.
-
Page 280: Classes And Functions
Index IrDA printing, 162 Classes and Functions NPCP printing, 163, 164 [DefaultInstall] AddReg, 191 add_registry_section, [AddReg] CESelfRegister, 191 flags, 194 CESetupDLL, 191 registry_root_string, 194 CEShortcuts, 191 value_name, 194 Copyfiles, 191 AddReg, [DefaultInstall], 191 DeregisterDevice(), 163 [AddReg], add_registry_section DTR printing, 167 flags, 194 [DestinationDirs], file_list_section, 192 registry_root_string, 194... - Page 281 XMKD, 206 DeviceURL, 204 XPWD, 206 IDNATarget, FTP Server, 204 XRMD, 206 InstallDir, [CEStrings], 189 stopping server from application, 208 Intermec Device Network Announcement. See IDNA support, 205 IOCTL_GET_CPU_ID, 220 web browsers, 208 IOCTL_HAL_COLDBOOT, 217, 222 IOCTL_HAL_GET_BOOT_DEVICE, 219 IOCTL_HAL_GET_BOOTLOADER_VERINFO, 216...
- Page 282 Index ITC_DEVID_SCANHW_MAX values IOCTL_HAL_GET_OAL_VERINFO, 216 ITC_DEVID_INTERMEC_EVIO, 213 IOCTL_HAL_GET_RESET_INFO, 218 ITC_DEVID_INTERMEC2D_IMAGER, 213 IOCTL_HAL_ITC_READ_PARM, 211 ITC_DEVID_OEM2D_IMAGER, 213 IOCTL_HAL_ITC_WRITE_SYSPARM, 214 ITC_DEVID_SCANHW_NONE, 213 IOCTL_HAL_REBOOT, 219, 222 ITC_DEVID_SE900_LASER, 213 IOCTL_HAL_WARMBOOT, 217, 222 ITC_DEVID_SE900HS_LASER, 213 IOCTL_PROCESSOR_INFORMATION, 220 ITC_DEVID_SCANHW_NONE, 213 KernelIoControl(), 210 ITC_DEVID_SE900_LASER, 213 ITC_DEVID_SE900HS_LASER, 213 ITC_DEVID_WANRADIO_NONE, 213 lpBytesReturned ITC_DEVID_WANRADIO_SIEMENS_MC45, 213 IOCTL_GET_CPU_ID, 221...
- Page 283 Index IOCTL_HAL_WARMBOOT, 217 Provider, [Version], 188 IOCTL_PROCESSOR_INFORMATION, 220 ReadFile(), NPCP printing, 163 ManifestName, FTP Server, 205 Reboot methods IOCTL_HAL_COLDBOOT, 222 IOCTL_HAL_REBOOT, 222 IOCTL_HAL_WARMBOOT, 222 nDeviceId, NLEDGetDeviceInfo, 222 RegFlushKey(), 202 nInBufSize RegisterDevice(), 163 IOCTL_HAL_GET_BOOTLOADER_VERINFO, DTR printing, 167 Registry IOCTL_HAL_ITC_READ_PARM, 211 FTP Server parameters, 204 IOCTL_HAL_ITC_WRITE_SYSPARM, 214 save location, IOCTL_HAL_ITC_WRITE_SYSPARM, IOCTL_PROCESSOR_INFORMATION, 220...
- Page 284 Index IOCTL_HAL_WARMBOOT, 217 Wireless TCP/IP installations, BlockSize parameter, 204 WAN radio IDs WriteFile() ITC_DEVID_WANRADIO_NONE, 213 DTR printing, 167, 168 ITC_DEVID_WANRADIO_SIEMENS_MC45, 213 IrDA printing, 162 ITC_DEVID_WANRADIO_SIEMENS_MC46, 213 NPCP printing, 163, 164 ITC_DEVID_WANRADIO_SIERRA_SB555, 213 Warm boot IOCTL_HAL_REBOOT, 219 Xscale processor ID, IOCTL_GET_CPU_ID, 220 700 Series Color Mobile Computer User’s Manual...
-
Page 285: General Index
Numbers RAM maintenance, 3 1551/1553 Tethered Scanner status, 2 configuring, 177 Abstract Syntax Notation.1. See ASN.1 intermec settings, 177 Accessory list, 21 reset to factory defaults, 180 Accounts, via Inbox, 66 troubleshooting, 179 Activation wizard 1D area imager reading distances, 173... - Page 286 Audio, 7 bar code configuration, 253, 256 backlight, 4, 10 configuration parameter, 253 clock, 255 Autostart FTP, 209 intermec settings, 9, 231 AvantGo channels, Pocket Internet Explorer, 81 beeper volume, 8 internal scanners, 171 RFID, 184 Backlight applet scan buttons, 182...
- Page 287 Index AT command set, 144 copying files from web site, 131 CAB files via Microsoft ActiveSync, 131 after the extraction, 198 via storage cards, 131 creating, 188 location of ESC, 133 INF files, 188 phone activation, 117, 119 with CAB Wizard, 201 phone application, 117 installation functions, SETUP.DLL, 197 setting up, 130...
- Page 288 Index Contacts Drivers adding a note, 56 adding a telephone number communications, 168 CDMA radios, 121 installing, 167 GSM radios, 127 opening, 167 adding to speed dial, 59 removing, 167 assigning to a category, 57 writing to, 168 changing, 56 NPCP changing options, 59 closing, 164...
- Page 289 AT command set Integrated scanners. See Internal scanners MC45, 144 Interface specifications, ETSI GSM 07.0x, 143 MC46, 144 Intermec Developer Library. See IDLs MC75, 144 Intermec part numbers, 21 phone application, 125 Intermec Settings applet, 9, 231 beeper volume, 8...
- Page 290 Index IrDA printing, 162 Line printing, 162 Location, Phone application, CDMA radios, 124 connecting to via Windows Mobile, 148 LPT9 printer device, 163 creating, a modem connection, 148 Pocket Internet Explorer, 79 Managing e-mail messages and folders, via Inbox, 64 Windows Mobile, 148 MC75 radio radome, 99 ITC_KEYBOARD_CHANGE, CreateEvent(), 225...
- Page 291 56 PB20 printers, printer support, 161 creating a note, 62 PB42 printers drawing on the screen, 35 intermec settings applet, 168 creating a drawing, 35 printer support, 161 selecting a drawing, 35 PDF417, about the laser scanner, 169 Pocket Outlook, 62...
- Page 292 Index GSM radios, 125 Profiles adding contact to speed dial, 127 802.11 radio module, 237 call history, 126 advanced settings, 252 customizing phone settings, 128 basic information, 237 finding, setting, selecting networks, 129 security information, 238 sending SMS messages, 127 editing, 237 service settings, 128 Programs, adding or removing, Windows Mobile, 38...
- Page 293 SMS, Folder behavior connected to e-mail server, 65 RFID readers, 181 SMS messages, Phone application configuring, 184 CDMA radios, 123 intermec settings, 184 GSM radios, 127 Roaming, toggle between automatic or Sprint, Phone ap- Snap-on modems, 15 plication, CDMA radios, 125 SNMP, 157 RTC.
- Page 294 LED, 260 postamble, 258 power supply, 260 preamble, 258 shuts down during operation, 260 intermec settings, 182 slow recovery after a boot, 260 Voice mail, Phone application, CDMA radios, 122 unit does not turn on, 260 Volume unit does not turn on in dock, 260...
- Page 295 Index WAP pages, 79 status icons, 27 connecting to an ISP, 148 support URLs, 26 Warm boot, performing, 16 Tasks, 60 Watcher applications Today screen, 26 activating, Sprint, 137 where to find information, 26 downloading, Sprint, 137 Windows Media Player, 76 using writing on the screen, 32 Sprint, 139...
-
Page 296: Files Index
PKFUNCS.H FTPDCE.EXE, 205, 208 IOCTL_HAL_GET_DEVICEID, 215 AutoFTP, 210 IOCTL_PROCESSOR_INFORMATION, 220 FTP Server, 203 FTPDCE.TXT, 208 REBOOTME.BIN, 208 REGFLUSH.CAB, 89 INTERMEC.MIB, 158 __RESETMEPLEASE__.TXT, 198 ITCADC.MIB, 158 RPM.EXE, 192 ITCSNMP.MIB, 158 RPMCE212.INI, 192 ITCTERMINAL.MIB, 158 SETUP.DLL, 191, 197 DllMain, 198 MAKECAB.EXE, 201 Sprint_Watcher_PPC_2002-03xxx.CAB, 138... - Page 298 Worldwide Headquarters 6001 36th Avenue West Everett, Washington 98203 U.S.A. tel 425.348.2600 fax 425.355.9551 www.intermec.com 700 Series Color Mobile Computer User's Manual *961-054-031J* P/N 961-054-031J...