
Related Manuals for GE 25898


Summary of Contents for GE 25898
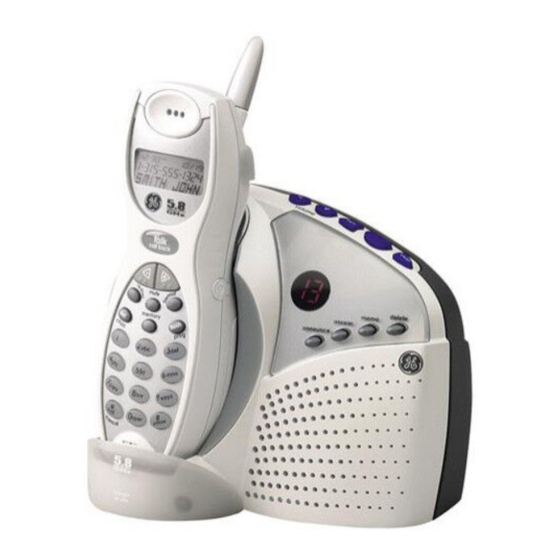
- Page 1 25898 5.8 GHz Cordless Call Waiting Caller ID Telephone/ Answering System User’s Guide We bring good things to life.
- Page 2 QUIPMENT PPROVAL Your telephone equipment is approved for connection to the Public Switched Telephone Network and is in compliance with parts 15 and 68, FCC Rules and Regulations and the Technical Requirements for Telephone Terminal Equipment published by ACTA. 1 Notification to the Local Telephone Company On the bottom of this equipment is a label indicating, among other information, the US number and Ringer Equivalence Number (REN) for the equipment.
-
Page 3: Nterference
NTERFERENCE NFORMATION This device complies with Part 15 of the FCC Rules. Operation is subject to the following two conditions: (1) This device may not cause harmful interference; and (2) This device must accept any interference received, including interference that may cause undesired operation. This equipment has been tested and found to comply with the limits for a Class B digital device, pursuant to Part 15 of the FCC Rules. -
Page 4: Table Of Contents
ABLE OF ONTENTS QUIPMENT PPROVAL NFORMATION ... 3 NTERFERENCE NFORMATION ... 3 EARING OMPATIBILITY ... 6 NTRODUCTION ... 7 EFORE EGIN ... 7 ARTS HECKLIST ELEPHONE EQUIREMENTS ... 8 ANDSET AND AYOUT ... 9 NSTALLATION MPORTANT NSTALLATION ... 9 NSTALLING THE HONE ... - Page 5 ... 24 DVANCED EATURES ... 24 HANNEL UTTON ... 24 EMOTE CCESS ... 24 ORDLESS ANDSET NSWERING YSTEM NDICATOR CREENING ALLS FROM THE ... 25 EMORY CCESSING THE NSWERING FROM NOTHER OCATION HANGING THE ECURITY LIP AND PTIONAL EADSET ... 26 TTACHING THE ONNECTING AN PTIONAL...
-
Page 6: Introduction
NTRODUCTION CAUTION: When using telephone equipment, there are basic safety instructions that should always be followed. Refer to the IMPORTANT SAFETY INSTRUCTIONS provided with this product and save them for future reference. This telephone/answering system is designed to be simple to use, however, you can reach its full potential more quickly by taking a few minutes to read this user’s guide. -
Page 7: Before You Begin
TVs microwave ovens, and VCRs. To minimize or prevent such interference, the base of the cordless telephone should not be placed near or on top of a TV, microwave ovens, or VCR. If such interference continues, move the cordless telephone farther away from these appliances. -
Page 8: Andset And
ANDSET AND display talk/callback button CID-VOL (-) button redial button memory button del/chan button review button play/stop button * exit button volume buttons page button PAGE charge in use announce button charge/in use indicator AYOUT talk call back mute memory play/stop oper erase... -
Page 9: Nstallation
NSTALLATION • Never install telephone wiring during a lightning storm. • Never install telephone jacks in wet locations unless the jack is specifically designed for wet locations. • Never touch non-insulated telephone wires or terminals, unless the telephone line has been disconnected at the network interface. •... - Page 10 3. Install the handset battery. NOTE: You must connect the handset battery before use. NOTE: Battery and battery door are packaged together inside a plastic bag and are separate from the handset. • Locate the battery compartment on the back of the handset. •...
-
Page 11: Answering System Setup
OUNTING NOTE: For best results, charge the telephone/answering system on a flat surface before hanging it on the wall. Slip the mounting holes (on the back of the base) over the wall plate posts and slide the unit down into place. (Wall plate not included.) NSWERING YSTEM This section shows you how to set up your answering system to receive... -
Page 12: Speaker Volume
3. Press and hold the hour button on the base to set the hour (a.m. or p.m.). Example: 12AM , 1AM , or 12PM , 1PM . 4. Press and hold the min button on the base to set the minute. The time advances in 5-minute intervals, or tap and release to advance in 1 minute intervals. -
Page 13: Answering System Operation
NOTE: If you select Toll Saver (TS) the unit answers after the 3rd ring if there are NEW and unread messages, OR the unit answers after the 5th ring if there are NO new and unread messages. NSWERING YSTEM This section discusses the buttons and features on the answering system. ESSAGES NDICATOR The messages indicator shows you how many messages you have received,... -
Page 14: Memory Full
EMORY When the answering system memory is full, the system answers after 10 rings. You should erase some messages so the answering system may record new messages. RASING ESSAGES You may erase messages three ways: one message at a time from the base;... -
Page 15: Telephone Set Up
ELEPHONE ROGRAMMABLE ENUS There are four programmable menus available on the handset: Language, Local Area Code, Ringer Tone and Factory Default. When you program these settings, make sure the phone is OFF ( not in talk mode). ISPLAY ANGUAGE 1. Press the flash/prog button on the handset until 1 ENG 2 FRA 3 ESP shows in the display. -
Page 16: Factory Default
ACTORY EFAULT As you become familiar with this system, you may prefer to use the system’s original settings. Follow the steps below to return to the factory default settings. 1. Press the flash/prog button until DEFAULT shows in the display. The default is NO . -
Page 17: Edial
NDICATOR When the handset is ON (in TALK mode), the talk/callback button lights up when the handset is taken off-hook. The charge/in use indicator on the base is lit. During an incoming call, the charge/in use indicator on the base and the handset talk/callback button flashes. -
Page 18: Ringer O N /Off Switch
INGER WITCH The handset ringer switch may be set to ON or OFF. If the switch is off, the unit does not ring. AGING THE ANDSET This feature helps locate a misplaced handset. 1. Press the page button on the base. The handset beeps for two minutes, and PAGING shows on the handset’s display. -
Page 19: Receiving And Storing Cid Information
IMPORTANT: In order to use all of the Caller ID features of this unit, you must subscribe to either the standard Name/Number Caller ID Service or Call Waiting Caller ID Service. To know who is calling while you are on the phone, you must subscribe to Call Waiting Caller ID Service. -
Page 20: Toring Cid Records In
CID R TORING ECORDS IN 1. Make sure the phone is OFF (not in talk mode). 2. Press the CID-VOL (- or +) button on the handset until the desired CID record is displayed. 3. Press the memory button on the handset. 4. -
Page 21: Cid Number
CID N IALING A UMBER 1. Make sure the phone is OFF (not in TALK mode). 2. Use the CID-VOL (- or +) buttons on the handset to display the desired CID record. 3. Press the talk/callback button on the handset to automatically dial the phone number in the record. - Page 22 3. Press the memory button again. The display shows ENTER NAME . 4. Use the handset touch-tone pad to enter a name (up to 15 characters). More than one letter is stored in each of the number keys. For example, to enter Bill Smith, press the 2 key twice for the letter B.
-
Page 23: Ialing From
2. Press the memory button on the handset. 3. Press the memory location for the phone number you want to dial, or use the CID-VOL (- or +) button on the handset to scroll to the desired number. 4. Press talk/callback on the handset. The number dials automatically. IMPORTANT: If you make test calls to emergency numbers stored in memory, remain on the line and briefly explain the reason for the call to the dispatcher. -
Page 24: Advanced Features
EVIEWING AND ELETING 1. Make sure the phone is OFF (not in TALK mode). 2. Press the memory button on the handset. 3. Use the CID-VOL (- or +) button on the handset to scroll to the desired memory location, or use the touch-tone pad to enter the desired memory location. -
Page 25: Alls From The Ull
CREENING ALLS FROM THE Use the handset to screen calls even when you can't hear the answering system. When the answering system picks up: 1. Press the format/answerer button to access the answering system. 2. Listen as the caller leaves a message. 3. -
Page 26: Hanging The
Erase message Skip message Turn off/on answerer Review voice menu options TIP: You can bypass the outgoing announcement by pressing any numbered key on the touch-tone pad while the announcement is playing. Then, you can enter your security code to access the answering system. HANGING THE ECURITY The default security code for accessing the answering system from... -
Page 27: Attery
2. Adjust the headset to rest comfortably on top of your head and over your ear. Move the microphone to approximately two to three inches from your mouth. 3. Press the talk/callback button to answer a call or make calls using the headset. -
Page 28: Andset Ound Ignals
ATTERY AFETY RECAUTIONS • Do not burn, disassemble, mutilate, or puncture. Like other batteries of this type, toxic materials could be released which can cause injury. • To reduce the risk of fire or personal injury, use only the battery listed in the User’s Guide. - Page 29 DELETE CALL ID? DELETED END OF LIST UNKNOWN NAME/ CALLER/NUMBER PAGING FROM BASE BLOCKED CALL NO BATTERY BLOCKED NAME INCOMPLETE DATA LINE IN USE SEARCHING OUT OF RANGE LONG DISTANCE LOW BATTERY REPT Prompt asking if you want to erase a Caller ID record.
-
Page 30: Roubleshooting
NO DATA EMPTY NO CALLS CALL WAITING ANSWERER REMOTE ACCESS NSWERING YSTEM The following messages show the status of the answering system or help you set up and use the system. 0-59 CL (blinking) An (blinking) F (blinking) Six bars (blinking) LA (Line Access) ROUBLESHOOTING ORDLESS... - Page 31 • The handset may be out of range of the base. Move closer to the base. • Make sure the battery is properly charged (12 hours). • Make sure the battery pack (in the handset) is properly installed. • The handset should beep when you press the talk/callback button, and the charge/in use indicator on the base should be lit when the handset rests in the cradle.
-
Page 32: Answering System Solutions
ID S ALLER OLUTIONS No Display • Charge the battery (for 12 hours). Or replace the battery. • Make sure that the unit is connected to a non-switched electrical outlet. Disconnect the power converter from the outlet and plug it in again. •... -
Page 33: Eneral Product Care
• Make sure to enter the correct security code. • Did unit hang up? If you take no action for a period of time, it automatically hangs up. ENERAL RODUCT To keep your telephone working and looking good, follow these guidelines: •... -
Page 34: Ervice
ERVICE If trouble is experienced with this equipment, for repair or warranty information, please contact customer service at 1-800-448-0329. If the equipment is causing harm to the telephone network, the telephone company may request that you disconnect the equipment until the problem is resolved. This product may be serviced only by the manufacturer or its authorized service agents. - Page 35 NDEX Accessing the Answering System from Another Location 25 Accessory Information 34 Advanced Features 24 Answering a Call 16 Answering System Display Messages 30 Answering System Indicator 25 Answering System Operation 13 Answering System Setup 11 Answering System Solutions 32 Attaching the Belt Clip 26 Battery Safety Precautions 28 Before You Begin 7...
- Page 36 Making a Call 16 Memory 21 Memory Full 14, 25 Message Playback 13 Messages Indicator 13 Mute 17 Paging the Handset 18 Parts Checklist 7 Programmable Menus 15 Receiving and Storing CID Information 19 Recording the Outgoing Announcement 12 Redial 17 Remote Access 24 Reviewing and Deleting Stored Numbers 24...
-
Page 37: Imited Arranty
IMITED ARRANTY What your warranty covers: • Defects in materials or workmanship. For how long after your purchase: • One year, from date of purchase. (The warranty period for rental units begins with the first rental or 45 days from date of shipment to the rental firm, whichever comes first.) What we will do: •... - Page 38 ATLINKS USA, Inc. 101 West 103rd Street Model 25898A Indianapolis, IN 46290 55898580 (Rev. 2 E/S) © 2004 ATLINKS USA, Inc. 05-01 Trademark(s) ® Registered Printed in China Marca(s) Registrada(s)
- Page 39 25898 Teléfono Inalámbrico/Sistema Contestador de 5.8 GHz con Identificador de Llamada en Espera Guía del Usuario Creamos cosas buenas para la vida.
- Page 40 NFORMACIÓN SOBRE LA El equipo de su teléfono esta aprobado para la conexión con la red Telefónica Pública (Public Switched Telephone Network) y cumple con los requisitos establecidos en las secciones 15 y 68 de las Reglas y Regulaciones de la FCC y con los Requerimientos Técnicos para Equipos de Terminales Telefónicas (Technical Requirements for Telephone Terminal Equipment), publicado por ACTA.
- Page 41 NFORMACIÓN DE Este artefacto cumple con la Parte 15 de las Reglas de la FCC. Su funcionamiento es sujeto a las dos condiciones siguientes: (l) Este artefacto no puede causar interferencia dañosa, y (2) Este artefacto debe aceptar cualquier interferencia recibida, incluyendo interferencia que puede causar un funcionamiento no deseado.
- Page 42 ABLE OF ONTENTS NFORMACIÓN SOBRE LA PROBACIÓN ... 2 QUIPO NFORMACIÓN DE NTERFERENCIAS OMPATIBILIDAD CON UDÍFONOS ... 6 NTRODUCCIÓN ... 7 NTES DE OMENZAR ... 7 ISTA DE ARTES EQUERIMIENTOS NCHUFE ... 7 ELEFÓNICO ORMATO DEL URICULAR Y LA ... 9 NSTALACIÓN NDICACIONES MPORTANTES PARA LA...
- Page 43 ARCAR UN ÚMERO DEL DENTIFICADOR DE AMBIAR EL ORMATO ... 21 ÚMERO ... 21 EMORIA LMACENAR UN OMBRE Y ÚMERO EN LA EMORIA AMBIAR UN ÚMERO ... 22 LMACENADO ARCAR UN ÚMERO ... 22 LMACENADO ARCADO EN ADENA DESDE ... 23 EMORIA NTRODUCIR UNA AUSA EN LA...
-
Page 44: Introducción
NTRODUCCIÓN CUIDADO: Cuando utilice equipo telefónico, hay instrucciones básicas de seguridad que siempre deben seguirse. Refiérase a la guía de INSTRUCCIONES DE SEGURIDAD IMPORTANTES provista con este producto y guárdela para referencia futura. Este teléfono/sistema contestador ha sido diseñado para ser de fácil manejo; sin embargo, usted puede aprovechar al máximo su potencial si se toma unos minutos ahora mismo para leer este manual de instrucciones. -
Page 45: Antes De Comenzar
NTES DE OMENZAR ISTA DE ARTES Asegúrese que su paquete incluye los artículos mostrados aquí. PAGE delete memo ans on/off announce charge in use Auricular Base EQUERIMIENTOS Para utilizar este teléfono, usted puede necesitar un enchufe modular telefónico tipo RJ11C como el ilustrado aquí, instalado en su hogar. - Page 46 ORMATO DEL URICULAR Y LA Pantalla Botón para hablar/devolver el llamado (“talk/callback”) Botón del identificador/ volumen “CID/ VOL (-)” Botón para volver a marcar (“redial”) Botón para memoria (“memory”) Botón para borrar/ canales (“del/chan”) Botón para revisar (“review”) Botón para reproducir mensajes (“play/stop”) Botón para salir (“...
-
Page 47: Instalación
NSTALACIÓN • Nunca instale cableado telefónico durante una tormenta de relámpagos. • Nunca instale enchufes telefónicos en localizaciones mojadas a menos que el enchufe haya sido diseñado específicamente para localizaciones mojadas. • Nunca toque cables o terminales no aislados, a menos que la línea telefónica haya sido desconectada en la interfaz de la red. - Page 48 NOTA: Usted debe conectar la batería del auricular antes de utilizar el aparato. NOTA: La batería y la puerta de las baterías están empacadas juntas dentro de una bolsa de plástico y separadas del auricular. • Localice el compartimiento de las baterías en la parte de atrás del auricular. •...
-
Page 49: Ontaje Sobre Ared
ONTAJE SOBRE ARED NOTA: Para mejores resultados, cargue el teléfono/sistema contestador sobre una superficie plana antes de montarlo sobre la pared. Deslice los agujeros de montaje (en la parte de atrás de la base) sobre los postecitos en la placa de pared y deslice el aparato hacia abajo hasta que entre en su sitio. -
Page 50: Volumen Del Altavoz
3. Oprima y sostenga el botón de la hora en la base para programar la hora (a.m. o p.m.) Por ejemplo, 12AM, 1AM o 12PM, 1PM . 4. Oprima y sostenga el botón de minutos (“min”) en la base para programar los minutos. -
Page 51: Peración Del
PERACIÓN DEL Esta sección habla sobre los botones y funciones del sistema contestador. NDICADOR DE ENSAJES El indicador de mensajes le muestra cuántos mensajes ha recibido, y el indicador de mensajes parpadea cuando se han recibido mensajes nuevos. El botón “ans on/off” debe estar en posición de encendido (on) para que funcione el indicador de mensajes. -
Page 52: Programación Del Teléfono
ORRAR ENSAJES Usted puede borrar mensajes de dos maneras: un mensaje a la vez con el botón para borrar, o todos los mensajes de una vez oprimiendo y sosteniendo el botón de borrar, o un mensaje a la vez desde un auricular en otra localización. 1. -
Page 53: Clave De Área Local
2. Utilice los botones de las flechas (“CID-VOL – o +”) en el teclado numérico para seleccionar 1, 2, o 3 . 3. Oprima nuevamente el botón de programa (flash/prog”). NOTA: Oprima el botón de salida (“*exit”) una vez para mantener la programación previa y volver a la pantalla de alerta. -
Page 54: Peración Del Eléfono
2. Utilice los botones de las flechas (“CID-VOL – o +”) para recorrer las opciones “ SI ” o “ NO ” . 3. Oprima nuevamente el botón de programa (flash/prog”). Usted escuchará un tono de confirmación. NOTA: Las programaciones de fábrica son inglés (“ENGLISH”), clave de área - - - (“AREA CODE - - - “), y tono del timbre 1 (“RINGER TONE 1”). -
Page 55: Para Volver A Marcar
OLVER A ARCAR 1. Oprima el botón “talk/callback” en el auricular. 2. Oprima el botón “redial” para volver a marcar el último número que usted marcó (hasta 32 dígitos”). Si usted recibe la señal de ocupado y quiere seguir marcando el número, oprima el botón para volver a marcar y así marcar el número directamente. -
Page 56: Dentificador De
1. Oprima el botón localizador en la base. El auricular emite tonos continuamente durante dos minutos y la indicación del localizador (“ LOCALIZANDO ”) aparece en la pantalla del auricular. 2. Para cancelar el localizador, oprima el botón “talk/callback” en el auricular o el botón localizador en la base. -
Page 57: Para Recibir Y Almacenar
ECIBIR Y LMACENAR LAMADAS Cuando usted recibe una llamada, la información es transmitida desde su compañía telefónica a su teléfono con Identificador de Llamadas entre el primer y el segundo timbre. Cuando la memoria del Identificador de Llamadas está llena, una llamada nueva automáticamente reemplaza a la llamada más vieja en la memoria. - Page 58 3. Oprima y sostenga el botón para borrar (“del/chan”) en el auricular. La pantalla le pregunte si borra todos los archivos (“ BORRAR TODO? ”). 4. Oprima nuevamente el botón para borrar (“del/chan”) todos los archivos. La pantalla anuncia que no hay llamadas (“ NO LLAMADA ”). LMACENAR EMORIA 1.
-
Page 59: Memoria
Para cambiar un número de volver a marcar viejo que esté almacenado en la memoria por uno nuevo: 1. Repita los pasos 1 al 5, y después oprima el número para volver a marcar, para mostrar el nombre y número nuevo que será marcado. 2. - Page 60 LMACENAR UN 1. Oprima el botón de memoria en el auricular. 2. Oprima el número deseado de la localización de memoria (teclas 0 al 9). Si la localización de memoria está ocupada, el número de esa localización de memoria y lo que contiene aparecerán en la pantalla. Si la localización de memoria está...
- Page 61 2. Oprima el botón de memoria en el auricular. 3. Oprima la tecla numérica (0-9) de la localización de memoria deseada. El número almacenado se marca automáticamente. 1. Asegúrese de que el teléfono esté desactivado ( OFF ) (no en modalidad para hablar –“TALK”).
- Page 62 SUGERENCIA: Espere al tono de acceso antes de oprimir el botón de memoria, o su llamada puede no pasar. NTRODUCIR UNA Oprima el botón para pausa (“#”) en el teclado numérico del auricular para introducir un retraso en la secuencia de marcado de un número telefónico almacenado.
- Page 63 base (ve ala sección de “Para Programar el Sistema Contestador”) Las funciones de los botones se localizan en el auricular arriba de cada tecla numérica. Por ejemplo, para reproducir mensajes: • Oprima el botón de la contestadora (“format/answerer”). La pantalla muestra la indicación de acceso remoto (“...
- Page 64 3. Siga las indicaciones del menú de voz para usar las funciones de control remoto del sistema contestador. La función del control remoto le permite llevar a cabo las siguientes funciones: Para Para revisar el mensaje Para volver a reproducir mensajes Para detener la reproducción de mensajes Para borrar mensajes Para saltar el mensaje...
- Page 65 ONECTAR LOS El auricular puede ser usado con unos audífonos opcionales para la operación a manos libres. 1. Conecte los audífonos en el enchufe para audífonos localizado al costado del auricular. El recibidor del auricular y el micrófono se desactivan al conectar los audífonos. 2.
- Page 66 RECAUCIONES DE EGURIDAD PARA LA • No queme, desarme, mutile, o agujere. Igual que otras baterías de este tipo, materiales tóxicos pueden escaparse y causarle daño. • Para reducir el riesgo de fuego o daño personal, use unicamente la batería indicada en la Guía del Usuario.
- Page 67 DELETED (BORRADO) END OF LIST (FIN DE LISTA) NEW (NUEV) UNKNOWN NAME/ CALLER/NUMBER (NOM/NUM DESCONOCIDO) PAGING FROM BASE (LOCALIZANDO BASE) BLOCKED CALL (LLAMADA PRIVADA) NO BATTERY (NO BATERIA) BLOCKED NAME (NOMBRE PRIVADO) INCOMPLETE DATA (INFO INCOMPLETA) LINE IN USE (LINEA EN USO) SEARCHING (BUSCANDO...) OUT OF RANGE...
- Page 68 REPT (REPT) NO DATA (NO ENVIADO) EMPTY (VACIO) NO CALLS (NO LLAMADA) CALL WAITING (LLAMD EN ESPERA) ANSWERER REMOTE ACCESS (ACC REMOTO CONT) NDICADORES DE Los siguientes indicadores le muestran el estado actual del sistema contestador o le ayudan a programarlo y a utilizarlo: 0-59 CL (parpadeando) An (parpadeando)
- Page 69 • Conecte otro teléfono al mismo enchufe de pared. Si no funciona el segundo teléfono, el problema puede estar en el cableado o en el servicio local. • El auricular puede estar fuera del rango de la base. Acérquese a la base. •...
- Page 70 OLUCIONES PARA EL No aparece nada en la pantalla • Cargue la batería (durante 12 horas). O cambie la batería. • Asegúrese que la base no esté conectada en un enchufe que pueda desactivarse con un apagador. Desconecte el cable de corriente de la base y vuelva a conectarlo.
- Page 71 • ¿Colgó el aparato? Si usted no toma ninguna acción durante un período de tiempo, el aparato cuelga automáticamente. UIDADO ENERAL DEL Para mantener su teléfono funcionando bien y con buena apariencia, observe las siguientes pautas: • Evite poner el teléfono cerca de calentadores (calefactores) de ambiente y dispositivos que generen interferencia eléctrica ejemplo, motores o lámparas fluorescentes).
- Page 72 ÓMO BTENER Si usted experimenta problemas con este equipo, para reparaciones o para información de garantía, comuníquese con el departamento de servicio al cliente al 1-800-448-0329. Si el equipo está causando daños a la red telefónica, la compañía telefónica puede pedirle que desconecte su equipo hasta que el problema haya sido resuelto.
- Page 73 Í NDICE Acceso Remoto 24 Antes de Comenzar 7 Auricular Inalámbrico 24 Botón de Canales 24 Caller ID (Identificador de Llamadas) con Call Waiting (Llamada en Espera) 18 Causas de una Mala Recepción 33 Clave de Área Local 15 Cómo Obtener Servicios de Mantenimiento 34 Compatibilidad con Audífonos (CCA) 3 Cuidado General del Producto 33...
- Page 74 Para Cambiar el Código de Seguridad 26 Para Cambiar el Formato del Número 21 Para Cambiar la Batería 27 Para Cambiar un Número Almacenado 22 Para Conectar el Gancho del Cinturón y Audífonos Opcionales 26 Para Conectar los Audífonos Opcionales en el Auricular 27 Para Contestar una Llamada 16 Para Dejar un Recado 14...
- Page 75 ARANTÍA IMITADA Lo que cubre su garantía: • Defectos de materiales o de trabajo. Por cuánto tiempo después de la compra: • Un año, a partir de la fecha de compra. (El periodo de garantía para unidades arrendadas se inicia con la primera renta o 45 días de la fecha del embarque a la firma de arrendamiento, lo que ocurra primero).
- Page 76 ATLINKS USA, Inc. 101 West 103rd Street Model 25898A Indianapolis, IN 46290 55898580 (Rev. 2 E/S) © 2004 ATLINKS USA, Inc. 05-01 Trademark(s) ® Registered Printed in China Marca(s) Registrada(s)