Table of Contents
Advertisement
Visit www.carrier.com
NOTE: Read the entire instruction manual before starting the installation.
This symbol
indicates a change since the last issue.
SAFETY CONSIDERATIONS
Improper installation, adjustment, alteration, service, maintenance,
or use can cause fire, electrical shock, or other conditions which
may cause personal injury or property damage. Consult a qualified
installer, for information or assistance. The qualified installer must
use factory-authorized kits or accessories when modifying this
product. Refer to the individual instructions packaged with the kits
or accessories when installing.
Follow all safety codes and wear safety glasses. Read these
instructions thoroughly and follow all warnings or cautions at-
tached to the unit. Consult local and state building codes and Sheet
Metal and Air Conditioning National Association (SMACNA) for
special installation requirements.
Recognize safety information. This is the safety-alert symbol
When you see this symbol on the unit or in instructions and
manuals, be alert to the potential for personal injury.
Understand the signal words DANGER, WARNING, and CAU-
TION. These words are used with the safety-alert symbol. DAN-
GER identifies the most serious hazards which will result in severe
personal injury or death. WARNING signifies hazards which
could result in personal injury or death. CAUTION is used to
identify unsafe practices which would result in minor personal
injury or product and property damage.
HOMEOWNER'S GUIDE
Step 1—Programming and Operating Instructions
AT POWER UP
When power is first applied, AC or HP will appear for 5 seconds
to tell you it is an air conditioner (AC) or a heat pump (HP) model.
After this, the time display will flash to tell you the power has been
off. The day and time will show, within 10 minutes, when the
power went off. Pressing any button will stop the flashing.
SETTING THE CURRENT TIME:
1. Press the TIME/TEMP button. SET TIME flashes on the
display.
2. Press the Up or Down button until the correct time is
displayed.
3. To quickly advance to the proper time, press and hold the UP
or DOWN button.
4. When the correct time appears on the display, press the
HOLD/END button.
NOTE: If you choose not to press the HOLD/END button, the
thermostat will automatically exit the time setting mode after 10
sec.
SETTING THE CURRENT DAY:
1. Press the DAY button to advance to the correct day.
MANUAL OPERATION
TO OPERATE MANUALLY (WITHOUT THE PRO-
GRAMMED COMFORT SCHEDULE):
Press the HOLD/END button to make the HOLD icon appear.
Then follow the four steps below:
Manufacturer reserves the right to discontinue, or change at any time, specifications or designs without notice and without incurring obligations.
Book 1 4
PC 101
Catalog No. O3TS-TA32
Tab misc misc
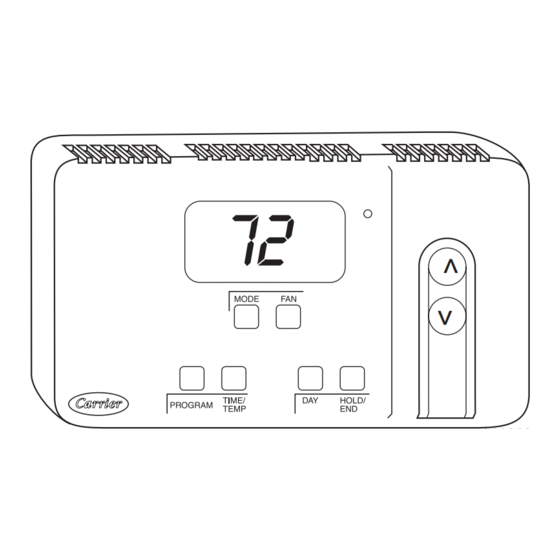
Standard Programmable Thermostat
.
Printed in U.S.A.
Homeowner's Guide/
Fig. 1—Standard Programmable Thermostat
1. To Select the Mode:
Use the MODE button to move between the choices. OFF,
HEAT, COOL, or EMHT will appear on the display. EMHT
will only appear on heat pump models.
2. To Select the Fan Operation:
Use the FAN button to move between continuous fan (indi-
cated by the FAN ON icon) and auto fan operation.
3. To Read the Room Temperature:
The large display reads room temperature until a button is
pressed.
4. To Adjust the Set Point:
The first press of the UP or DOWN button does not change the
set point. It displays the current set point for a period of 5
seconds. Successive presses within this 5 seconds will adjust
the set point and restart the 5 seconds. During the 5 seconds,
the SET TEMP icon will be flashing.
PROGRAMMED OPERATION
Introduction
The Standard Programmable Thermostat provides four periods per
day (MORNING, DAY, EVE, NIGHT) and two schedules per
week (MoTuWeThFr and SaSu). A separate time, heat set point,
and cool set point can be set for each period and schedule. Before
starting to actually program the thermostat, fill out Table 1 with the
values you wish to program. (The Energy Star, US Department of
Energy recommended time and temperature values are already
programmed for you as a starting point and are shown on the left
side of the table.)
The first press of the PROGRAM button brings up the program-
ming mode and places you at the current day and period.
Successive presses move you between the four daily periods.
WHILE PROGRAMMING:
The TIME/TEMP button moves between selections of SET TIME,
SET TEMP and HEAT, and SET TEMP and COOL. These three
numbers are to be programmed for each of the periods MORN-
ING, DAY, EVE, and NIGHT.
Form TSTAT-26SI
Pg 1
A99068
9/01
Replaces: TSTAT-24SI
Advertisement
Table of Contents

Related Manuals for Carrier Standard Programmable Thermostat


Summary of Contents for Carrier Standard Programmable Thermostat
- Page 1 Introduction 2. Press the Up or Down button until the correct time is The Standard Programmable Thermostat provides four periods per displayed. day (MORNING, DAY, EVE, NIGHT) and two schedules per week (MoTuWeThFr and SaSu). A separate time, heat set point, 3.
- Page 2 7. Press the PROGRAM button to advance to the next time NOTE: All Carrier equipment, with the exception of the Ther- period. Enter time and temperature settings from boxes 4 mostat Conversion Kit, TSTATXXCNV10, is compatible with this...
- Page 3 Step 2—Install Thermostat OPTION 1—ANTICIPATOR VALUE ADJUSTMENT This adjustment controls the sensitivity and cycle rate of the thermostat. Higher numbers decrease the cycle rate. Lower num- bers increase the cycle rate. However, this feature will not allow Before installing thermostat, turn off all power to unit. There more than 4 equipment cycles per hour (or 1 cycle every 15 may be more than 1 disconnect.
- Page 4 TO SELECT: starts counting down when the output is turned on, (e.g., if Y output is turned on for 9 minutes and then satisfies, it cannot turn 1. Enter configuration mode if not already there (see above). back on for another 6 minutes regardless of demand). However, 2.
- Page 5 TYPICAL TYPICAL SINGLE-SPEED FAN COIL/ FAN COIL/ THERMOSTAT AIR CONDITIONER THERMOSTAT FURNACE FURNACE HEATING HEATING 24 VAC HOT 24 VAC HOT 24 VAC COMM 24 VAC COMM COOLING COOLING * See note 1 * See note 1 A01399 A01400 Fig. 2—Typical Air Conditioner Fig.
- Page 6 STANDARD PROGRAMMABLE THERMOSTAT CONFIGURATION RECORD Date __________________ Owner/Operator __________________________ Thermostat Model No. ______________________________ Indoor Unit Model No. _____________________ Outdoor Unit Model No. ___________________________ A) Mode Settings ______ Hold (On or Off) ______ Mode (OFF, HEAT, COOL, EMHT) ______ Heating Set Point Value...
- Page 8 Copyright 2001 CARRIER Corp. • 7310 W. Morris St. • Indianapolis, IN 46231 tstat-26si Manufacturer reserves the right to discontinue, or change at any time, specifications or designs without notice and without incurring obligations. Book 1 4 Tab misc miscPC 101 Catalog No.