Garmin GPS III Owner's Manual
Gps navigation for aviation
Hide thumbs
Also See for GPS III:
- Owner's manual (100 pages) ,
- Quick manual (2 pages) ,
- Declaration of conformity (1 page)
Table of Contents
Advertisement
Advertisement
Table of Contents

Related Manuals for Garmin GPS III


Summary of Contents for Garmin GPS III
- Page 1 Owner’s Manual & Reference ®...
- Page 2 Information in this document is subject to change without notice. GARMIN reserves the right to change or improve its products and to make changes in the content without obligation to notify any person or organization of such changes.
-
Page 3: Introduction
Section Three (Reference) provides details about the advanced features and operations of the GPS III Pilot by topic. Before getting started with your GPS, check to see that your GARMIN GPS III Pilot package includes the following items. If you are missing any parts, please contact your dealer immediately. -
Page 4: Cautions
GPS unit so that it will not cause damage or personal injury in the event of an accident. For auto- motive use, do not mount the GPS III Pilot over airbag panels or in a place where the driver or passengers are likely to have an impact with it in an accident or collision. -
Page 5: Fcc Compliance
(2) this device must accept any interference received, including interference that may cause undesired operation. The GPS III Pilot does not contain any user-serviceable parts. Repairs should only be made by an authorized GARMIN service center. Unauthorized repairs or modifications could void your warranty and your authority to operate this device under Part 15 regulations. -
Page 6: Limited Warranty
GARMIN Corporation warrants this product to be free from defects in materials and workmanship for one year from the date of purchase. GARMIN will, at its sole option, repair or replace any components which fail in normal use. Such repairs or replacement will be made at no charge to the customer for parts or labor. The cus- tomer is, however, responsible for any transportation costs. -
Page 7: Table Of Contents
INTRODUCTION About This Manual ....i Cautions ......ii FCC Compliance . - Page 8 INTRODUCTION Table of Contents Main Menu ......73 Setup Functions .....76 APPENDIX A: Mounting Instructions .
-
Page 9: Getting Started
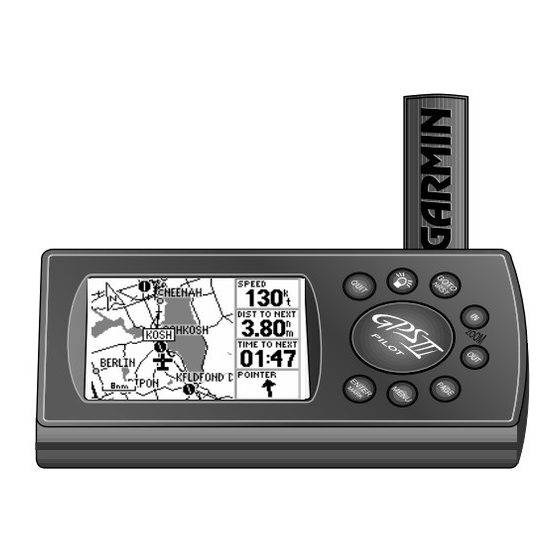
GETTING STARTED Unit Features Antenna (detachable) Function Keys Power/Backlight Key (red) Rocker Keypad LCD Display To change the screen orientation, press and Battery Door hold the PAGE key. -
Page 10: Keypad Usage/Display
GETTING STARTED Keypad Usage/Display (POWER)— Red key turns the unit on and off, and controls three levels of screen backlighting intensity. (PAGE)— Scrolls main pages in sequence and returns display from a menu/options page to a main page. Press and hold this key to change screen orientation. (MENU)—... -
Page 11: Battery Installation
The GPS III Pilot operates on 4 AA batteries, which are installed at the base of the unit. These batteries provide up to 24 hours of continuous use. Rechargeable NiCad or lithium batteries may also be used. NOTE: The on-screen battery level indicator is calibrated for alkaline batteries, and will not be accurate when using NiCad or lithium batteries (see page 79). -
Page 12: What Is Gps
Once you initialize the unit to a position, it will typically compute a fix with- in a few minutes. We’ll show you how to initialize your new GPS III Pilot on page 5. Initialization is only necessary under the following conditions: •... -
Page 13: Initialization
Initializing Your GPS III Pilot To initialize the GPS III Pilot, take the receiver outside and find an open area where the antenna has a clear view of the sky. You may either hold the receiver at a comfort- able height with the antenna pointing up (see page 4), or mount the receiver on the dash of a vehicle, as described in Appendix A. - Page 14 Also, if you’re using the GPS III Pilot inside the cockpit, make sure the unit is placed so that it has the clearest possible view of the sky. Your GPS will only be able to detect satel- lites that it can “see”...
-
Page 15: Main Page Sequence
To turn the GPS III Pilot back on, press and hold the red power key. The GPS III Pilot features six main pages which are linked together in a chain. You can quickly scroll through the pages in either direction using the PAGE or QUIT keys. -
Page 16: Satellite Status Page
GETTING STARTED Satellite Status Page The signal strength bars give you an indication of what satellites are visible to the receiver, whether or not they’re being used to calculate a posi- tion fix, and the signal quality. If satellite reception is lost, or an insufficient number of satellites are available, you will be alerted with a ‘Poor... -
Page 17: Position Page
The Position Page shows you where you are, what direction you’re heading, and how fast you’re going—and it’ s a page you may want to use when you don’t have a destination selected. A graphic compass display at the top of the page shows your direction of travel (track) while you’re moving, while six user-selectable data fields below display your current speed, average speed, trip odometer, trip timer, and sunrise/sunset times at your current position. -
Page 18: Map Page
(each with its own unique symbol) with the identifier listed directly above the waypoint’ s symbol. We’ll cover more about the GPS III Pilot’ s waypoint features and the Map Page in the reference section of this manual. -
Page 19: Hsi Page
The GPS III Pilot features two different navigation pages: HSI (horizontal situation indicator) and Highway. The HSI Page is first. The HSI Page provides graphic steering guidance to a destination waypoint and will likely become your primary navigation screen. (The Highway page also provides graphic steering guidance by displaying a three-dimensional perspective of your course and the surrounding area.) The HSI... -
Page 20: Highway Page
The GPS III Pilot’ s Highway Page also provides graphic steering guidance to a destination waypoint. As you head toward your destination, the middle of the screen provides visual guidance to your waypoint on a moving graphic “highway.” Your pre- sent position is at the bottom center of the highway display. -
Page 21: Main Menu
The GPS III Pilot’ s Main Menu provides access to an additional set of pages that are used to create or edit waypoints, create routes, review track log or trip information, configure the vertical navigation features, perform E6B calculations or make changes to system settings. -
Page 22: Viewing Database Info
‘Waypoints’ option from the Main Menu. One of the most important features of the GPS III Pilot is the built-in Jeppesen database, which includes information on airports, runways, communication frequen- cies, VORs, NDBs, intersections and airspace boundaries. This information is readily available directly from the map, or from the ‘Waypoints’... -
Page 23: Going To A Waypoint
The GPS III Pilot’ s GOTO feature allows you to quickly and easily navigate to any airport, navaid or user-entered waypoint stored in memory. A GOTO is really nothing more than a straight-line course from your present position to the destination you’ve selected. -
Page 24: Cancel Goto/Active Route
GETTING STARTED Cancel GOTO/Active Route To cancel the current GOTO destination, select ‘Cancel GOTO’ from the GOTO Options Page. Use the LEFT/RIGHT keys on the rocker keypad to select the desired data item. Available items include course, distance, fuel, and sunrise/sunset times. To cancel the current GOTO destination, simply select another destination. -
Page 25: Simulator Tour
The Reference section of this manual may be consulted for any additional questions you may have, or to learn about the more advanced features of the GPS III Pilot. For now, let’ s get start- ed on the Simulator Tour! If the GPS III Pilot is currently off, you’ll need to start by turning it on. - Page 26 1. Press PAGE to move through each of the main pages in normal fashion. 2. Press QUIT to sequence through the main pages in reverse order. In normal mode operation, the GPS III Pilot would automatically sequence from Satellite Status Page to Map Page once enough satellites where received to determine your position.
- Page 27 The GPS III Pilot’ s Map Page combines digital charts and Jeppesen data with a number of user-selectable features. Before we select our destination and begin navi- gating toward it, let’ s take a look at some of those features.
- Page 28 SIMULATOR TOUR Viewing Waypoint Info Use the rocker keypad to pan to other areas on the map display. When panning, an on-screen cursor appears for reference. Place the cursor over an on- screen airport or navaid to highlight the item, then press ENTER to view database information for the selected item.
- Page 29 Now that we’ve seen how to find waypoints on the map and view information about them, let’ s see how the GPS III Pilot is used to navigate to the waypoint we just selected. (Keep in mind that the cursor can also be used to GOTO any point on the map–even without a waypoint already at that location–by simply panning to a location...
- Page 30 SIMULATOR TOUR HSI Page From the HSI Page, you can increase/decrease the simulated speed using the UP/DOWN keys on the rocker keypad. To move off course in simula- tor mode, use the LEFT/ RIGHT rocker keypad keys. The other primary navigation screens are the HSI and Highway pages, with the HSI Page appearing first in the sequence of main pages.
- Page 31 The GPS III Pilot’ s Highway Page provides a graphic highway display that shows your movement relative to the desired course. The line down the middle of the high- way represents your desired course. As you navigate toward your destination, the high- way will actually move, indicating the direction you’re off course.
- Page 32 You fly over a nice fishing lake or golf course you’ve never noticed before and decide you would like to return to this place in your car. How would you mark this spot? The GPS III Pilot’ s ENTER/MARK key provides a simple way to mark your present position and save it as a waypoint.
- Page 33 Suppose another thirty minutes into your flight you experience an emergency and need to find a place to land. Or, you just want to stop for a break at a nearby airport or top off the tanks. A list of the nine nearest airports within 200 miles of your present position is just a keystroke away! Instantly, you can select an airport from the list and designate it as your destination waypoint.
- Page 34 If you are several hundred feet, or more, below or above these limits, the GPS III Pilot will not bother you with an alert, but the airspace boundary will still appear on the Map Page.
-
Page 35: Reference
(solid bar status). Once a fix has been calculated, the GPS III Pilot will then update your position, track, and speed by selecting and using the best satellites in view. You can also access the GPS III Pilot’ s contrast feature from this page. - Page 36 The satellite number on the sky view will appear highlighted. As soon as the GPS III Pilot has collected the necessary data to calculate a fix, the status field will indicate a 2D or 3D status.
- Page 37 500 miles with the receiver off. (This message will automatically appear when you first use your GPS III Pilot. The prompt may also appear during nor- mal use if the antenna is shaded or the unit is used indoors.)
- Page 38 1. Cycle through the three levels of backlight by repeatedly pressing the red power key. To turn the screen backlighting off: 1. Press the red power key. Whenever the GPS III Pilot’s backlighting is off, the bulb icon disappears from the Satellite Status Page.
- Page 39 The following Satellite Status Page options are available: Start Simulator— allows you to activate the GPS III Pilot’ s built-in simulator mode. If ‘Start Simulator’ is selected, ‘Stop Simulator’ will appear as an option instead. To activate (deactivate) simulator mode: 1.
-
Page 40: Position Page
The second page in the GPS III Pilot’ s main page sequence is the Position Page. This page shows you where you are, what direction you’re heading, and how fast you’re going, and it’ s most useful when you are traveling without an active destina- tion waypoint. - Page 41 Many features of the GPS III Pilot are menu driven. Each of the main pages has an options menu, allowing you to custom tailor the corresponding page to your prefer- ences and/or select special features which specifically relate to that page.
- Page 42 REFERENCE Position Page Options ‘Change Fields’ allows you to custom tailor the information that appears on the Position Page. Select the desired data type from the list. ‘Restore Defaults’ will over- ride any data field changes you’ve made to the Position Page, reverting back to the factory default settings.
-
Page 43: Map Page
The GPS III Pilot features a powerful real-time moving map that can do much more than just plot your course and route. The Map Page also displays a digital chart, includ- ing airspace boundaries, airports, navaids, lakes, rivers, coastlines and highways. An on- screen cursor lets you pan ahead to other map areas, determine the distance and bear- ing to any map position, and perform various waypoint and route functions. - Page 44 REFERENCE Map Page Use the rocker keypad to pan away from your present position. Place the pointer over an airport or navaid and press ENTER to see more information. By placing the panning pointer over an on-screen waypoint and pressing GOTO/ NRST, you won’t have to manually enter the identifier for the waypoint.
- Page 45 Many features of the GPS III Pilot are menu driven. Each of the main pages has an options menu, allowing you to custom tailor the corresponding page to your prefer- ences and/or select special features which specifically relate to that page.
- Page 46 REFERENCE Map Page Options ‘Setup Map’ allows you to change map orientation, background map detail, on- screen Jeppesen data, text size, etc. The map settings are orga- nized by a series of ‘file tabs’. Use the rocker keypad to select the desired tab, and to select the desired setting(s).
- Page 47 To change a map setup feature: 1. Highlight ‘Map Setup’ and press ENTER. 2. To change map orientation, select the ‘Map’ tab (if not already selected) and press ENTER. Highlight the ‘Orientation’ field and press ENTER. Select ‘North Up’ to fix the top of the map display to a north heading.
-
Page 48: Hsi Page
REFERENCE HSI Page This example shows the air- craft heading parallel to the desired course, with the air- craft right of course more than 0.5 nm. When off course beyond the limits of the CDI scale, the D-bar will appear in gray and stay at the edge of the scale (until your off course error is less than the limits of... - Page 49 Many features of the GPS III Pilot are menu driven. Each of the main pages has an options menu, allowing you to custom tailor the corresponding page to your prefer- ences and/or select special features which specifically relate to that page.
- Page 50 Release Hold— cancels the ‘hold’ feature enabled when the ‘Set OBS and Hold’ option was selected. This option returns the GPS III Pilot to automatic sequenc- ing of waypoints along the active route. However, if an OBS course has been selected, that course setting will be retained until cancelled (as described on page 41) or until waypoint passage.
- Page 51 DISTANCE TO PROFILE DISTANCE TO TARGET The GPS III Pilot’ s vertical navigation feature allows you to create a three- dimensional profile which guides you from your present position and altitude to a final (target) altitude at a specified location. Once the profile is defined, message alerts and additional data on the HSI Page will keep you informed of your progress.
-
Page 52: Vertical Navigation
7. When using a route, the ‘VNav Waypoint’ field allows you to specify which route waypoint will be used for the vertical navigation profile. By default, the GPS III Pilot will select the last waypoint in the route. To select a different waypoint, highlight the ‘VNAV Waypoint’... - Page 53 Selective Availability (SA) program. With ‘SA’ on, GPS altitude may be in error by several hundred feet. Errors of this magnitude may result in fluctuations in the VNAV indicator on the HSI Page. The GPS III Pilot is a VFR navigation tool and should not be used to perform instrument approaches.
-
Page 54: Highway Page
Whenever a destination waypoint(s) has been selected, the GPS III Pilot’ s Highway Page will guide you to your destination with digital readouts and a high- way display. Along the right side of the page (top, when display is vertical) are four user-selectable data fields that display current speed, distance and time to next way- point, and a bearing pointer (defaults). - Page 55 Many features of the GPS III Pilot are menu driven. Each of the main pages has an options menu, allowing you to custom tailor the corresponding page to your prefer- ences and/or select special features which specifically relate to that page.
-
Page 56: Waypoint Categories
‘file tab’ at the top of the page. Your GPS III Pilot uses a built-in Jeppesen database to provide position and facility information for thousands of airports, VORs, NDBs and intersections. Each facility in the database is stored as a waypoint, with its own latitude/longitude, iden- tifier (up to six letters and/or numbers) and other pertinent information. - Page 57 2. Use the rocker keypad to enter the desired identifier—UP/DOWN to change each character and RIGHT to move to the next character. 3. As the identifier is entered, the GPS III Pilot will scroll through the database, displaying any waypoints with the same identifier letters you have entered to that point. When the desired waypoint is displayed, press ENTER.
-
Page 58: Airport Information Page
RIGHT to move to the next character. 3. As the name is entered, the GPS III Pilot will scroll through the database, displaying any waypoints with the same letters you have entered to that point. In some instances there may be more than one waypoint with the desired name. - Page 59 Runway Information Page The Runway Information Page displays the identifier, designations, length, width, surface type and lighting information for the selected airport. This page also provides a graphic diagram of the runways and a map of the surrounding area. The surface type information can be any one of: hard, turf, sealed, gravel, dirt, soft, unknown, or water.
- Page 60 REFERENCE Waypoint Information Pages The VOR Information Page provides complete information about the selected VOR, including facility name, city, frequency and designation for co-located DME or TACAN. Both the NDB and VOR Information Pages provide ‘WX’ indications if the select- ed facility broadcasts weather information.
-
Page 61: Nearest Page
In addition to being used to define a GOTO destination, the GPS III Pilot’ s GOTO/NRST key can also be used to view detailed information on the nine nearest airports, VORs, NDBs, intersections and user waypoints within 200 miles of your pre- sent position. - Page 62 GOTO/NRST and then ENTER. As mentioned earlier, additional information is stored in the GPS III Pilot’ s Jeppesen database. This information may be retrieved using the ‘Waypoints’ option on the Main Menu, but it is also available from the Nearest Page.
-
Page 63: User Waypoints
In addition to the built-in database, the GPS III Pilot also stores up to 500 user- defined waypoints, with a selectable symbol and comment available for each waypoint. User-defined waypoints can be created using four methods: Mark Present Position— your present position can be captured and saved as a user waypoint using the ENTER/MARK key (press &... - Page 64 REFERENCE Creating User Waypoints User waypoints can be created directly from the Map Page, by placing the panning pointer on the desired position and pressing ENTER. User waypoints can also be created by entering the position coordinates for the waypoint. Marking User Waypoints on the Map Page User waypoints can also be quickly created from the Map Page, which allows you to “point and shoot”...
- Page 65 5. To enter a name for the new waypoint, highlight the waypoint name field and press ENTER. Use the rocker keypad to enter the waypoint name and press ENTER when finished. 6. To enter position coordinates for the new waypoint, highlight the waypoint coordinates field and press ENTER.
- Page 66 REFERENCE Editing User Waypoints User waypoints can be delet- ed individually, by common symbol or all at once. Select the desired ‘Delete’ option and press ENTER. To rename a user waypoint, enter the new name directly over the old name and press ENTER.
- Page 67 To change the user waypoint’s symbol: 1. Highlight the waypoint symbol field and press ENTER. 2. Use the rocker keypad to select the desired symbol and press ENTER. The selected symbol will be used to denote the waypoint position on the map display. When a waypoint is created, the time and date of creation is automatically added as a waypoint comment.
- Page 68 REFERENCE Waypoint Options ‘Show Map’ allows you to view the area around the user waypoint’s position. ‘Display Options’ lets you determine what user way- point information will appear on the map display. The Waypoint Edit Page features additional options, besides the ‘Show Map’ option described in the previous steps.
-
Page 69: Goto
(See page 64 for more information about TracBack.) Routes— allows you to manually create a sequence of intermediate waypoints which lead you to your final destination. The GPS III Pilot will store up to 20 reversible routes, with up to 30 waypoints in each route. - Page 70 3. Use the rocker keypad to enter the facility name/city. As you enter the first few char- acters, the GPS III Pilot’s Spell n Find feature will scroll through the database, display- ing any waypoints which match the letters you have entered. When searching by city name, there may be mulitiple waypoints for the same city.
- Page 71 GOTO Options are also provided to initiate a TracBack route or to cancel the current GOTO destination. To display the GOTO Options, press MENU (immediately after pressing GOTO/NRST). The following options are available: TracBack— allows you to retrace your path using the track log automatically stored in the receiver’...
-
Page 72: Tracback
A track log is an electronic breadcrumb trail show- ing the path you have travelled. Your GPS III Pilot can be set to automatically record track log points anytime the receiver is on and locked onto satellites (see page 74). - Page 73 Once a TracBack has been activated, the GPS III Pilot will take the track log cur- rently stored in memory and divide it into route segments, called ‘legs’. Up to 30 track log waypoints (labeled ‘T###’, e.g. ‘T001’) will be created to mark the most significant features of the track log in order to duplicate your path as closely as possible.
-
Page 74: Routes
Route navigation allows you to manually create a sequence of intermediate way- points which lead you to your final destination. The GPS III Pilot will store up to 20 reversible routes, with up to 30 waypoints in each route. Routes can be created and modified by text entry—using the rocker keypad to enter waypoint names. - Page 75 Activate— allows you to navigate the route in the same sequence it was original- ly created, as described above. REFERENCE Route List Activating a route tells the GPS III Pilot you wish to use this route for navigation guidance. Selecting a GOTO destination along the current route will...
- Page 76 REFERENCE Route Options ‘Copy’ allows you to make a duplicate of a route before making editing changes. ‘Delete’ will remove the route from memory, but not the waypoints contained in the route. Invert— allows you to reverse the order of waypoints in the route. Copy—...
- Page 77 Once a route is added to memory, you can review and/or edit the route from the Route Edit Page. The Route Edit Page shows the sequence of waypoints for the select- ed route and provides additional options to insert waypoints, remove waypoints or perform trip/fuel planning functions.
-
Page 78: Active Route Page
REFERENCE Route Editing With a route displayed, use the LEFT/RIGHT keys on the rocker keypad to select the trip planning features. The Active Route Page shows the route currently being used for navigation guidance. The Route Edit Page also displays trip planning information for each leg or the entire route. - Page 79 Many features of the GPS III Pilot are menu driven. Each of the main pages has an options menu, allowing you to custom tailor the corresponding page to your prefer- ences and/or select special features which specifically relate to that page.
- Page 80 REFERENCE Active Route Page Options To reverse the sequence of waypoints in the active route, select the ‘Invert’ option. To delete the active route from memory, select the ‘Delete Route’ option. Invert— reactivates the current route in reverse order and navigates from the end waypoint back to the beginning waypoint.
-
Page 81: Main Menu
The GPS III Pilot’ s Main Menu provides access to the waypoint, route, track log, trip planning and setup features of the receiver. The Main Menu can be accessed at any time using the MENU key. To display the Main Menu, press the MENU key twice. - Page 82 REFERENCE Main Menu ‘Fill’ will record track log data until memory is full, then pro- vide a ‘Track Memory Full’ message. To utilize the TracBack fea- ture, you should clear the track log before leaving the departure airport. Track Log Settings Record Mode lets you select one of three track recording options: ‘Off’...
- Page 83 Trip Computer— provides readouts for average speed, maximum speed, odometer, trip odometer and trip timer. These readouts can be reset from the Trip Computer Options. To reset a trip computer readout(s): 1. Press MENU (with the Trip Computer Page displayed). An options list is displayed. 2.
-
Page 84: Setup Functions
REFERENCE Main Menu / Setup The ‘Winds’ option allows you to calculate the current head- wind or tailwind component. The ‘Setup’ option uses file tabs for quick selection/review of unit settings. 5. Highlight the ‘Total Air Temperature’ (TAT) field and press ENTER. Enter the TAT and press ENTER. - Page 85 Position Format (latitude/longitude, UTM/UPS, Maidenhead, regional grids); Map Datum selection Interface Format (NMEA, RTCM, GARMIN proprietary); Mode setting for use with PC or a second unit The following pages describe, in more detail, the available settings for each Setup file tab item.
- Page 86 REFERENCE Setup: Simulator ‘Simulator’ allows you to enable/disable the built-in simulator feature—and set simulated speed, track and altitude. The ‘Track Control’ setting allows the simulator to auto- matically “line up” on the cor- rect bearing to a destination waypoint. Simulator Settings Mode lets you turn the built-in simulator on or off.
- Page 87 System Settings Backlight lets you keep the screen/keypad backlighting on continuously (‘always on’) when selected, or enables the automatic shutoff to preserve battery life. Automatic shutoff times from 15 seconds to 4 minutes (since last key press) are available. To set the backlight timeout: 1.
- Page 88 WARNING: If ‘User Mag Var’ is selected, you must periodically update the magnetic varia- tion as your position changes. Using this setting, the GPS III Pilot will not automatically cal- culate and update the magnetic variation at your present position. Failure to update this set- ting may result in substantial differences between the information displayed on your GPS III Pilot and external references, such as a magnetic compass.
- Page 89 ENTER and select ‘Reset’ or ‘Off’ (as appropriate). Press ENTER to confirm. Battery Timer provides a running count of how long the GPS III Pilot has been in operation with the current batteries. The timer automatically stops when using an external power source.
-
Page 90: Time Settings
REFERENCE Setup: Time Enter an offset amount to adjust the time display to your local area. In the United States, all offset amounts will be ‘Behind UTC’. If you’re unsure of the exact offset select a ‘Local’ time for- mat, then enter offset values until you arrive at the correct local time. - Page 91 3. If enabling the alarm, highlight the time field (to the immediate right) and press ENTER. Enter the alarm time using the rocker keypad and press ENTER. NOTE: The GPS III Pilot must be turned on when the alarm time is reached. Otherwise, the message will not occur.
- Page 92 REFERENCE Setup: Airspace You may enable/disable the airspace alerts by the individ- ual categories shown. The altitude buffer provides an added margin of safety beyond the floor/ceiling limits of a given airspace. Airspace Settings Class B is used to enable/disable alarms for Class B or CTA (ICAO control areas) airspace. Class C allows you to enable/disable alarms for Class C or TMA (ICAO terminal control areas) airspace.
- Page 93 NOTE: Some airspace altitude limits may be charted in terms of altitude above ground level (AGL). If the actual lower limit of an airspace is charted in AGL, the GPS III Pilot will alert you at any altitude below the upper limit. However, if the actual upper limit is also charted in AGL, the GPS III Pilot will provide the alert at all altitudes.
- Page 94 REFERENCE Setup: Position Only the latitude/longitude, UTM/UPS and Maidenhead settings apply worldwide. The additional grid settings are only valid for a specific region. Over 100 different datums are provided to allow the GPS III Pilot to correspond to vari- ous paper charts. Use WGS 84 unless your chart specifies otherwise.
-
Page 95: Interface Settings
ENTER. The ‘Transfer Mode’ field allows you to specify what infor- mation to request or send to a second GPS III Pilot. The ‘Host’ setting lets you control all data transfer functions from the second GPS III Pilot or from a PC. -
Page 96: Appendix A: Mounting Instructions
APPENDIX A Mounting Instructions The GPS III Pilot can be mounted on any flat surface using the two Velcro™ strips provided in the standard package, or you can use the supplied mounting bracket. To mount the GPS III Pilot using the Velcro strips: 1. - Page 97 2. Mate the two clips (opposite the thumb tab) on the upper bracket with the notches on the bottom of the GPS III Pilot. 3. Rotate the GPS III Pilot into place in the upper bracket and snap the thumb tab clips into the notches on the top of the GPS III Pilot.
-
Page 98: Appendix B: Specifications
** Subject to accuracy degradation to 100m 2DRMS under the U.S. DoD-imposed Selective Availability Program. † Alkaline batteries lose a significant amount of their capacity as temperature decreases. Use lithium batteries when operating the GPS III Pilot in below freezing conditions. Extensive use of screen backlighting will significantly reduce battery life. -
Page 99: Appendix C: Wiring/Interfacing
GPS receiver. The NMEA 0183 version 2.0 interface format is supported by the GPS III Pilot and enables the unit to drive up to three NMEA devices: NMEA 0183 version 2.0 Approved sentences:... -
Page 100: Appendix D: Antenna/Remote Mounting
Remote Suction Cup Mount – allows you to mount the standard detachable antenna up to 6 feet away from the GPS III Pilot unit, using a suction cup mount. This mount should only be used inside a vehicle. GA 26 Remote Antenna – allows you to mount an amplified antenna outside the vehicle, up to 8 feet away, using supplied magnetic or suction cup mounts. -
Page 101: Appendix E: Messages
The GPS III Pilot uses an on-screen message indicator to alert you to important information. Whenever the message appears, press ENTER to acknowledge the mes- sage and return to the previous page you were viewing. Messages are provided for system status, waypoint/route editing, battery condition, etc. For your safety, pay careful attention to all messages. - Page 102 RAM Failed—The GPS III Pilot has detected a failure in its internal memory. If the message persists, the GPS III Pilot is unusable and should be taken to an authorized GARMIN service center. Received Invalid Waypoint—A waypoint was received during upload transfer that has an invalid identifier and/or position.
-
Page 103: Appendix F: Map Datums
The following are the map datums available for the GPS III Pilot. Menu Page abbreviations are listed first, followed by the corresponding map datum name and area. The default map datum for the GPS III Pilot is WGS 84. Adindan... -
Page 104: Map Datums
APPENDIX F Map Datums Indian Bngldsh Indian- Bangladesh, India, Nepal Indian Thailand Indian- Thailand, Vietnam Indonesia ‘74 Indonesia 1974- Indonesia Ireland 1965 Ireland 1965- Ireland ISTS 073 Astro ISTS 073 ASTRO ‘69- Diego Garcia Johnston Island Johnston Island Kandawala- Sri Lanka Kerguelen Islnd Kerguelen Island Kertau 1948... - Page 105 Oman Oman- Oman Ord Srvy GB Old Survey Grt Britn- England, Isle of Man, Scotland, Shetland Isl., Wales Pico De Las Nv Canary Islands Ptcairn Ast ‘67 Pitcairn Astro ‘67- Pitcairn Isl. Prov S Am ‘56 Prov So Amricn ‘56- Bolivia, Chile,Colombia, Ecuador, Guyana, Peru, Venezuela Prov S Chln ‘63 Prov So Chilean ‘63- S.
-
Page 106: Appendix G: Navigation Terms
APPENDIX G Navigation Terms Altitude—Height above mean sea level (MSL). Avg Speed—The average of all second-by-second speed readings since last reset. Bearing (BRG)—The compass direction from your present position to a destination waypoint. Course—The desired course between the active ‘from’ and ‘to’ waypoints. Distance (Dist)—The ‘great circle’... - Page 107 APPENDIX G Time to Dest—The estimated time required to reach a GOTO destina- Navigation Terms tion, or the final waypoint in a route. Time to Next—The estimated time required to reach a GOTO destina- tion, or the next waypoint in a route. Vertical Navigation Time to VNv—Prior to reaching the initial descent point, ‘Time to VNv’...
-
Page 108: Appendix H: Index
APPENDIX H Index Active Route Options ..68-72 Active Route Page ..16,70-72 Active Waypoints ....48 Airports Nearest . - Page 109 Installation, wiring ... . .91 Interface Formats ....77 Interface Settings ....87 Keypad Usage .
- Page 110 APPENDIX H Index Satellite Status Page ..8,27-29 Satellite Status Page Options . . .30-31 Screen Contrast ... . .27,79 Screen Orientation ...1,79 Scrolling .
- Page 112 GARMIN International, Inc., 1200 E. 151st Street, Olathe, KS 66062 USA GARMIN (Europe) Ltd., Unit 5, The Quadrangle, Abbey Park Industrial Estate, Romsey SO51 9AQ UK GARMIN (Asia) Corp., 3F, No. 1, Lane 45, Pao-Hsing Road, Hsin Tien, Taipei, Taiwan R.O.C.