Table of Contents
Advertisement
PAINT SPRAY GUN
ASSEMBLY AND OPERATING
Due to continuing improvements, actual product may differ slightly from the product described herein.
3491 Mission Oaks Blvd., Camarillo, CA 93011
Visit our Web site at http://www.harborfreight.com
READ AND UNDERSTAND ALL WARNINGS
AND INSTRUCTIONS BEFORE USE.
©
Copyright
2000 by Harbor Freight Tools
artwork contained herein may be reproduced in any shape or form without the express written
consent of Harbor Freight Tools.
For technical questions and replacement parts, please call 1-800-444-3353.
INSTRUCTIONS
TO PREVENT SERIOUS INJURY,
®
. All rights reserved. No portion of this manual or any
Manual revised 08/05
43760
®
Advertisement
Table of Contents

Related Manuals for Central Pneumatic 43760


Summary of Contents for Central Pneumatic 43760
- Page 1 PAINT SPRAY GUN 43760 ASSEMBLY AND OPERATING INSTRUCTIONS Due to continuing improvements, actual product may differ slightly from the product described herein. ® 3491 Mission Oaks Blvd., Camarillo, CA 93011 Visit our Web site at http://www.harborfreight.com TO PREVENT SERIOUS INJURY, READ AND UNDERSTAND ALL WARNINGS AND INSTRUCTIONS BEFORE USE.
-
Page 2: Table Of Contents
When unpacking, check to make sure the product is intact and undamaged. If any parts are missing or broken, please call Harbor Freight Tools at the number on the cover of this manual as soon as possible. REV 12/05 For technical questions, please call 1-800-444-3353; SKU 43760 Page 2 Troubleshooting section at end of manual. -
Page 3: Specifications
Spray Gun. Do not overreach. Keep proper footing and balance at all times. Do not reach over or across running machines or air hoses. For technical questions, please call 1-800-444-3353; SKU 43760 Page 3 Troubleshooting section at end of manual. - Page 4 Maintain a distance of at least 25 feet from the air compressor. If possible, locate the air compressor in a separate room. Do not smoke while spraying. For technical questions, please call 1-800-444-3353; SKU 43760 Page 4 Troubleshooting section at end of manual.
- Page 5 For technical questions, please call 1-800-444-3353; SKU 43760 Page 5 Troubleshooting section at end of manual.
-
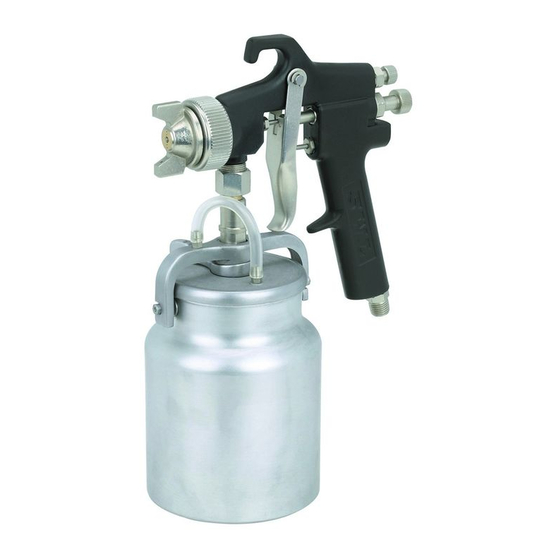
Page 6: Air Connection
Check the air connection for leaks and then disconnect the tool from the air source. Control Layout Pattern Control Knob (14) FIGURE 1 Fluid Control Air Cap Set (1) Knob (15) Trigger (32) Air Inlet (34) Cup (43) For technical questions, please call 1-800-444-3353; SKU 43760 Page 6 Troubleshooting section at end of manual. -
Page 7: A Comparison: Conventional Versus Hvlp Spray Guns
If it appears to thin, add a very small amount of thinner (not included). BE CAREFUL when thinning. Proceed slowly, adding very minimal amounts. NEVER exceed the manufacturer’s thinning recommendations. For technical questions, please call 1-800-444-3353; SKU 43760 Page 7 Troubleshooting section at end of manual. -
Page 8: Fan Direction And Pattern Adjustment
FIGURE 1 on page 6). By turning it counterclockwise (all the way open), the pattern will flatten. Turn the Pattern Control Knob (14) clockwise for a round pattern. See FIGURE 4 below. FIGURE 4 Flat/Open Round/Closed REV 12/05 For technical questions, please call 1-800-444-3353; SKU 43760 Page 8 Troubleshooting section at end of manual. - Page 9 (you see globs of paint), close down the Fluid Control Knob (15) slowly, checking the mixture after each adjustment. See FIGURE 5 below. FIGURE 5 Too Coarse Correct Too Fine (Tighten) (Loosen) For technical questions, please call 1-800-444-3353; SKU 43760 Page 9 Troubleshooting section at end of manual.
-
Page 10: Techniques
Clean out the gun thoroughly after EVERY use, according to the instructions found on the next page. For technical questions, please call 1-800-444-3353; SKU 43760 Page 10 Troubleshooting section at end of manual. -
Page 11: Maintenance
Disposal: After cleaning your Spray Gun, properly dispose of your cleaning solutions according to the solution manufacturer’s direction and local hazardous waste standards. For technical questions, please call 1-800-444-3353; SKU 43760 Page 11 Troubleshooting section at end of manual. -
Page 12: Parts List
THERETO, OR ARISING OUT OF HIS OR HER INSTALLATION OF REPLACEMENT PARTS THERETO. NOTE: Some parts are listed and shown for illustration purposes only and are not available individually as replacement parts. REV 10/03; 08/05 For technical questions, please call 1-800-444-3353; SKU 43760 Page 12 Troubleshooting section at end of manual. -
Page 13: Assembly Diagram
Assembly Diagram 24 23 REV 10/03; 08/05 For technical questions, please call 1-800-444-3353; SKU 43760 Page 13 Troubleshooting section at end of manual. -
Page 14: Troubleshooting
2. Holes on one side of the Air cap are plugged. (Clean the Air cap with a nonmetallic point.) If the steps above do not solve the problem or if the repairs involved are too complex, contact a qualified technician. SKU 43760 For technical questions, please call 1-800-444-3353. Page 14... - Page 15 2. Packing worn or dry 2. Replace or lubricate (non-silicone) If the steps above do not solve the problem or if the repairs involved are too complex, contact a qualified technician. SKU 43760 For technical questions, please call 1-800-444-3353. Page 15...
- Page 16 90 Day Warranty Harbor Freight Tools Co. makes every effort to assure that its products meet high quality and durability standards, and warrants to the original purchaser that this product is free from defects in materials and workmanship for the period of 90 days from the date of purchase. This warranty does not apply to damage due directly or indirectly, to misuse, abuse, negligence or accidents, repairs or alterations outside our facilities, criminal activity, improper installation, normal wear and tear, or to lack of maintenance.