
Related Manuals for Sony STR-CT550WT


Summary of Contents for Sony STR-CT550WT
- Page 1 4-269-874-22(1) Home Theatre System Operating Instructions HT-CT550W ©2011 Sony Corporation...
- Page 2 EU Disposal of waste directives. batteries (applicable in The manufacturer of this product is Sony Corporation, the European Union and 1-7-1 Konan Minato-ku, Tokyo, 108-0075 Japan. The other European Authorized Representative for EMC and product safety...
-
Page 3: Precautions
• AC power cord (mains lead) must be changed only at the qualified service shop. If you have any question or problem concerning your system, please consult your nearest Sony dealer. On heat buildup Although the system heats up during operation, this is not a malfunction. - Page 4 HDMI, the HDMI Logo, and High-Definition Multimedia Interface are trademarks or registered trademarks of HDMI Licensing LLC in the United States and other countries. “BRAVIA” logo is a trademark of Sony Corporation. “x.v.Colour (x.v.Color)” and “x.v.Colour (x.v.Color)” logo are trademarks of Sony Corporation. “PlayStation ”...
-
Page 5: Table Of Contents
.....29 Using the Radio Data System (RDS)..30 Surround Function Enjoying the surround effect....31 Advanced Settings Controlling connected Sony equipment with the remote control....32 Changing the input button assignments of the remote control ......35 Settings and adjustments using the... -
Page 6: Getting Started
Getting Started Unpacking • Receiver (STR-CT550WT) (1) • FM wire antenna (aerial) (1) • Operating Instructions (1) • Warranty (1) • Subwoofer (SA-WCT550W) • Digital optical cord for a TV (2.5 m) (1) • Speaker (SS-CT550W) (1) • Remote control (RM-AAU114) •... - Page 7 Inserting batteries into the remote control Insert two size AA (R6) batteries (supplied) by matching the 3 and # ends on the batteries to the diagram inside the battery compartment of the remote control. To use the remote control, point it at the remote control sensor at the front of the receiver.
-
Page 8: Index To Parts And Controls
Index to parts and controls For more information, see the pages indicated in parentheses. Receiver A ?/1 (on/standby) C VOLUME +/– B INPUT SELECTOR D Front panel display (page 10) Press to select the input source to play back. (remote control sensor) Every time you press the button, the input source changes cyclically as follows: TV t BD/DVD t GAME t... -
Page 9: Subwoofer (Sa-Wct550W)
Subwoofer A ?/1 (power button) B SECURE LINK button (page 40) C LINK/STANDBY indicator You can check the status of wireless transmission between the receiver and the subwoofer. • Turns green: The system is turned on,wireless transmission is activated and sound signals are being received. - Page 10 Front panel display (on the receiver) A Audio format indicators D COAX/OPT Lights up according to the jack you are Light up according to the audio format that using, the DIGITAL COAX or the is being input to the system. DIGITAL OPT jack.
- Page 11 C AMP MENU (page 37) Remote control D SOUND FIELD +/– (page 31) This section describes subwoofer and speaker (muting) button operation. See page 32 for details on the F 2 +/– button operation of connected equipment. Press to adjust the volume. G C, X, x, c or Note •...
-
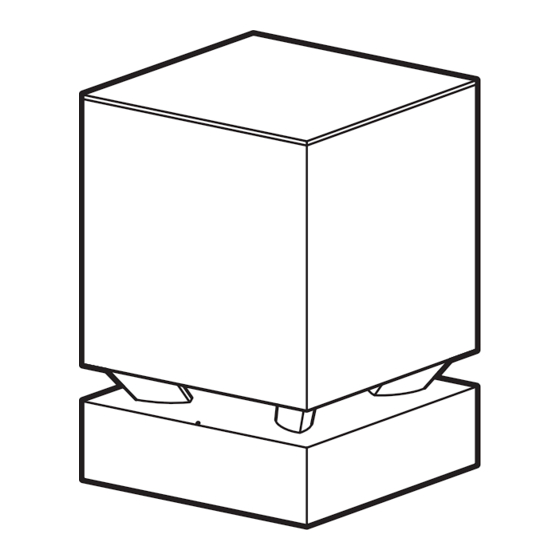
Page 12: Positioning The System
Positioning the system The illustrations below are examples of how to install the speaker. Note • When you select a place for the receiver or the subwoofer, do not block the heat ventilation on the rear panel of the receiver or the subwoofer. Installing the speaker to the Installing the speaker and the TV separately... - Page 13 Install the speaker on a vertical and flat reinforced area of the wall. • Be sure to subcontract the installation to Sony dealers or licensed contractors and pay special attention to safety during the installation.
-
Page 14: Installing The Supplied Wireless Transceivers
Installing the supplied wireless transceivers Insert the two supplied wireless transceivers into the wireless transceiver (EZW-RT50/EZW-RT20) slot on the rear panel of both the receiver and the subwoofer. Rear panel of the receiver Rear panel of the subwoofer Wireless transceiver Wireless transceiver Connecting the speaker The connectors of the speaker cord are color-coded depending on the type of speaker. -
Page 15: Connecting The Tv And Player, Etc
Connect the TV and/or player, etc., with HDMI jacks to the system using an HDMI cable. By connecting Sony “BRAVIA” Sync-compatible equipment using HDMI cables and by setting the Control for HDMI function via the TV for each connected equipment, operation can be simplified. See “What is “BRAVIA”... - Page 16 Notes • All the HDMI jacks on the system function in the same way. If you want to connect a DVD player in addition to a Blu-ray Disc player, use any available HDMI jack. • The system is compatible with the Audio Return Channel (ARC) function. If you connect the system to the Audio Return Channel (ARC)-compatible TV’s HDMI jack via an HDMI cable, you do not need to connect the TV to the system with the digital optical cord (page 39).
-
Page 17: Connecting Other Equipment
Connecting other equipment When connecting equipment that do not have HDMI jacks, such as a “PlayStation 2,” a DVD player, ® a satellite tuner, or a cable television tuner, etc., set “CTRL HDMI” to “OFF” in the AMP menu of the system (page 20). -
Page 18: Connecting The Fm Wire Antenna (Aerial)
Connecting the FM wire antenna (aerial) Connect the FM wire antenna (aerial) to the FM 75 Ω COAXIAL jack. FM wire antenna (aerial) (supplied) Rear of the receiver FM 75 Ω COAXIAL jack Notes • Be sure to fully extend the FM wire antenna (aerial). •... -
Page 19: Connecting The Ac Power Cord (Mains Lead)
HDMI function to on for the connected equipment. System When you use a Sony TV which has a Control for HDMI function, setting the Control for The receiver transmits sound from the equipment HDMI function on TV will set the Control for to the subwoofer. - Page 20 If you add or reconnect an Turn on the system, the TV and the connected equipment. equipment Select the input of the system and the Perform steps of “Preparing for “BRAVIA” HDMI input of the TV (BD/DVD, GAME, Sync” (page 19) and “If “COMPLETE” does not or SAT/CATV), so that an image from a appear after performing the steps above”...
-
Page 21: Setting Up The Sound Output Of The Connected Equipment
Setting up the sound output of the connected equipment To output multi-channel digital audio, check the digital audio output setting on the connected equipment. For example, for a Blu-ray Disc player, check that “Audio (HDMI)” is set to “Auto.” For details, refer to the operating instructions supplied with the connected equipment. -
Page 22: Playback Options
For Notes details, refer to the operating instructions supplied • The following features may operate with non-Sony with the connected equipment. equipment, however, compatibility with these equipment that complies with the HDMI CEC System Audio Control specification is not guaranteed. - Page 23 • Depending on the TV, when you adjust the receiver’s If you use a TV that is not compatible with volume using the TV’s remote control, the volume “BRAVIA” Sync, set the “PASS THRU” to level appears on the TV screen, in the same way it “ON”...
- Page 24 Standard HDMI cable, 1080p, Deep Colour, or 3D images may not be displayed properly. • We recommend that you use an HDMI authorized cable or a Sony HDMI cable. • We do not recommend using an HDMI-DVI conversion cable. • Check the setup of the connected equipment if...
-
Page 25: Operating The System Using The Supplied Remote Control
Input source Playable equipment Operating the system SAT/CATV Satellite tuner or cable television tuner, etc. connected using the supplied remote to the SAT/CATV IN jack control VIDEO DVD player, etc. connected to the DIGITAL COAX VIDEO IN jack LINE IN CD player, etc. -
Page 26: Tuner Functions
While pressing and holding SHIFT (1), press the number buttons (2) to enter Tuner Functions the frequency. Example: 88.00 MHz Listening to the radio While pressing and holding SHIFT, select 8 t 8 t 0 t 0. You can enter the frequency of a station directly using the number buttons. -
Page 27: Programming Radio Stations
Press Programming radio “COMPLETE” appears on the front panel display, and the station is stored. stations You can program up to 20 FM stations. Before tuning, make sure to turn down the volume to Repeat 2 to 5 to store other stations. minimum. -
Page 28: Naming Preset Stations
Press PRESET +/– repeatedly to select Note that no more than one name can be entered the preset station. for each preset station. Each time you press the button, the system Note tunes in one preset station. • You cannot enter a name for a preset station for which You can select the preset number directly by a Radio Data System (RDS) broadcast is received pressing the number buttons while pressing... -
Page 29: Viewing The Station Name Or Frequency On The Front Panel Display
Create a name by using C/X/x/c. Viewing the station name Press X/x to select a character, then press c to move the cursor to the next position. or frequency on the front Letters, numbers, and other symbols can be panel display input for a radio station name. -
Page 30: Using The Radio Data System (Rds)
Using the Radio Data System (RDS) What is the Radio Data System? The Radio Data System (RDS) is a broadcasting service that allows radio stations to send additional information along with the regular programming signal. This tuner offers convenient RDS features, such as station name display.* * Not all FM stations provide RDS service, nor do they provide the same type of services. -
Page 31: Surround Function
Tips • You can set a different sound field for each input source. • If you press the THEATRE button on a Sony TV remote control when “CTRL HDMI” is set to “ON,” SOUND the sound field changes to “MOVIE” (some Sony FIELD +/–... -
Page 32: Advanced Settings
The equipment assigned to the selected input button becomes operable. remote control Referring to the following table, press You can control connected Sony equipment with the corresponding button for the the remote control of this system. operation. Some functions may not be selectable depending Common operations on the equipment. - Page 33 Remote Control Function Remote Control Function Button Button wh Number buttons Selects channels and tracks (Guide) Displays the guide when directly. you are watching analog or digital channels. For TV, press and hold qf TV (yellow), and press the Selects the audio format/ number buttons to select track.
- Page 34 To control the HDD/DVD COMBO Remote Control Function Button Remote Control Function wg CLEAR While pressing and Button holding qd SHIFT, press Switches to other viewing wg CLEAR. angles when multi-angles are recorded on a DVD To control the DVD player/Blu-ray VIDEO.
-
Page 35: Changing The Input Button Assignments Of The Remote Control
Press and hold the input button whose Note assignment you want to change, and • The above explanations are intended to serve as an then press and hold AV ?/1 at the same example only. Depending on the equipment, the time. - Page 36 ** The factory default setting of the SAT/CATV button. To clear all remote control button assignments While holding down 2 –, press ?/1 and t/ Then, release the buttons. The remote control is reset to its factory default settings.
-
Page 37: Settings And Adjustments Using The Amplifier Menu
Settings and adjustments CTRL using the amplifier menu HDMI HDMI PASS AUTO Using the AMP menu THRU You can set the following items with AMP MENU on the remote control. The default settings are underlined. Your settings are retained even if you disconnect SYSTEM DIMMER the AC power cord (mains lead). - Page 38 Adjusting the bass and treble level (BASS, TREBLE) You can adjust the bass and treble level. The parameters of “BASS” and “TREBLE” range from “–6” to “+6” in 1-step increments. MENU • BASS: Adjusts the bass level. C, X, x, c, •...
- Page 39 the receiver’s HDMI output jack. We Enjoying the sound at low recommend this setting if you use a volume (NIGHT MODE) TV that is compatible with “BRAVIA” Sync. This setting saves You can enjoy sound effects and hear the dialog power in standby mode compared with clearly even at a low volume level using this the “ON”...
- Page 40 Note Cancelling the Secure Link • When the receiver is turned off via the AUTO STBY function (SECURE OFF) function, the receiver may not be turned on automatically when you turn on the TV next time. Select “WIRELESS” in the AMP menu, or c.
- Page 41 Checking the wireless communications status of the wireless system (RF CHECK) Indicates whether or not the wireless system is activated on the receiver. When the receiver finishes checking, “OK” or “NG” appears. • OK: A wireless connection is possible. • NG: A wireless connection is not possible.
-
Page 42: Troubleshooting
The surround effect cannot be obtained. problem before requesting repairs. Should any • Depending on the input signal and the problem persist, consult your nearest Sony setting for the sound field, surround sound dealer. processing may not work effectively (page 31). - Page 43 • Check that the input source is correctly – Check that the AC power cord (mains selected. lead) of the subwoofer is connected securely. • Check that all the cables and cords of the system and the connected equipment are –...
- Page 44 After checking the above item and fixing any connected equipment. Refer to the operating problems, turn on the system. If the cause of the instructions supplied with the connected problem cannot be found even after checking the equipment. above item, consult your nearest Sony dealer.
- Page 45 Side-by-Side (Half) * It is possible to input these formats only with HDMI Over-Under connection. (Top-and-Bottom) 1920 × 1080i 50 Hz Frame packing Receiver (STR-CT550WT) Side-by-Side (Half) Amplifier section Over-Under POWER OUTPUT (rated) (Top-and-Bottom) Front L + Front R: 70 W + 70 W (at 4 ohms, 1920 ×...
- Page 46 1280 × 720p 29.97/30 Hz Power consumption Frame packing On: 30 W Side-by-Side (Half) Standby mode: 0.5 W or less Over-Under Dimensions (approx.) 270 mm × 389 mm × (Top-and-Bottom) 280.5 mm (w/h/d) Deep Colour: 30bit/36bit Mass (approx.) 8.8 kg Audio inputs BD/DVD, GAME, SAT/ Wireless transceiver (EZW-RT50)
- Page 47 Index A/V SYNC 38 NIGHT MODE 39 ADVANCED AUTO VOLUME 11 AMP menu 37 AUDIO DRC 38 Positioning the system 12 Audio Return Channel (ARC) 16 PROTECTOR 44 AUTO STBY 39 Radio 26 BASS 38 Radio stations 27 Remote control before use 7 CNT LEVEL 38 operating 11...
- Page 48 Sony Corporation Printed in Malaysia...