
Related Manuals for Belkin PM01110EA


Summary of Contents for Belkin PM01110EA
- Page 1 G Wireless routEr user Manual PM01110ea F5D7234-4 English Français DEutsch nEDErl anDs Español italiano...
-
Page 2: Table Of Contents
tablE oF contEnts sections table of contents securing your Wi-Fi Network � � � � � � � � � � � � � � � � � � � � � � � � � � � � � � � � � � 50 1 Introduction �... -
Page 3: Benefits Of A Home Network
Thank you for purchasing the Belkin G Wireless router (the router)� The following two short sections discuss the benefits of home networking and outline best practices for maximizing your wireless home network range and performance� Please be sure to read through this User Manual completely, and pay special attention to the section entitled “Placement of your router for Optimal... -
Page 4: Placement Of Your Router For Optimal Performance
To achieve the best wireless network coverage for your “wireless clients” in the same way, your wireless connection and performance will degrade (i�e�, computers enabled by Belkin Wireless Notebook Network Cards, somewhat as the distance between your router and connected devices Wireless Desktop Network Cards, and Wireless UsB Adapters): increases�... - Page 5 introDuction sections table of contents 2� Avoid Obstacles and Interference 3� Cordless Phones Avoid placing your router near devices that may emit radio “noise,” if the performance of your wireless network is impaired after attending to such as microwave ovens� Dense objects that can inhibit wireless the above issues, and you have a cordless phone: communication include: •...
- Page 6 Many commercial websites that require a user name and password to access your account • For Belkin wireless networking products, use the detailed site secure connections can be interrupted by a computer’s power survey and wireless channel information included with your Wireless management setting, which causes it to “go to sleep�”...
-
Page 7: Product Overview
The following is a list of features that make your new Your router employs Network Address Translation (NAT) to share the Belkin G Wireless router an ideal solution for your home or small office single iP address assigned to you by your internet service Provider while network�... - Page 8 proDuct ovErviEW sections table of contents Support for VPN Pass-Through Integrated 802�11g Wireless Access Point if you connect to your office network from home using a VPN connection, 802�11g is an exciting new wireless technology that achieves data rates up your router will allow your VPN-equipped computer to pass through the to 54Mbps, nearly five times faster than 802�11b�...
-
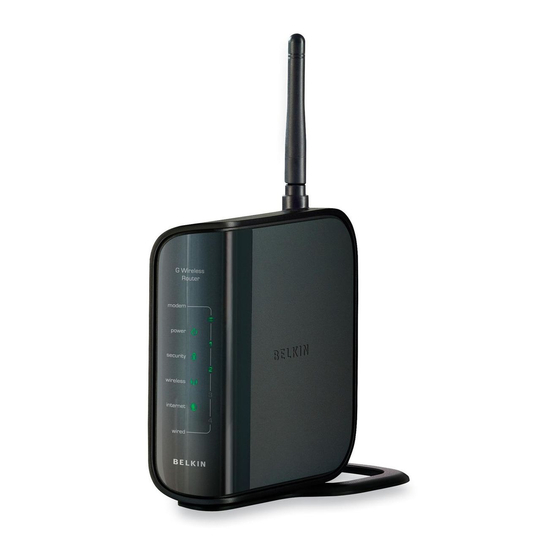
Page 9: Knowing Your Router
The leD indicators are easily visible on the front of the router to provide • Belkin G Wireless router you with information about network activity and status� • Quick installation Guide Belkin setup Assistant CD with User Manual • • Belkin rJ45 ethernet Networking Cable • Power supply System Requirements •... - Page 10 KnoWing your routEr sections table of contents 1. Modem leD 2. Power leD 3. security leD 4. Wireless leD 5. internet leD 6. Wired leDs (1 – 2 – 3 – 4) g Wireless router...
- Page 11 KnoWing your routEr sections table of contents 1� Modem LED 3� Security LED This leD lights in GreeN to indicate that your modem is connected Wireless security is OFF properly to the router� it blinks rapidly when information is being sent over the port between the router and the modem�...
-
Page 12: Of The Wired Computer Ports On The Rear Of The Router, The Led Will Light
KnoWing your routEr sections table of contents 5� Internet LED This unique leD shows you when the router is connected to the internet� When the light is OFF, the router is NOT connected to the internet� When the light is blinking, the router is attempting to connect to the internet� When the light is solid GreeN, the router is connected to the internet�... -
Page 13: G Wireless Router
KnoWing your routEr sections table of contents 7� Power Jack 10� Reset Button Connect the included 5V DC power supply to this jack� The “reset” button is used in rare cases when the router may function improperly� resetting the router will restore the router’s normal operation while maintaining the programmed settings�... -
Page 14: G Wireless Router
• Power supply Setup Assistant Belkin has provided our setup Assistant software to make installing your Modem Requirements router a simple and easy task� You can use it to get your router up and Your cable or Dsl modem must be equipped with an rJ45 ethernet port�... -
Page 15: Green
connEcting anD conFiguring your routEr sections table of contents Step 1: Hardware Connections Unplug your modem’s power cord� Put the router next to the Wait 20 seconds for the modem� raise the router’s antenna� router to start up� look at the display on the front of locate the networking cable that connects your modem and the router�... -
Page 16: G Wireless Router
connEcting anD conFiguring your routEr sections table of contents Step 2: Set Up the Router – Run the Setup Assistant Software shut down any programs that are running on your computer at this note for Windows users: if the setup Assistant does not start time�... -
Page 17: G Wireless Router
connEcting anD conFiguring your routEr sections table of contents Select Country Confirmation Screen select your country from the drop-down box� Click “Begin” to continue� Verify that you have completed all QiG steps by checking the box to the right of the arrow� Click “Next” to continue� g Wireless router... -
Page 18: Connecting And Configuring Your Router
connEcting anD conFiguring your routEr sections table of contents Progress Screen 2�1 Checking Settings setup Assistant will show you a progress screen each time a step in the The setup Assistant will now examine your computer’s network settings setup has been completed� and gather information needed to complete the router’s connection to the internet�... - Page 19 connEcting anD conFiguring your routEr sections table of contents 2�2 Verifying Hardware Connections 2�3 Naming your Wireless Network The setup Assistant will now verify your hardware connection� The setup Assistant will display the default wireless network name or service set identifier (ssiD)� This is the name of your wireless network to which your computers or devices with wireless network adapters will connect�...
- Page 20 connEcting anD conFiguring your routEr sections table of contents 2�4 Requesting Internet Account Info (if needed) if your internet account requires a login and password, you will be select your isP from the drop-down boxes� prompted with a screen similar to the illustration below� Click “Next” to continue�...
- Page 21 connEcting anD conFiguring your routEr sections table of contents 2�5 Configuring the Router 2�6 Checking Internet Connection The setup Assistant will now configure your router by sending data to the We are almost done� The setup Assistant will now check your connection router and restarting it�...
- Page 22 Congratulations Troubleshooting You have finished installing your new Belkin router� You will see the if the setup Assistant is not able to connect to the internet, you will see Congratulations screen when your router can connect to the internet� You the following screen�...
- Page 23 connEcting anD conFiguring your routEr sections table of contents 2�7 Optional: Assistance Connecting Other Computers This optional step will help you to connect additional wired and wireless Once you have verified that your other wired and wireless computers are computers to your network� Follow the on-screen instructions� properly connected, your network is set up and working�...
- Page 24 connEcting anD conFiguring your routEr sections table of contents Step 3: Set Up Wireless Security – Run the Security Assistant Software Now that your network is set up and working, it is recommended that you turn on wireless security to prevent unauthorized access to your network from neighboring wireless-enabled computers�...
- Page 25 connEcting anD conFiguring your routEr sections table of contents Progress Screen 3�1 Picking the Security Type The security Assistant will show you a progress screen each time a step select the security type for your wireless network and click “Next” has been completed�...
- Page 26 connEcting anD conFiguring your routEr sections table of contents 3�2 Creating a Network Key 3�3 Transferring the Key enter a network key (PsK) for your wireless network and click “Next” After setting up your wireless security, you will have to transfer the to continue�...
- Page 27 connEcting anD conFiguring your routEr sections table of contents 3�4 Verifying the Connection Congratulations if all your wireless computers are able to connect to the router, click Once you have verified that your wireless computers are properly “Next”� if you are having trouble, select “i had problem with at least one connected, your wireless network is set up and secured�...
-
Page 28: Alternate Setup Method
altErnatE sEtup MEthoD sections table of contents The Web-Based Advanced User interface is a web-based tool that you Step 1 Connect your Router can use to set up the router if you don’t want to use the setup Assistant software� You can also use it to manage advanced functions of the router� From the Web-Based Advanced User interface, you can perform the Turn off the power to your modem by unplugging the power supply following tasks:... - Page 29 altErnatE sEtup MEthoD sections table of contents 1.6b 1.6 a Note: Your router may have ports in different locations than depicted in the illustration above� Verify that your modem is 1.6 Before plugging the power 1.8 Verify that your computer connected to the router cord into the router, plug the is connected properly to...
- Page 30 altErnatE sEtup MEthoD sections table of contents Step 2 Set up your Computer’s Network Settings to Work with a DHCP Server see the section in this User Manual called “Manually Configuring Network settings” for directions� Step 3 Configure the Router Using the Web-Based Advanced User Interface Using your internet browser, you can access the router’s Web-Based plEasE notE: if you have difficulty accessing the router’s Web-Based Advanced User interface�...
- Page 31 altErnatE sEtup MEthoD sections table of contents Logging into the Router Logging out of the Router You will see the router’s home page in your browser window� The home One computer at a time can log into the router for the purposes of making page is visible to any user who wants to see it�...
- Page 32 altErnatE sEtup MEthoD sections table of contents Using the Web-Based Advanced User Interface The home page is the first page you will see when you access the Web-Based Advanced User interface (Ui)� The home page shows you a quick view of the router’s status and settings� All advanced setup pages can be reached from this page� (10) g Wireless router...
- Page 33 altErnatE sEtup MEthoD sections table of contents Quick-navigation links login/logout button You can go directly to any of the router’s Ui pages by clicking directly This button enables you to log in and out of the router with the press of on these links�...
- Page 34 altErnatE sEtup MEthoD sections table of contents lan settings version info shows you the settings of the local Area Network (lAN) side of the shows the firmware version, boot-code version, hardware version, and router� Changes can be made to the settings by clicking on any one of the serial number of the router�...
- Page 35 altErnatE sEtup MEthoD sections table of contents Step 4 Configure your Router for Connection to your Internet Service Provider (ISP) The “internet/WAN” tab is where you will set up your router to connect to Setting your Connection Type your internet service Provider (isP)� The router is capable of connecting From the “Connection Type”...
- Page 36 altErnatE sEtup MEthoD sections table of contents Setting your Internet Service Provider (ISP) Connection Type to Change WAN MAC Address Dynamic IP if your isP requires a specific MAC address to connect to the service, you A dynamic connection type is the most common connection type used can enter a specific MAC address or clone the current computer’s MAC with cable modems�...
- Page 37 altErnatE sEtup MEthoD sections table of contents Setting your Internet Service Provider (ISP) Connection Type to Static IP A static iP address connection type is less common than other connection types� if your isP uses static iP addressing, you will need your iP address, subnet mask, and isP gateway address�...
- Page 38 altErnatE sEtup MEthoD sections table of contents Setting your ISP Connection Type to PPPoE Most Dsl providers use PPPoe as the connection type� if you use a Dsl modem to connect to the internet, your isP may use PPPoe to log you into the service�...
- Page 39 altErnatE sEtup MEthoD sections table of contents user name My ip address This space is provided to type in your user name that was assigned by Provided by your isP� enter the iP address here� (Only available when your isP� user selects “Use static iP address”...
- Page 40 altErnatE sEtup MEthoD sections table of contents Setting your Internet Service Provider (ISP) Connection Type to Point-to-Point Tunneling Protocol (PPTP) [european Countries Only]� some isPs require a connection using PPTP protocol, a type of connection most common in european countries� This sets up a direct connection to the isP’s system�...
-
Page 41: Alternate Setup Method
altErnatE sEtup MEthoD sections table of contents pptp account My ip address Provided by your isP� enter your PPTP User iD here� Provided by your isP� enter the iP address here� (Only available when user selects “Use static iP address” from iP Address Assignment above�) pptp password My subnet Mask Type in your password and retype it into the “retype Password”... - Page 42 Belkin router� To confirm you are successfully connected to the internet, open an internet browser, such as internet explorer...
- Page 43 altErnatE sEtup MEthoD sections table of contents Setting your Internet Service Provider (ISP) Connection Type to Layer 2 Tunneling Protocol (L2TP) [israel Only]� some isPs require a connection using l2TP protocol, a type of connection most common in israel� This sets up a direct connection to the isP’s system�...
- Page 44 A “Domain Name server” is a server located on the internet that translates Get Dynamically From isP: Gets WAN iP address from Universal resource locators (Urls) like “www�belkin�com” into iP isP automatically� addresses� Many internet service Providers (isPs) do not require you to enter this information into the router�...
- Page 45 MAC address will be “seen” by the isP and MAC address you specified� may cause the connection not to work� Belkin has provided the ability to clone (copy) the MAC address of the computer into the router� This MAC address, in turn, will be seen by the isP’s system as the original MAC...
-
Page 46: Using The Web-Based Advanced User Interface
Using the Web-based advanced User interface sections table of contents Using your internet browser, you can access the router’s Web-Based Changing LAN Settings Advanced User interface� in your browser, type “192�168�2�1” (do not type in anything else such as “http://” or “www”), then press the “enter” key� All settings for the internal lAN setup of the router can be viewed and You will see the router’s home page in your browser window�... - Page 47 There is no need to change the subnet mask� This is a unique, advanced want to change this number, you can do so by entering a new starting and feature of your Belkin router� it is possible to change the subnet mask ending iP address and clicking on “Apply Changes”� The DHCP server if necessary;...
-
Page 48: Viewing The Dhcp Client List Page
Domain name The default setting is “Belkin”� You can set a local domain name (network name) for your network� There is no need to change this setting unless you have a specific advanced need to do so� You can name the network anything you want such as “MY NeTWOrK”�... -
Page 49: Configuring The Wireless Network Settings
Using the Web-based advanced User interface sections table of contents Configuring the Wireless Network Settings Clicking on the header of the “Wireless” tab will take you to the “Wireless” Changing the Wireless Network Name (SSID) header page� Under the “Wireless” tab, there are links that allow you to To identify your wireless network, a name called the ssiD (service set make changes to the wireless network settings�... - Page 50 Using the Web-based advanced User interface sections table of contents Using the Wireless Mode Switch Your router can operate in four different wireless modes: “g and b”, “g g only Mode only”, “b only”, and “off”� The different modes are explained (below)� 802�11g mode works with 802�11g clients only� This mode is recommended only if you want to prevent 802�11b clients from accessing your network�...
- Page 51 Using the Web-based advanced User interface sections table of contents Changing the Wireless Channel There are a number of operating channels you can choose from� in the United states, there are 11 channels� in Australia, the United Kingdom, and most of europe and Asia, there are 13 channels� in a small number of other countries, there are other channel requirements�...
- Page 52 Using the Web-based advanced User interface sections table of contents Using the Broadcast SSID Feature Protected Mode Switch note: this advanced feature should be employed by advanced As part of the 802�11g specification, Protected mode ensures proper users only. operation of 802�11g clients and access points when there is heavy 802�11b traffic in the operating environment�...
-
Page 53: Securing Your Wi-Fi Network
64-bit and 128-bit WeP encryption, but you might have older equipment keys) bits of system- encryption is throughput loss that only supports 64-bit WeP� All Belkin wireless products will support generated strengthened both 64-bit and 128-bit WeP� data g Wireless router... - Page 54 Temporal Key integrity Protocol (TKiP) and (Aes) for encryption� aF 0F 4b c3 D4 = 64-bit WeP key For a list of Belkin wireless products that support WPA, please visit our c3 03 0F aF 0F 4b b2 c3 D4 4b c3 D4 E7 = 128-bit WeP key website at www�belkin�com/networking�...
- Page 55 Using the Web-based advanced User interface sections table of contents Sharing the Same Network Keys Using a Hexadecimal Key Most Wi-Fi products ship with security turned off� so once you have your A hexadecimal key is a combination of numbers and letters from A–F and network working, you need to activate WeP or WPA and make sure your 0–9�...
-
Page 56: Wep Setup
Using the Web-based advanced User interface sections table of contents WEP Setup 64-Bit WEP Encryption select “64-bit WeP” from the “security” menu’s “security Mode”� Click “Apply Changes” to save the setting� After selecting your WeP encryption mode, you can enter your key by typing in the hex key manually, or you can put a check mark in “Passphrase”, then type in your passphrase�... - Page 57 Using the Web-based advanced User interface sections table of contents 128-Bit WEP Encryption note to Mac users: The passphrase option will not operate with Apple AirPort� To configure encryption for your Mac computer, set the encryption using the manual method described in the next section� Click “Apply Changes”...
-
Page 58: Using Wi-Fi Protected Setup
Using the Web-based advanced User interface sections table of contents Changing the Wireless Security Settings Your router is equipped with the latest security standard called Wi-Fi Protected Access 2 (WPA2) and the legacy security standard called Wired equivalent Privacy (WeP)� Your router also supports the Wi-Fi Protected setup (WPs) specification, which simplifies the setup of a ™... -
Page 59: Wpa Setup
Windows XP operating system� You also need WPs handshaking procedure from the client within two minutes� to download the latest driver for your Belkin Wireless G Desktop or Notebook Network Card from the Belkin support site� Other operating router PiN: if an external registrar is available, you may enter in the systems are not supported at this time�... -
Page 60: Guest Access
Using the Web-based advanced User interface sections table of contents Setting WPA/WPA2 Click “Apply Changes” to finish� You must now set all clients to match these settings depending on the type of access you want them to have� Guest Access The guest pre-shared key allows guest users an internet-only access to restrict them from entering your network and having access to files on your PCs�... - Page 61 NOT Manufactured by Belkin in order to use WPA-PsK, ensure you are using the Windows Wireless if you do NOT have a Belkin WPA Wireless Desktop or Wireless Notebook Network Utility by doing the following: Card and it is not equipped with WPA-enabled software, a file from Microsoft called “Windows XP support Patch for Wireless Protected...
-
Page 62: Using The Access Point Mode
Using the Web-based advanced User interface sections table of contents 4.� Under the “Wireless Networks” Using the Access Point Mode tab, click the “Configure” button and you will see the Note: This advanced feature should be employed by advanced users only� following screen� The router can be configured to work as a wireless network access point� Using this mode will defeat the NAT iP sharing feature and DHCP server�... - Page 63 Wireless Access Point� Note that you can only bridge your Belkin G Wireless router (model F5D7234-4, F5D7231-4) to a Belkin Wireless G range extender/Access Point (model F5D7132, F5D7130)� We do not support bridging with access points of other manufacturers at this time�...
- Page 64 Using the Web-based advanced User interface sections table of contents Range Extension Adding Another Network Segment Wirelessly range extension will extend the wireless coverage area in your home Bridging an Access Point to your router allows you to add a network or office� The example on the next page illustrates the use of bridging to segment in another area in the home or office without running wires�...
- Page 65 Setting Up a Bridge Between your Router and a Secondary Access Point Bridging your Belkin router to a secondary Access Point requires that you access the router’s Advanced setup Utility and enter the MAC address of the Access Point in the appropriate area� There are also a few other requirements� plEasE bE surE to FolloW thE stEps bEloW, carEFully.
- Page 66 Using the Web-based advanced User interface sections table of contents Place your secondary Access Point within range of your router and You will see the router’s user interface in the browser window� Click near the area where you want to extend the range or add the network “Wireless Bridge”...
-
Page 67: Configuring The Firewall
Using the Web-based advanced User interface sections table of contents Check the box that says “enable ONlY specific Access Points Configuring the Firewall to connect”� Your router is equipped with a firewall that will protect your network from in the fields named “AP1”, type in the MAC address of your a wide array of common hacker attacks including: secondary Access Point�... - Page 68 Using the Web-based advanced User interface sections table of contents The firewall also masks common ports that are frequently used to attack Configuring Internal Forwarding Settings networks� These ports appear to be “stealth”, meaning that for all intents The “Virtual servers” function will allow you to route external (internet) and purposes, they do not exist to a would-be hacker�...
- Page 69 Using the Web-based advanced User interface sections table of contents Entering Settings into the Virtual Server Setting Client IP Filters To enter settings, enter the iP address in the space provided for the The router can be configured to restrict access to the internet, email, or internal (server) machine, and the port(s) required to pass�...
-
Page 70: Setting Mac Address Filtering
Using the Web-based advanced User interface sections table of contents To restrict internet access to a single computer for example, enter the Setting MAC Address Filtering iP address of the computer you wish to restrict access to in the iP fields� Next, enter “80” in both the port fields� select “Both”� select “Block”� You The MAC address filter is a powerful security feature that allows you can also select “Always”... - Page 71 Using the Web-based advanced User interface sections table of contents To enable this feature, select “MAC Address Filtering” and click “enable Enabling the Demilitarized Zone (DMZ) MAC Address Filtering”� Next, enter the MAC address of each computer on your network by clicking in the space provided and entering the MAC The DMZ feature allows you to specify one computer on your network address of the computer you want to add to the list�...
- Page 72 Using the Web-based advanced User interface sections table of contents Setting up the Router’s Dynamic DNS (DDNS) Update Client You must register with DynDNs�org’s free update service before using this feature� Once you have your registration, follow the directions below� select DynDNs as the “DDNs service”� enter your DynDNs�org user name in the “User Name”...
-
Page 73: Utilities Tab
Using the Web-based advanced User interface sections table of contents Utilities Tab WAN Ping Blocking Computer hackers use what is known as “pinging” to find potential victims on the internet� By pinging a specific iP address and receiving a response This screen lets you manage different parameters of the router and from the iP address, a hacker can determine that something of interest perform certain administrative functions�... -
Page 74: Restarting The Router
Using the Web-based advanced User interface sections table of contents Restarting the Router sometimes it may be necessary to restart or reboot the router if it begins working improperly� restarting or rebooting the router will NOT delete any of your configuration settings� restarting the router to restore normal operation Click the “restart router”... - Page 75 Using the Web-based advanced User interface sections table of contents The following message will appear� restarting the router can take Restoring Factory Default Settings up to 25 seconds� it is important not to turn off the power to the Using this option will restore all of the settings in the router to the factory router during the restart�...
- Page 76 Using the Web-based advanced User interface sections table of contents The following message will A 25-second countdown will appear on the screen� When the appear� Click “OK”� countdown reaches zero, the router’s defaults will be restored� The router’s home page should appear automatically� if it does not, type the router’s address (default = 192�168�2�1) into the navigation bar of your browser�...
- Page 77 Using the Web-based advanced User interface sections table of contents Saving a Current Configuration You can save your current configuration by using this feature� saving your Click “save”� A window configuration will allow you to restore it later if your settings are lost or called “File Download” will changed�...
- Page 78 Using the Web-based advanced User interface sections table of contents A window will open that allows you to select the location where you When the save is complete, want to save the configuration file� select a location� You can name you will see the following the file anything you want, or use the default name “user�conf”�...
- Page 79 Using the Web-based advanced User interface sections table of contents Restoring a Previous Configuration This option will allow you to restore a previously saved configuration� Click “Browse”� A window will open that allows you to select the location of the configuration file� All configuration files end with a “�conf”�...
- Page 80 Using the Web-based advanced User interface sections table of contents You will be asked if you want A 25-second countdown will appear on the screen� When the to continue� Click “OK”� countdown reaches zero, the router’s configuration will be restored� The router’s home page should appear automatically� if not, type in the router’s address (default = 192�168�2�1) into the navigation bar of your browser�...
-
Page 81: Updating The Firmware
From time to time, Belkin may release new versions of the router’s firmware� Firmware updates contain feature improvements and fixes to problems that may exist� When Belkin releases new firmware, you can download the firmware from the Belkin update website and update your router’s firmware to the latest version�... - Page 82 Using the Web-based advanced User interface sections table of contents Downloading a New Version of Firmware You will now be taken to the download page of “F5D7234-4 Firmware update - North America”� To download the new version of firmware, click the download logo ( )� g Wireless router...
- Page 83 Using the Web-based advanced User interface sections table of contents A window will open that allows you to select the location where you When the save is complete, you will see the following window� Click want to save the firmware file� select a location� You can name the “Close”�...
- Page 84 Using the Web-based advanced User interface sections table of contents updating the router’s Firmware in the “Firmware Update” page, click “Browse”� A window will open Browse to the firmware file you downloaded� select the file by that allows you to select the location of the firmware update file� double-clicking on the file name�...
- Page 85 Using the Web-based advanced User interface sections table of contents The “Update Firmware” box will now display the location and name You will see one more message� This message tells you that the of the firmware file you just selected� Click “Update”� router may not respond for as long as one minute as the firmware is loaded into the router and the router is rebooted�...
- Page 86 Using the Web-based advanced User interface sections table of contents Changing System Settings Changing the Login Time-Out Setting The “system settings” page is where you can enter a new administrator The login time-out option allows you to set the period of time that you can password, set the time zone, and enable remote management of be logged into the router’s Web-Based Advanced User interface�...
- Page 87 Enabling Remote Management The router keeps time by connecting to a simple Network Time Protocol Before you enable this advanced feature of your Belkin router, MAKe (sNTP) server� This allows the router to synchronize the system clock sUre YOU HAVe seT THe ADMiNisTrATOr PAssWOrD� remote to the global internet�...
- Page 88 UPnP (Universal Plug-and-Play) is yet another advanced feature offered This innovation provides the router with the built-in capability to by your Belkin router� it is a technology that offers seamless operation of automatically check for a new version of firmware and alert you that voice messaging, video messaging, games, and other applications that the new firmware is available�...
-
Page 89: Manually Configuring Network Settings
Manually conFiguring nEtWorK sEttings sections table of contents in order for your computer to properly communicate with your router, you will need to change your PC’s TCP/iP settings to DHCP� Manually Configuring Network Adapters in Windows 2000, NT, XP, or Vista Click “start”, “settings”, then “Control Panel”�... - Page 90 Manually conFiguring nEtWorK sEttings sections table of contents Manually Configuring Network Adapters in Windows 98SE or Me right-click on “My Network Neighborhood” and select “Properties” Click the “DNs Configuration” tab (1)� Write the DNs address(es) in from the drop-down menu� the chart�...
- Page 91 Manually conFiguring nEtWorK sEttings sections table of contents Manually Configuring Network Adapters in Mac OS up to v9�x in order for your computer to properly communicate with your router, you will need to change your Mac computer’s TCP/iP settings to DHCP� Pull down the Apple menu�...
- Page 92 Manually conFiguring nEtWorK sEttings sections table of contents Manually Configuring Network Adapters in Mac OS X v10�x Click on the “system Preferences” icon� select “Network” from the “system Preferences” menu� select “Built-in ethernet” (1) next to “show” in the “Network” menu� select the “TCP/iP”...
- Page 93 Manually conFiguring nEtWorK sEttings sections table of contents if “Manually” is selected, your router will need to be set up for a static iP connection type� Write the address information in the table below� You will need to enter this information into the router�...
-
Page 94: Recommended Web Browser Settings
rEcoMMEnDED WEb broWsEr sEttings sections table of contents in most cases, you will not need to make any changes to your web browser’s settings� if you are having trouble accessing the internet or the Web-Based Advanced User interface, then change your browser’s settings to the recommended settings in this section� Internet Explorer 4�0 or Higher in the “internet Options”... - Page 95 rEcoMMEnDED WEb broWsEr sEttings sections table of contents Under the “internet Options” screen, click on “Connections” and Netscape Navigator 4�0 or Higher ® ® select “lAN settings…”� start Netscape� Click on “edit” then “Preferences”� Make sure there are no check marks next to any of the displayed options: “Automatically detect settings”, “Use automatic in the “Preferences”...
-
Page 96: Troubleshooting
troublEshooting sections table of contents Problem: installation CD does not automatically start� Solution: if the CD-rOM does not start the setup Assistant automatically, it could be that the computer is running other applications that are interfering with the CD drive� if the setup Assistant 2�... - Page 97 troublEshooting sections table of contents The setup Assistant should start within a few seconds� if, instead, a window appears showing the files on the CD, double-click on the icon labeled “setupAssistant�exe”� if the setup Assistant still does not start, reference the section titled “Manually Configuring Network settings”...
- Page 98 troublEshooting sections table of contents Problem: The setup Assistant cannot find my router� Solution: if the setup Assistant is not able to find the router during the installation process, please check the following items: if the setup Assistant is not able to find the router during the Unplug power to the router for 10 seconds, and then plug the power installation process, there may be third-party firewall software back into the router�...
- Page 99 This will cause the router to reattempt communication with the modem� if the “Modem” light on the router is not lit after completing these steps, please contact Belkin Technical support� Try shutting down and restarting your computer� g Wireless router...
- Page 100 You may need to configure your router to meet the specific requirements of your isP� To search our Knowledge Base for isP-specific issues, go to: http://web�belkin�com/support and type in “isP” if you are still unable to access the internet after verifying these settings, please contact Belkin Technical support�...
- Page 101 Your Belkin router’s lights should The exact window that opens will vary depending on the model of be as follows: wireless card you have;...
-
Page 102: Information
(as opposed to wirelessly), ensure that “Broadcast ssiD” is enabled� This setting is found on the router’s wireless “Channel and ssiD” configuration page� if you are still unable to access the internet after completing these steps, please contact Belkin Technical support� g Wireless router... - Page 103 troublEshooting sections table of contents Problem: My wireless network performance is inconsistent� Data transfer is sometimes slow� signal strength is poor� i am having difficulty establishing and/or maintaining a Virtual Private Network (VPN) connection� Solution: Wireless technology is radio-based, which means connectivity and limiting the Wireless transmit rate the throughput performance between devices decreases when the limiting the wireless transmit rate can help improve the maximum...
- Page 104 How do i extend the range of my wireless network? Solution: Belkin recommends using one of the following products to extend wireless These Belkin products are available at your local retailer, or can be ordered from Belkin directly� network coverage throughout large homes or offices: For network/range extension information, please visit: www�belkin�com/...
-
Page 105: Password
Problem: i am having difficulty setting up Wired equivalent Privacy (WeP) security on a Belkin Wireless router or Belkin Access Point� solution: log into your Wireless router or Access Point� For example: Open your web browser and type in the iP address of the Wireless router c3 03 0F aF 4b b2 c3 D4 4b c3 D4 E7 E4 = 128-bit key or Access Point�... - Page 106 Problem: i am having difficulty setting up Wired equivalent Privacy (WeP) security on a Belkin client card (Wireless Network Card or Adapter)� Solution: The client card must use the same key as the G Wireless router or ensure the box “The key is provided for me automatically”...
- Page 107 Problem: Do Belkin products support WPA? i am having difficulty setting up Wi-Fi Protected Access (WPA) security on a Belkin Wireless router or Belkin Access Point for a home network� Solution: Solution: note: To use WPA security, all your clients must be upgraded to drivers and software that support it�...
- Page 108 Problem: i am having difficulty setting up Wi-Fi Protected Access (WPA) security on a Belkin client card (Wireless Network Card or Adapter) for a home network� solution: Clients must use the same key that the G Wireless router or access Under “Network Authentication”, select “WPA-PsK”�...
- Page 109 Problem: i am having difficulty setting up Wi-Fi Protected Access (WPA) security on a Belkin client card (Wireless Network Card or Adapter) for a business� Solution: Double-click the “signal indicator” icon to bring up the “Wireless Under “Network Authentication”, select “WPA”�...
- Page 110 Problem: i am having difficulty setting up Wi-Fi Protected Access (WPA) security and i am NOT using a Belkin client card for a home network� solution: if you are NOT using a Belkin WPA Wireless Desktop or Wireless...
- Page 111 troublEshooting sections table of contents What is the difference between 802�11b, 802�11g, 802�11a, and N? Currently there are four levels of wireless networking standards, which Wireless g plus MiMo n MiMo n1 MiMo transmit data at very different maximum speeds� each is based on technology the designation 802�11(x), so named by the ieee, the board that is (802.11g)
- Page 112 FCC Statement DECLARATION OF CONFORMITY WITH FCC RULES FOR ELECTROMAGNETIC COMPATIBILITY We, Belkin international, inc�, of 501 West Walnut street, Compton, CA no guarantee that interference will not occur in a particular installation� 90220, declare under our sole responsibility that the product:...
- Page 113 The FCC requires the user to be notified that any changes or radio products with the Ce 0682 or Ce alert marking comply with modifications to this device that are not expressly approved by Belkin the r&TTe Directive (1995/5/eC) issued by the Commission of the international, inc�, may void the user’s authority to operate the equipment�...
- Page 114 What is not covered by this warranty? Belkin international, inc� (“Belkin”) warrants to the original purchaser of All above warranties are null and void if the Belkin product is not provided this Belkin product that the product shall be free of defects in design, to Belkin for inspection upon Belkin’s request at the sole expense of...
- Page 115 Belkin reserves the right to review the damaged Belkin product� All costs how state law relates to the warranty. of shipping the Belkin product to Belkin for inspection shall be borne THis WArrANTY CONTAiNs THe sOle WArrANTY OF BelKiN�...
- Page 116 For information on product disposal please refer to Latviski Ar šo [Belkin Ltd Belkin Ltd ] deklar , ka [F5D7234-4 / iek rtas tips] atbilst Direkt vas 1999/5/EK [Latvian] b tiskaj m pras b m un citiem ar to saist tajiem noteikumiem.
- Page 117 COUNTRY NUMBER INTERNET ADRESS AUsTriA 0820 200766 www�belkin�com/uk/networking/ You can find additional support information on our website www�belkin� BelGiUM 07 07 00 073 www�belkin�com/nl/networking/ com through the tech-support area� if you want to contact technical CZeCH rePUBliC 239 000 406 www�belkin�com/uk/networking/...
- Page 118 Netherlands © 2008 Belkin International, Inc. All rights reserved. All trade names are registered trademarks of respective manufacturers listed. Apple, AirPort, Mac, Mac OS, and AppleTalk are trademarks of Apple Inc., registered in the U.S. and other countries. Windows, Windows Vista, NT, and Microsoft are either...