Table of Contents
Advertisement
Quick Links
Advertisement
Table of Contents

Related Manuals for Audiovox XADV2


Summary of Contents for Audiovox XADV2
- Page 1 User Guide...
-
Page 3: Table Of Contents
Table of Contents Introduction . . . . . . . . . . . . . . . . . . . . . . . . . . . . . . . . . . . . . . . . . . . . . . . . . . . . 5 Features . -
Page 6: Introduction
Introduction Features Congratulations on your purchase of the XM Dock & Play PowerConnect Second Vehicle Kit! Your new Second Vehicle Kit has everything you need to use your XM onyX Radio in a second vehicle . • Add Satellite Radio to a second vehicle: No need for a second subscription; just install this Kit in another vehicle –... -
Page 7: Safety And Care Information
Safety and Care Information IMPORTANT! Always read and understand all the instructions to avoid injury to yourself and/or damage to your device . SIRIUS XM Radio Inc . disclaims all responsibility for damage from data loss due to breakdown, repair, or other causes . • Do not expose to extreme temperatures (above 140ûF or below -4ûF, or above 60ûC or below -20ûC) . - Page 8 Introduction • For optimal audio performance, insert the PowerConnect Power Adapter directly into your vehicle’s cigarette lighter/power outlet . Don’t use an intermediary device, such as a dual vehicle power adapter for multiple devices . • When using this product, it is always important to keep your eyes on the road and hands on the wheel .
-
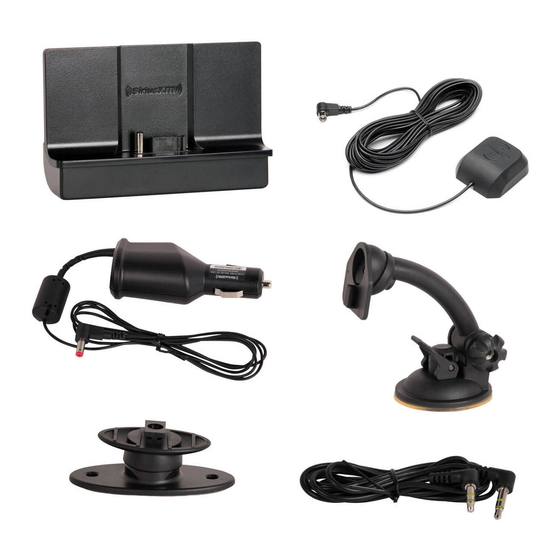
Page 9: What's In The Box
What’s in the Box? Aux In Cable PowerConnect Vehicle Dock Dash Mount Window Mount Magnetic Mount PowerConnect Alcohol Antenna Power Adapter Preparation Pads TIP! For other accessories you can add to your Vehicle Kit – from a Remote Control for ease of use, to a Cassette Adapter for vehicles with a cassette player, to professional installation if you’d rather leave your in-vehicle setup to the experts –... -
Page 10: Powerconnect Vehicle Dock
Introduction PowerConnect Vehicle Dock Color-Coded Connections The color-coded PowerConnect Vehicle Dock makes it simple to connect, just match the colors on the cable ends to the colors on the dock to see what goes where . Rear View AUDIO ANT (Silver) PWR (Red) AUDIO (Green) FM (Blue) - Page 11 Wire Guide The PowerConnect Vehicle Dock has a wire guide at the top rear to help organize the cables and wires connected to the dock . If you need to bring a cable or wire from one side of the dock to the other, utilize the wire guide by looping the cable though the wire guide as shown .
-
Page 14: Vehicle Installation
Vehicle Installation Step 1: Choose a Location for Your Radio When installing the PowerConnect Vehicle Dock in your vehicle, choose a location where it will not block your vision, interfere with the controls, or obstruct the air bag . The location should be easily DASH MOUNT - Option 1 accessible and provide good visibility of the display, and should not be located where it... - Page 15 WINDOW MOUNT - Option 1 WINDOW MOUNT - Option 2...
-
Page 16: Step 2: Install The Dash Or Window Mount
Vehicle Installation Step 2: Install the Dash or Window Mount Depending on your situation, you can either choose to use the Dash Mount or the Window Mount . IMPORTANT! When you install the chosen mount, do not attach the dock to the mount yet . - Page 17 The dock mounting plate can be tilted in different directions . Adjust as necessary for your particular vehicle . When the orientation is correct, tighten the knob . Knob Adhesive Foot Dock Mounting Plate Clean the surface with the alcohol preparation pad and let it dry thoroughly .
- Page 18 Vehicle Installation Installing the Window Mount: IMPORTANT! States or localities may prohibit driving with a suction mount on the windshield . (See California Vehicle Code Section 26708(a); Minnesota Statutes 2008, Section 169 . 7 1) . When driving in these areas, the dash mounting option should be used instead .
- Page 19 the knob . The dock mounting plate can be swiveled to the left or right, and adjusted up or down, to optimize the driver’s view of the radio . Lever Dock Mounting Plate Knob...
-
Page 20: Step 3: Mount The Magnetic Mount Antenna
Vehicle Installation Step 3: Mount the Magnetic Mount Antenna The Magnetic Mount Antenna contains a strong magnet which will stick to any metal part of your vehicle, but will not damage the vehicle . To install the Magnetic Mount Antenna: Choose the best location for the Magnetic Mount Antenna considering your vehicle type . - Page 21 SUV: We recommend mounting the antenna at the rear of the roof as shown . Convertible: We recommend mounting the antenna at the leading edge of the trunk as shown . Pickup Truck: We recommend mounting the antenna just above the front windshield as shown .
- Page 22 Vehicle Installation Place the antenna in the location you selected . Follow the Tips and Cautions shown on the next several pages . TIP! Mount the antenna on the roof (for most vehicles) or trunk (for convertibles) where it has a clear view of the sky in all directions .
- Page 23 CAUTION! Don’t mount the antenna inside the vehicle, for example, on the dashboard . CAUTION! Don’t mount the antenna on any of the vehicle’s front, back or side pillars . CAUTION! Don’t mount the antenna close to a roof rack . Adjust the rack so it’s further away from the antenna or move the antenna closer to the center of the roof .
- Page 24 Vehicle Installation CAUTION! Don’t mount the antenna close to another antenna . Mount it at least 3 inches away . TIP! Always be careful to include enough slack in your cable to accommodate open doors or trunk lids . Use things typically found around the home, like electrical tape, to secure cables in areas so that hinges do not pinch the cable with the door .
-
Page 25: Step 4: Route The Magnetic Mount Antenna Cable
Step 4: Route the Magnetic Mount Antenna Cable Before you begin routing the antenna cable, read these general instructions for how to route and hide the antenna cable . Then route your antenna cable according to the instructions which follow for your specific type of vehicle . Use a blunt plastic putty knife, a credit card, a plastic knife, or a similar blunt tool to lift the rubber window moulding... - Page 26 Vehicle Installation Route cable out from under rear windshield moulding and tuck into weatherstripping around trunk opening Avoid sharp bends by running cable through Pull weatherstripping weatherstripping for several inches from trunk opening Tuck cable into weatherstripping. Route cable through weatherstripping several inches to avoid sharp bends Pull cable out of weatherstripping and route through trunk to cabin...
- Page 27 Bring cable out of weatherstripping and into trunk Route cable along trunk wall and into cabin through gap or conduit, along existing wiring harness Route cable along trunk wall and into cabin...
- Page 28 Vehicle Installation Use a blunt plastic putty knife or similar blunt tool to lift edge of interior trim and tuck cable Route cable under under trim. Continue trim or upholstery towards front of vehicle Continue routing cable under trim or carpet towards front of vehicle Route cable from trunk under interior trim, into...
- Page 29 Continue routing cable under carpet or console to radio location Coil excess cable under Pull carpet carpet or mat or mat back Bring cable out from trim Bring cable out from trim and route under carpet to dashboard or console TIP! Always be careful to include enough slack in your cable to accommodate open doors or trunk lids .
- Page 30 Vehicle Installation Route the cable: • Sedan/Coupe With the Antenna Placed at the Rear of the Roof: 1 . Feed the antenna cable from the antenna underneath the rubber molding around the rear window . Use a blunt plastic putty knife or similar blunt tool to lift the rubber molding around the rear window and tuck the antenna cable underneath the molding .
- Page 31 4 . Route the cable through the main cabin area under the interior trim, towards the front of the vehicle . Use a blunt plastic putty knife or similar blunt tool to lift the plastic trim just enough to tuck the cable under underneath . Avoid side airbag locations on back pillars and above the doors .
- Page 32 Vehicle Installation • Sedan/Coupe With the Antenna Placed at the Front of the Roof: 1 . Feed the antenna cable from the antenna underneath the rubber molding around the windshield . Use a blunt plastic putty knife or similar blunt tool to lift the rubber molding around the windshield and tuck the antenna cable underneath the molding .
- Page 33 • SUV: 1 . Feed the antenna cable underneath the rubber weather stripping of the rear tailgate window/door and route the cable along the rear hatch . Lift the weather stripping from the opening and tuck the cable inside it, then replace the weather stripping .
- Page 34 Vehicle Installation 4 . Bring the end of the cable out at the PowerConnect Vehicle Dock location . Leave yourself enough cable so you can easily connect it to the antenna connector of the dock . 5 . Continue with “Step 5: Connect the Magnetic Mount Antenna and PowerConnect Power Adapter”...
- Page 35 4 . Bring the cable out from the trim near the front of the cabin and route it under the carpet toward the dashboard or console . Coil any excess cable in a hidden location, such as under the carpet, keeping it away from any vehicle pedals or controls . Secure the excess cable with wire ties (purchased separately) .
- Page 36 Vehicle Installation • Pickup Truck: 1 . Use a blunt plastic putty knife or similar blunt tool to lift the rubber molding around the windshield and tuck the antenna cable underneath it . 2 . Continue tucking the cable underneath the windshield molding around the windshield to the lowest corner .
-
Page 37: Step 5: Connect The Magnetic Mount Antenna And Powerconnect Power Adapter
Step 5: Connect the Magnetic Mount Antenna and PowerConnect Power Adapter Plug the Magnetic Mount Antenna into the silver ANT connector on AUDIO the PowerConnect Vehicle Dock . Insert the PowerConnect Power Adapter into your vehicle’s cigarette lighter or power adapter socket . Plug the PowerConnect Power Adapter into the red PWR connector AUDIO... -
Page 38: Step 6: Connect The Audio
Vehicle Installation Step 6: Connect the Audio To play audio through your vehicle’s stereo or FM radio, decide on one of the following audio connection options: • Option 1: Best: Use the included Aux In Cable if your vehicle’s stereo system has an auxiliary input connection . - Page 39 Option 1: Aux In Cable Installation Instructions Plug one end of the Aux In Cable into the green AUDIO connector on the dock . AUDIO Plug the other end into the auxiliary input jack connection of your vehicle’s stereo system . Insert the dock into the mount .
- Page 40 Vehicle Installation display screen that denotes antenna signal strength . You can also press menu and then press to scroll Signal Indicator to and highlight Signal Indicator . Press the Select button . The SATELLITE Satellite and Terrestrial bars show the strength of the signal being received .
- Page 41 Option 2: Cassette Adapter Installation Instructions Plug the Cassette Adapter into the green AUDIO AUDIO FM OUT connector on the dock . Insert the Cassette Adapter into the vehicle’s cassette deck . You may need to turn on your vehicle’s stereo system in order to do so .
- Page 42 Vehicle Installation strength . You can also press menu and then press to scroll to and highlight Signal Indicator . Press the Select button . The Satellite Signal Indicator and Terrestrial bars show the strength of the signal being SATELLITE received .
- Page 43 Option 3: PowerConnect Installation Instructions Insert the dock into the mount . Insert your radio into the dock . Power on your radio by pressing the Power button . Be sure the vehicle is outside and the antenna has a clear view of the sky . Verify that you are receiving the XM signal .
- Page 44 Vehicle Installation available FM channel to listen to the XM audio through your vehicle’s FM radio . Refer to “How To Find Available FM Channels In Your Area” on page 48 Ensure that your radio is tuned to channel 1 . Upon power up, your radio should tune to channel 1 by default, when it’s not yet activated .
- Page 45 11 If the selected FM channel doesn’t work well for you, work down the list of FM channels until you find one that allows you to hear XM clearly . Each time, you will need to tune your vehicle’s FM radio to the FM channel and then set your radio to transmit on the same FM channel (steps 7 &...
-
Page 48: Appendix: How To Find Available Fm Channels
Appendix: How To Find Available FM Channels How To Find Available FM Channels In Your Area An available FM channel is one that is not being used by an FM radio station in your area . When you tune your FM radio to an available channel, you should only hear static or silence –... - Page 49 Manually tune through your local FM channels Manually tune through your local FM channels on your vehicle’s FM radio . Turn on your vehicle’s FM radio . Start at 88 . 1 and use the ‘Manual’ tune function on your vehicle’s FM radio to tune through each FM channel one-by-one (88 .
- Page 50 Appendix: How To Find Available FM Channels TIP! If you regularly drive from one location to another, such as your daily commute, you may need to use different FM channels along your route for best performance . If this is the case, we recommend saving the best FM channels as presets on your FM radio and on your Satellite Radio .
-
Page 52: Troubleshooting
Troubleshooting Your Vehicle Kit has been designed and built to be trouble-free, but if you experience a problem, try this: • Check that all connections are firm and secure . • Make sure the vehicle power socket is clean and free of corrosion . • Make sure you have connected the radio as described in this installation guide . - Page 53 If you see this on the screen: Try this: Channel Off Air • The channel you’ve selected is not currently broadcasting . Tune to another channel . Loading • Your radio is acquiring audio or program information . This message usually goes away in a few seconds .
- Page 54 Troubleshooting If this happens: Try this: Audio sounds too soft • Raise the volume of your stereo system or increase the audio level of your radio until the sound quality improves . Refer to the User Guide which accompanied your radio for instructions . Audio fades or has static when • Check all cables for a firm and secure connection .
- Page 55 If this happens: Try this: The radio shuts off unexpectedly • If your radio has these features, check these: • If Sleep Timer is set, the radio will turn off after the selected length of time in a home dock/ sound system . Set Sleep Timer to Off . • If Delayed Power is set, the radio will turn off after the selected length of time in the dock .
-
Page 58: Product Specifications
Product Specifications Dimensions PowerConnect Vehicle Dock 101 .5 mm (W) X 58 .6 mm (H) X 30 .5 mm (D) 4 .0 in (W) X 2 .3 in (H) X 1 .2 in (D) Weight PowerConnect Vehicle Dock 46 g (1 .6 oz) Audio Outputs 3 .5 mm diameter mini stereo jack External Power... -
Page 59: Patent Information
Patent and Environmental Information Patent Information It is prohibited to, and you agree that you will not, copy, decompile, disassemble, reverse engineer, hack, manipulate, or otherwise access and/ or make available any technology incorporated in this product . Furthermore, the AMBE voice compression software included in this product is protected ª... - Page 60 FCC Statement The user is cautioned that changes or modifications not expressly approved by SIRIUS XM Radio Inc . can void the user’s authority to operate this device . This device complies with Part 15 of the FCC Rules . Operation is subject to the following two conditions: This device may not cause harmful interference .
- Page 61 Copyrights and Trademarks ©2009 SIRIUS XM Radio Inc . SIRIUS, XM and all related marks and logos are trademarks of SIRIUS XM Radio Inc . and its subsidiaries . Visit xmradio .com/xmlineup for updates . All programming/channel lineup/XM service subject to change or preemption . All other marks and logos are the property of their respective owners .
- Page 64 xmradio .com SIRIUS XM Radio Inc . 1221 Avenue of the Americas New York, NY 10020 1 .800 . 9 67 .2346 © 2009 SIRIUS XM Radio Inc . XM Dock & Play PowerConnectª Second Vehicle Kit User Guide (XDPVKUG0809) 100909a...