Table of Contents
Advertisement
Quick Links
See also:
User Manual
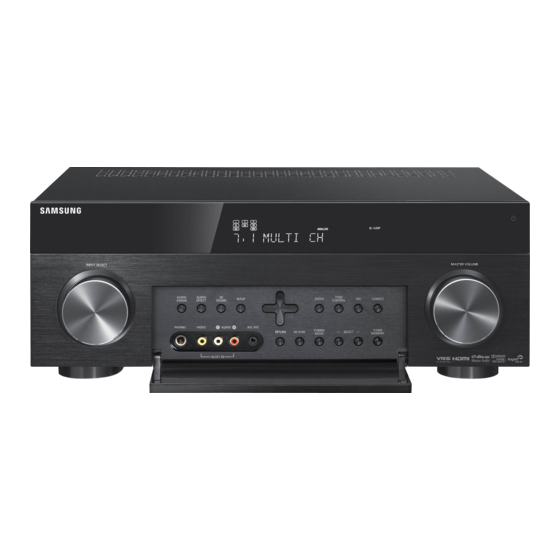
AV Receiver System
HW-D700_D770S_ELS_0609.indd 1
HW-D700_D770S_ELS_0609.indd 1
user manual
imagine
the possibilities
Thank you for purchasing this Samsung product.
To receive more complete service,
please register your product at
www.samsung.com/register
HW-D700
HW-D770S
2011-06-09
2011-06-09
5:37:07
5:37:07
Advertisement
Table of Contents

Related Manuals for Samsung HW-D700


Summary of Contents for Samsung HW-D700
-
Page 1: User Manual
HW-D700 HW-D770S AV Receiver System user manual imagine the possibilities Thank you for purchasing this Samsung product. To receive more complete service, please register your product at www.samsung.com/register HW-D700_D770S_ELS_0609.indd 1 HW-D700_D770S_ELS_0609.indd 1 2011-06-09 2011-06-09 5:37:07 5:37:07... -
Page 2: Safety Information
Safety Information Safety Warnings TO REDUCE THE RISK OF ELECTRIC SHOCK, DO NOT REMOVE THE COVER(OR BACK). NO USER-SERVICEABLE PARTS ARE INSIDE. REFER SERVICING TO QUALIFIED SERVICE PERSONNEL. This symbol indicates “dangerous voltage” inside the product that presents CAUTION a risk of electric shock or personal injury. RISK OF ELECTRIC SHOCK DO NOT OPEN This symbol indicates important... -
Page 3: Precautions
Precautions • Ensure that the AC power supply in your house complies with specifi cations listed on the identifi cation sticker located on the back of your product. • Install your product horizontally, on a suitable base (furniture), with enough space around it for ventilation (7.5~10cm). -
Page 4: Table Of Contents
Contents Safety Warnings SAFETY INFORMATION Precautions Accessories GETTING STARTED Description Front Panel Display Rear Panel Remote Control CONNECTIONS Speaker Positioning Connecting the Speakers Connecting the Bi-AMP Speaker Connecting External Devices/your TV via HDMI HDMI Function Connecting to your TV Connecting a DVD or BD(Blu-ray) Player Connecting a Cable, Satellite or Set-top Box Connecting a CD Player Connecting Using the External Amplifi... -
Page 5: Other Information
Using the Surround Modes OPERATION Using the S.DIRECT Button Using the AUDIO EFFECT Button On the Front of the Main Unit Using the SUBWOOFER button Listening to the Radio To Listen in Mono/Stereo Presetting Radio Stations About RDS Broadcasting Using the RDS (Radio Data System) to Receive FM Stations To Show the RDS Signals PTY (Program Type) Indication and PTY-SEARCH... -
Page 6: Getting Started
Getting Started Accessories Check the box for the supplied accessories listed below. INPUT SELECT POWER TV SOURCE RDS DISPLAY PTY- PTY SEARCH PTY+ NEO:6 SLEEP DIMMER PROLOGIC AUDIO ASSIGN MUTE TUNING S.DIRECT TONE MO/ST TUNER MEMORY SETUP/MENU INFO RETURN EXIT BD/DVD GAME/TV AV SYNC... - Page 7 Used to select a source. INPUT SELECT CONTROL BD/DVD GAME IPOD AUDIO IPOD VIDEO SETUP BUTTON Displays the SETUP menu. AUDIO ASSIGN BUTTON Toggles to select an input mode for the selected source. AUDIO EFFECT BUTTON Toggles to select a surround sound mode. 3D SOUND BUTTON Press to apply 3D Sound effect.
-
Page 8: Getting Started
Getting Started Display SPEAKER INDICATORS Displays sound producing speakers. LISTENING MODE INDICATORS Displays the current listening mode and audio source. TUNING INDICATORS Displays the status of the current radio broadcast. AUDIO INPUT INDICATORS Displays the audio input signal type of the currently connected external audio source. SPEAKER LEVEL INDICATOR Displays the speaker level. -
Page 9: Rear Panel
Rear Panel 12 13 VIDEO IN JACKS Receives the video signal from a video player (BD/DVD, SAT, TV). USB PORT Can be only used for fi rmware upgrades. HDMI OUT JACKS Outputs digital video and audio signals simultaneously using an HDMI cable. HDMI IN JACKS Receives digital video and audio signals simultaneously using an HDMI cable. -
Page 10: Remote Control
Getting Started Remote Control Tour of the Remote Control INPUT SELECT POWER TV SOURCE RDS DISPLAY PTY- PTY SEARCH PTY+ NEO:6 SLEEP DIMMER PROLOGIC AUDIO ASSIGN MUTE TUNING S.DIRECT TONE MO/ST TUNER MEMORY SETUP/MENU INFO RETURN EXIT BD/DVD GAME/TV iPod TUNER AV SYNC CROSS... - Page 11 POWER BUTTON Turns the receiver on/off. TV BUTTON To change to TV mode, press the TV button. AMP BUTTON To change to AMP mode, press the AMP button. NUMBER BUTTONS Used to select a TV channel. NEO : 6 BUTTON Select the desired NEO:6 mode.
- Page 12 Getting Started DIMMER BUTTON Adjusts the brightness of the display. DSP BUTTON Used to select the SFE mode. AUDIO ASSIGN BUTTON Toggles to select an input mode for the selected source. SEARCH BUTTON Press to search backwards or forwards. PAUSE BUTTON Pauses playback on a connected device.
-
Page 13: Installing Batteries In The Remote Control
Installing batteries in the Remote Control * Battery size: AAA ✎ NOTE Follow these precautions to avoid leaking or cracking cells: Place batteries in the remote control so they match the polarity : (+) to (+) and (–) to (–). ... -
Page 14: Connections
When using Dolby Pro Logic IIz, place the Surround Back Speakers in the FHL, FHR position and connect them to SURROUND BACK/ FRONT HEIGHT terminal(s). * Speakers are provided with model HW-D770S only. Model HW-D700 does not come with speakers. -
Page 15: Centre Speaker
Centre Speaker It is best to install it at the same height as the front speakers. You can also install it directly over or under the TV. Surround Speakers Place these speakers behind your listening position. If there isn't enough room, place these speakers so they face each other. Place them about 60 to 90cm above your ears, facing slightly downward. -
Page 16: Connecting The Speakers
Tighten the knob by turning clockwise to secure the wire. FRONT (R) SURROUND (R) SURROUND BACK ( R ) SURROUND BACK ( L ) FRONT (L) ACTIVE SUBWOOFER CENTRE SURROUND (L) Model HW-D700 AV Receiver HW-D700 Model HW-D770S AV Receiver HW-D700 FRONT SPEAKER PS-FC770S CENTRE SPEAKER... - Page 17 ✎ NOTE Speakers are provided with model HW-D770S only. Model HW-D700 does not come with speakers. One Active Subwoofer is provided, if you would like to use another, purchase it from the retailer where you bought the player and connect it to the other SUBWOOFER OUT Jack.
-
Page 18: Connecting The Bi-Amp Speaker
Connections Connecting the Bi-AMP Speaker Connect the tweeter (high range) port and woofer (low range) to the front port and surround back speaker port respectively as appropriate. Then, you can use the bi-amplifi cation feature that supports enriched high range and base tones. Bi-AMP Speaker R Bi-AMP Speaker L Tweeter... -
Page 19: Connecting External Devices/Your Tv Via Hdmi
Connecting External Devices/your TV via HDMI HDMI is a digital standard interface for connection to such devices as a TV, projector, DVD player, Blu-ray player, set-top box and more. HDMI removes any loss of signal from analogue conversion, enabling you to enjoy video and audio sound quality as it was originally created in the digital source. - Page 20 Connections MAIN Jack • Supports Anynet+ and ARC. • Supports Full HD and 3D. SUB Jack • Does not support Anynet+ and ARC. • When both Main and SUB are connected at the same time, output signal of SUB will be the same to that of Main, which matches specifi...
-
Page 21: Hdmi Function
NOTE If you use an HDMI cable to connect a Samsung TV to your AV Receiver, you can operate the AV receiver using the TV’s remote control. This function is available only in connection with Samsung TV and DVD player supporting Anynet + (HDMI-CEC). -
Page 22: Connecting To Your Tv
Connections Connecting to your TV VIDEO COMPONENT OPTICAL AUDIO Video Connection If your television is equipped with Component Video inputs, connect a Component video cable (not supplied) from the Component Video Output (P and Y) jacks on the back of your AV Receiver to the Component Video Input jacks on your TV. -
Page 23: Connecting A Dvd Or Bd(Blu-Ray) Player
Connecting a DVD or BD(Blu-ray) Player COMPONENT VIDEO AUDIO VIDEO COMPONENT OPTICAL DVD or BD Player Video Connection Connect a Component video cable (not supplied) from the COMPONENT IN (BD/DVD) (P and Y) jacks on the back of your AV Receiver to the Component Video Output jacks on your DVD/BD player. Connect a Video cable (not supplied) from the VIDEO IN (BD/DVD) jack on the back of your AV Receiver to the Video Output jack on your DVD/BD player. -
Page 24: Connecting A Cable, Satellite Or Set-Top Box
Connections Connecting a Cable, Satellite or Set-top Box COMPONENT VIDEO SAT(Cable/Satellite/Set-top box) VIDEO AUDIO COMPONENT OPTICAL Video Connection Connect a Component video cable (not supplied) from the COMPONENT IN (SAT) (P and Y) jacks on the back of your AV Receiver to the Component Video Output jacks on your SAT. Connect a Video cable (not supplied) from the VIDEO IN (SAT) jack on the back of your AV Receiver to the Video Output jack on your SAT. -
Page 25: Connecting A Cd Player
Connecting a CD Player AUDIO OPTICAL COAXIAL CD Player Audio Connection Connect the Digital Input (COAXIAL, OPTICAL1~3) on your AV Receiver to the Digital Output of the CD Player. Connect AUDIO IN (CD) on your AV Receiver to the Audio Out of the CD player. ✎... -
Page 26: Connecting Using The External Amplifi Er (Ex. Second Room)
Connections Connecting Using the External Amplifi er (Ex. Second Room) This setup allows 7.1-channel playback in your main listening room and 2-channel stereo playback in Second Room, with a same source in each room. • Use an RCA audio cable to connect the AV receiver’s LINE OUT L/R jacks to an analogue audio input on your Second Room amplifi... -
Page 27: Connecting An Ipod
Adjust the volume to a moderate level before you connect your iPod and AV Receiver. When the unit is powered on and you connect an iPod, the unit will charge your iPod's battery. Make sure to connect the dock connector so that the label “SAMSUNG” faces upward. English HW-D700_D770S_ELS_0609.indd 27 HW-D700_D770S_ELS_0609.indd 27... - Page 28 Connections Disconnecting an iPod Follow the steps below to prevent damage to an iPod and data when disconnecting from your AV receiver. Use the INPUT SELECT on the main unit to switch to a mode other than IPOD AUDIO or IPOD VIDEO.
-
Page 29: Connecting The Fm Antenna
Connecting the FM Antenna Connect the FM antenna supplied to the FM ANTENNA terminal as a temporary measure. Slowly move the antenna wire around until you fi nd a location where reception is good, then fasten it to a wall or other rigid surface. -
Page 30: Setup
You can also turn the unit on/off by pressing the POWER button on the remote control. Remote Control Functions You can operate your AMP (this AV receiver)/ TV and BD(Samsung only)/DVD player with this remote control. See pages 59 ~ 60 for more details. -
Page 31: Selecting Digital/Hdmi/Analogue
Selecting Digital/HDMI/Analogue You can listen to sound of analogue, HDMI, optical input using this unit. Press the INPUT SELECT button on the remote control to select a desired function (BD/DVD, SAT, TV, CD, AUX). See page 30. Press the AUDIO ASSIGN button on the remote control to select the audio input source of the external device you have connected. -
Page 32: Setup Menu Tree
Setup Setup Menu Tree Here’s a quick look at how the setup menus are organized on your AV Receiver. INPUT INPUT SELECTION BD/DVD OPTICAL1, 2 COAXIAL OPTICAL1, 2 COAXIAL OPTICAL1, 2 COAXIAL SPEAKER SPEAKER SIZE 7.1 CHANNEL SPEAKER DISTANCE SPEAKER LEVEL TEST TONE SURROUND DPLIIx... - Page 33 SPEAKER SPEAKER SIZE FRONT LARGE SMALL CENTER LARGE SMALL NONE SURROUND LARGE SMALL NONE SURROUND BACK LARGE SMALL NONE FRONT HEIGHT LARGE SMALL SUBWOOFER CROSSOVER 60Hz, 80Hz, 100Hz, 120Hz, 150Hz, 180Hz, 200Hz 7.1 CHANNEL SURR.BACK PLIIz BI-AMP SPEAKER DISTANCE FRONT LEFT FRONT RIGHT CENTER SURROND LEFT...
- Page 34 Setup SURROUND DPLIIx PANORAMA DIMENSION -7~+7 CENTER WIDTH DTS NEO:6 CENTER IMAGE EX/ES AUTO OPTION AUDIO SYNC 0ms~240ms (10ms step) TONE CONTROL TONE BASS -6dB ~ +6dB (1dB Step) TREBLE -6dB ~ +6dB (1dB Step) MP3 ENHANCER SMART VOLUME AUTO CALIBRATION MODE MEASUREMENT move to "Auto Calibration Measurement Page"...
-
Page 35: Audio Setup
Audio Setup Selecting a Source Device And Connection Jack (Digital Audio In) Select the external devices you have connected to the receiver. Press the SETUP/MENU button on the remote control. • Each time the button is pressed, the mode switches between INPUT and SETUP OFF. - Page 36 Setup - To exit setup mode - • Press the SETUP/MENU or EXIT button on the remote control. SETUP OFF appears on the display and Setup Mode is exited. Setting the Speaker SPEAKER Possible Settings Default Setting FRONT (Front) LARGE, SMALL SMALL CENTER (Centre) LARGE, SMALL, NONE...
-
Page 37: Connection Setting For Surround Back
Connection Setting For Surround Back Settings for the surround back speaker differ depending on the connection method and installation site of the speaker to be connected. You must confi gure the 7.1 CHANNEL settings according to the connected speaker before you listen to music properly. Press the SETUP/MENU button on the remote control. -
Page 38: Setting The Speaker Listening Distance
Setup Setting the Speaker Listening Distance If the speakers cannot be placed at equal distances from the listening position, you can adjust the delay time of the audio signals from the centre and surround speakers. Press the SETUP/MENU button on the remote control. •... -
Page 39: Setting The Speaker Level
Setting the Speaker Level You can set the balance and level of speakers. Press the SETUP/MENU button on the remote control. • Each time the button is pressed, the mode switches between INPUT and SETUP OFF. Press the ▲▼ buttons to select SPEAKER, and then press ... -
Page 40: Setting The Test Tone
Setup Setting the Test Tone Use the test tone to check the speaker connection status or level. Press the SETUP/MENU button on the remote control. • Each time the button is pressed, the mode switches between INPUT and SETUP OFF. Press the ▲▼... -
Page 41: Setting Dolby Pro Logic Mode
Setting Dolby Pro Logic Mode This mode provides up to 7.1 channel sound from 2 channel sources, or provides 7.1 channel sound from 5.1 channel sources for music or movie mode. Press the PROLOGIC button on the remote control. • MOVIE : Adds realism to the movie soundtrack. -
Page 42: Setting Neo:6 Mode
Setup Setting NEO:6 Mode You can play back 2 channel sound over 5.1 or 7.1 channels when enjoying music or a movie. Press the SETUP/MENU button on the remote control. • Each time the button is pressed, the mode switches between INPUT and SETUP OFF. Press the ▲▼... -
Page 43: Other Settings
Other Settings Audio Sync Video may look slower than the audio if it is connected to a digital TV. If this occurs, adjust the audio delay time to match the video. Press the SETUP/MENU button on the remote control. • Each time the button is pressed, the mode switches between INPUT and SETUP OFF. -
Page 44: Mp3 Enhancer
Setup MP3 Enhancer This also helps enhance your sound experience (ex. mp3 music). Use this if you want to hear better sound from a low quality mp3 source. Press the SETUP/MENU button on the remote control. • Each time the button is pressed, the mode switches between INPUT and SETUP OFF. - Page 45 CALIBRATION 0.3m 0.3m 0.3m 0.3m USER Microphone 0.3m 0.3m 0.0m 0.0m > MOVE ' RETURN SELECT EXIT Press the SETUP/MENU button on the remote control. • Each time the button is pressed, the mode switches between INPUT and SETUP OFF. Press the ▲▼...
-
Page 46: Drc Setup
Setup DRC Setup You can use this function to enjoy Dolby Digital sound when watching movies at low volume at night. DRC compresses the audio to make the loudest sounds quieter and the quietest sounds louder. Press the SETUP/MENU button on the remote control. •... -
Page 47: Video Convert Setup
- TV : HDMI audio is output • HDMI ANYNET+ : ON, OFF Anynet+ is a function that enables you to control other Samsung Devices with your Samsung TV's remote control. - ON : Anynet+ is enabled. - OFF : Anynet+ is disabled. - Page 48 Setup Press the ▲▼ buttons to select OPTION, and then press the ENTER button. Press the ▲▼ buttons to select CONV. VIDEO, and then press the ENTER button. Press the ▲▼ buttons to select BYPASS or AUTO. • BYPASS : Converts the input video source into the digital counterpart without changing the resolution.
- Page 49 Operation Using the Surround Modes Using the S.DIRECT Button Output the original signal as it is without applying the sound fi eld effect or any other sound effect. Press the S.DIRECT button. ✎ NOTE The screen will display “DIRECT” instead of “S.DIRECT”. Input Signal and Surround Chart o = active, –...
- Page 50 Operation ✎ NOTE Channel status displays are dependent on the speaker confi guration. SFE mode works with 2-ch signals. If Dolby Pro Logic IIz is set to On, the Surround Back speaker(SBL/SBR) is changed to the Front Height Speaker(FHL/FHR), Dolby true HD, Dolby plus, DTS-HD Audio ,SFE and NE0:6 will be output 5.1 channel.
- Page 51 Selecting the 3D SOUND mode Press the AUDIO EFFECT button to select 3D SOUND mode. 3D SOUND will • Each time you press this button, be selected in turn. < > Press the button. < > button, 3D SOUND ON 3D SOUND OFF will be selected in turn. •...
-
Page 52: Presetting Radio Stations
Operation To Listen in Mono/Stereo Press the MO/ST button on the remote control. • Each time you press this button, STEREO or MONO will be selected in turn. • If you select MONO in an area with weak reception, it will help to reduce noise. •... - Page 53 About RDS Broadcasting Using the RDS (Radio Data System) to Receive FM Stations RDS allows FM stations to send an additional signal along with their regular program signals. For example, the stations send their station names, as well as information about what type of program they broadcast, such as sports or music, etc.
- Page 54 Operation PTY (Program Type) Indication and PTY-SEARCH Function One of the advantages of the RDS service is that you can locate a particular kind of program from the preset channels by specifying the PTY codes. To search for a program using the PTY codes Before you start, remember...
- Page 55 Using an iPod You can enjoy playback of your iPod using the supplied remote control. Listening to Music (iPod audio function) You can play music fi les stored in the iPod player by connecting it to the AV receiver. Connect the iPod dock connector to the iPod jack on the AV Receiver. Place the iPod in the dock.
-
Page 56: Sleep Timer Function
Operation Press the , buttons to select the fi le to play and press the ENTER button. • The iPod's video fi les will be played on the TV screen. You can use the remote control to control simple playback functions such as the PLAY, PAUSE, STOP, SKIP (#,$) buttons. -
Page 57: Mute Function
Mute Function This function is useful when answering a doorbell or telephone call. Press the MUTE button. • MUTE appears on the display. To output sound again Press the MUTE button again or press the Volume button. • MUTE will disappear and sound will output. Adjust the Display You can adjust the brightness of the display. -
Page 58: Using Headphones
Do not turn the volume up too high when you use headphones as it may damage your hearing. Software Upgrade Samsung may offer upgrades for AV Receiver's fi rmware in the future. Please visit Samsung.com or contact the Samsung call centre to receive information about downloading upgrades and using a USB drive. -
Page 59: Tv Brand Code List
The remote control may not work on some brands of TVs. Also, some operations may not be possible depending on your brand of TV. The remote control will work with Samsung TVs by default. TV Brand Code List Brand... - Page 60 The remote control may not work on some brands of DVD. Also, some operations may not be possible depending on your brand of DVD. The remote control will work with Samsung DVD (BD) by default. DVD Brand Code List Brand...
- Page 61 Other Information Troubleshooting Before requesting service, please check the following. Symptom Check Remedy The unit will not turn on. • Is the power cord plugged into the • Connect the power plug to the outlet? outlet. A function does not •...
- Page 62 Other Information Symptom Check Remedy Can't select EX/ES • Is SBACK (Surround Back) set to • Refer to page 36 to select mode. NONE in the Speaker Size? LARGE or SMALL. • Is the input signal selected • Use a 7.1 channel external properly? component.
- Page 63 Auto Calibration Error List Error No. Auto Calibration Error Message on OSD E02 NO MIC Connect the calibration microphone. E03 NOISY Keep quiet during the measurement. The speaker are too close to the microphone. E04 MIC LEVL Install all speakers and the calibration microphone at the proper location. E05 NO FRONT Connect the front speaker correctly.
- Page 64 * S/N Ratio, Distortion, Separation and Usable sensitivity are based on measurement using AES (Audio Engineering Society) guidelines. - Samsung Electronics Co., Ltd reserves the right to change the specifi cations without notice. - Weight and dimensions are approximate. - Design and specifi cations are subject to change without prior notice.
- Page 65 Contact SAMSUNG WORLD WIDE If you have any questions or comments relating to Samsung products, please contact the SAMSUNG customer care centre. Contact Centre Contact Centre Area Web Site Area Web Site ` North America 0700 Samsung (0700 726 Serbia www.samsung.com...
- Page 66 Correct disposal of batteries in this product (Applicable in the European Union and other European countries with separate battery return systems.) This marking on the battery, manual or packaging indicates that the batteries in this product should not be disposed of with other household waste at the end of their working life. Where marked, the chemical symbols Hg, Cd or Pb indicate that the battery contains mercury, cadmium or lead above the reference levels in EC Directive 2006/66.