Table of Contents
Advertisement
Quick Links
Advertisement
Table of Contents

Related Manuals for Daewoo DPC3000N


Summary of Contents for Daewoo DPC3000N
- Page 1 DPC3000N...
- Page 2 Precaution IMPORTANT The lighting flash with arrowhead CAUTION: TO PREVENT THE RISK The exclamation point within an symbol, within an equilateral triangle, OF ELECTRIC SHOCK DO NOT equilateral triangle is intended to alert is intended to alert the user to the REMOVE COVER (OR BACK).
-
Page 3: Important Safety Instructions
Important Safety Instructions WARNING Plug the cigar jack tightly Do not use the cigar jack Never touch the cigar jack Do not move the product so that it does not move. if it is damaged. with a wet hand. while a disc is playing. This will prevent the danger Using such a jack may result Doing so may cause fire or... - Page 4 Important Safety Instructions READ INSTRUCTIONS - All the safety GROUNDING OR POLARISATION OVER LOADING - Do not overload wall and operating instructions should be outlets, extension cords, or integral - If this product is equipped with a read before the product is operated. convenience receptacles as this can polarised alternating current line plug result in risk of fire or electric shock.
-
Page 5: Table Of Contents
Table of contents Before You Start Advanced Operation Cautions on handling discs ________ 5 OSD (On-screen Display) ________ 28 Compatible Discs ________________ 6 Selecting Audio Language ________ 28 What's in the box ________________ 8 Selecting Subtitles _______________ 29 Preparing the Remote Control ______ 8 Repeating a Title, Chapter (DVD), Track (CD-DA) _________________ 30 Using the remote control __________ 9... -
Page 6: Before You Start
Before You Start Cautions on handling discs Playing Discs Only discs displaying the mark shown on page 9 can be played on the DVD player. Note, however, that discs with special shapes (heart-shaped discs, hexagonal discs, irregular discs, etc.) cannot be played on the DVD player. Do not attempt to play such discs, as they may damage the player. -
Page 7: Compatible Discs
Before You Start Caution on handling discs Do not get fingerprints, grease or dirt on discs. Be especially careful not to scratch discs when removing them from their cases. Do not bend discs. Do not heat discs. Do not enlarge the center hole. Do not write on the labeled (printed) side with a ball-point pen or pencil. -
Page 8: Mp3 Compatibility Information
CD-Audio, CD-R, CD-RW - 12cm or 8cm discs. - Linear PCM digital audio - CD-Audio, CD-R and CD-RW formatted CDs are divided into tracks. (This unit can play CD-R and CD-RW discs recorded on CD Audio or with MP3 audio files) MP3 compatibility information The CD-ROM must be ISO 9660 compatible. -
Page 9: What's In The Box
What's in the box Thank you for buying this product. Please confirm that the following accessories are in the box when you open it. Accessories Pouch and DC power cable headrest strap Bag and s traps Monitor DVD player/Remote control/Batteries User’s manual DIN cable Warning : DC cable must be connected to cigar lighter socket. -
Page 10: Using The Remote Control
Before You Start - Improper use of batteries may cause battery leakage and corrosion. - To operate the remote control correctly, follow the instructions. Warning - Don't insert the batteries into the remote control in the wrong direction. - Don't charge, heat, open, or short-circuit the batteries. - Don't throw the batteries into fire. -
Page 11: How To Install
Before You Start How to install Installing the bag between the driver and passenger seats Take one of the supplied straps and connect the latch to the upper front metal ring on the left side of bag. Hook the "S" connector to the middle metal ring on the left side of bag after looping the strap around the headrest of the driver's seat. -
Page 12: Wiring Diagram
Before You Start Install the detached monitor onto the seat back Take the pouch with monitor from the bag. Loop the strap around the headrest and adjust it tightly. Connect the pouch with monitor. Please check if the DIN cable is connected well. Wiring diagram To cigar lighter To DIN Input... -
Page 13: 7" Tft Lcd Monitor
Before You Start 7" TFT LCD Monitor Front view Side views Side views (Jacks) (Control knobs) & ! SCREEN % EARPHONE 1 ( EARPHONE 2 @ SPEAKER (LEFT) ^ VIDEO INPUT ) VOLUME # POWER ON LED & AUDIO INPUT 1 COLOR * DIN A/V INPUT 2 BRIGHT... -
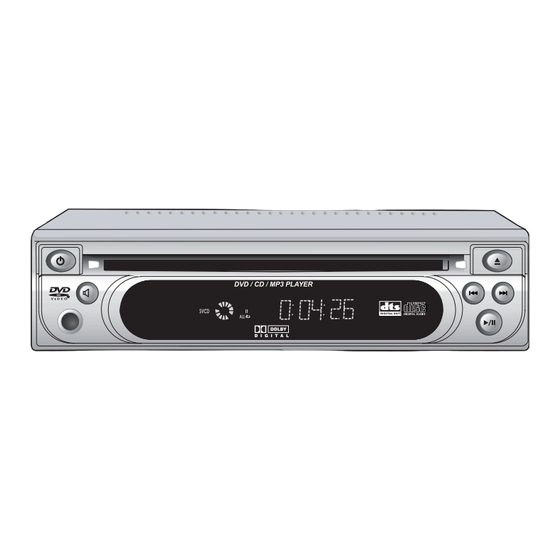
Page 14: Control & Display
Control & Display Front Panel Control & ! POWER & MUTE Turns the power on/off. Turns the audio outputs on/off. @ DISC IN / OUT HOLE * STEREO JACK FOR CAR PACK / AV IN Discs are inserted and ejected here. Plug-in car pack jack for stereo audio # EJECT output. -
Page 15: Display
Control & Display Display & ! DVD/SVCD/MP3/PBC ^ TIME Illuminates the type of the disc Indicates time information and loaded. displays information about operation such as PLAY, STOP, LOAD, NO @ ROTATION DISC, etc. Rotates when the disc is spinning. &... -
Page 16: Rear Panel
Control & Display Rear Panel DIGITAL DC IN DC OUT EXTERNAL REMOTE S-VIDEO OUT VIDEO AUDIO 2.5A, 12V MAX.1.5A, 12V & ! DC INPUT % VIDEO OUT Use the cigarette cable adaptor to Use a video cable to connect one of connect to the cigarette light socket. -
Page 17: Remote Control
Control & Display Remote Control OPEN / CLOSE Ejects the disc SETUP Use to set various functions according to individual preference POWER Turns on or off the DVD player. NUMBER Press the number button. Use the +10 button to input numbers of 10 or over. TITLE Use the TITLE button to display the title screen included on DVD discs. - Page 18 Control & Display STEP Play one frame at a time during Repeating a specific section. pause. PROGRAM SKIP Programs the desired titles and Select previous or next track, title, tracks of DVD and CD-DA. chapter or index, or select the ZOOM beginning of current track, title, chapter or index.
-
Page 19: Getting Started
Getting Started Power Connections When using the Cigarette cable adaptor supplied. - Make sure that input voltage is only 12V - Connect to DC INPUT. DIGITAL DC IN DC OUT EXTERNAL 2.5A, 12V MAX.1.5A, 12V REMOTE S-VIDEO OUT VIDEO AUDIO When connecting the DC power cable. -
Page 20: Connecting To A Tv
Getting Started Connecting to a TV L (White) DIGITAL R (Red) DC IN DC OUT EXTERNAL Audio Output REMOTE S-VIDEO OUT VIDEO AUDIO 2.5A, 12V MAX.1.5A, 12V S-Video Output Video Output (Yellow) Audio Input Video Input S-Video Input Connect the DVD player to your TV Connect the AUDIO CABLES between the AUDIO OUT L and R jacks on the back of your DVD player and the corresponding AUDIO INPUT jacks on your TV. -
Page 21: Connecting To A Car Audio System
Getting Started Connecting to a Car Audio System L (White) DIGITAL R (Red) Audio Output DC IN DC OUT EXTERNAL 2.5A, 12V MAX.1.5A, 12V REMOTE S-VIDEO OUT VIDEO AUDIO Video Output (Yellow) TV or LCD Audio Input Video Input Connecting to a Car Audio System Connect the AUDIO CABLES between the AUDIO OUT L and R jacks on the back of your DVD player and the corresponding AUDIO INPUT jacks on your audio system. -
Page 22: Connecting To A Dolby Digital System21
Getting Started Connecting to a Dolby Digital System Coaxial Digital Out DIGITAL DC IN DC OUT EXTERNAL S-VIDEO OUT VIDEO AUDIO 2.5A, 12V MAX.1.5A, 12V REMOTE Video Output Coaxial Cable S-Video Output Dolby Digital Decoder Coaxial Digital In Center Speaker Front Front Speaker (L) -
Page 23: Basic Operation
Basic Operation Playing DVD's Before Playing your DVD Ensure that your DVD player is connected correctly to the TV and audio system, which are output components. Turn on the power of the TV and audio system. Ensure that the local code of the DVD player is matched to that of the disc. If not matched, your disc cannot be played (refer to page 7). -
Page 24: Basic Playback Controls
Basic Operation Basic Playback Controls PLAY/PAUSE( ) : Starts playback or pause on a disc that's playing (press again to restart playback) STOP( ): Stop playback ): Press for fast backward searching. ): Press for fast forward searching PREV( ): Skip to the previous chapter. NEXT( ): Skip to the next chapter. -
Page 25: Playing Mp3 Discs
Basic Operation Playing MP3 discs To Play a MP3 File Insert the MP3 disc. Make sure that the disc's label is facing up. MP3 menu screen is displayed automatically depending on MP3 disc's folder (directory) structure. Using the UP ( ) or DOWN ( button to find the desired folder. -
Page 26: Playing Kodak Picture Cd And Jpeg File Play
Basic Operation - The file name is only displayed in English. - This DVD player is compatible with the "MPEG-1 Audio Layer 3" standard. It is not Note compatible with other standards, such as "MPEG-2 Audio Layer 3", "MPEG-2.5 Audio Layer 3", MP1, MP2, etc. -
Page 27: Fast Forward / Reverse
Basic Operation Fast Forward / Reverse Use this function to play the DISC contents in fast forward or fast reverse. During searching, audio will be muted (except CD-DA). Press the FR ( ) or FF ( ) button during disc play. Press the PLAY/PAUSE ( ) button to resume normal playback. -
Page 28: Slow Forward / Reverse
Basic Operation Slow Forward / Reverse Use this function to play the DISC contents in slow forward or slow reverse. During searching, audio will be muted. Press the PLAY/PAUSE ( ) button during play mode. Press the ( ) or ( ) repeatedly. -
Page 29: Advanced Operation
Advanced Operation OSD (On-screen Display) You can display the playback status on the TV screen as follows ; Title, Chapter number, Playing time, Disc. Press the DISPLAY ( ) button during playback. - Disc, Chapter (DVD), Track (CD-DA), Time information appears on screen. To turn off the OSD, press the DISPLAY ( button. -
Page 30: Selecting Subtitles
Advanced Operation Selecting Subtitles It is possible to change the subtitle language to a different language from the one selected at the initial settings. This operation works only with discs on which multiple subtitle languages are recorded. Press the SUB-T ( ) button during disc play. -
Page 31: Repeating A Title, Chapter (Dvd), Track (Cd-Da)
Advanced Operation Repeating a Title, Chapter (DVD), Track (CD-DA) You can play the desired title, chapter, section repeatedly. Press the PLAY MODE ( ) button during disc play. - Each press of the PLAY MODE button changes the repeat mode in the following sequence. -
Page 32: Program Play
Advanced Operation Program play This function is used to play the Title, Chapter and Tracks on the disc in the order you program. Press the PROGRAM ( ) button on the remote control. Program menu is displayed on screen. Select the Title, Chapter (DVD) and Track NO. (CD-DA) is displayed on the TV screen. -
Page 33: Zooming A Picture
Advanced Operation Zooming a Picture Press the ZOOM ( ) button during playback. Each press of the ZOOM ( ) button changes the zoom mode in the following sequence. ➡ ➡ ➡ ➡ ➡ ➡ NORMAL If you press the direction button during the ZOOM mode, the ZOOM point will shift. -
Page 34: Switching The Camera Angle
Advanced Operation Switching the Camera Angle Some DVDs contain scenes that have been shot simultaneously from multiple angles. Press the ANGLE ( ) button on the remote control during disc play. The ANGLE icon appears. If no additional camera angle are recorded, the ( ) icon will be displayed. -
Page 35: Direct Search (Go To)
Advanced Operation DIRECT Search (GO TO) This function is used to go to the Chapter, Track or Song of the disc you want. Press the GOTO ( ) button during playback. Select "Chapt" and press DOWN ( ) button. Enter the title number using the numeric button. CD-DA Press the GOTO ( ) button during playback. -
Page 36: Using The Setup Menu
Using the Setup Menu Once the initial settings have been completed, the player can always be operated under the same conditions whenever the power is switched on. These settings are called SETUP data, and are easily modified and stored using the SETUP menu. The SETUP menu includes the information for GENERAL, VIDEO, AUDIO and PREFERENCES system controls. -
Page 37: General Setup
Using the Setup Menu General Setup TV DISPLAY You can select a TV screen aspect ratio according to your TV. If the TV on which the movie is played is of 'WIDE' type, choose "WIDE". If it is of "4:3" type, choose NORMAL/PS (Pan & Scan) or NORMAL/LB (Letter Box). NORMAL/PS : Choose this setting if you want the movie to fill the entire screen of your TV. - Page 38 Using the Setup Menu CAPTIONS Adjusts caption selections. On: Choose this setting to display captions. Off: Choose this setting to close captions. SCREEN SAVER This saver can keep the screen from being damaged. Last Memory Adjusts last memory selections. On: Continues playing from last point. (after the disc open/close or power on/off in DVD/CD playback)
-
Page 39: Audio Setup
Using the Setup Menu Audio Setup EQ Type This unit can produce a 3D surround effect, using 3D Surround Sound technology. Choose the desired preset equalizer mode. (Rock, Pop, Live, Dance, Techno, Classic, Soft) BASS BOOST This is enhanced at all levels without distorting other frequencies. - Page 40 Using the Setup Menu SPDIF OUTPUT 1) SPDIF OUTPUT To connect the unit's digital output to an external device equipped with a digital input, this item must be set correctly. 2) CD, DOLBY DIGITAL, DTS, MPEG, PCM CHANNEL (available SPDIF OUTPUT setting is MANUAL) - DOLBY DIGITAL: Select "DOLBY DIGITAL"...
-
Page 41: Video Setup
Using the Setup Menu Video Setup SHARPNESS Adjusts the sharpness of the image. Press the ENTER ( ) button to select the adjust mode, then use the UP ( ) or DOWN ( buttons to select the image quality adjustment item. -
Page 42: Preference Setup
Using the Setup Menu Preference Setup PBC (Option) This feature is only available when a (Super) Video CD is loaded. It allows you to disable or enable the PBC (Playback Control) menu of VCD discs. 1) Press the SETUP ( ) button during stop mode. - Page 43 Using the Setup Menu DISC MENU Use the Disc Menu option to select the language you want a DVD's disc menu to be displayed in (not the same as the player menu). 1) Press the SETUP ( ) button during stop mode.
-
Page 44: Password Setup
Using the Setup Menu DEFAULT If you select defaults, every function set returns to Factory Defaults except parental. Password Setup PASSWORD MODE PASSWORD CHANGE 1) Select "Password Setup" sub item. 2) Enter your old password, and new password in 4 digits. -
Page 45: Additional Information
Additional Information Specifications DVD-Video/ DVD-R/ -RW/ +R/ System +RW/ CD/ CD-R/ -RW/ MP3 files/ Picture CD Power supply DC 12V, 2.5A General Power consumption 1A, 12W Weight 1,203g External Dimensions (mm) 178(W) x 212(D) x 430(H) Operation temperature +5°C ~ +35°C Operation humidity 10~80% Signal System... -
Page 46: Troubleshooting
Additional Information Troubleshooting Cause Symptom Correction No power The power cord is Plug the power cord into the wall disconnected. outlet securely. The power is on, No disc in inserted. Insert a disc. (Check that the DVD or but the DVD player audio CD indicator in the DVD doesn't work display is lit.) - Page 47 Additional Information Cause Symptom Correction The remote The remote control is not Point the remote control at the remote control doesn't pointed at the remote sensor of the DVD player. work properly. sensor on the DVD player. The remote control is too Operate the remote control within far from the DVD player.
-
Page 48: Warranty
Warranty DEAM (Daewoo Electronics America) warrants each new electronic product manufactured by it to be free from defective material and workmanship and agrees to remedy any such defect or to furnish a new part (at the Company’s option) in exchange...