Table of Contents
Advertisement
Quick Links
Advertisement
Table of Contents

Related Manuals for Planet NAS-3410


Summary of Contents for Planet NAS-3410
- Page 1 4-Slot NAS RAID Server NAS-3410 User’s Manual...
-
Page 2: Safety Information
Electronic Emission Notice Federal Communications Commission (FCC) This equipment has been tested and found to comply with the limits for a Class A digital device, pursuant to Part 15 of the FCC Rules. These limits are designed to provide reasonable protection against harmful interference when the equipment is operated in a commercial environment. -
Page 3: Safety Notices
WEEE separately. Copyright Copyright © 2005 by PLANET Technology Corp. All rights reserved. No part of this publication may be reproduced, transmitted, transcribed, stored in a retrieval system, or translated into any language or computer language, in any form or by any means, electronic, mechanical, magnetic, optical, chemical, manual or otherwise, without the prior written permission of PLANET. -
Page 4: Table Of Contents
Table of Contents Chapter 1 Introduction ----------------------------------------------------------------- 1 1.1 Features --------------------------------------------------------------------------------------------------------1 1.2 Package Contents --------------------------------------------------------------------------------------------1 1.3 Physical Details -----------------------------------------------------------------------------------------------2 Chapter 2 Initial Installation ----------------------------------------------------------- 4 2.1 Hardware Installation Procedures ------------------------------------------------------------------------4 2.2 Setting the IP Addresses------------------------------------------------------------------------------------6 2.3 Accessing the Administration Home Page--------------------------------------------------------------8 Chapter 3 Server Configuration---------------------------------------------------- 10 3.1 Server Information and Settings ------------------------------------------------------------------------ 10 3.2 Modifying the Administrator’s Password -------------------------------------------------------------- 11... - Page 5 5.4 Expanding a RAID-5 Volume ---------------------------------------------------------------------------- 28 5.5 Migrating Data Volumes----------------------------------------------------------------------------------- 29 5.6 SmartExtend – Add More NAS Capacity-------------------------------------------------------------- 29 5.7 Volume/Disk Scan ------------------------------------------------------------------------------------------ 31 5.8 Hot-swapping ------------------------------------------------------------------------------------------------ 32 Chapter 6 Security Control---------------------------------------------------------- 33 6.1 Security Information---------------------------------------------------------------------------------------- 33 6.2 Creating the Local User and Local Group Accounts ----------------------------------------------- 34 6.3 Caching Windows Domain User Accounts ----------------------------------------------------------- 35 6.4 Creating UNIX/Linux Host -------------------------------------------------------------------------------- 37 6.5 Creating Share and Assigning Share Permissions ------------------------------------------------- 37...
- Page 6 System Requirement ------------------------------------------------------------------------------------- 91 Installing TCP/IP Protocol for Microsoft Networks ------------------------------------------------- 91 Installing NAStart ------------------------------------------------------------------------------------------ 91 Discovering NAS-3410 ----------------------------------------------------------------------------------------- 92 To set the automatic refresh interval ------------------------------------------------------------------ 92 Server Quick Setup Using NAStart -------------------------------------------------------------------- 92 Importing and Exporting System Settings ----------------------------------------------------------------- 93...
-
Page 7: Chapter 1 Introduction
Introduction To accommodate the increasing storage demands for enterprise, small business, SOHO, and home use, PLANET provides a reliable and affordable solution, the NAS-3410. Regardless of the operating systems installed in your network, the NAS-3410 has straightforward setup procedures and can be installed in any existing network environment using its simple and intuitive management interface. -
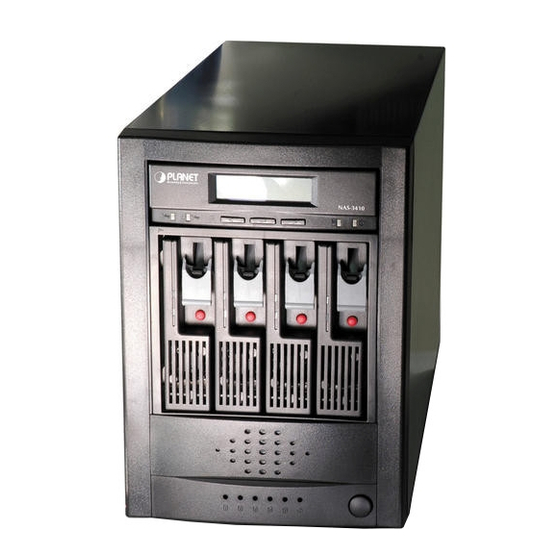
Page 8: Physical Details
If any of the above items are damaged or missing, please contact your dealer immediately. 1.3 Physical Details Front View Power button: When the A/C power cable is in socket, the NAS-3410 will start to initiate. Press this button twice to shutdown the NAS-3410. Press once again to switch on the server. LED definition:... - Page 9 Green Power on – – Power/Fault Yellow Fault – – NAS System Board Diagram...
-
Page 10: Chapter 2 Initial Installation
Initial Installation 2.1 Hardware Installation Procedures Step 1: Pull out a HDD tray from the NAS-3410 mobile rack. Step 2: Configuring the jumper on your hard disk using Cable Select (CS) before installing to the hard disk tray. (Refer to your hard disk’s user manual for the instruction) Step 3: Secure and mount a hard disk onto the HDD tray using four screws under the tray. - Page 11 Step 5: Repeat Step 1 to Step 3 if necessary for the other HDD trays. Step 6: Connect your NAS-3410 to the network by attach a LAN cable from the LAN port located at the back of your NAS-3410. (At least one network connection is required) Step 7: Plug the power cord into the power connector on you NAS-3410.
- Page 12 Verify the HDD status LED 1 (Power/Fault) LED 2 (HD Access) Meaning Green Blinks Off (Master) Powering up Red On (Slave) Green On Red On during HDD is being accessed access Green Blinks Fast Red On RAID building, rebuilding, expanding or disk-scanning Amber On HDD is ready for being hot-unplugged...
-
Page 14: Setting The Ip Addresses
CPU Fan Speed: 3994 RPM Thermal (oC) Voltage (V) 1.44 3.30 4.68 Configuring the IP addresses using the LCD console 1. After NAS-3410 is boot up, the LCD console shows System Ready. Press the right button. - Page 15 System Ready 2. The IP address of LAN1 is shown. Press the middle button to configure LAN1 IP address. Note that the symbol at the right hand upper corner indicates that the IP address can be configured using the LCD console. LAN1 IP: 192.168.1.1 3.
-
Page 16: Accessing The Administration Home Page
2.3 Accessing the Administration Home Page You can configure the detail settings of your NAS-3410 in the administration home page. To access the administration home page, type the IP address of your NAS-3410 in the address field of the web browser:... - Page 17 http://192.168.1.1 /admin/ or Run the utility NAStart utility provided in the CD-ROM, right-click on a NAS server on the left-hand tree-view pane. Select Admin page item from the right-click menu to open the administration page. It will prompt for username and password. By factory default, the username is admin and no password is needed.
-
Page 18: Chapter 3 Server Configuration
Server Configuration This chapter describes how to name the server, specify the server date and time, upgrade the OS firmware, shut down the system and use UPS with the NAS-3410. 3.1 Server Information and Settings Click Server from the administration homepage. You will see the Information page describing the summary information of the NAS-3410. -
Page 19: Modifying The Administrator's Password
Apply. 3.3 Enabling UPS Support The NAS-3410 supports UPS and basic power management functions. It sends alerts when there are power events like utility power failure or low battery capacity. When power events occur, the NAS-3410 can shut down itself automatically to prevent potential data loss. -
Page 20: Server Maintenance
To use smart-signaling UPS, connect UPS to the NAS-3410 with an RS-232 cable. Then go to the Server UPS Settings menu on the administration page to enable UPS support. To use network-type UPS, connect the UPS to the LAN first. Then go to the Server UPS Settings page on the administration page. -
Page 21: Shutting Down The Server
3.5 Shutting Down the Server Shutdown, reboot and startup actions The NAS-3410 can be shut down by pressing the power button twice at the front of the server case. The whole shutdown process might take seconds to minutes until data are all safely saved to the hard disks. - Page 22 Activating Optional Features To activate the optional features, please follow the steps. 1. Open the Administration Page, select License from the Server menu. The page is like: 2. Enter the license key in the input field. A license key is a string of 24 characters. The characters can be any numbers or English letters.
-
Page 23: Chapter 4 Network Configuration
4.1 Network Information The Network Information screen is the summary of the current network settings of the NAS-3410. It provides the administrator a quick look of the basic network setting of the NAS-3410. -
Page 24: Tcp/Ip Settings
TCP/IP handles network communications between network nodes that are connected to the network. It is important to setting up correct TCP/IP setting that for NAS-3410 to function properly. The NAS-3410 provides two on-board Gigabit Ethernet ports (LAN1 & LAN2). You can configure the Ethernet ports using the following operating modes: Stand Alone: Each LAN1 &... -
Page 25: Windows Settings
Optionally, you can register the NAS-3410 to the domain. Once registered, the NAS-3410 will be created as a machine account on the domain controller. And it will use Netlogon as the authentication mechanism, which provides better integration into the Windows network environment. -
Page 26: Unix/Linux Settings
Click the Workgroup Mode radio button if you want to configure NAS-3410 in Workgroup Mode. Or, click the Domain Mode radio button if you want to configure NAS-3410 in Domain Mode. Select the option to support Unicode. Select the option to disconnect idle connection automatically. Server will disconnect the connections which have been idle for 5 minutes if this option is enabled. - Page 27 UNIX resources. The NAS-3410 supports the retrieval of user accounts and their UID/GID from a NIS server. If the NIS support is enabled, the NAS-3410 can auto-map NIS users with local/domain users. It matches user names and assigns the UID/GID of the matched NIS users to local/domain users.
-
Page 28: Macintosh Settings
6. Click Apply to save the setting. 4.6 NetWare Network Settings NAS-3410 operates in a manner similar to a Novell NetWare 3.12 file server. Setting up your NAS-3410 and shared among Novell NetWare clients. A share can be mapped to the NAS-3410 using NetWare clients. -
Page 29: Web Data Access Settings
3. Click Apply to save the setting. 4.7 Web Data Access Settings This section shows the parameters that you can set up for user to access NAS-3410 user’s home page. You can configure the user access constraint, authentication policy and default setting by defining the Access Control, Security Policy and Default User Page settings. -
Page 30: Snmp Settings
5. Select the User Limit. Click the Unlimited radio button or specify the maximum number of users allowed to access the content in your NAS-3410 via FTP. 6. Specify the Home Directory when user connects to the NAS-3410 via FTP. Note that you must select a volume to create a FTP home directory. -
Page 31: Email Settings
5. Select Read Only from the pull down menu if you want the corresponding management console has read only privilege. 6. Repeat Step 2 to Step 5 if more than one management console is available. NAS-3410 supports up to 4 management consoles. - Page 32 Once the CA certificate is installed, the client can access all NAS-3410s' web pages with SSL connection. Suppose that the server IP address is 192.168.1.10. To access the NAS-3410's web pages with SSL connection, please open https://192.168.1.10/ for the user homepage, or https://192.168.1.10/admin/...
-
Page 33: Chapter 5 Storage Management
Volume View List of Volumes It displays all the volumes in the NAS-3410. Volume Name shows the volume name which is defined when creating a volume. Each volume name is also a hyperlink. It opens a page for showing the detailed information of that volume. Members indicate the hard disks which compose the volume. - Page 34 You can modify the volume name on that page. Device View It is a list of all the storage devices connected with the NAS-3410, including hard disks, CD/DVD-ROM, CD/DVD writers and tape drives. List of hard disks In Volume shows to which volume the hard disk belongs.
-
Page 35: Creating A Volume
be used to create a volume or be assigned as a hot-spare disk. Defective The hard disk contains bad sectors. The hard disk is not mounted and not accessible. Off-line Backup/Archiving Devices These are either CD/DVD-ROM drives, CD/DVD writers or tape drives. Type indicates what kind of device it is. -
Page 36: Deleting A Volume
RAID-5 volume expansion makes it possible to enlarge volume capacity without rebooting the NAS-3410. Volume capacity grows on the fly. Moreover, you do not have to change any share permissions, security controls and quota settings after volume expansion. Storage management becomes much easier. -
Page 37: Migrating Data Volumes
To expand a SmartExtend volume, please open the administration page of the SmartExtend target system. When the target volume is connected to the initiator, use the Volume Expand function to expand the target volume. 5.5 Migrating Data Volumes Migrating a data volume is to duplicate a volume block by block. It helps administrators migrate or duplicate data between volumes of different RAID types or capacity. - Page 38 The SmartExtend function is an optional feature which must be activated by a license key. Please contact the vendor to obtain the license key. All NAS-3410 can become SmartExtend targets. You do not have to activate the function. Follow the steps below to build a SmartExtend connection between an initiator and a target.
-
Page 39: Volume/Disk Scan
user account when it tries to use the target volume. The user account must be a member of this group. Specify a SmartExtend initiator which will connect to this target volume. (d) Apply the settings. 7. On the Volume SmartExtend page, you will see the target volume in the list, but the Status column will show Disconnected. -
Page 40: Hot-Swapping
5.8 Hot-swapping You may have to change hard disks in some situations, such as hard disk failure, degraded RAID or general maintenance. The NAS-3410 supports HDD hot swapping. Below are the instructions of replacing hard disks. Identify which hard disk fails. The amber LED of the HDD tray will blink to indicate hard disk failure. -
Page 41: Chapter 6 Security Control
6. Configure the local user and domain user quota limit. 6.1 Security Information The Security Information screen is the statistic of the current security setting of the NAS-3410. It provides administrator a summary of the security database and the status of the operation mode. -
Page 42: Creating The Local User And Local Group Accounts
A local user or group is an account that can be granted permissions and rights from your NAS-3410. You can add local user to a local group. Groups are indicated by a * sign at the suffix of the name. You can also grant administrator privilege to a local group. Groups with administrator privilege are indicated by a # sign at the suffix of the name. -
Page 43: Caching Windows Domain User Accounts
5. If you want to disable this user account, click the Disable user account checkbox. 6. Select a group from the left hand window and click the >> button to add the user as a member of this group in the Member of section. 7. - Page 44 When the Windows Network is set to using Domain Mode in your NAS-3410, you need to cache domain account in the NAS-3410’s local user database. By caching domain accounts, it speeds up the process of setting permissions and quotas.
-
Page 45: Creating Unix/Linux Host
For NAS-3410, NFS client’s mount privileges are granted specifically to UNIX/Linux host created by the administrator. If a UNIX/Linux host is granted access right to a share in the NAS-3410, user of the UNIX/Linux host can have access to the share. Administrator should create a UNIX/Linux host list prior to grant access right to them. - Page 46 7. Click Apply to save the setting. You can assign the following share permission to a user on NAS-3410: No Access (NA) – Account has been denied access to the share. Read Only (RO)– Account is allowed to read the share.
-
Page 47: Aggregate Volumes Under A Share
12. If you want to remove shares, check the corresponding checkbox located at the end of the row and click You can assign the following share permission to UNIX/Linux Hosts on NAS-3410: Read Only (RO) – the host is allowed to read the share. -
Page 48: Configuring File And Folder Security And Acl
ACL node is created and added to the ACL for the file or folder. If you assign permissions to a local user, a Security ID (SID) created by NAS-3410 will be referred by the ACL for the file and folder security. If the local user is then deleted, and the same name is created as the previous one, the new user does not have permissions to the file or folder, because the SID will not be the same. - Page 49 Set file/folder permission in Windows Network NAS-3410 provides a simple, efficient way to set up and maintain file/folder security in Windows Network. To change permissions, you must have been granted permission to do so by the administrator. Below is the permission mapping table of NAS-3410 in Windows Network:...
-
Page 50: Managing Quotas
4. Click Apply to save the setting. 6.8 Managing Quotas Configuring user quota: NAS-3410 supports two types of quotas: user quota and folder quota. User quota monitors the disk space usage of each user. It is based on file ownership, and is independent to which volume... - Page 51 Folder quota monitors the amount of data that can be stored on the folder on which folder quota is applied regardless of who saves there. It can limit the total amount of data stored in the NAS-3410 to effectively control the proper consumption of the storage resources. Note that is it prohibited to set folder quota to the Volume root or “System folder”...
- Page 52 Click Apply to save the settings. You can click the Recalculate to obtain the most updated information of the total amount of disk space in use on each folder. To set all quotas to the same value, please specify the quota value in the Set all quotas to xx MB input field.
-
Page 53: Chapter 7 Disc Sharing And Data Archiving
7.1 Start to Use the Disc Server Function The Disc Server function is an optional feature on NAS-3410. To active the function on these models, please get a license key from your vendor and enter the key on the Server License menu of the administration page. -
Page 54: Managing Discs
settings and permissions. The CD replacement will happen once and it will return to the previous settings. The disc image’s name can be either inherited from the CD label or user-defined. A user-defined name will only apply once to the next duplicated disc image. If you set the CD function to 'Direct Access', it will mount any disc inserted in the CD/DVD device. -
Page 55: Sharing Discs
To delete a disc image: To delete a disc image, check the check-boxes to the right and click the Delete icon. 7.4 Sharing Discs Administrators can choose to share a single disc, multiple discs or a disc image folder. If a single disc is shared, its content will be shown when users open the network share. -
Page 56: Archiving Data To Cd/Dvd Discs
administration page. To do disc recording, the CD function must be configured as Loader/Writer. To change the CD function, please click the hyperlink in the Function column of the Device List table. Next, select a disc image by clicking the Select a Disc hyperlink. After the selection is made, the disc image information will be shown underneath, including image size, disc format and disc volume label. - Page 57 purposes Source Folders Specify the data to be archived. The folders, not preserving the full paths, will be archived to CD/DVD discs Disc Label Specifies the labels of the CD/DVD discs. Date Extension If the date extension is enabled, it will append the date of archiving to the disc labels.
-
Page 58: Chapter 8 User Access
NAS-3410 ready for user accesses from various network OS. Before reading on, please make sure that the NAS-3410 is configured with an IP address and a volume is created successfully. For the rest of the sections, we assume that the server name is NASSERVER, the IP address is 192.168.170.172 and there is a volume named volume01. -
Page 59: Accessing From Web Browsers
After sharing the volume, specify the access rights of local users/groups and domain users/groups. Now Windows users can access the NAS-3410. They can run the Windows Explorer and open the path of \\nasserver. The shared folder volume01 will appear in the window. - Page 60 Now users can run the web browser and open the IP address of 192.168.170.172 to browse the NAS-3410. When the user homepage is opened, it prompts for user name and password. Then it will display all shared folder after user login. The user homepage will be like: In the top right corner of the user page are the tool-bar icons, which provide access to various functions like creating folder or uploading files.
-
Page 61: Accessing From Macos
After sharing the volume, specify the access rights of local users/groups and domain users/groups. After the configuration is done, MacOS 8 or OS 9 users can use the MacOS Chooser or Network Browser to access the NAS-3410. Mac OS X users can use the Connect to Server function to... -
Page 62: Accessing From Ftp Clients
Once you find the server, click Connect to put it on Desktop. 8.5 Accessing from FTP Clients You can set an FTP home directory in the NAS-3410 for user access. Login authentication is done by checking the ACL of the FTP home directory. During an FTP session, the server always checks ACL when it receives any FTP requests, such as ls, put, get, etc. -
Page 63: Accessing From Nfs Clients
Create local user accounts or retrieve domain accounts from the domain controller, depending on whether the NAS-3410 is in the workgroup mode or the domain mode. Configure the folder security settings of volume01 to control user access. Click the Set hyperlink to specify the access rights (ACL) for the FTP home directory –... -
Page 64: Chapter 9 Backup And Recovery
The new updates are written to a new location. The file-system maintains records and pointers to keep track of the snapshot data and file changes. The snapshot feature is an optional feature on NAS-3410. Snapshot Management To manage snapshots, please open the administration page. Enter the Backup Snapshot Manage page and select a volume. - Page 65 Delete snapshots if free If enabled, it will automatically delete the oldest snapshots to space is low free more disk space when the free space is lower than the specified percentage. Snapshot Policy They specify how many hourly, daily, weekly and monthly snapshots to keep, respectively.
-
Page 66: Tape Backup And Restore
8 schedules of any types. 9.2 Tape Backup and Restore The NAS-3410 builds in backup software for data protection. The backup software features full or incremental backup, scheduled tasks and multi-volume backup. The administrator is able to define backup policy by incorporating one or more backup tasks. It can also utilize the hardware compression capability. - Page 67 6. Specify whether to overwrite the tape. If yes, the backup task will rewind the tape to the beginning and overwrite it with backup files. If not, it will append the backup to the tape, not overwriting any existing data on tape. 7.
- Page 68 5. To restore selected files or folders, please make selections on the Java UI in the What to Restore item. 6. Choose the target location. It can restore data to either the original location or an alternative location. If the original location is selected, it will restore data to the location where they are originally backed up.
-
Page 69: Using A Tape Library
Then, connect the tape library to the NAS server with a SCSI cable. The NAS server supports up to two tape libraries. The tape library support is an optional feature on NAS-3410. Managing Devices, Tapes and Tape Cleaning When the NAS server starts up, it will initialize the tape library. - Page 70 Inventorying tape slots It checks all the slots of the tape library to see if they are occupied and reads in media information from all the tapes. The whole process may take a while, depending on the number of tapes and the tape drive speed.
- Page 71 Each media pool is divided into two sets, the save set and the scratch set. The save set is consisted of the tapes containing important data which cannot be overwritten. On the other hand, the scratch set is consisted of the tapes which are free to be overwritten. At the very beginning, all tapes are empty and locate in the scratch set.
- Page 72 1. Specify the task name. The created backup set will be named after the task name, appended by date/time. 2. Choose a tape library and the tape drive. Usually the tape drive is set to Auto, allowing the NAS server to choose any available tape drive to do the backups. 3.
- Page 73 1. Specify the task name. The created backup set will be named after the task name, appended by date/time. 2. Choose a tape library. 3. Specify what to backup by selecting source folders. 4. Add backup schedules by clicking the Add a Schedule hyperlink. A.
-
Page 74: Smartsync - Nas-To-Nas Data Replication
only partial of them. To view the information of the backup set, click the hyperlink in the Backup Type column. Next, choose to restore all files or only certain files or folders. For the latter, you need to install Sun Java virtual machine v1.4 or higher. Please go to http://java.sun.com and download the software. - Page 75 SmartSync client to the SmartSync server. On the NAS-3410 which acts as the SmartSync server, create a sync point in it. A sync point is a folder in the SmartSync server which is exposed to SmartSync clients for data replication. A sync point of mirror mode receives data from a SmartSync client and builds an identical data copy in it.
- Page 76 Step 1 is to specify the IP address of the SmartSync server. Please enter the IP address of the NAS-3410 where you create the sync point. The second input box is for the port number. By default, port 873 is used to get remote SmartSync server information such as sync point names. If the port is remapped by a firewall or a NAT device, you must specify the remapped port number here.
- Page 77 It will keep one backup version per month in the last Z months prior to the Y weeks. On the NAS-3410 which acts as the SmartSync client, set up a SmartSync task, which defines the schedule settings and the source folder.
- Page 78 Two or more NAS-3410s are required, one as the SmartSync server, others as the SmartSync clients. It will replicate data from the SmartSync server to the SmartSync client. On the NAS-3410 which acts as the SmartSync server, create a sync point of “Distribute” mode, which distributes data to the SmartSync clients as they request.
- Page 79 On the NAS-3410 which acts as the SmartSync client, set up a SmartSync task, which defines the schedule settings and the target folder. To set up a SmartSync task, please go to the Backup SmartSync Task menu on the Administration Page. Click the Add Task button.
-
Page 80: Loading And Writing Cd/Dvd Discs
9.5 Loading and Writing CD/DVD Discs Connecting a CD or DVD writer to the NAS-3410, you will be able to load data from CD/DVD discs or burn files on writeable CD/DVD discs. The CD and DVD burning feature turns the NAS-3410 into a device that publishes data, beyond the powerful data storage function. - Page 81 Select a Source Device where you insert the disc to be loaded. Above the Source Device item you will see a device list for your reference. Specify the destination. Click the Select Path hyperlink and select a target path. Choose whether to overwrite the existing files. “Overwrite with newer files” means it will overwrite the target if the files on the CD/DVD disc are newer.
- Page 82 The NAS-3410 supports CD or DVD burning. It can use ISO-9660 CD format to write data to CD or DVD discs. Supported devices are CD-RW, DVD-RW and DVD+RW writers. Dual-layer DVD writing is also supported. To write data to CD/DVD discs, please insert a blank disc into the CD/DVD writer first. Next, open the Administration Page and enter the Backup Loader/Writer page.
-
Page 83: Backup And Restore System Profiles
When it is writing to disc, you can see the progress by clicking the hyperlink in the Status column of the Device List. A separate browser window will pop up. The progress is indicated by the progress bar, the Processed Folders item, the Processed Files item and the Size Processed item. - Page 84 the system configurations to factory default. Go to the Server Shutdown page. Check the Reset configuration to factory default option and click the Reboot button. The second step is to restore system configurations using one of the system profiles. Go to the Backup System Profiles Restore page.
-
Page 85: Chapter 10 Virus Protection
Chapter 10 Virus Protection Most storage systems are vulnerable to virus attacks. An infected file in you NAS-3410 can be exchanged among the clients system in the network and resulting in corrupted data or causing productivity loss. The integrated Trend Micro antivirus software in NAS-3410 is the best-of-breed security product that delivers the reliable antivirus protection to prevent virus from spreading before they get to you. -
Page 86: Configuring Scan Settings
NAS-3410. Click the Enable Real-time scan checkbox to enable real-time scanning. Select scan direction. Incoming files are those that are being stored in NAS-3410 whereas outgoing files are copied or moved from NAS-3410 to other location. Click Apply to save the settings. -
Page 87: Updating Virus Pattern File
File Types to Scan Click the desire scan file type. If All file types is selected, all files regardless to its file extension will be scanned. If Files with specified file extensions Only is selected, specify using the recommended extensions recommended by Trend Micro or specify the file extension manually. Note that the maximum scanning layer of a compressed file is set to 2 layers for all real-time, manual and scheduled scan. - Page 88 2. Or, you can download the virus pattern file in ZIP format from Trend Micro’s website – http://www.trendmicro.com manually. Select A virus pattern file in ZIP format here and specify the location of the virus pattern file. 3. Click Apply to save the settings. Configuring a scheduled update 1.
-
Page 90: Chapter 11 Event Logs And System Status
* You can configure what kind of events should initiate the notification process in Event Configuration Advance menu. 11.1 Thermal Settings User can also define the thermal scheme of the NAS-3410 so that NAS-3410 can give off warning message or shutting down when the system or CPU temperature is over a pre-defined threshold... -
Page 91: Checking The Event Logs
CPU and System temperature. Otherwise, the CPU fan will always run at full speed. You can set the NAS-3410 to give off warning message or shutdown base on the CPU or System temperature. Check the Warning and Shutdown checkboxes and select the proper temperature from the pull down menu. -
Page 92: Viewing System Status
System Status displays a comprehensive view of the system fan status, thermal status and system voltage. You can use this information to quickly find out the problem of your NAS-3410 and take appropriate action. In Status Environment page, you can monitor the CPU fan status, CPU and System temperature plus the System Voltages. -
Page 93: Share Access Counts
• Current Connections – configure and show the protocol used by the client that is currently connecting to the NAS-3410 by click the check box beside the protocol you want to show on the list. • User – the name of the user who has connected to NAS-3410. -
Page 94: Appendix Anastart Utility
Appendix A NAStart Utility NAStart is a powerful software that discover and administer NAS Servers on the network, and remotely loads disc images into the NAS Server. You can either duplicate a whole CD or build an image from a group of files. Sharing and publishing data was never been so easy. Use NAStart to display and modify the setting you have created. -
Page 95: Installation
Installation System Requirement • IBM PC or compatible with 80486 processor or higher • At least 8 MB of free memory (16 MB is recommended) • Minimum 5MB of free hard disk space • VGA or higher resolution monitor • Microsoft Windows 95/98/98SE/ME, Windows NT/2000/XP Installing TCP/IP Protocol for Microsoft Networks NAStart communicates with NAS Servers through the TCP/IP protocol. -
Page 96: Discovering Nas-3410
2. Enter a number between 1 to 60 minutes. 3. Click OK. Server Quick Setup Using NAStart You can perform initial setup for your NAS-3410 using NAStart. 1. Click the button on the toolbar. 2. Or, go to Server -> Server Quick Setup. -
Page 97: Importing And Exporting System Settings
Importing and Exporting System Settings This section describes how to export the system settings of a NAS Server into a file. This file can be read into another NAS Server on the network by using the import feature. Import System Settings and Export System Settings form a combined process of replicate system settings from one configured NAS Server to another NAS Server. -
Page 98: Browsing & Administering Servers
Browsing & Administering Servers Browsing Servers Below is the main window of NAStart. Upon execution, NAStart brings up Windows Explorer for you to drag & drop files into My Container for later image building. You can disable this option by choosing Tool->NAStart Options and un-checking the option - "Open Windows Explorer when NAStart starts". -
Page 99: Tool Bar Functions
The following are some icon representations: NAS Network: display all the NAS Servers found on the LAN. NAS Server: represents a NAS Server Disc Image Folder: contains disc images of the NAS Server. You can double click to view its content. Disc Image: represents a mirrored CD/DVD image. - Page 100 Tree View Mode: expands or shrink the directory tree in the tree view pane (to the left). List View Mode: changes the view mode of items in the list view pane (to the right). Save Container: saves data in My Container into a container file. Load Container: loads a container file into My Container.
-
Page 101: Mirroring Cd/Dvd Remotely
Mirroring CD/DVD Remotely This chapter describes how to copy a CD from a PC CD-ROM drive to a NAS Server. Please follow the steps below. 1. To mirror a CD or a DVD remotely into a NAS Server, first click the "Mirror CD"... - Page 102 3. Change the volume label of the CD/DVD image if necessary. If you want to change the volume label, click the 2. User Define radio button and enter the volume label in the input-box. Then click the Update button. Click the Next button afterwards. 4.
- Page 103 6. Click OK to start the task. The Task Manager will show the progress.
-
Page 104: Archiving Files As A Cd/Dvd Image
Archiving Files As a CD/DVD Image This chapter describes how to build CD image from My Container into a NAS Server. Please follow the steps below. 1. The first thing to build a CD/DVD image is to collect files. Open Windows Explorer and drag &... - Page 105 3. Choose one or more servers as the destination. Select a server in the Target & File Path list-box, select Smart mode for redundancy check of the CD image or select Force mode to allow a second copy of the same CD image. Then, click the >> button. You can see the task being added to the right-hand pane.
- Page 106 6. The Task Manager will show the progress.
-
Page 107: Burning Disc Images
Burning Disc Images If the NAS server is equipped with CD or DVD writer, it can burn any existing disc image in it. Select a NAS server from the NAS Servers tree view pane of the NAStart main window. Select a disc image in the NAS server and right-click on it. -
Page 108: Appendix B Specification
Appendix B Specification Model NAS-3410 Form Factor Tower Processor Intel Celeron 1.2GHz Memory 256MB Hard Disk Tray Four, ATA 133 IDE interface RAID Level 0, 1, 5, JBOD LAN Port 10/100/1000Mbps RJ-45 port x 2 COM Port 1, for UPS...