Table of Contents
Advertisement
Available languages
Available languages
Advertisement
Table of Contents

Related Manuals for ION PICS 2 SD


Summary of Contents for ION PICS 2 SD
- Page 1 PICS 2 SD USER GUIDE ENGLISH ( 1 – 5 ) GUÍA DEL USUARIO ESPAÑOL ( 6 – 10 ) GUIDE D’UTILISATION FRANÇAIS ( 11 – 15 ) GUIDA UTENTE ITALIANO (16 – 20 ) BEDIENUNGSANLEITUNG DEUTSCH ( 21 – 25 ) GEBRUIKERSHANDLEIDING NEDERLANDS ( 26 –...
-
Page 2: Fcc Notice
Improper use creates the risk of serious accident. Do not try to open the case of PICS 2 SD or attempt to modify PICS 2 SD in any way. High-voltage internal components create the risk of electric shock when exposed. Maintenance and repairs should be performed only by authorized service providers. -
Page 3: Box Contents
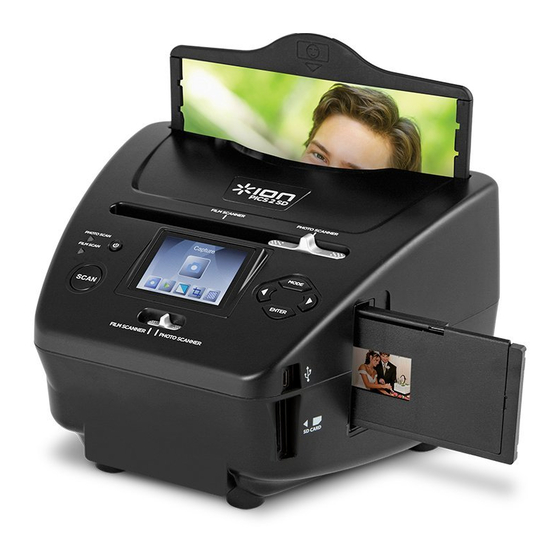
PICS 2 SD USB cable USB power adapter Slide holder Film holder Photo holders (3) Quickstart Guide Safety Instructions & Warranty Information Booklet PICS 2 SD FEATURES POWER BUTTON MODE BUTTON USB POWER ADAPTER DISPLAY ENTER BUTTON SLIDE HOLDER SCAN BUTTON... - Page 4 Insert your slide, negative, or photo into the appropriate holder. (See USING THE INCLUDED HOLDERS for more information.) Insert the holder into PICS 2 SD. If using a slide or negative holder, insert it into the slot on the right side. If using a photo holder, insert it into the slot on the top.
-
Page 5: Viewing & Editing Images
• Home: Returns to the main menu. TRANSFERRING IMAGES FROM PICS 2 SD Connect PICS 2 SD to your computer with the included USB cable. Press the MODE BUTTON to enter the main menu. Use the LEFT / RIGHT BUTTONS to select "USB MSDC" and press the ENTER BUTTON. -
Page 6: Specifications
Your computer must have a USB 2.0 to recognize the PICS 2 SD. into a high-speed USB communicate with your PICS 2 SD. Check to port. see if USB 2.0 is installed on your computer. If I get a Windows message you do not have a USB 2.0 installed on your... - Page 7 únicamente proveedores de servicio autorizados. Mantenga el PICS 2 SD lejos del agua y de otros líquidos. No use el PICS 2 SD con las manos mojadas. Nunca use PICS 2 SD en la lluvia o la nieve. La humedad crea el peligro de incendio y electrocución.
-
Page 8: Contenido De La Caja
Adaptador de alimentación USB Soporte de diapositivas Soporte de película Soportes de fotografías (3) Guía de inicio rápido Folleto de instrucciones de seguridad e información sobre la garantía CARACTERÍSTICAS DEL PICS 2 SD BOTÓN DE BOTÓN ENTER SOPORTE DE ENCENDIDO DIAPOSITIVAS... - Page 9 Cuando escanea diapositivas, negativos o fotos con el PICS 2 SD, debe guardar las imágenes escaneadas en una tarjeta SD opcional o en la memoria interna del PICS 2 SD (hasta 14 MB). Para escanear y guardar sus imágenes, siga estos pasos: Con el cable USB incluido, conecte el PICS 2 SD ya sea a su computadora (si está...
- Page 10 • Inicio: Vuelve al menú principal. CÓMO TRANSFERIR IMÁGENES DESDE EL PIC 2 SD Conecte el PICS 2 SD a su computadora con el cable USB incluido. Pulse el BOTÓN DE MODO para abrir el menú principal. Use los BOTONES IZQUIERDA / DERECHA para seleccionar "USB MSDC"...
-
Page 11: Especificaciones
Su computadora debe tener un puerto USB 2.0 para PICS 2 SD. puerto USB de alta velocidad. comunicarse con el PICS 2 SD. Verifique si está instalado USB 2.0 en su computadora. Si no lo tiene, Apareció un mensaje de Windows puede actualizar sus puertos USB. - Page 12 Une mauvaise utilisation risque de provoquer un accident grave. Ne pas essayer d’ouvrir le boîtier du PICS 2 SD ou d’altérer le PICS 2 SD de quelque façon que ce soit. Les composants haute tension internes créent le risque de décharge électrique lorsqu’ils sont exposés.
-
Page 13: Contenu De La Boîte
PICS 2 SD Câble USB Adaptateur d’alimentation USB Porte-diapositive Porte-négatif Portes-photo (3) Guide d’utilisation simplifié Consignes de sécurité et informations concernant la garantie CARACTÉRISTIQUES DU PICS 2 SD TOUCHE TOUCHE MODE ADAPTATEUR D’ALIMENTATION D'ALIMENTATION TOUCHE ENTER ÉCRAN PORTE-DIAPOSITIVES EMPLACEMENT POUR PORTE- D’AFFICHAGE... -
Page 14: Utilisation Des Supports
Lorsque vous numérisez vos diapositives, négatifs ou photos avec le PICS 2 SD, vous pouvez sauvegarder les images sur une carte mémoire flash ou sur la mémoire interne du PICS 2 SD (jusqu’à 14 Mo). Voici les étapes à suivre pour numériser et sauvegarder vous images : À... -
Page 15: Transfert D'images
• Home : Permet de retourner au menu principal. TRANSFERT D’IMAGES Branchez le PICS 2 SD à votre ordinateur à l’aide du câble USB inclus. Appuyez sur la touche MODE pour afficher le menu principal. À l'aide des touches de déplacement gauche/droite, sélectionnez l’option «... -
Page 16: Spécifications
Votre ordinateur doit avoir un USB 2.0 pour pas PICS 2 SD. branché dans un port USB communiquer avec votre PICS 2 SD. Vérifier pour haute vitesse voir si un USB 2.0 est installé sur votre ordinateur. Je reçois le message d’erreur Si vous ne possédez pas d’USB 2.0 installé... - Page 17 Conservare lo PICS 2 SD lontano da acqua e altri liquidi. Non servirsi dello PICS 2 SD con le mani bagnate. Mai utilizzare lo PICS 2 SD sotto la pioggia o la neve. L’umidità crea il pericolo di incendio e di scossa elettrica.
-
Page 18: Contenuti Della Confezione
PICS 2 SD Cavo USB Adattatore di alimentazione USB Porta diapositive Porta pellicole Portafoto (3) Guida rapida Istruzioni di sicurezza e garanzia CARATTERISTICHE DEL PICS 2 SD TASTO DI TASTO MODE (MODALITÀ) CAVO USB ALIMENTAZIONE TASTO ENTER (INVIO) ADATTATORE DI DISPLAY... - Page 19 Collocare la diapositiva, il negativo o la foto nel supporto adeguato. (Per maggiori informazioni, si veda il paragrafo “UTILIZZO DEI SUPPORTI IN DOTAZIONE”.) Inserire il supporto nel PICS 2 SD. Se si utilizza un porta diapositive o un porta negativi, inserirli nello slot di destra. Se si utilizza un portafoto, inserirla nello slot in alto.
- Page 20 Servirsi dei tasti LEFT / RIGHT (sinistro / destro) per selezionare "USB MSDC" e premere il tasto ENTER (invio). A DISPLAY comparirà un simbolo USB, per indicare che il PICS 2 SD sta funzionando come periferica USB remota per essere letto dal computer.
-
Page 21: Specifiche Tecniche
Il computer deve essere dotato di una porta USB 2.0 2 SD. ad una porta USB ad alta per comunicare con lo PICS 2 SD. Verificare che sul velocità. computer sia installata una porta USB 2.0. Se sul Ricevo un messaggio Windows computer non è... - Page 22 Geräte Beschränkungen unterliegt. Verwendung am falschen Ort birgt ein ernsthaftes Unfallrisiko. Versuchen Sie nicht, das Gehäuse des PICS 2 SD zu öffnen oder den PICS 2 SD auf andere Weise umzubauen. Hochspannungskomponenten im Inneren können zu einem elektrischen Schlag führen.
- Page 23 SCHACHTELINHALT PICS 2 SD USB-Kabel USB-Netzadapter Diahalter Filmhalter Fotohalter (3) Schnellanleitung Siherheitshinweise & Garantiebestimmungen PICS 2 SD - FUNKTIONSELEMENTE NETZSCHALTER EINGABETASTE USB-NETZADAPTER ANZEIGE SCHLITZ F. FILM / DIA DIAHALTER HALTER SCAN-TASTE FILMHALTER SCHLITZ F. SCANNER-MODUS FOTOHALTER FOTOHALTER SCHALTER 3,5" x 5" (8,9 cm x 12,7 cm) USB-ANSCHLUSS 4"...
- Page 24 Dia, Negativ oder Foto in den dafür vorgesehenen Halter einlegen. (Weitere Informationen hierzu im Abschnitt VERWENDUNG DER BEILIEGENDEN HALTER.) Halter in den PICS 2 SD einlegen. Wird der Dia- oder Negativ-Halter verwendet, diesen in den auf der rechten Seite befindlichen Schlitz einschieben. Bei Verwendung eines Fotohalters, diesen in den auf der Oberseite befindlichen Schlitz schieben.
- Page 25 Programm schneidet diese beim Scannen automatisch weg (vorausgesetzt die richtigen Schnittmaße wurden zuvor eingestellt, wie oben beschrieben). Um das Bild zu scannen, am PICS 2 SD die TASTE SCANNEN drücken. Nachdem der Scan durchgeführt ist, mit den TASTEN LINKS / RECHTS "Speichern"...
-
Page 26: Technische Daten
MÖGLICHE URSACHE LÖSUNG Mein Computer erkennt PICS 2 SD ist nicht an einen Um mit Ihrem PICS 2 SD kommunizieren zu können, braucht PICS 2 SD nicht. Hochgeschwindigkeits-USB- Ihr Computer USB 2.0. Überprüfen Sie, ob USB 2.0 auf Port angeschlossen. - Page 27 Gebruik de PICS 2 SD niet in de buurt van water en andere vloeistoffen. Gebruik de PICS 2 SD niet wanneer uw handen nat zijn. Gebruik de PICS 2 SD nooit in regen of sneeuw. Vocht geeft een gevaar op brand en elektrische schok.
-
Page 28: Inhoud Verpakking
INHOUD VERPAKKING PICS 2 SD USB-kabel USB-stroomadapter Diahouder Filmhouder Fotohouders (3) Snelstartgids Boekje met veiligheids- en garantie-informatie FUNCTIES PICS 2 SD STROOMKNOP MODUSKNOP USB-KABEL DISPLAY ENTER-KNOP USB-STROOMADAPTER SCANKNOP SLEUF VOOR DIAHOUDER FILM/DIAHOUDER SCHAKELAAR FILMHOUDER SCANNERMODUS SLEUF VOOR FOTOHOUDER FOTOHOUDERS KNOPPEN VOOR USB-POORT 3,5"... - Page 29 AFBEELDINGEN SCANNEN MET PICS 2 SD Bij het scannen van uw dia's, negatieven of foto's met PICS 2 SD kunt u de gescande afbeeldingen opslaan op een optionele SD-kaart of naar het interne geheugen van de PICS 2 SD (tot 14MB). Om te scannen en de...
- Page 30 • Home (home): Keert terug naar het hoofdmenu. OVERZETTEN AFBEELDINGEN VAN PICS 2 SD Sluit de PICS 2 SC aan op uw PC met de meegeleverde USB-kabel. Druk op de MODUSKNOP om naar het hoofdmenu te gaan. Gebruik de KNOPPEN VOOR LINKS / RECHTS om "USB MDC" te selecteren en druk op de ENTER-KNOP.
- Page 31 De PC dient over USB 2.0 te beschikken om met de door de PC een USB 2.0-poort PICS 2 SD te kunnen communiceren. Controleer of USB 2.0 op de PC is geïnstalleerd. Als dit niet het Er verschijnt een Windows-bericht geval is kunnen de USB-poorten van een upgrade "apparaat wordt niet herkend"...
- Page 32 www.ionaudio.com Made in China MANUAL VERSION 1.4...