Advertisement
Quick Links
Advertisement

Related Manuals for Fisher-Price SPARKLING SYMPHONY 71970


Summary of Contents for Fisher-Price SPARKLING SYMPHONY 71970
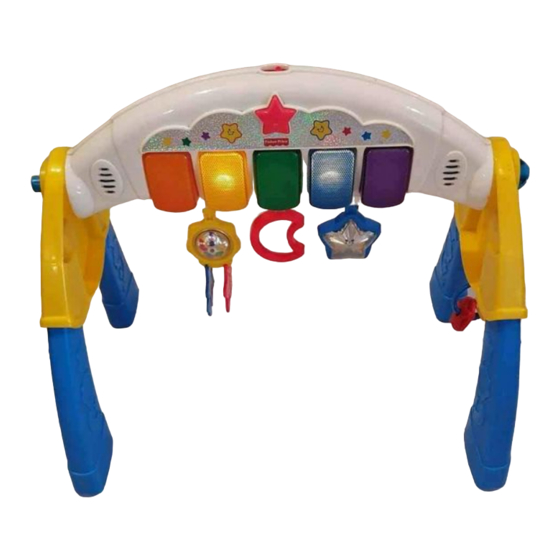
- Page 1 71970 Instructions Baby's Gym Toddler's First Piano Sparkling Symphony ™...
- Page 2 To prevent entanglement injury, NEVER place gym or suspend links in crib or playpen. NEVER add strings, ties or other products to the gym. • Please keep this instruction sheet for future reference, as it contains important information • Adult assembly is required. •...
-
Page 3: Battery Replacement
Battery Replacement Battery Compartment Door For best performance, we recommend replacing the batteries that came with this toy with three, new alkaline “AA” (LR6) batteries. • Locate the battery compartment on the arch. • Loosen the screws in the battery compartment door with a Phillips screwdriver and remove the door. -
Page 4: Battery Safety Information
Battery Safety Information SHOWN ACTUAL SIZE Batteries may leak fluids that can cause a chemical burn injury or ruin your toy. To avoid battery leakage: • Do not mix old and new batteries or batteries of different types: alkaline, standard (carbon-zinc) or rechargeable (nickel-cadmium). - Page 5 Make sure the buttons on the legs fit into the circular openings in the joints. • Repeat this procedure to attach the other threaded knob and two legs to the remaining joint. Baby Gym Hole Button Threaded Knob Joint...
- Page 6 • Turn the threaded knob clockwise to attach the leg assembly to the arch. Make sure the knob is fully tightened. • Repeat this procedure to attach the other leg assembly to the arch. Baby Gym Arch Leg Assembly Keys...
- Page 7 Select the appro- priate groove so that your baby can reach and activate sounds and lights! • Repeat this procedure to attach the other two hanging toys to the hanger. Baby Gym Upper Groove Groove T-End...
- Page 8 Note: To re-assemble this toy for use as a piano, simply turn the knobs on the leg assemblies counter-clockwise and remove the arch. Follow the instructions beginning on page 9, step 2. Baby Gym Magic Star •• for low volume and •...
- Page 9 Opening One-time Assembly • Position one of the joints front side up. • Position a threaded knob with the peg side down. • Insert and snap the threaded knob into the upper hole in the joint. • Insert a right and left leg (marked R or L on each leg) into the slots on the joint.
- Page 10 Threaded Knob • Position the arch so that the keys are upright. • Fit one end of the arch to the threaded knob on a leg assembly. • Turn the threaded knob clockwise to attach the leg assembly to the arch. Make sure the knob is fully tightened.
- Page 11 Toddler Piano Assembly Grooves • Fit the T-end of a hanging toy into either groove in either leg assembly. • Pull the hanging toy down to "snap" it into place. Star • Attach the stars to the leg assembly as shown. •...
- Page 12 Keys Volume Switch Volume Switch • Slide the power switch to keys to hear a part of a song and see a twinkling light. After the music stops, press another key to hear the next part of the song and see more lights.
- Page 13 • Wipe all parts of this toy with a clean cloth dampened with a mild soap and water solution. Never immerse this toy. • Keep this toy away from direct sunlight and other sources of heat. • This toy has no consumer serviceable parts. Do not take this toy apart.
-
Page 14: Consumer Information
® 1-800-432-KIDS (5437), 8 AM - 6 PM EST Monday through Friday. Hearing-impaired consumers using TTY/TDD equipment, please call 1-800-382-7470. Or, write to: Fisher-Price ® Consumer Relations, 636 Girard Avenue, East Aurora, New York 14052. For countries outside the United States: CANADA: Questions? 1-800-567-7724. -
Page 15: Fcc Note (United States Only)
FCC Note (United States Only) Note: This equipment has been tested and found to comply with the limits for a Class B digital device, pursuant to Part 15 of the FCC Rules. These limits are designed to provide rea- sonable protection against harmful interference in a residential installation. - Page 16 Fisher-Price, Inc., a subsidiary of Mattel, Inc., East Aurora, NY 14052 U.S.A. ©2004 Mattel, Inc. All Rights Reserved. ® and ™ designate U.S. trademarks of Mattel, Inc.