Salus 091FLRF User Manual
Programmable room thermostat with rf (volt free)
Hide thumbs
Also See for 091FLRF:
- Quick manual programming (2 pages) ,
- Quick manual (2 pages) ,
- Quick start manual (2 pages)
Table of Contents
Advertisement
Advertisement
Table of Contents

Related Manuals for Salus 091FLRF


Summary of Contents for Salus 091FLRF
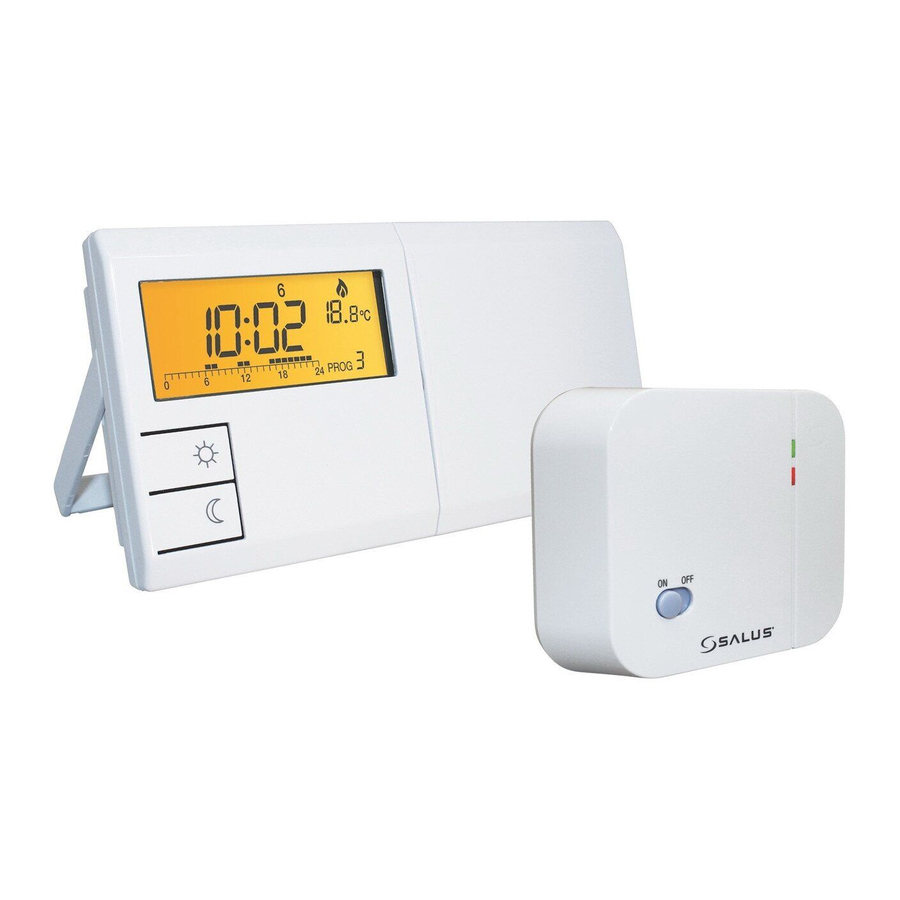
- Page 1 User’s Manual Programmable Room Thermostat with RF (Volt Free) Model 091FLRF...
-
Page 3: Installing & Wiring The Receiver
INTRODUCTION This thermostat can replace most common residential thermostats and is designed to be used with electric, gas or oil heating control systems. Unlike ordinary single unit design thermostats, this is a new type of thermostat separating the operational functions into two units. The Receiver serves for wiring connections and heat on/off control. - Page 4 ) of this manual before deciding on a final location for the receiver and control centre units. 4) The Receiver should be mounted in a suitable location that is both accessible for the connection of mains and control wiring, and allows good reception of the RF signal.
- Page 5 The wiring terminals and RF Address Code setting DIP switches are located on the rear of the Receiver, as shown in this picture:...
- Page 6 Multiple Thermostat Installations Please note, if using more than one Receiver in the same installation, be sure that there is at least a 1 metre gap between receiver units to avoid RF interference. When installing multiple thermostats you should ensure that you assign different address codes for each Receiver following the ‘RF Address Code Setting’...
- Page 7 RF Address Code Setting If there is another user nearby, e.g. in the next house, your receiver may be fault triggered by their transmitter. You may select a different RF address code to prevent this. The receiver can only respond to RF transmissions with the same address code setting as its own address code.
- Page 8 Address Code Dip 1 2 3 4 5 Switch Leavers. 1 2 3 4 5 Factory Defaut Setting Dip switch 1 - 5 in On position.
- Page 9 TESTING THE RF TRANSMISSION It is important to site the Receiver and Control Centre in locations where the RF signal cannot be interrupted. The receiving range between Control Centre and Receiver is 60M in open area. Many factors can affect the RF transmission, shortening the operating distance e.g.
- Page 10 INSTALLAING THE CONTROL CENTRE Select a suitable location for the control centre. The location of the control centre can greatly affect its performance. If it is located where air circulation cannot reach, or exposed to direct sun light, it will not adjust the room temperature properly.
- Page 11 USING YOUR NEW CONTROL CENTRE The following procedures show how to operate the control centre. It is recommended that you follow the instructions and try to operate once before connecting it to the heating or cooling system. 1, Start There is a sliding door on the right half of the thermostat. If you open the door, you can see some buttons.
- Page 12 Note: I, Temperature may not be 20°C as the diagram shown and the Output-On indicator may activate after a few seconds, depending on different situations. II, Do not use a pencil to push the reset button. The graphite residue of a pencil can cause a short circuit and damage the control centre.
-
Page 13: Manual Override
Temperature mode You can see ☼ and on both the buttons and the LCD. ☼ means comfort temperature and means economy temperature. These two temperatures are user changeable. Furthermore, there is a fixed defrost temperature (7°C) indicated by on the LCD. Throughout the operation of the thermostat we will refer to them as comfort, economy or defrost temperature instead of numeric values. - Page 14 2, Set day/time To set day, press d. Similarly, press h to set hour and m to set minute. Buttons used: Example: When start or after reset, the time is 00:00, Sunday. To set the clock to current time (e.g., 11:23, Tuesday), press d for day, h for hour and m for .
- Page 15 3, View/Change temperature Press Temp, and the thermostat enter View/Change temperature mode. The LCD will show the setting of the current temperature mode (☼, or ) which will be flashing. Press ☼ or to review or change the temperature. Press OK to directly return to normal operation mode.
- Page 16 IV,To review economy temperature, V, You can press key again to press : set the economy temperature, or press OK to return to normal operation mode. Note: I, The temperature setting range is 5° to 30°C. II, To lower the setting, enter View/Change temperature mode and press ☼...
- Page 17 4, Manual Override Press ☼ to select comfort temperature. Press to select economy temperature. The current temperature mode will be overrode until the next set point of the program comes. Press OK to clear override. Buttons used : Example: The temperature is now set to I, In normal operation mode, economy mode.
- Page 18 Time hold Timer hold is an alternative to manual override. Press and hold ☼ (or ) key for few seconds, the hold time will appear. Press the key again to set the hold time. Press OK to return to normal operation mode.
- Page 19 III, Press OK or just leave no key Note: pressed, the thermostat will I, A ‘hand’ appears when the return to normal mode current temperature mode is being overrode. II, The setting will change rapidly by pressing and holding the keys.
- Page 20 PROG 0 Program 0 is a special program. It will set the whole day to defrost PROG 1 temperature (7°C). (If cooling PROG 2 mode is selected, it will turn off the system. See Part 8, PROG 3 Controlling a cooling system.) PROG 4 Program 1,2, 3 and 4 are some typical schedules of a day.
- Page 21 IV, N o w y o u c a n s e t t h e time shown to economy temperature by pressing , or press ☼ to set it to comfort temperature. Or you can use h key to pass through the time without changing the setting.
- Page 22 V, Press h or ☼ to move the Note: flashing point to 19;00: I, Program 0, 1, 2, 3, 4, 5 are preset programs. ☼ and cannot be used to edit them. But the h key is still active. II, The nine programs are common to all seven days.
-
Page 23: Reset Button
6, Reset button There is a small hole at the right of the OK key. This is the reset button. Pressing it can reset the thermostat into initial status: Time – 00:00:00; Day – Sunday; Temperature – Comfort: 19°C, Economy: 15°C; Programs – All seven days set to PROG 1; User- define programs –... - Page 24 7, Selections of Heat/Cool, 5 min Delay Off/On Span 0.5/1s Press OK button for approximate 5S for these selections Heat Mode : Heat icon flashing, press OK to confirm Heat mode or press Comfort or Econmic, then press OK to change to Cool mode. To select whether a heating or a cooling system to be controlled.
- Page 25 Span is the temperature difference between the turn on temperature and turn off temperature. 0.5ºC or 1ºC of span can be selected and the effect is summarized in the following table: Span Heating System Cooling System Tr<=Ts-0.2 Tr>=Ts+0.2 when..0.5°C Tr>=Ts+0.2 Tr<=Ts-0.2 when..
- Page 26 1 x Control Centre 4 x #6 x 1” screws 4 x wall anchors 1 x drilling template 1 x user manual 2 x AA alkaline batteries Salus Controls plc Salus House, Dodworth Business Park South, Dodworth, Barnsley, S75 3SP Web: www.salus-controls.eu...
- Page 27 Specification Switch Rating : Volt free 230V AC 10 (5)A max Power Supply : 2 x AA size Alkaline batteries Operating Temperature : 0˚C - 40˚C Temperature Setting Range : 5˚C - 30˚C in 0.5˚C steps Storage Conditions : -20˚C - 60˚C to 90% RH/non condensing Frost Protection Temperature : 7˚C Temperature Control...