Table of Contents
Advertisement
Owner's Manual
Thank you, and congratulations on your choice of the BOSS
BR-532 Digital Studio.
Before using this unit, carefully read the sections entitled:
• USING THE UNIT SAFELY (page 2–3)
• IMPORTANT NOTES (page 4–5)
These sections provide important information concerning
the proper operation of the unit.
Additionally, in order to feel assured that you have gained a
good grasp of every feature provided by your new unit,
Owner's manual should be read in its entirety. The manual
should be saved and kept on hand as a convenient reference.
Printing Conventions in This Manual
• Text or numerals enclosed in square brackets [ ] indicate buttons.
[START]
START button
[REC]
REC button
• Reference such as (p. **) indicate pages in this manual to which
you can refer.
Copyright © 2001 BOSS CORPORATION
All rights reserved. No part of this publication may be reproduced in any form
without the written permission of BOSS CORPORATION.
Advertisement
Table of Contents

Related Manuals for Boss Digital Studio BR-532


Summary of Contents for Boss Digital Studio BR-532
- Page 1 Owner’s Manual Thank you, and congratulations on your choice of the BOSS BR-532 Digital Studio. Before using this unit, carefully read the sections entitled: • USING THE UNIT SAFELY (page 2–3) • IMPORTANT NOTES (page 4–5) These sections provide important information concerning the proper operation of the unit.
- Page 2 USING THE UNIT SAFELY symbol alerts the user to important instructions Used for instructions intended to alert or warnings.The specific meaning of the symbol is the user to the risk of death or severe determined by the design contained within the injury should unit...
- Page 3 108b • In households with small children, an adult • Before moving the unit, disconnect the AC should provide supervision until the child is adaptor and all cords coming from external capable of following all the rules essential for the devices.
-
Page 4: Important Notes
IMPORTANT NOTES 291a In addition to the items listed under “USING THE UNIT SAFELY” on page 2–3, please read and observe the following: Power Supply: Use of Batteries Additional Precautions • Do not use this unit on the same power circuit with any •... - Page 5 • Do not use this unit for purposes that could infringe on a copyright held by a third party. Roland/BOSS assumes no responsibility whatsoever with regard to any infringe- ments of third-party copyrights arising through your use...
-
Page 6: Table Of Contents
Contents IMPORTANT NOTES ....................4 Introduction to the BR-532 ..................11 Features..................................11 Memory cards supported by your BR-532 ......................13 Remove the Card Cover ............................. 13 Panel Descriptions....................14 Front Panel ................................... 14 Display ..................................18 Rear Panel..................................19 Inserting batteries................................ - Page 7 Contents Advanced Use ..........37 Repeating Playback—Repeat ................. 38 Setting the repeat portion............................38 Setting the repeat portion with accurate timing ..................... 39 Recording an additional performance while listening to an existing performance—Overdubbing ................... 40 Changing the position of the input sound....................... 40 Putting multiple tracks together—Bouncing............
- Page 8 Operating MMC-compatible devices with the BR-532 ................70 Mixing the output from an external MIDI device with the output from your BR-532 (AUDIO SUB MIX) ........... 72 Displaying the song information ................73 Displaying the remaining available recording time ....................73 Displaying the memory card usage..........................
- Page 9 Voice Transformer ............................95 Rhythm Guide Style/Pattern List ................96 Style ....................................96 Preset Pattern ................................97 Practical applications of the BR-532 ..............98 Reducing card memory use when creating songs....................98 When the same phrase is repeated....................... 98 Saving patterns ............................... 98 Optimizing...............................
- Page 10 Contents How to use the Rhythm Guide ..........................100 Changing the development of the song ....................100 Inserting a one-measure count to synchronize the start of the song with an external device ..101 Recording using an external sound source ......................101 Backing up a song ....................
-
Page 11: Introduction To The Br-532
Introduction to the BR-532 Features Simple operation The BR-532 is designed to be operated as easily as a cassette What are V-Tracks? tape recorder, even by beginners. Whether you are simply preparing a demo tape, or are Each track consists of eight virtual tracks, and you can getting ready to go to master with your first album, the choose any one of these tracks for recording or playback. - Page 12 Two versatile digital effects processors Quick movement to a point The BR-532 contains two types of effect units. One type is for You can assign a marker to any point in a track that you wish recording (insert effect) and the other type is independent (locator function).
-
Page 13: Memory Cards Supported By Your Br-532
The BR-532 uses SmartMedia cards as the storage media for coin or screwdriver. recording and playback. fig.00-10 The BR-532 uses 16 to 128 MB SmartMedia cards with a 3.3 V power supply. SmartMedia cards are available at your nearest computer or digital camera shop. -
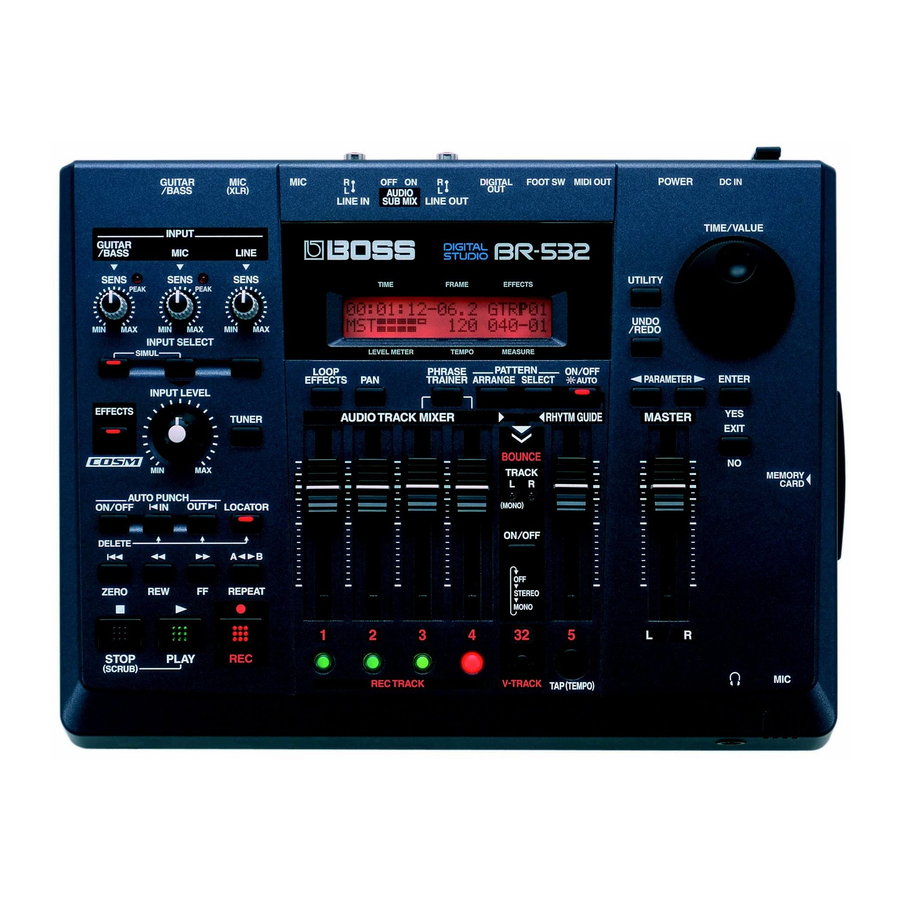
Page 14: Panel Descriptions
Panel Descriptions Front Panel fig.00-02 PEAK (clip) indicator GUITAR/BASS: For selecting either guitar or bass use of the GUITAR/ This indicator shows how strong the input level is at the BASS jack. various input jacks (e.g., GUITAR/BASS and MIC). MIC: For selecting either the MIC jack when a microphone is connected, or the internal microphone. -
Page 15: Repeat Button
Panel Descriptions EFFECTS button LOCATOR button Use this button to turn on and off the insert effects (p. 31) or Use this button to store any location that you desire. Then, by call up the screen for editing the various settings. pressing this button, you can automatically move to that stored location. -
Page 16: Master Fader
(p. 42). 17 MASTER fader Controls the overall volume of the BR-532. 22 PHRASE TRAINER button Use this button to perform the settings for the phrase trainer 18 REC TRACK (Recording Track) function. -
Page 17: Headphones Jack
For undoing the last-performed recording or editing operation and returning the data to its previous state. By This microphone can be used for recording with the BR-532. pressing this button once again, you can bring back the canceled recording or re-execute the editing operation. (p. 58) Turning off the internal microphone (p. -
Page 18: Display
Select the level meter to be displayed (p. 30) drop).This is one type of a specification known as MTC (MIDI Time Code), and when you use the BR-532 to play in TEMPO synchronization with another MIDI device, you will need to set both devices to the same MTC type. -
Page 19: Rear Panel
POWER switch With INPUT SELECT set to a setting other than LINE, and AUDIO SUB MIX turned on, the signal is mixed and output This is the power switch. It turns the power of the BR-532 to LINE OUT. on/off. -
Page 20: Inserting Batteries
11 Cord Hook Wrap the cable around this hook so that the AC adaptor 1. Make sure that the power of the BR-532 is turned off. cable is not pulled out accidentally. 2. Remove the battery cover on the rear panel. -
Page 21: Quick Start
Quick Start... -
Page 22: Listening To The Demo Song
Listening to the Demo Song (1) Connecting peripheral devices Make connections as shown in the diagram below. When making any connections, make sure that all devices are turned off. fig.Q01-01 Electric Guitar Electric Bass Rhythm Machine etc. CD Recorder etc. AC Adaptor (PSA-series) CD Player etc. - Page 23 Listening to the Demo Song * When using the FS-5U foot switch (sold separately), set the polarity switch as shown below. If the polarity switch is not set To prevent malfunction and/or damage to speakers or correctly, the foot switch may not operate properly. other devices, always turn down the volume, and turn fig.Q01-04a off the power on all devices before making any...
-
Page 24: Turn On The Br-532
532 is turned on (see below). completely lowered? fig.Q01-06b Is the memory card inserted? * The BR-532 is shipped with a memory card already inserted in the slot. 2. Turn off the AUDIO SUB MIX switch on the rear panel. fig.Q01-05a * You can set the BR-532 so that the remaining recording time is displayed during recording. -
Page 25: Listening To The Demo Songs
If you have changed the recording or editing In addition to the procedures given above, you can also change Since the BR-532 automatically updates the recorded your current position in the song using the procedures given data and operation content if the recording or editing below. -
Page 26: Changing The Current Position
Listening to the Demo Song Changing the current position Elapsed time display The value given at “TIME” in the display shows the elapsed time into the song using MTC (MIDI time codes) and is expressed as follows: hours-minutes-seconds-frames-sub frames. The time code specifications can differ depending on the device. -
Page 27: Recording/Playing Back A Song
Before inserting the memory card (SmartMedia), be sure to first turn off the BR-532. If a memory card is inserted when the power is turned on, the data in the memory card may be destroyed, or the memory card may become 4. -
Page 28: Select The Song To Record
Normally you should select this type. * The BR-532 uses a sample rate of 44.1 kHz. It is not possible to change the sample rate. STANDARD (LV1): 4. Press [ENTER]. -
Page 29: Connecting Instruments
Your BR-532 is equipped with a number of input jacks to Select the input source to record. The indicator of the selected match the type of instrument that you will connect. Select an button will light. -
Page 30: Turning Off The Internal Microphone
Recording/playing back a song Turning off the internal microphone Switching the LEVEL METER To use only the microphone connected to the MIC jack, you Switch the input or output indicated by the LEVEL METER. must first turn off the internal microphone. 1. -
Page 31: Using Insert Effects
P: Preset Patch What is an insert effect? U: User Patch An effect added directly to a specific signal (with the BR-532, S: Song Patch this refers to the instrumental sounds from an INPUT jack) is If effects are turned off (the EFFECTS indicator is off) called an “insert effect.”... -
Page 32: Using The Rhythm Guide
Recording/playing back a song (5) Using the rhythm guide Changing the Rhythm Pattern When you record, it is convenient to use the built-in rhythm guide. 1. Press [PATTERN SELECT]. fig.Q01-23a By using the rhythm guide during recording, you can use the track editor to edit in units of measures, synchronize outputs with an external device, and perform other useful operations. -
Page 33: Tapping To Change The Tempo
Recording/playing back a song Tapping to change the tempo You can determine the tempo by the timing with which you press [TAP]. You set rhythm patterns so that the tempo changes to Tap on [TAP] four or more times to change the tempo of the match the song's progression (p. -
Page 34: Recording Operations
“DOUBL’N” loop effect, you can achieve the 2. Press [REC]. doubling effect even on monaural recordings on single [REC] flashes in red and the BR-532 enters the recording tracks for more efficient use of your track space. standby state. -
Page 35: Playing Back Recorded Music
Use the TRACK faders to adjust the volume separately for each track. (8) Turning off the power Before you turn off the BR-532, make sure to first stop any recording. If the BR-532 is turned off during playback, recording, or any other process where the memory card is being accessed, the recorded data, mixer settings, and effect patch data may be lost. -
Page 36: Conserving Battery Power (Power Save)
TIME/VALUE dial on the BR-532 is used for a certain appears. amount of time, the BR-532 will enter the standby state and turn off the display backlight and button indicators. Also, when in the standby state, the display will appear as shown below. -
Page 37: Advanced Use
Advanced... -
Page 38: Repeating Playback-Repeat
Repeating Playback—Repeat By using the “Repeat function ” you can repeatedly play fig.R01-01a Repeat back a specified part. Repeating playback allows you to check the mixing balance or perform loop recordings with the punch in/out functions (p. 48). Time The position in the song where [REPEAT] is pressed first becomes repeat start point (A), and the position where it is Repeat Start Repeat End... -
Page 39: Setting The Repeat Portion With Accurate Timing
Repeating Playback—Repeat Setting the repeat portion with accurate timing Normally, the repeat start and end points are registered at the exact position where [REPEAT] is pressed. This may make it difficult for you to set the repeat portion exactly as you desire. -
Page 40: Recording An Additional Performance While Listening To An Existing Performance-Overdubbing
3. Press [REC]. 4. Press [EXIT] (or [PAN]) to return to the Play page. [REC] flashes in red and the BR-532 enters the recording standby state. By panning the track that you are playing back to the left 4. -
Page 41: Putting Multiple Tracks Together-Bouncing
Although the BR-532 allows the simultaneous playback of The [INPUT SELECT] indicator goes out, and the four tracks, when you run out of tracks, the BR-532 also lets input source is automatically muted. This prevents you copy the recordings of multiple tracks together onto one the input source from being mixed in and recorded track (V-Track). -
Page 42: Finishing Up The Song-Mix Down
When mixing down, you must first perform the final settings such as adjusting the sound tone, sound positioning In the mixer block of the BR-532, chorus, doubling, and (pan), and volume balance, and finish up the song. reverb are provided as loop effects.By using these you can add spaciousness to the sound. -
Page 43: Mixing Down
Disabling digital copying After playing the song back and checking the sound, setting You can set the BR-532 so that when data is mixed down the pan and loop effects, and adjusting the volumes of the digitally (i.e., to a DAT recorder), the mixed down data on various tracks, it is time to mix the tracks down. -
Page 44: Changing V-Tracks
V-Tracks for recording or playback. Therefore, by making use of the many V-Tracks, you can use the BR-532 just as if it were a 32-track multitrack recorder. This allows a wide range of uses, such as recording one take of a guitar solo or vocal, and then recording another take without having to erase the first one. -
Page 45: Re-Recording Only A Mistake-Punch-In/Out
. using the button on the BR-532. If this is the case, you can use Therefore, punch in at the location where you want to begin a separately sold foot-switch (BOSS FS-5U, Roland DP-2, etc.) -
Page 46: Manually Punching In And Out Using A Foot Switch
Specifying the area for recording etc.) to punch in and out, connect the foot switch to the FOOT SW jack on the BR-532 and change the function of the Before you begin recording, you must register the locations FOOT SW jack by following the procedure given below. -
Page 47: Erasing A Registered Auto Punch In/Out Location
Re-recording only a mistake—Punch-in/out 6. Press [REC] to place the BR-532 in recording standby and then press [PLAY]. If you want to punch in/out at a locator point, press Recording automatically starts at the auto punch-in [LOCATOR] to move to the locator point, and press location, so start playing what you want to record. -
Page 48: Repeatedly Recording Over The Same Location (Loop Recording)
Re-recording only a mistake—Punch-in/out Repeatedly Recording Over the How to Record Same Location (Loop Recording) As an example of use, the explanation below assumes you are using the auto punch in/out to re-record a portion of The repeat function (p. 38) allows you to play a certain track 1, which is a track to which you have already recorded. -
Page 49: Registering Time-Locator Function
Registering time—Locator Function Registering a locator point Using the locator function, you can register any desired time in a song as a “locator point ” so that you can jump to that point later with just the press of a button. 1. -
Page 50: Editing The Performance On A Track (Track Editing)
Editing the performance on a track (Track Editing) Copying recorded data The BR-532 allows you to edit your songs by performing editing functions such as copying and moving data recorded (Track Copy) on the tracks. Track Copy allows you to copy a specific part of recorded data and then place it in a different location. -
Page 51: Copying By Specifying The Time (Time/Mes)
Editing the performance on a track (Track Editing) Copying by specifying the time 1. Press [UTILITY]. (TIME/MES) 2. Press PARAMETER [ ] to move the cursor to “TRK,” and press [ENTER]. Perform the procedure given below to copy the portion fig.R08-02 between specific times. -
Page 52: Copying A Complete Track (All)
Editing the performance on a track (Track Editing) Copying a complete track (ALL) 7. Press PARAMETER [ ] to move the cursor, and turn the TIME/VALUE dial to specify the Perform the procedure given below to copy the complete beginning of the portion of data you want to copy. recorded data from one track to another. -
Page 53: Moving Recorded Data (Track Move)
Editing the performance on a track (Track Editing) Moving recorded data 4. Turn the TIME/VALUE dial to select “AB” and press [ENTER]. (Track Move) fig.R08-14 Track Move allows you to move a specific portion of recorded data to a different location. After the recorded data is moved, the location it was in will 5. -
Page 54: Moving A Complete Track (All)
Editing the performance on a track (Track Editing) 1. Press [UTILITY]. 12. When you are ready to execute the move, press [ENTER]. The display will ask “Are you sure?,” so that you can 2. Press PARAMETER [ ] to move the cursor to confirm the operation. -
Page 55: Erasing Recorded Data (Track Erase)
Editing the performance on a track (Track Editing) Erasing recorded data 7. Press PARAMETER [ ] to move the cursor, and turn the TIME/VALUE dial to specify the time of (Track Erase) the beginning of the location where you want the data to be moved. -
Page 56: Erasing By Specifying The Time (Time/Mes)
Editing the performance on a track (Track Editing) 6. When you are ready to execute the erasure, press [ENTER]. 7. Press PARAMETER [ ] to move the cursor, and turn the TIME/VALUE dial to specify the The display will ask “Are you sure?,” so that you can beginning of the portion of data you want to erase. -
Page 57: Exchanging Recorded Data (Track Exchange)
Editing the performance on a track (Track Editing) Exchanging recorded data 4. Turn the TIME/VALUE dial to select “ALL” and press [ENTER]. (Track Exchange) fig.R08-25 Perform the procedure given below to exchange the recorded data between two tracks. Example: exchanging all the data on track 1 with all the 5. -
Page 58: Canceling A Recording Or Editing Procedure-Undo/Redo
Canceling a recording or editing procedure—Undo/Redo Reversing the last operation Occasionally when the recording you make may not turn out as you wish, or the settings you make for an editing —Undo operation are incorrect, and you want to reverse what you have done. -
Page 59: Organizing The Songs You've Recorded
Organizing the songs you’ve recorded Copying a Song (Song Copy) Erasing songs (Song Erase) Follow the procedure below to copy a song from the memory Follow the procedure below to erase a song from the card. memory card. 1. Press [UTILITY]. 1. -
Page 60: Saving Memory On The Memory Card (Song Optimize)
(replace) actually remains on the memory which. With your BR-532, you can use “Song Name” to give card. In some cases, this unwanted data may occupy a each song a name, which helps you manage and organize significant amount of space on the memory card. -
Page 61: Formatting The Memory Card-Initialize
Doing so can destroy the data on the memory card and/or render the * If you format the memory card supplied with the BR-532, the memory card itself unusable. demo songs on the card will be lost. -
Page 62: Using The Rhythm Guide
Using the Rhythm Guide Your BR-532 comes equipped with a built-in “Rhythm Guide.” The Rhythm Guide greatly increases the functionality of your BR- 532 by providing features such as those given below. A rhythm pattern (called “Pattern” on the BR-532) that When bouncing tracks (see p. -
Page 63: Creating Patterns
* You cannot set a starting measure that is beyond the starting is set (p. 64). measure of the next step. 1. With playback stopped on the BR-532, press Style [PATTERN ARRANGE]. Select a style that is suitable for the kind of music you are The Step Entry screen appears. -
Page 64: Inserting A Step
Using the Rhythm Guide 6. Set the final step style as “BREAK.” * In case BREAK is not set, the pattern keeps playing back at the The patterns you create are only temporary. If you final step. return to the Play screen without saving a pattern, and press [PATTERN SELECT] to display the Pattern Selection screen, the pattern is given the name “TMP.”... -
Page 65: Deleting All Steps
Using the Rhythm Guide Saving the pattern 1. Press PARAMETER [ ] repeatedly to move the cursor to “ERS.” fig.R12-08 With the Step Entry screen or Drum Kit Selection screen displayed, perform the procedure given below. 1. Press PARAMETER [ ] repeatedly to move the cursor to “WRITE”... -
Page 66: Selecting A Pattern
Using the Rhythm Guide Selecting a pattern 6. Press [PATTERN ARRANGE] or [EXIT] to return to the Follow the procedure given below to select the pattern to play with the rhythm guide or the pattern for which you Play screen. want to change the settings. -
Page 67: Synchronizing With Midi Devices
When you wish to connect two MIDI devices, you should compare their charts to see which types of MIDI message can be conveyed between them. * For more details about MIDI of the BR-532, please refer to “MIDI Implementation” (p. 111). -
Page 68: Using An External Midi Sound Module To Play The Rhythm Guide
The sounds produced by the rhythm guide and their 1. Use a MIDI cable to connect the BR-532 and your MIDI corresponding note numbers are given below. sound module as shown in the diagram. -
Page 69: Synchronizing Playback With A Midi Sequencer
* When synchronizing with a MIDI sequencer, it is possible to synchronize the MIDI sequencer using the BR-532 (i.e., with the BR-532 as the master), but it is not possible to synchronize OFF: Synchronization signals will not be output. -
Page 70: Using Mmc
532 supports the MMC protocol. hand, in order to support NTSC color video, the drop By using MMC, your BR-532 can send commands such as format drops the first two frames of every minute PLAY, STOP, and FF to connected MIDI devices to operate excluding minutes 10, 20, 30, 40, and 50. - Page 71 MMC will not be transmitted. OFF: MASTER: MMC information is sent. The BR-532 becomes the master of the external MIDI instrument. * For details on the MMC functionality supported by the BR- 532, read “MIDI implementation” (p. 111).
-
Page 72: Mixing The Output From An External Midi Device With The Output From Your Br-532 (Audio Sub Mix)
Also, since you can output the signal from the MIDI device without having to first record it to a track on the BR-532, you can use the BR-532 tracks more Even when the AUDIO SUB MIX switch is turned on, if effectively. -
Page 73: Displaying The Song Information
Displaying the song information Displaying the remaining Displaying the memory card available recording time usage Follow the procedure below to either display the elapsed Follow the procedure below to display the current condition recording time or the remaining available recording time in of the memory card being used. -
Page 74: Search For The Music's Start And End (Scrub/Preview)
1. Hold down [STOP] and press [PLAY]. To enable you to find these points accurately, the BR-532 is The [PLAY] indicator begins flashing and scrubbing equipped with the Scrub Function. When you use the Scrub starts. -
Page 75: Changing The Scrub Points
Search for the music’s start and end (Scrub/Preview) Changing the scrub points Using Scrub and Preview to find the music ending point You can set either the point before or after the current position as the scrub point. Enabling the Preview Function Follow the procedure given below to change the scrub point. -
Page 76: Tuning An Instrument-Tuner
Tuning an instrument—Tuner The BR-532 has a built-in “chromatic tuner function” that allows you to tune your instrument quickly. The built-in tuner supports both guitar and bass guitar. As an example, here is the procedure to tune the guitar. Changing to the tuner Tuning 1. -
Page 77: Setting The Reference Pitch Of The Tuner
“A” key at the center of a piano keyboard) from the instrument that serves as the reference pitch during performances (e.g., piano). On the BR-532, you can set the reference pitch of the tuner to any value between 435 and 445 Hz. You may change the setting as needed. -
Page 78: Copying Difficult Songs-Phrase Trainer
1. Record the song you want to copy onto tracks 3 and 4. 1. Press [PHRASE TRAINER] to make the indicator light. For how to record with the BR-532, refer to “Recording” fig.R17-02 (p. 33). -
Page 79: Using The Insert Effects
“effect patches.” The preset patches contain preset data. Their settings can be Your BR-532 comes equipped with a number of preset effect changed, but you cannot create a new preset patch. patches for use with vocals and instruments. These are... -
Page 80: Editing Insert Effect Settings
Using the insert effects Editing insert effect settings 4. Press PARAMETER [ If you wish to create a new effect sound, you should first ] to move the cursor to select an existing patch that is closest to the sound you want, each effect and turn the TIME/VALUE dial to turn each and then edit its settings. -
Page 81: Saving Insert Effects Settings (Write)
* You cannot save an effect patch during the recording or order. playback of a song. Your BR-532 allows you to change where insert effects are 1. Entering the patch name. connected. Follow the procedure below to change where insert effects are connected. -
Page 82: Using The Loop Effects
Using the loop effects Here is an explanation of how to change the various parameters for the loop effects (chorus/doubling/reverb). Loop effects do not have “patches.” Loop effect settings are saved along with the song data. For an explanation of loop effects, refer to “What is a loop effects?”... -
Page 83: Initializing The Br-532'S Settings
Initializing the BR-532’s settings Initializing all the BR-532’s settings Initializing the system settings 1. Press [UTILITY]. Follow the procedure below to initialize the system parameters. 2. Press PARAMETER [ ] to move the cursor to “INI,” and press [ENTER]. fig.00-50 A list of the initial settings for each parameter is given in the “Parameter List”... -
Page 84: Initializing The Effect Settings
Initializing the BR-532’s settings Initializing the effect settings Initializing the Rhythm Guide User patterns Follow the procedure below to initialize the effect parameters. This initializes the Rhythm Guide User Patterns 1–4. After initialization, the metronome is set. A list of the initial settings for each parameter is given in 1. -
Page 85: Appendices
Appendices Loop Effect Parameter Functions CHORUS/DOUBL’N/REVERB <When “CHORUS” is selected> You can select either chorus, doubling, or reverb. Effect Type Rate (0–100) This sets the type of the effect. Adjusts the rate of the Chorus effect. CHORUS: Depth (0–100) A sound with a subtly shifted pitch is added to the direct Adjusts the depth of the Chorus effect. -
Page 86: Insert Effect Algorithm List
Insert Effect Algorithm List The algorithms that can be used as an insert effect are shown below. The algorithms that can be selected will differ for each bank. To select the algorithm that you wish to use, first select the effect bank that includes that algorithm, and then refer to “Effect Patch List”... -
Page 87: Acoustic Guitar
Insert Effect Algorithm List 4. ACOUSTIC GUITAR BANK: MIC This is a multi-effect designed for acoustic guitar. Even when 7. VOCAL MULTI an electric-acoustic is connected at line level, this provides a warm sound similar to what is obtained through a This is a multi-effect designed for vocals. -
Page 88: Bank: Line
Insert Effect Algorithm List BANK: LINE BANK: SIMUL 9. STEREO MULTI 11. VO+GT.AMP This algorithm connects seven types of effect, all in full This algorithm is for use when simultaneously recording a stereo. vocal and electric guitar. For the guitar, you can produce an amp sound using a preamp and speaker simulator. -
Page 89: Insert Effect Parameter Functions
Insert Effect Parameter Functions Acoustic Guitar Simulator Acoustic Processor This simulates the sound of an acoustic guitar. It allows you With this feature, you can change the sound from a pickup to use an electric guitar to produce sounds similar to those of on an electric-acoustic guitar into a richer sound, similar to an acoustic guitar. -
Page 90: Compressor
Insert Effect Parameter Functions Defretter Depth (0–100) Adjusts the depth of the Chorus effect. This simulates a fretless bass. Pre Delay (0.5–50.0 mS) Effect On/Off (OFF, ON) Adjusts the time needed for the effect sound to be output This parameter turns the defretter effect on/off. after the direct sound has been output. -
Page 91: Doubling
Insert Effect Parameter Functions Feedback (0–100) Low Mix Level (0–100) This parameter adjusts the amount of feedback. Changing Adjusts the amount of phase-shifted sound of the lower the amount of feedback causes the number of times the range that is to be mixed with the input. delayed sound is repeated to change as well. -
Page 92: Flanger
Insert Effect Parameter Functions Level (-20–+20 dB) Tuning (0–100) This is a parameter for “RADIO.” It simulates the sounds This parameter adjusts the volume after the equalizer stage. that occur when you adjust the tuning frequency of an AM radio. Flanger Wow Flutter (0–100) The flanger effect gives a twisting, jet-airplane-like character... -
Page 93: Pitch Shifter
Insert Effect Parameter Functions Effect On/Off (OFF, ON) When the “COSM GUITAR AMP” or the “VO+GT.AMP” algorithm is selected This parameter turns the phaser effect on/off. JC-120: Rate (0–100) The sound of the Roland “JC-120” (Jazz Chorus 120), a This sets the rate of the Phaser effect. favorite of pro musicians around the world. -
Page 94: Speaker Simulator
(GUITAR AMP: 0–100, BASS AMP: -100–+100) This simulates the characteristics of various types of Adjusts the tone for the low frequency range. speakers. When the output of the BR-532 is connected directly to a mixer, etc., this can be used to create the sound Middle of your favorite speakers system (GUITAR AMP: 0–100, BASS AMP: -100–+100) -
Page 95: Tremolo/Pan
Insert Effect Parameter Functions Voice Transformer When the “COSM BASS AMP” algorithm is selected This controls the formants, allowing a variety of voice fig.S03-03 (BR-8-P.106) SP Simulator Speaker Well-matched Microphone characters to be created. This adds two voice characters with Cabinet Type Unit... -
Page 96: Rhythm Guide Style/Pattern List
Rhythm Guide Style/Pattern List Style Style Initial Beat Measure Name Tempo ROCK1 ROCK2 ROCK3 ROCK4 ROCK5 ROCK6 HdRck1 HdRck2 HdRck3 HdRck4 HdRck5 HEAVY1 HEAVY2 HEAVY3 HEAVY4 HEAVY5 POP1 POP2 POP3 POP4 POP5 POP6 POP7 POP8 BALLAD1 BALLAD2 BLUES1 BLUES2 BLUES3 BLUES4 R&B1 R&B2... -
Page 97: Preset Pattern
Rhythm Guide Style/Pattern List Preset Pattern Each of the preset patterns (except P.50 Metro) is set so that a three-measure BREAK, followed by V1 (verse) comes after the END (ending). Style Initial Beat Starting measure BREAK Drum Name Tempo ROCK1 ROOM ROCK2 ROOM... -
Page 98: Practical Applications Of The Br-532
Practical applications of the BR-532 Reducing card memory use when creating songs When the same phrase is repeated (Example 1) Creating a song using Preset No. 11: HdRck5 fig.S05-01 Verse Verse Verse Verse Verse Verse Verse Fill Verse Verse Intro... -
Page 99: Utilizing The V-Tracks
Practical applications of the BR-532 Utilizing the V-Tracks Mixing a song using four tracks In this manner, you can use the V-Tracks to check the sounds in all parts, and while leaving the source data as down to a single track is (see note), assemble all of the parts on a single track. -
Page 100: Lengthening A Portion Within The Song After Recording Is Finished
Practical applications of the BR-532 How to use the Rhythm Guide Lengthening a portion within the song after recording is finished Changing the development of the song (Example 4) Increasing the number of times a (Display is just a sample.) -
Page 101: Inserting A One-Measure Count To Synchronize The Start Of The Song With An External Device
1. When creating a rhythm guide, make Step 1 a virtual step and specify the appropriate style and form (such as 2. With the BR-532 as the master (p. 69), synchronize with the Metro setting). the external MIDI sequencer, and input the sound source’s output to LINE IN. -
Page 102: Backing Up A Song
Backing up a song When you insert a memory card (SmartMedia) into your BR-532 and turn it on, the folders and files shown below are created, inside which all data will be stored. If you are copying data from your memory card to a personal computer to back up the data, be aware of the items given below. -
Page 103: Troubleshooting
Troubleshooting If the BR-532 does not function as you expect, please check the following points before assuming that a malfunction has occurred. If this does not resolve the problem, contact a nearby Roland service center or your dealer. Problems with the sound... -
Page 104: Other Problems
Are you using a 5 V type SmartMedia card? If memory card data has been damaged, the following causes The BR-532 requires the use of 3.3 V type SmartMedia are possible. Please initialize the card once again. (p. 61) cards. -
Page 105: Error Messages
Cannot Change! This is at the Top! Solution: Turn off the BR-532, properly insert the Cause: You have attempted to modify the starting memory card, then turn the BR-532 back on. measure of step 1 at the Step Entry screen for the pattern. Power Down! Solution:... - Page 106 What is an event? Solution 2: Reduce the number of tracks that are being The smallest unit of memory used by the BR-532 to store recorded simultaneously. recorded results on disk is the event. A newly created Solution 3: Reduce the Data Type (STANDARD or song provides approximately 1,300 events per song.
-
Page 107: Parameter List
Parameter List (*1) If you want to save the settings as part of the currently selected song, hold down [STOP] and press [REC]. (*2) Stored in the BR-532. Mixer Parameter (*1) Parameter name Display Initial value Value Input Select GUITAR/BASS... - Page 108 Parameter List Rhythm Guide Parameter (*1) Parameter name Display Initial value Value Rhythm Guide Auto/On/Off OFF, AUTO, ON Pattern Pattern P01–50, SNG, U01–04 Song Parameter (*1) Parameter name Display Initial value Value Song Name Song Name SONG 0001 12 letters Data Type Data Type STANDARD(LV1)
- Page 109 Parameter List Even when [STOP] is held down and [REC] pressed, the settings for the Pattern Arrange parameters, and Insert Effect parameter (p.86) are not saved. Pattern Arrange Parameter Parameter name Display Initial value Value Step current setting 1–50 Beat current setting 1/1–8/1, 1/2–8/2,1/4–8/ 4, 1/8–8/8...
-
Page 110: Effect Patch List
Effect Patch List GTR (GUITAR/BASS) Patch Name Algorithm Patch Name Algorithm JC Clean COSM GTR AMP COMPRESSOR VOCAL MULTI Rock Lead COSM GTR AMP DE-ESSER VOCAL MULTI TW Clean COSM GTR AMP VOCAL EQ VOCAL MULTI TEXAS COSM GTR AMP KARAOKE VOX VOCAL MULTI Driven Lead... -
Page 111: Midi Implementation
Time Code type ll = Velocity : 01H - 7FH (1 - 127) * The time code types defined by the MIDI specification correspond to the BR-532 Sync Note Off parameter “MTC Type” as follows. If the MIDI parameter “Rhythm MIDI Ch.” is set to “1–16,” note numbers corresponding to MIDI specification setting “MTC Type"... -
Page 112: System Exclusive Message
* see ‘2. MIDI Machine Control’ section Byte Description Status of Exclusive Message Universal System Exclusive Message Realtime Header Device ID (7FH) MMC Command Message MMC RESET EOX (End of Exclusive Message) When powered on the BR-532 transmits as the device ID 7FH. - Page 113 41 | 29H || 73 | 49H || 105 | 69H | If the efficient Maker of the locate switch is pressed or when moved, the BR-532 transmits as 10 | 0AH || 42 | 2AH || 74 | 4AH ||...
- Page 114 MIDI Implementation MIDI Machine Control (MMC) Command, Information Field / Response Reference Commands Transmitted Command Action 01H STOP STOP 03H DEFERRED PLAY PLAY 06H RECORD STROBE REC / PUNCH IN 07H RECORD EXIT PUNCH OUT 0DH MMC RESET RESET 44H 01H LOCATE TARGET LOCATE...
-
Page 115: Midi Implementation Chart
MIDI Implementation Chart Date : Jun. 25, 2001 DIGITAL STUDIO MIDI Implementation Chart Model BR-532 Version : 1.00 Transmitted Recognized Remarks Function... Basic Default 1–16 Channel Changed 1–16 ************** Default Mode 3 Mode Messages Altered ************** Note 33, 34, 36, 37, 38, 39, 42, 44, 46... -
Page 116: Specifications
Specifications BR-532: Digital Studio Tracks Nominal Input Level (Variable) Track: 4 V-Track: 32 (8 V-Tracks per each Track) GUITAR/BASS jack: -24 dBu MIC (Phone/XLR) jack: -50 dBu * Up to 2 tracks can be recorded simultaneously, and up to 4... - Page 117 Specifications Current Draw 200 mA * Expected battery life under continuous use: Carbon: 2.5 hours Alkaline: 7 hours These figures will vary depending on the actual conditions of use. Dimensions 290.5 (W) x 220.5 (D) x 65.0 (H) mm 11-7/16 (W) x 8-11/16 (D) x 2-9/16 (H) inches Weight 1.8 kg/4 lbs (excluding batteries) Accessories...
-
Page 118: Index
Index Form ..................62–63 Format ................13, 27, 61 AB Quantize ................39 FRAME ..................18 AC Adaptor jack ..............19 Frame ..................26 Algorithm ................. 31 AUDIO SUB MIX ..............72 AUDIO SUB MIX switch ..........19, 24 GUITAR/BASS jack ..............19 AUDIO TRACK MIXER fader .......... - Page 119 Index Moving to the start ..............26 MT2 .................... 28 Sample Rate ................28 MTC ................... 69 Saving the pattern ..............65 Multitrack 2 ................28 SCRUB FROM ................74 Scrub Function ................. 74 Scrub Point ................. 74–75 Note Number ................68 SCRUB TO ................
- Page 120 Index Write-Protect ................61 ZERO button ................15...
- Page 121 MEMO..
-
Page 122: Track Sheet
Track Sheet... - Page 123 For EU Countries This product complies with the requirements of European Directive 89/336/EEC. For the USA FEDERAL COMMUNICATIONS COMMISSION RADIO FREQUENCY INTERFERENCE STATEMENT This equipment has been tested and found to comply with the limits for a Class B digital device, pursuant to Part 15 of the FCC Rules.
- Page 124 02673312 ‘01-9-A4-21N...
- Page 125 CORRECTIONS We are sorry that there are some mistakes in the BR-532 Owner’s Manual. Please correct them as follows. Page 27 Inserting the memory card Page 63 Creating patterns (Error) Add the following sentence: * The supplied memory card has a write-protect sticker (p. 61) When editing a preset pattern in order to create a new pattern affixed to it.