Sony Cyber-shot DSC-HX1 Instruction Manual
Hide thumbs
Also See for Cyber-shot DSC-HX1:
- Instruction manual (98 pages) ,
- Specifications (2 pages) ,
- Handbook (176 pages)
Table of Contents
Advertisement
Available languages
Available languages
Quick Links
Download this manual
See also:
Handbook
ON"_
4-132-0_9-61/1
Additional
information
on this product
and answers
to frequently
asked questions
can be found at our
Customer
Support
Website.
En la pSgina Web de atenci6n
al cliente puede
encontrar
inl_)rmacidn
adicional sobre este producto
y respuesta
alas preguntas
hechas con m_s
frecuencia.
http:llwww.sony.net/
_
rinted on 70% or more recycled paper using VOC
(Volatile Organic Compound)-free vegetable oil based
ink.
Impreso en papel reciclado en un 70% o ma.s utilizando
tinta hecha con aceite vegetal exento de compuesto
organico vola.til (COY).
Digital S till Camera
Camarafotografia digital
DSC-HX1
Instruction Manual ............................
Manual de instrucciones ..........
© 2009
Sony
Corporation
Printed in Japan
4 1 3 2 0 5 9 6 1 0
Advertisement
Chapters
Table of Contents

Related Manuals for Sony Cyber-shot DSC-HX1


Summary of Contents for Sony Cyber-shot DSC-HX1
- Page 1 Support Website. En la pSgina Web de atenci6n al cliente puede encontrar inl_)rmacidn adicional sobre este producto © 2009 Sony Corporation y respuesta alas preguntas hechas con m_s frecuencia. http:llwww.sony.net/ (Volatile Organic Compound)-free vegetable oil based rinted on 70% or more recycled paper using VOC ink.
- Page 2 • Do not handle damaged or leaking lithium inn batteries. • Be sure to charge the battery pack using a genuine Sony battery charger or a device that can charge the battery pack. • Keep the battery pack nut of the reach of small children.
- Page 3 Regulatory Information Declaration of Conformity RECYCLING LITHIUM-ION Trade Name: SONY BATTERIES Model No.: DSC-HX 1 Lithium-Ion batteries Responsible Party: Sony Electronics Inc. recyclable. Address: 16530 Via Esprillo, San Diego, CA 92127U.S.A. can help preserve environment by returning your Telephone No.: 858-942-2230...
- Page 4 Notice for the customers in the countries applying Directives The manulhcmrer of this prodnct is Sony Corporation, 1=7=1 Konau Minato=ku Tokyo, 108= 0075 Japan. The Authorized Representative EMC and product sali_ty is Sony Deutschland GmbH, Hedelfinger Strasse 61,7t)327 Stuttgart, Germany.
- Page 5 If you should lose the correctly, you will help prevent potentially Rise cover, please contact your nearest Sony negative consequences lilt the environment service station. human health which could otherwise be caused by inappropriate waste handling of the battery. The...
-
Page 6: Table Of Contents
Table of contents Notes on using the camera ............... Getting started ............Checking tne accessones supplied ......Identifying par_s ..................Charging the battery pacK ............... Inserting tne battery pacKta "Memory Stick Duo" media (sold separately) ..................Setting the clock ..................Shooting/viewing images ........ - Page 7 Using viewing functions ............Viewing an enlarged image (Playback zoom) ......... Searching for an image (Image Index) ........... Selecting the display format (View Mode) ..........Deleting images ................Deleting images ..................Connecting to other devices ..........Viewing images on a TV ................Printing still images .................
-
Page 8: Notes On Using The Camera
Information Technology Industries may be damaged. Association). • Clean the flash surface before use. The heat • Sony does not guarantee that the camera will of flash emission may cause dirt oil the flash play back images rccorded or edited... - Page 9 No compensation for damaged content or recording failure Sony cannot compensate for failure to record or loss or damage of recorded content due to a malfunction of the camera or recording media, etc.
- Page 10 %!iiii%iii_iiii_ii Checking the accessories supplied iiUi_iiiii_ _ Using the shoulder strap • Battery charger BC-VHI iiiiii iiiii_ Attach the shoulder strap and lens cap strap iiiiii--_iiiiiiiii_i to prevent the camera l'rom being dropped and damaged. • Power cord (mains lead) ( 1) iiiiiiiiiiiiiiiiiiiiiiiiiiiiiiiiiiiii_iii (not supplied in the USA and Canada)
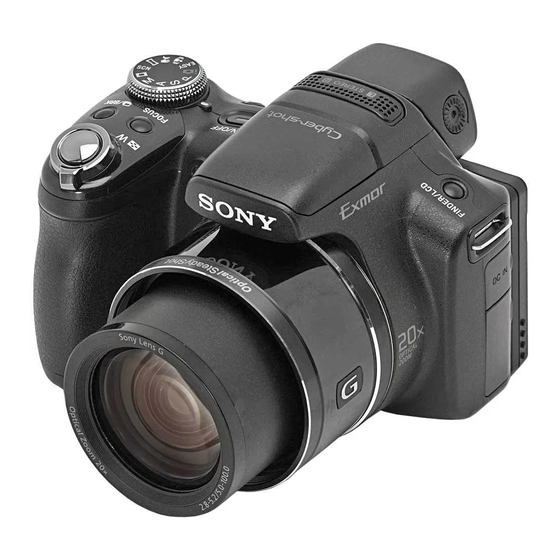
- Page 11 iiiii_ii Identifying parts _iii--_iiiiiiii [] DC IN jack/DC IN jack cover _iiii iiii • You cannot charge the battery pack by _iiiiiii connecting your camera to the AC Adaptor (sold separately). Use the battery charger to charge the battery pack. Multi connector ©...
- Page 12 _iiii!iiii,)iiiiiiii'i_iiiii_iii Jog dial Press iiiiii_)idi)_iiiiiiiiiif_ iiiii_iiiiiii}/iii_iii!iiiiii_,_,';';';';';';';'i Selecting the item Turn value/adjusting Selecting the setling !'oc us area/scrolling unages iiiiiiiiiiiiiiiiiiiiiiiiiiiiiiiiiiiii_m Hook for shoulder strap MENU button Control button Menu on: A/_'/'_/P"/O Menu off: DISP/<e,.)/_/,_ Speaker Battery insert slot Battery eject lever "Memory Stick Duo"...
-
Page 13: Charging The Battery Pack
iiiii_iiii Charging the battery pack _iii--_iiiiiiiiii _iiii iiiii Insert the battery pack into the _iiiiiii battery charger. • You can charge the battery even when it is partially charged. © Battery pack For customers in the USA and Canada Connect the battery charger to the wall... - Page 14 ['rom the battery charger. © • Be sure to use the battery pack or the battery charger of the genuine Sony brand. Battery life and number of images you can record/view Shooting still LCD screen Approx. Approx.
- Page 15 iiiii_iiii Inserting the battery pack/a "Memory _iii--_iiiiiiiiii Stick Duo" media (sold separately) _iiii iiiii _iiiiiii Open the cover. © Insert the "Memory Stick Duo" media (sold separately). With the terminal side facing the lens, insert the "Memory Stick Duo" media until it clicks into place. Insert the battery pack.
- Page 16 iiil iiiiiiiiiiiii_ _"Memory Stick" media that you can use iiUi_iiiii_ • Never remove the "Memory Stick Duo" iiiiii iiiii_ "Memory Stick Duo" media media/battery pack when the access lamp is lit. This may cause damage to data in the iiiiii--_iiiiiiiii_i "Memory Stick Duo"...
- Page 17 iiiii_iiiiii _Checking the remaining battery charge _iii--_iiiiiiiiiii A remaining charge indicator appears the upper let) of the LCD screen. _iiiiiii i-:_emaining charge icon 60Min Remaining time © • It takes about one minute until the correct remaining charge indicator appears. •...
-
Page 18: Setting The Clock
iiil iiiiiiiiiiiii_ Setting the clock iiiiii iiiii_ Press the ON/OFF (Power) iiiiii--_illli_i button. iiiiii_iii iiiiii ',,,,iili/i_ii_ The camera is turned on. • It may take time for the power to turn on and allow operation. iiiiiiiiiiiiiiiiiiiiiiiiiiiiiiiiiiiii_m © ON/OFF (Power) button Select a setting item with A/ •... - Page 19 iiiii_iiii Select [OK], then press 0. _iii--_iiiiiiiiii _iiii iiiii _iiiiiii © I_t'_t'_ • The camera does not have a feature for superimposing dales on images. By using "PMB" in the CD-ROM (supplied), you can print or save images with the date. _ Setting the date and time again Press the MENU...
-
Page 20: Shooting Images
iiiiii-_iiiiiiii_ Shooting images iiiiii/i iiiiii iii_ iiiiii_iii_ • iii_ iiiiii/i_/_i/iiiiii_ iiiiiiiiiiiiii_iiiiiiiiii[i}iiiiiiiii_ Set the mode dial to i_ Mode dial iiiiiiiJiiiit!itiiiiiit_iiiiiii iiiiiiiiii_iiiiiiiiiiiiiiiiiiiiiiiti_ (Intelligent Auto Adjustment), then press ON/OFF (Power) iiiiii iiiiii/F•• iiiiiWiii button. _iiiiiiiiiiiiiiii To shoot movies, set the mode dial to ON/OFF (Power) (Movie Mode) (page 44). -
Page 21: Viewing Images
Viewing images iii_iiii Press the _ (Playback) button. The last image shot is displayed. • When images on the "Memory Stick Duo" media recorded with other cameras cannot be played back on this camera, view the images in [Folder Viewl (page 47). [i_] (Playback) button _ Selecting... -
Page 22: Displaying Minimum Indicators (Easy Shooting)
Displaying minimum indicators (Easy Shooting) This mode uses the minimum number of settings. The text size increases and indicators become easier to see. 1 Set the mode dial to EASY (Easy Shooting). i!i!i!i!i_!!_i_i_i_i_i_i_i_i_i_i_i_i_i_i_i_i_i_i_i_i_i_i_i_i_i_i_i_i_ ¸i_i_!_i!!_!i_i_i!_11_!!ii_!!_i!!!!_i!!!!_i!!!!_i!!!!_ Self-Timer Press _ on the control button ---+ Select [SelffTimer 10sec] or [Self- Timer Off]. -
Page 23: Detecting Smiles And Shooting Automatically
Detecting smiles and shooting automatically (Smile Shutter) Press the C (Custom) button. • If the Smile Shutter screen does not appear, set [Smile Shutter] with [Custom Button] in m'_ (Settings). C (Custom) button 2 Wait detecting a smile. When the smile level exceeds the "_ point on the indicator, the camera shoots images... -
Page 24: Detecting The Shooting
Detecting the shooting conditions automatically (Scene Recognition) 1 Set the mode dial to i6 (Intelligent Auto Adjustment). 2 Aim the camera at the subject. When the camera recognizes a scene, a Scene Recognition icon, J (Twilight), &._ (Twilight Portrait), _J (Twilight using a tripod), [] (Backlight),... - Page 25 d" 25 GB...
-
Page 26: Selecting The Focus Method
Selecting the focus method 1 Press the FOCUS button. FOCUS button Select the desired mode with i/ V/_/I_ on the control button --, (Multi AF): Focuses on a subject in all range of the finder tran-le automatically. (Center AF): Focuses on a subject in the center of the finder frame automatically. -
Page 27: Focusing On The Face Of The Subject (Face Detection)
Focusing on the face of the subject (Face Detection) The camera detects the fi_ce of the subject and focuses on it. You can select which subject takes priority when focusing. Press the MENU button. MENU button 2 Select E*,,_,o (Face Detection) with i/T/_/I_ on the control button --. -
Page 28: Using The Self-Timer
Shooting close-ups (Macro) You can shoot beautiful close-up images of small subjects such as insects or flowers. Press & (Macro) on the control button, then select the desired mode with </1_ --. O. _AUTO ( Auto): This camera adjusts the t_cus automatically fiom distant subjects to close-up. -
Page 29: Selecting A Flash Mode
Selecting a flash mode Press $ (Flash) on the control button, then select the desired mode with _/1_ --. O. _A_O (Flash Auto): Flashes when there is insufficient light or backlight. (Flash On): Flash always operates. SSL (Slow Synchro (Flash On)): Flash always operates. -
Page 30: Changing The Screen Display
Changing the screen display Press DISP (screen display) on the control button, then select the desired mode with a/V. (Bright + Image Only): Sets screen brighter and displays only images. (Bright + Histogram): Sets screen brighter and displays a graph of the image brightness. -
Page 31: Selecting The Image Size To Match The Usage
Selecting the image size to match the usage The image size determines the size of the image file that is recorded when you take a image. The larger the image size, the more detail will be reproduced when the image is printed on large-format paper. - Page 32 When shooting the Sweep Panorama images (Slandard) Shoo1 tile Sweep Panorama images using (Vertical direction: 3424x 192(}) standard size. (Horizomal direction: 4912x 1080) (Wide) Shool lhe Sweep Panorama images using wide (Vertical direction: 4912x 1920) size. (Horizontal direction: 7152x 1080) •...
-
Page 33: Shooting With Program Auto
Shooting with Program Auto Allows you to shoot with the exposure adjusted automatically (both the shutter speed and the aperture (F wflue)). Also you can select wuious settings using the menu. 1 Set the mode dial to P (Program Auto). 2 Press the shutter button. -
Page 34: Shooting Moving Subjects With Different Effects (Shutter Speed Priority Shooting)
Shooting moving subjects with different effects (Shutter Speed Priority Shooting) You can shoot still images after adjusting the shutter speed manually. 1 Set the mode dial to S (Shutter Speed Priority Shooting). Press the jog dial. Jog dial Turn the jog dial to select the shutter speed value. You can select a shutter... -
Page 35: Adjusting Background
Adjusting background blur, and shooting (Aperture Priority Shooting) You can manually adjust the amount of light that passes through the lens. 1 Set the mode dial to A (Aperture Priority Shooting). 2 Press the jog dial. Jog dial 3 Turn the jog dial to select the aperture (F value). You can select an aperture (F wflue) fiom F2.8 to F8.0. -
Page 36: Shooting With A Desired Exposure (Manual Exposure Shooting)
Shooting with a desired exposure (Manual Exposure Shooting) You can shoot still images at a desired exposure after adjusting the shutter speed and aperture (F wflue) manually. The camera maintains the setting even when the power is turned off. Once you set a wflue, you can reproduce the same exposure by simply setting the mode dial to M... -
Page 37: Shooting With Reduced Blur
Shooting with reduced blur A series of high-speed burst shots are taken with one tklll press of the shutter button, and image processing is applied to reduce subject blur and noise. Set the mode dial to _ (Hand-held Twilight) or €{&_ (Anti Motion Blur). -
Page 38: Shooting Panoramic Images
Shooting panoramic images Shoots multiple images and allows you to create a panoramic image fiom composed images while you pan the camera. You can create both up and down, and right and left panoramic images. 1 Set the mode dial to _ (Sweep Panorama). - Page 39 39 GB...
-
Page 40: Shooting Continuously
Shooting continuously (High-speed burst shooting/Exposure bracket) 1 Press the _/BRK (Burst/Bracket) button. [_ / BP_ (Burst/Bracket) button Select a shooting mode with 4/ I_ on the control button, and press 0. (Normal): Shoots a single image. I_Hi (Burst(High)): Shoots up to 10 images per second in succession. - Page 41 © 41GB...
-
Page 42: Using The Shooting Mode That Matches The Scene (Scene Selection)
Using the Shooting mode that matches the scene (Scene Selection) Set the mode dial to SCN (Scene Selection). A list of Scene Selection modes is displayed. Select the desired mode with A/V/_/I_ on the control button --. If you want to switch to another scene, press the MENU button. - Page 43 (Twilight): Shoots night I_O (High Sensitivity): scenes without losing Shoots images without nighttime atmosphere, flash even in low lighting, _ (Gourmet): Shoots food arrangements in delicious color. (Beach): Shoots (Portrait): Shoots with seaside or lakeside scenes backgrounds blur away, and with the blueness of the the subject...
- Page 44 Shooting movies 1 Set the mode dial to H (Movie Mode). Press the shutter button fully down to start recording. Press the shutter button fully down again to stop recording. • The operating sound of the lens might be recorded while shooting a movie.
- Page 45 _ image size The larger the image size, the higher image quality. The higher the amount of data used per second (average bit rate), the smoother the playback image. iiiiiiiiii 1440x1080(Fine) 12 Mbps Shoot highest quality movie for display on HDTV (1080) 1440x1080(Standard) 7Mbps...
-
Page 46: Using Viewing Functions
Viewing an enlarged image (Playback zoom) Press the _-I (Playback) button to display an image, then turn the O, (Playback zoom) lever to the T side. The image is enlarged twice the previous size, at the center of the image. Adjust the zoom scale and position. -
Page 47: Selecting The Display Format (View Mode)
Selecting the display format (View Mode) Allows you to select the display format for viewing multiple images when using "Memory Stick Duo" media. 1 Press the (Playback) button to display an image, then press the MENU button. MENU button 2 Select 4_" (View Mode) with A/T/4/I_ on the control button --. -
Page 48: Deleting Images
Deleting images 1 Press _i (Playback) button to display an image, then press (Delete) button. (Delete) button Press A/V on the control MENU button button to select the desired setting. All in Date Range: You can delete all images in the displayed date range. -
Page 49: Connecting To Other Devices
Viewing images on a TV Connect the camera to the TV with the cable for multi-use terminal (supplied). To audio/video To the multi connector put jacks Cable for multi-use terminal • The Video Oul setting is set (o NTSC mode al the t'ac(ory to let you enjoy optimmn movie image quality. -
Page 50: Printing Still Images
Printing still images If you have a PictBridge compliant printer, you can print images by the following procedure. First, set the camera to enable USB connection between the camera and the printer. Connect the camera to the printer with the cable for multi- use terminal (supplied). - Page 51 © 51GB...
-
Page 52: Using The Camera With A Computer
Using the camera with a computer _ Using "PMB (Picture Motion Browser)" can enjoy the recorded images more than ever by taking adwmtage of the software, and "PMB" is included on a CD-ROM (supplied). There are more functions, in addition to those listed below,... - Page 53 _ Stage 1: installing the "PMB" (supplied) You can install the software (supplied) using the following procedure. When you install "PMB," "Music Transfer" is also installed. • Log on as Administrator. Check your computer environment. Recommended environment for using "PMB" and "Music Transfer"...
- Page 54 (PMB Guide) icon on the desktop. • To access the "PMB Guide" fi'om the start menu: Click [Start l -_ [All Programsl [Sony Picture Utilityl [Helpl [PMB Guidel. • Do not disconnect the cable for multi-use terminal from the camera...
- Page 55 _ Using the camera with your Macintosh computer You can copy images to your Macintosh computer. However, "PMB" is not compatible. When images are exported to "Memory Stick Duo" media, view them in [Folder View 1. You can install "Music Transfer" on your Macintosh computer.
-
Page 56: Changing Camera Settings
Changing the operation sounds You can set the sound produced when you operate the camera. Press the MENU button. MENU button 2 Select _ (Settings) with • on the control button, then press Select _r (Main Settings) with A/•/_/I_ on the control button, then press [Beep] --. -
Page 57: Setting The Custom Button
Setting the custom button You can set the commonly-used function selecting from Smile Shutter, White Balance or Metering Mode to the custom button and set easily when shooting. The default setting for the custom button is [Smile Shutterl. Press the MENU button. MENU button Select _... -
Page 58: Using The Menu Items
Using the MENU items Displays awfilable fnnctions for easy setting when the camera is in shooting or playback mode. Only the items that are awfilable t_r each mode are displayed on the screen. Select _ (Settings) ---*YT [main Settingsl ---*[Initializel to initialize the settings to the default setting. - Page 59 MENU in shooting mode Movie shooling mode Changes the setting according to the selecled scene when shooling movies. Auto[R_t_ High Sensitivity) Shooting Direclkm Sets the direction ol moving the camera. Right/_ Left/l_ Up/]_ Down) hnage Size Sets the image size. ( iIg /iN/iN/iN/ NN/ _ /iN_) aM VGA 8M...
- Page 60 iiiii ..Color Filter Adds color effects as if you use a color filter. (@OFF Ofl'/G_Red Red/C_reen Green/C_Bme Blue/Q_warm Warm/Q_ool Cool) Color Saturation Adjusts the brightness of the image. (@=/@s,o Standard/@+ Contrast Adjusts the contrast of the image. (_-- -/I_STD Standard/_÷ Sharpness Adjusts the sharpness of the image.
- Page 61 O _ (Protect) Prevents accidental erasure. (O'_ T his linage/CI_ Multiple Images) DPOF Adds a Print order mark to the image you want to print in a "Memory Stick Duo" media. ( Dp% This lmage/Dm_ Muldple hnages) (Print) Prints images using a PictBridge compliant printer. ( _._ This hnage/t,,t@ Multiple hnages) (Rotate) Rotates a still image.
-
Page 62: Using The (Settings) Items
Using the (Settings) items You can change the default settings of the camera. I_? (Shooting Settings) are displayed only when settings have been entered fiom shooting mode. 1 Press the MENU button to display the menu screen. MENU button Select _ (Settings) with • on the control button, and confirm by pressing O. - Page 63 (Shooting AF llhnninatnr The AF illuminator supplies fill light to R)cus more Settings) easily on a subject in dark surroundings. Grid Line Sets whether nr not to display tile grid lines nn tile screen. Digital Zoom Selects tile digital zoom mode.
- Page 64 ("Memory Format Formats lhe "Memory Slick Duo" media. Stick" Tool) Create REC.Folder Creales a t'older ill "Memory Stick Duo" media for recording images. Change REC.Folder Changes lhe folder currently used lor recording images. Delete REC.Folder Deletes folders in "Memory Stick Duo" media. Copy Copies all images in llae internal memory to "Memory Stick Duo"...
-
Page 65: Others
Learning more about the camera ("Cyber- shot Handbook") "Cyber-shot Handbook", which explains how to use the camera in detail, is included on the CD-ROM (supplied). Refer to it for in-depth instructions on the many functions of Calilera. • You need Adobe Reader to read "Cyber-shot Handbook". -
Page 66: List Of Icons Displayed On The Screen
List of icons displayed on the screen Icons are displayed on the screen to indicate the camera status. You can change the screen display using DISP (screen display) on the control button (page 30). When shooting still images _60Min Battery remaining battery warning... - Page 67 Color Saturation AE/AF lock IS0400 ISO number NR slov_rshutter [][3 [][13_= Sharpness Shutter speed F3.5 ['_] Smile Deteclion Sensitivity Aperture value indicalor +2.0EV Exposure value _rm_ AF range finder frame indicator Macro Recording a movie/Standby a movie Standby X1,4 Zoom scaling sC_C_ 0:12 Recording time (m:s)
- Page 68 _o 02 Recording folder SellLTimer C:32:00 Sel]Ldiagnosis display [[_N, Playback lolder Nmnber of recordable Destination images Overheating wanting 12/12 hnage number/Number (_Oll'v'el'si 0 11Lens images recorded in selected lolder [_?& Face [)election lOOMin Recordable time [_ti {_"id _-_t_.o Burst/Bracket Recording/Playback Media ("Memory Stick Duo"...
-
Page 69: Troubleshooting
Sony will not copy or save any of those data. ,'t_iT! IItI.l','L:_ i Cannot insert the battery pack. • Insert the battery pack correctly by pushing the battery eject lever (page 15). - Page 70 remaining charge indicator is incorrect. • The battery charge ,,will quickly get used up and the actual remaining battery charge vdll bc lower than the indicator in the following cases: When you use the camera in an extremely hot or cold location. When you use the flash and zoom frequently.
- Page 71 Cannot play back images. • Press the [_ (Playback) button (page 21). • The l'older/l'ile name has been changed on your computer. • No guaranlees are made for playing back, on this camera, files containing images which were processed on a compuler or images which were shol using other cameras.
-
Page 72: Precautions
Precautions Do not use/store the camera in the On moisture condensation following places If the camera is brought directly from a cold to a warllrl location, moisture may condense • In an extremely hot, cold or humid place inside or outside the camera. This moisture In places such as in a car parked in the sun,... -
Page 73: Shooting Movies
Specifications Camera [Finder] Panel: 0.5 cm (0.2 type) [System] Total number of dots: Image de'dee: 7.63 rnrn (1/2.4 type) Exmor Approx. 2(11 (1(10dots equivalent CMOS sensor [Power, general] Total pixel number of camera: Approx. 11).3Megapixels Power: Rechargeable battery pack NP-FH50, 6.8 V Efllzctive pixel number of camera: Approx. - Page 74 Trademarks BC-VH1 battery charger Power requirements: AC 100 V to 240 V, • The following marks arc trademarks of Sony 50 Hz/60 Hz, 4 W Corporation. Output voltage: DC 8.4 V, 0.28 A Cyb_r,-shot, "Cyber-shot," "Memory Stick," _,, "Memory Stick PRO,"...
- Page 75 • No manipule baterf:_s de Jones de litio dafiadas o con fugas. • Asegfirese de cargar la baterf:_ con tin cargador INSTRUCCIONES de baterfas original de Sony o con un dispositivo que pueda cargarla. DESEGURIDAD • Mantenga la baterf:_ fuera del alcance de nihos pequefios.
- Page 76 Sony Tratamiento de las baterias al final Deutschland GmbH, Hedelfinger Strasse de su vida util (aplicable en la 70327 Stuttgart. Alemania. Para resolver Unibn Europea y en paises cualquier asunto relacionado con e l s oporte...
- Page 77 |ndice Notas sobre la utilizaciOn de la cb.mara ........... lntroducci6n ............Comprobaci0n de los accesonos suministrados ........Identificacl0n de los componemes ............Carga de a bateria ................Inserci0n de la bateria o de un "Memor,_ Stick Duo" (se venae por separado) ....................
- Page 78 Toma d eimP.genes continua (Toma enr_.faga aalta velocidad/variaciOn delaexposiciOn) ....UtilizaciOn del m odo d etoma d eimP.genes adaptado auna escena (SelecciOn escena) ..............FilmaciOn depeliculas ..............Utilizacion de las funciones de visualizacion ..... 46 Visualizaci0n de imP.genes ampliadas (Zoom de reproducci0n) ...
- Page 79 _ Notas sobre la utilizaci6n de la c_mara Copia de seguridad de la memoria • Limpie la superficie del flash antes de utilizarlo. El calor de la emisidn del flash interna y del "Memory Stick Duo" puede hacer que la superficie del flash se No apague la c_imara ni extraiga la baterfa ni el...
- Page 80 DCF (Design rule for Camera File system) definida pot la JEITA (Japan Electronics Inlk>rm:ttiou Technology Industries Association). • Sony no garantiza la reproducci6n en otros equipos de im:igenes grabadas con su c_hnara y la reproducci6n en la c_hnara de im:igenes...
-
Page 81: Suministrados
%!iiii%iii_iiii_ii Comprobacion de los accesorios iiiiii-i_iiiii_ suministrados iiiiii iiiii_ iiiiii--_iiiiiiiii_i • Cargador de baler/a BC-VH 1 ( 1) • CD-ROM Software de aplicacidn Cyber-shot iiiiiiiii_iii iiiiiiiii ',,,,iiiiii/i_iii! "Gufa pr_ictica de Cyber-shot" "Gufa avanzada de Cyber-shot" • Manual de instrucciones (este manual) _ Uso de la correa para el hombro •... - Page 82 _;;i_i!i!i_ Identificacion de los componentes iiiii%iiiiiiii; Gancho de la correa para el hombro Toma DC IN/tapa de la toma DC IN • No es posible cargar la baterfa concclando la c_hnara al adaplador alimentacidn de ca (se vende por separado). Ulilice el cargador de baterfa para cargar la baterfa.
- Page 83 _ii/!iii,)iiiii'iii'i_iiii_ii _i_i_%iiiiiiiiiiiii_ Dial t_icti] Pulsar iiiiii_)i0i))i_iiiiiiii?if_ Selcccionar el cqemento Girar Seleccionar el valor de jusle/@lstar la zona de enl'oque/desplazar ll]l_lgellk'S Gancho de la correa para el hombro Bot6n MENU _Bot6n de control Menfi actiw_do: IdV/-_/_-/O © Menfi desactiwMo: DISP/_,_.)/_/_ [_ Altavoz Ranura de inserci6n de la baterla...
-
Page 84: Carga De A Bateria
iiiiii_iiiiii i_¸ "Ji Carga de la bateria _iiiii _iiiiiii_iii ..Introduzca la bateria en el cargador. • Es posible cargar la baterfa aunque se encuentre parcialmente cargada. Bateria Para los clientes de EE. UU. y Canad_i Conecte el cargador © ©... - Page 85 • Asegfirese de utilizar la baterfa o el cargador de baterfa originales de Sony. Duracidn de la bateria y namero de ira&genes que se pueden © grabadver © Toma de Pantalla LCD Aprox.
- Page 86 iiiiiiNiii i_¸ "Ji Insercion de la bateria o de un _iiiii _iiiiiii_iii .."Memory Stick Duo" (se vende por separado) _iiL "iiiiii Abra la tapa. © © Inserte el "Memory Stick Duo" (se vende por separado). Introduzca el "Memory Stick Duo" con el lado del terminal orientado hacia el objetivo hasta que encaje.
- Page 87 iiil iiiiiiiiiiiii_ _"Memory Stick" que es posible utilizar iiiiii-i_iiiii_ • No retirc el "Memory Stick Duo"/la baterfa iiiiii iiiii_ "Memory Stick Duo" cuando el indicador luminoso de acceso estd encendido. Podr/a dafiar los datos del iiiiii--_iiiiiiiii_i "Memory Stick Duo'Tmemoria interna. iiiiiiiii_iii _ Cuando no hay insertado un iiiiiiiii...
- Page 88 iiiiiiNiii i_¸ ",ii _ Comprobaci6n de la carga _iiiii restante de la bateda _iiiiiii_iii ..Se mostrar_ un indicador de carga restante en la parte superior izquierda la pantalla LCD. Icono de carga _iiL "iiiiii restante 60Min Tiempo restante • E1 indicador correcto de la carga restante ©...
-
Page 89: Ajuste De] Reloj
_iiiii!iiiiiiiiiiii'iiiiii_iiiii_iii Ajuste del reloj iiiiii-i_iiiii_ iiiiii iiiii_ Pulse el bot6n ON/OFF iiiiii--_iiiiiiiii_i (Encendido). iiiiiiiii_iii iiiiiiiii ",,,,iiiiii/i_iii! La cmnara se encender_. • Es posible que la alimentaci6n tarde unos instantes en actNarse y que puedan llewtrse a cabo operaciones. Boton ON/OFF (Encendido) Seleccione un elemento... - Page 90 iiiiii_iiiiii i: ¸ ,,J _iiiii Seleccione [OK] y, a _iiiiiii_iii ..continuaci6n, pulse O. ,,i_ii ..X iJ,> iiiii _iiL ",iiiii Salir • La cfimara no dispone de funcidn para superponer l'echas alas im_igenes. Medianle la ufilizacidn "PMB" que se encuentra incluido en el CD-ROM (suministrado),...
- Page 91 iiiiiiiii%iii%i!i'iiiii;i Toma de imagenes iiiiii/i_/_iiii_iiiH iiiiii Ajuste el dial de modo en Dial de modo iiiiii/i_/ iiiiii i6 (Ajuste automat, inteligente) iiiiii--iiiiiiiiiiiii_i/i y, a continuacidn, pulse el iiiiii iiiiii/b ii_ bot6n ON/OFF (Encendido). _iiiiiiiiiiiiiiii tara fihnar pelfculas, ajuste el dial de modo en Bot6n ON/OFF _:H (Modo pelfcula) (p_igina 44).
- Page 92 _ii, ¸ " iiiiHi_i Visualizacion de imagenes _iiiiiiiiiii Pulse el botdn (Reproduccidn). Se visualizar_ la 01tima imagen captumda. • Si las im_genes del "Memory Stick Duo" _iiiiiiiiiiiiiiii gmbadas con otms cmnaras no se pueden reproducir en esta cfimara, visualice las im_genes de [Vet carpetasl (p_gina 47).
-
Page 93: Visualizacion De Los Minimos Indicadores
Visualizacion de los minimos indicadores (Toma facil) Este modo pennite utilizar el ndmero m/nimo de ajustes. El tamafio del texto aumenta y los indicadores pasan a ser m_s filciles de visualizarse. 1 Ajuste el dial de modo en EASY (Toma fficil). Autodisparador Pulse _,..) del botdn... -
Page 94: Deteccion De Sonrisas Y Captura De Imp.genes Autom_.Ticamente
Deteccion de sonrisas y captura de imagenes automaticamente (Captador de sonrisas) Pulse el bot6n C (Personalizado). • Si no aparece la pantalla Captador de sonrisas, ajuste [Captador de sonrisas] con [BotdnPersonalizadol en _--- (Ajustes). Boton C (Personalizado) 2 Espere a que se detecte una sonrisa. -
Page 95: De Toma De
Deteccion de las condiciones de toma de imagenes automaticamente (Reconocimiento de escena) 1 Ajuste el dial de modo en (Ajuste automat, inteligente). Oriente la c_.mara hacia el motivo. Cl_lando C_li-l__tr_.t reconoce i_ln_.t eSCell__t, muestra un icono Reconocimiento de escena, (Crepfisculo), "_ (Retrato crepfisculo), (Crepfisculo con trfpode),... - Page 96 23ES...
- Page 97 Seleccion del metodo de enfoque 1 Pulse el bot6n FOCUS. Bot6n FOCUS Seleccione el modo que desee mediante A/V/_/I_ del bot6n de control--. (Multi AF): Pennite enfocar autom;iticamente un motivo en todos los rangos del cuadro del visor. (AF centro): Pennite enfocar autom;iticamente un motivo en el centro del cuadro del visor.
- Page 98 Enfoque de la cara del motivo (Deteccion de cara) La c;hnara detecta la cara del motivo y la entk_ca. Es posible seleccionar qu6 motivo desea que tenga prioridad a la hora de efectuar el entkNue. 1 Pulse el bot6n MENU. Boton MENU ,&...
- Page 99 26ES...
- Page 100 Toma de primeros pianos (Macro) Es posible tomar primeros pianos de grau belleza de motivos pequefios como iusectos o flores. Pulse & (Macro) del botdn de _-_,_ ..control y, a continuacidn, _2_.'_\ seleccione el modo deseado mediante _/1_ --. O. (Auto): Esta cmnam ajusta el enfoque autom5ticmnente desde objetos _AtlT0...
- Page 101 Seleccion de un modo de flash Pulse $ (Flash) del botdn de control y, a continuacidn, seleccione modo deseado mediante _/1_ --, 0. _AUTO (Flash automdtico): Destella cuando no hay suficiente luz o luz de fondo. $ (Flash activado): El flash funciona siempre. SsL (Sinc lenta (Flash activado)):...
-
Page 102: En Pantalla
Cambio de la visualizacion en pantalla Pulse DISP (visualizaci6n pantalla) del bot6n de control y, a continuaci6n, seleccione el modo deseado mediante A/V. (Brillante + $61o imagen): Pennite aumentar el brillo de la pantalla y visualizar finicamente im_igenes. [P_ (Brillante + Histograma): Pennite aumentar... -
Page 103: Cambio De La Visualizacion Seleccion Del Tamaho De La Imagen Para Adaptarlo Al Tipo De Uso
Seleccion del tamafio de la imagen para adaptarlo al tipo de uso El tamafio de la imagen determina el tamafio del archivo de imagen grabado al tomar la imagen. Cuanto re;is grande sea el tamafio de la imagen, m_s detalles se reproducir_n al imprimir la imagen en papel de fonnato gmnde. - Page 104 Cuando se toman im_genes de Barrido panor_mico ST_O(Est_indar) Las im_igenes de Barrido panor_hnico se roman (direcci6n vertical: 3 424xl 920) con el lamafio est_indar. (direcci6n horizontal: 4 912x I 080) (Ancho) Las im_igenes de Barrido panor_hnico se roman (direcci6n vertical: 4 912xl 920) con el lamafio panor_hnico.
- Page 105 Toma de imagenes mediante Programa automatico Permite tomar imfigenes con la exposici6n ajustada automfiticamente (tanto la velocidad de obturacidn como la abertura (wflor F)). Tambidn es posible seleccionar diversos ajustes a travds del men6. Ajuste el dial de modo en p (Programa automfitico).
-
Page 106: Del Obturador)
Toma de imagenes de motivos en movimiento con distintos efectos (Toma con prioridad de la velocidad del obturador) Es posible tomar imfigenes fijas despuds de ajustar la velocidad de obturaci6n lilanuahilente. Ajuste el dial de modo en S (Toma con prioridad de la velocidad obturador). - Page 107 34ES...
-
Page 108: De Rondo Y De La Toma De Imp.genes De La Abertura)
Ajuste del desenfoque de fondo y de la toma de imagenes (Toma con prioridad de la abertura) Es posible ajustar manuahnente la cantidad de luz que pasa a travds del objetivo. 1 Ajuste el dial de modo en A (Toma con prioridad de la abertura). - Page 109 Toma de imagenes con la exposicion deseada (Toma con exposicion manual) Es posible tomar imfigenes fijas con la exposici6n deseada despuds de ajustar manuahnente la velocidad de obtumci6n y la abertura (wflor F). La cchnara mantiene el ajuste incluso si la alimentaci6n estfi desconectada.
-
Page 110: Reducido
Toma de imagenes con desenfoque reducido Se toma una serie de im_igenes en Mfaga a alta velocidad mediante una presi6n total del bot6n del disparador y se aplica el procesamiento de im_igenes pare reducir el desenfoque y el ruido del motivo. Ajuste el dial de modo en J_ (Crept_sculo manual) o en I15_(Antidesenfoque de mocidn). - Page 111 Toma de imagenes panoramicas Permite tomar mfiltiples imfigenes y crear una imagen panorfimica a partir de imfigenes compuestas mientras toma panor&nicas con la c&nara. Es posible crear im_genes panor_micas hacia arriba, hacia abajo, hacia la derecha y hacia la izquierda. 1 Ajuste el dial de modo en (Barrido panorfimico).
- Page 112 © 39 Es...
-
Page 113: Delaexposicion)
Toma de imagenes continua (Toma en rafaga a alta velocidad/variacion de la exposicion) 1 Pulse el botdn _/s_ (Rfifaga/ Variacidn) Botdn [_/BI1K (R_ifaga/ Variacion) Seleccione el modo de toma mediante _/1_ del botdn de control y pulse O. (Normal): Permite tomar sola imagen. - Page 114 © 41ES...
-
Page 115: Adaptado Auna Escena
Utilizacion del modo de toma de imagenes adaptado a una escena (Seleccion escena) 1 Ajuste el dial de modo en scN (Selecci6n escena). Se visualizar_ una lista de modos de Selecci6n esceua. 2 Seleccione el modo que desee mediante a/V/_/l_ del botdn de control--. - Page 116 (Crepusculo): Permite I_"O (Alta sensibilidad): tomar esoenas nooturnas Permite tomar imagenes perder el ambiente flash incluso en condiciones nocturno. de iJuminacion escasa. _ (Gourmet): Permite tomar ima.genes conjuntos de alimentos colores deliciosos, (Playa): Permite tomar (Retrato): Permite escenas en la orilla deJ mar reafizar tomas de imagenes o de un lago capturando...
-
Page 117: Filmacion Depeliculas
Filmacion de peliculas 1 Ajuste el dial de m°d° en H (M°d° pelicula). Pulse el bot6n del disparador a fondo para iniciar la grabaci6n. Pulse el bot6n del disparador a fondo de nuevo para detener 3 la grabaci6n. • Es posible que se grabe el sonido del funcionamienlo del objetivo cuando se fihna tma pelfcula. Es posible clue se grabe el pilido de o(ros botones como, pot e jemplo, el dial t_ictilo la palanca W/T (Zoom). - Page 118 _Tamafio de imagen Cuanto tn_s grande sea el tamafio de la imagen, mayor ser_ la calidad. Cuanto mayor la cantidad de datos utilizados por segundo (velocidad de bits media), tnfis unifonne serfi la imagen de reproducci6n. 1 440xl 080(Fina) 12 Mbps Permite filmar pelfculas...
-
Page 119: Utilizacion De Las Funciones De Visualizacion
Visualizacion de imagenes ampliadas (Zoom de reproduccion) Pulse el bot6n [_] (Reproducci6n) para visualizar una imagen y, a continuaci6n, mueva la palanca O, (Zoom de reproducci6n) hacia el lado T. La imagen se ampliarfi al doble del tamafio anterior a partir del centro de la imagen. Ajuste la relaci6n de zoom y la posici6n. -
Page 120: Seleccion Del Formato De Visualizacion (Modo Visualizacion)
Seleccion del formato de visualizacion (Modo visualizacion) Pennite seleccionar el formato de visualizaci6n para visualizar wMas imfigenes cuando se utiliza un "Memory Stick Duo". Pulse el botdn _] (Reproduccidn) para visualizar una imagen y, a continuacidn, pulse el botdn MENU. Bot6n MENU 2 Seleccione... -
Page 121: Eliminacion De Im_Igenes
Eliminacion de imagenes Pulse el bot6n (Reproducci6n) para visualizar una imagen y, a continuaci6n, pulse el bot6n (Borrar). Bot6n _ (Borrar) Pulse A/V del bot6n de Bot6n MENU control para seleccionar ajuste deseado. Todas im_gs de rango fecha: Permite eliminar todas las im_genes correspondientes al tango de fecha... -
Page 122: Conexion Con Otros Dispositivos
Visualizacion de imagenes en un televisor Conecte la cfimara al televisor mediante el cable para terminal multiuso (suministrado). A las tomas de entrada AI conector mOltiple udio/video Cable para terminal multiuso • El ajuste de Salida vfdeo est_i en modo NTSC de f_ibrica para permitirle disfrutar de una calidad imagen... -
Page 123: Impresion De Imp.genes Fijas
Impresion de imagenes fijas Si dispone de una impresora compatible con PictBridge, podm imprimir imdgenes siguiendo el procedimiento indicado a continuaci6n. En primer lugar, ajuste la cMnara para permitir una conexi6n USB entre la c_mara y la impresora. Conecte la c_.mara a la impresora mediante el cable para terminal multiuso (suministrado). - Page 124 © © < 51 ES...
-
Page 125: Utilizacion De La C_.Mara Con Un Ordenador
Utilizacion de la camara con un ordenador _ Utilizaci6n de "PMB (Picture Motion Browser)" Ahora m_s que nunca, puede disfiutar de las im_genes grabadas gracias al software "PMB" se encuentra incluido en un CD-ROM (suministrado). Ademfis de las enumeradas a continuaci6n, existen mils funciones pare... - Page 126 Encienda el ordenador e inserte el CD-ROM (suministrado) en la unidad de CD-ROM Se mostrar_ llt pantalla del men6 de instalaci6n. © Haga clic en [Instalar]. soNY Cyber.shot Application Software Aparecer_ la pautalla "Choose Setup Language". £)_ <...
- Page 127 • Pare acceder a la "Gufa de PMB" desde el menO de inicio: Haga clic en [Iniciol -_ [Todos los programasl -_ [Sony Picture Utilityl -_ [Ayudal -_ [Gufa de PMB1. • No desconecte el cable para el terminal multiuso...
- Page 128 _ UtJlJzacJ6n de la c_mara con un ordenador Macintosh Es posible copiar im;igenes a un ordenador Macintosh. Sin embargo, el software "PMB" no es compatible. Cuando exporte im;igenes a un "Memory Stick Duo", visualfcelas [Ver carpetasl. Es posible instalar el software "Music Transfer" en un ordenador Macintosh.
-
Page 129: Modificacion De Los Ajustes De La Camara
Modificacion de los sonidos de funcionamiento Es posible ajustar el sonido que se produce al realizar una operaci6n en la cMnara. 1 Pulse el bot6n MENU. Bot6n MENU Seleccione (Ajustes) mediante • del bot6n de control y, a continuaci6n, pulse O. Seleccione _r (Ajustes principales) mediante... -
Page 130: Configuracion Del Boton Personalizado
Configuracion del boton personalizado Es posible establecer la funci6n utilizada habituMmente a partir de Captador de sonrisas, BMance Blanco o Modo medici6n para el bot6n personMizado y ajustarlo fdcihnente ill tomar im_genes. El ajuste predeterminado del bot6n personMizado es [Captador de sonrisasl. -
Page 131: Utilizacion De Los Elementos De Menu
Utilizacion de los elementos de MENU Permite visualizar las funciones disponibles para facilitar el ajuste cuando la cMnara se encuentra en modo de toma de imdgenes o de reproducci6n. En la pantalla solamente visualizan los elementos disponibles en cada modo. Seleccione _._ (Ajustes) _ ?T [Ajustes principales]... - Page 132 MENU en el modo de toma de imageries Modo Toma pelfcula Cambia el ajuste en funci6n de la escena seleccionada al (omar imfigenes. Auto/l_t_ Alta sensibilidad) Direcci6n de la loma Permite establecer la direcci6n en la que se moverzl la cfimara. (mlll_Derecha/_ lzquierda/_ Arriba/_...
- Page 133 iiiii °,,i Modo color Cambia la intensidad de la imagen o aiSade efi_ctos especiales. (1-" i + Normal/V_ Vf,Ado/___ Real/_ Sepia![_I- ,W + B y N) Filtro color Permite afiadir e[bctos de color como si utilizase un filtro de color. (C_FF"...
- Page 134 (Mfilliples tamafios) Cambia el t amafio de las i mfigenes en hmci6n del uso. /_bHDTV/_[_ Bh,g / E-mail) (Borrar) Borra iron'genes. Esla imugen/_ Mfilliples imfigenes/_ Todas imfigs de rungo fecha #) "' E1 lexto visualizado varfu en funci6n del Modo visualizacidn. O _ (Proteger) lmpide el borrado uccidental.
-
Page 135: Utilizacion De Los Elementos De
Utilizacion de los elementos de _ (Ajustes) Es posible cambiar los ajustes predeterminados de la cmnara. I_? (Ajustes de toma) solamente se mostrarM1 si los ajustes se han introducido desde el modo de toma de imfigenes. 1 Pulse el botdn MENU para visualizar la pantalla del menQ. - Page 136 (Ajustes lluminador E1 iluminador AF suministra luz de relleno para toma) enfocar con m_s facilidad un mofivo en emornos osct/ros. Cuadrfcula Permite ajustar si desea o no que se visualicen lfneas de cuadrfcula en la pantalla. Zoom digital Selecciona el modo de zoom digital.
- Page 137 (Ajustes Conexi(m USB Selecciona el modo USB al conectar la cghnara a un principales) ordenador o a una impresora compatible PictBridge mediame el cable para terminal multiuso. Desc mdsica Cambia los archivos de mfisica medianle el software "Music Transfer". Format mfisi Elimina todos los archivos de mfisica de fondo que se enctlen|ran almacenados en la cfimara.
-
Page 138: Otros
Mas informacion acerca de la camara ("Guia practica de Cyber-shot") La "Gufa prdctica de Cyber-shot", en la que se explica detalladamente c6mo utilizar la cMnara, se incluye en el CD-ROM (suministrado). Consdltela para obtener instmcciones detalladas acerca de las distintas funciones de la cMnara. -
Page 139: Lista De Los Iconos Visualizados En La Pantalla
Lista de los iconos visualizados en la pantalla Los iconos se visualizan en la pantalla para indicar el estado de la cmnara. Es posible cambiar la visualizaci6n en pantalla mediante DISP (visualizaci6n pantalla) del bot6n de control (p_gina 29). Cuando se toman im_genes fijas 60Min reslante Balerfa... - Page 140 Nil_;_i:_ii!ii_ii_i_ii_ii_ii_ii_ii_ii_ii_i_iiiii_ii_aiii@_iN__ ii_!!_i_N_;_i_!_!ii:i}:i _i}:i_i}:i_i}:i_i}:i_i}:i_iiiiil;, ¸iiiiiiiiiiiiiiii ¸iiiiiiiiiiiiiiii ¸iiiiiiiiiiiiiiii ¸iiiiiiiiiiiiiiii ¸iiiiiiiiiiiiiiii ¸iiiiiiiiiiiiiiii ¸iiiiiiiiiiiiiii ¸iiiiiiiiiiiii G_ed ('_re_n Fillro color Bloqueo AE/AF ISO400 Nfimero 1SO _ool Obturacidn lenta NR Saluraci6n de color Velocidad de obmracidn Valor de abertura F3,5 Comras_e +2,0EV Valor de exposicidn [_-- [_'t"...
- Page 141 i_i!!_i _i!_ii!ii!_i _!_!_!_!_!_!_!_!_!_!_!_!_!_!_!_i! _iili _iili _iili _iili _iili _iili _iili _iili _iili _iili _iili _iili _iili _iili _iili _iili _iili _iili _iili _iili _iili _iili _iili _iili _iili _iili _iili _iili _iili _iili _iili _iili _iili _iii _t_t Carpeta de grabacidn <_o _ Aulodisparador C:32:00...
-
Page 142: Solucion De Problemas
Si realiza la operaci6n anterior, los ajustes de fecha y hora de borrar_in. Consulte con el distribuidor de Sony o con la ofi¢ina de servi¢io local autorizada de Sony. AI reparar c&naras que incluyen memofia interna o la funci6n de archivos de mdsica,... - Page 143 La alimentacibn se desconecta de repente. • En funcidn de la tcmperatura de la czlmara y la baterfa, es posible que la alimcntaci6n desactive autom;iticamente para proteger la c_hnara. En tal caso, se mostrar_1 un mensaje en la pantalla LCD antes de que se desactive la alimentaci6n.
- Page 144 No es posible crear im_lgenes panor_lmicas. • Realicc panorSmicas con la cfimara tal y como indica la barra de direccidn a una '_,clocidad constante. No es posible crcar imfigenes panorfimicas en las siguientes situaciones: Realiza panor_hnicas con la cfimara demasiado rfipido o demasiado lento.
-
Page 145: Precauciones
Precauciones No utilice/almacene la c_mara en Acerca de la temperatura de funcionamiento los siguientes lugares • En lugares extremadamentc calurosos, frfos La c_hnara ha sido disetiada para utilizarse o hOmedos temperaturas de entre 0 _'C y 40 °C No sc En lugares tales como ell un automdvil recomienda tomar im_igenes en lugares... -
Page 146: Especificaciones
Especificaciones C_mara [Visor] Panel: 0,5 cm (tipo !t,2) [Sistema] Ndmern total de puntos: Dispnsitivo de imagen: 7,63 mm (tipo 1/2,4) Equivalente a aprnx. 2(11 000 pnntos sensor Exmor CMOS [Alimenta¢i6n, general] NOmern total de pfxeles de la cfimara: Aprnx. 11t,3 megapfxeles Alimentaci6n: Baterfa recargable NP-FH50, 6,8 V... - Page 147 Marcas comerciales • Las siguientes lal_.lrcas son nlarcas comerciales de Sony Corporation. CybEp-sho'l:, "Cyber-shot", "Memory Stick", _,_, "Memory Stick PRO", MEMORYSTIgK PRD, "Memory Stick Duo", MEMDRYSTIER DUO, "Memory Stick PRO MEMDRY STICRPRO Dun, "Memo W Duo", Stick PRO-HG Duo", MEMORY STIl:gPR0-HG DuO, "Memory Stick Micro",...