Table of Contents
Advertisement
Available languages
Available languages
Advertisement
Table of Contents

Related Manuals for Craftsman 917.773754


Summary of Contents for Craftsman 917.773754
- Page 1 Owner's Manual CRAFTSMAN ° 6.75 Horsepower Inch Cut Model No. 917,773754 Espahol, p. 18 Read and follow all Safety Rules and instructions before operating this equipment. U.S.A. Sears, Roebuck and Co., Hoffman Estates, IL 60179 Visit our Craftsman website: www.sears.com/craftsman...
- Page 2 Sears Service ......Back Cover LIMITED TWO YEAR WARRANTY ON CRAFTSMAN WEEDTRIMMER For two (2) years from date of purchase, when this Craftsman Weedtrimmer is main- tained, lubricated, and tuned up according to the operating and maintenance instruc- tions in the owner's...
- Page 3 AWARNmNG: E ngineexhaust,some Do not pull machine backwards unless ab- of its constituents,and certainvehicle solutely necessary. Always look down and behind before and wMle moving backwards. componentscontain or emit chemicals knownto the State of Californiato Do not operate the machine without cause cancer and birth defectsor other proper...
- Page 4 Repair Protection Agreements Congratulations on making a smart pur- Fast help by phone - phone support chase. Your new Craftsman® product from a Sears technician on products designed and manufactured for years requiring in-home repair, plus conve- dependable operation.
- Page 5 Serial Number: Date of Purchase: GasolineCapacity/Type: 1.25 Quarts (UnleadedRegular) Oil Type (API-SF-SJ): SAE 30 (above32°F);SAE 5W-30 (below32°F) Oil Capacity: 20 Ounces Spark Plug (Gap: .030") Champion R J19LM or J19LM Trimmer Line Length: 18.75 Inches (0.155 Inch Diameter) • The model and serial numbers will be found...
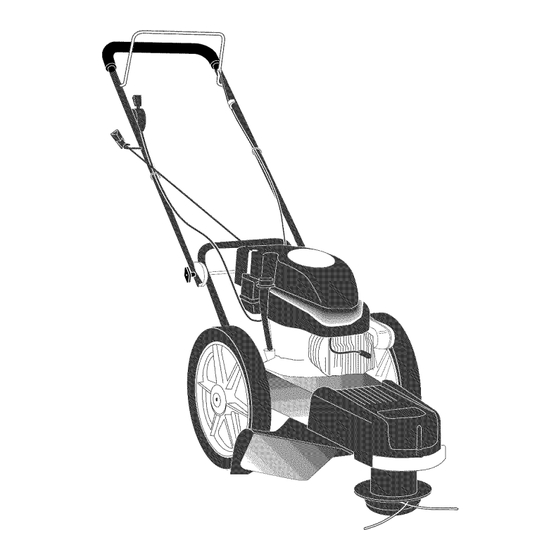
- Page 6 KNOW YOUR TRmMMER READ THIS OWNER"S MANUAL AND ALL SAFETY RULES BEFORE OPERATING YOUR TRIMMER. Compare the illustrations with your trimmer to familiarize yourself with the location of various controls and adjustments. Save this manual for future reference. These symbols may appear on your trimmer AVOID SERIOUS INJURY ORDEATH or in literature supplied...
- Page 7 TO ADJUST TRmMMmNG HEmGHT _CAUTmON: Stop the engine and wait for SAFETY GLASSES all moving parts to stop. Disconnect spark plug wire from spark plug and place wire where it cannot come in contact with plug. The height of cut can be set to six (6) dif- ferent positions ranging...
- Page 8 ADD GASOUNE NOTE: In cooler weather it may be necessary to repeat priming steps. • Fill fuel tank to bottom of gas tank warmer weather overpriming may cause filler neck. Do not overfill. Use fresh, clean, regular unleaded gasoline with a flooding and engine will not start.
- Page 9 MAINTENANCE FILL IN DATES _(b_'_. _'£._ _r AS YOU COMPLETE /__O_'J SE.RVICE REGULAR SERVICE /__'/%'4 _"y%" 4¢,.,_/_/" DATES Check for Loose Fasteners Clean Trimmer Clean Under Engine Cover Check Drive Belt / Pulleys Check / Replace Trimmer Lines Check Engine Oil Level Change Engine Oil I/'1,2 Clean Air Filter...
- Page 10 Alwaysobserve safety ruleswhen per- forming any maintenance. TmRES Keeptires free of gasoline,oil, or insect controlchemicalswhich can harm rub- ber. Avoidstumps,stones, deep ruts,sharp objectsand other hazardsthat may causetire damage. TR(MMER L(NE For best results, replace trimmer lines when they have worn to half their original length.
- Page 11 Wipe off any spilled oil from trimmer side of engine. LUBRmCATmON Fill engine with oil (See "ADD OIF' in Use only high quality detergent oil rated the Operation section of this manual). with API service classification SF-SJ. Replace engine oil cap. Select the oil"s SAE viscosity grade Reconnect...
- Page 12 MUFFLER CLEAN UNDER ENGmNE COVER Inspect and replace corroded muffler as it Clean under engine cover before each could create a fire hazard and/or damage. use, or more frequently in heavy cutting dirty conditions. Engine cover screen SPARK PLUG engine air intake screen must be kept free of dirt and chaff to prevent...
- Page 13 TO REMOVE/REPLACE TRmMMER HEAD _,WARNmNG: To avoid serious injury, DRmVE BELT before performing any service 1. Remove screw at front of chassis cover. adjustments: 2. Lift cover up and away from trimmer. Stop engine. Make sure the rotating lines and all moving parts have completely stopped.
- Page 14 11 .Assemble new belt, idler pulleys screw securely. bottom belt keeper to idler bracket. Always use Craftsman replacement parts Tighten pulley bolts securely. to assure proper fit and long life. NOTE: Be sure belt is inside...
- Page 15 Immediately prepare your trimmer for stor- Also, alcohol blended fuels (called gasohol age at the end of the season or if the unit or using ethanol or methanol) can attract will not be used for 30 days or more. moisture which leads to separation formation of acids during...
- Page 16 TROUBLESHOOTmNG o See appropriate section in manuam unmess directed to a Sears Parts & Repair Center. PROBLEM CAUSE CORRECTmON Does not start 1. Dirty air filter. 1. Clean/replace air filter. 2. Out of fuel. 2. Fill fuel tank. 3. Stale fuel. 3.
- Page 17 Operate a trimmer across the face of slopes, nevor up or down sWop÷so lo DEGREES 15 DEGREES...
- Page 18 Sears reparar& gratis todo defecto en el material y la mano de obra. Si la recortadora para mala hierba Craftsman se usa para fines comerciales o de arriendo, esta garantia s61o se aplica pot noventa (90) dias a partir de la fecha de compra.
- Page 19 1.OPERACI6N GENERAL Opere solamente conluzdeldiao conuna buena luzartificial. o Antesdeempezar, debefamHiarizarse completamente conloscontroles y el uso Nooperela ma,quina b ajola influencia del correcto de lamaquina. Paraesto,debeleer alcohol o delasdrogas. y comprender todaslasinstruceiones que Nunca operelamaquina cuando la hierba aparecen enla maquina y enlosmanuales estemojada.
- Page 20 Congratulaciones por su buena compra. Ayuda r_pida pot tel_fono - soporte teleo nuevo producto Craftsman® esta diseSado f6nico pot parte de un t6cnico Sears sobre y fabricado para funcionar de modo fiabb por productos que requieren un arreglo en casa, muchos aSos.
- Page 21 N0mero de Serie: Fecha de Compra: Capacidad y Tipo de Gasolina: 1.25 Cuartos (Regular sin Plomo) Tipo de Aceite (API-SF-SJ): SAE 30 (Sobre 32°F); SAE 5W-30 (Debajo 32°F) Capacidad de Aceite: 20 Onzas Bujia (Abertura: .030") Champion RJ19LM o J19LM Longitud de la linea de la recortadora: 18.75...
- Page 22 FAIVIlLIARI'CESE CON SU RECORTADORA LEA ESTE MANUAL DE USUARUOY LAS REGLAS DE SEGURUDAD ANTES DE OPERAR SU RECORTADORA. Compare UasHustraciones con su recortadora para famHiarizarse con Uaubi- caci6n de Uosdiversos controUes y ajustes. Guarde este manuaU para referencia en eUfuturo. Estoss_mbolos pueden aparecer sobre...
- Page 23 SEGURIDAD Cabeza de recortadora La operaci6n de cualquier recortadora puede Tabulaci6n hacer que salten objetos extrafios dentro de de Ia placa sus ojos, Io que puede producir dafios graves de bloque en 6stos. Siempre use anteojos de seguridad o protecci6n para los ojos mientras opere su recortadora o cuando haga ajustes o reparacio- nes.
- Page 24 GASOLINA Uene eUestanque de combustibUe hasta Uaparte inferior deUcueHo de reHeno deU estanque de gasoHna. No UoHene demasiado. Use gasoHna reguUar, sin pUomo, nueva y Hmo pia con eUminimo de 87 octanos. No mezde eUace[te con UagasoHna. Para asegurar que UagasoHna utHizada sea fresca compre estanques UoscuaUes puedan ser utHizados ,_kdurante Uospdmeros 30 dias.
- Page 25 ,,o,, ''ENE'ASFEOHAS A MEDIDA COMPLETE /__OJ#_r" FECHA.S S U SERVICIO REGULAR /_¢_,_ r" DE SERVI C lO Revisar si hay sujetadores sueltos Limpiar la recortadora Limpiar debajo de la cubierta del motor Revisar las correas y las poleas impulsadas Verifique / reemplazar las lineas 1_ 3 de la recortadora Revisar el nivel del aceite...
- Page 26 Con la extremidad de lalinea plagada en el lado _PRECAUCI6N: UtHbe s6b UaUinea de trasero del clip del sujetador, empujar la linea recortadora recomendada. No utHbe otros hacia afuera hasta que la linea est8 compbtao materiabs como canes, cuerdas, cintas, mente colocada debajo del clip del sujetador.
- Page 27 PARA CAIVlBIAR E L ACEITE DELMOTOR GIRE EN EL SENTIDO A LAS AVlSO:AntesdeincHnar Ua recortadora MANILLAS DEL RELOJ PARA paradrenareU aceite, d reneeU tanque de combustibUe hacbndofuncionar e ]motorhasta quee]tanque est6vacio. 1. Desconecte e ]aUambre de]abujiay p6ngabde modoquenopuedaentraren contacto con6sta. 2.
- Page 28 1. Desenrosque laperillaencima dela tap& Perno 2. Gire latapahacia arriba yremu6vela delmotor. fiIeteado 3. Limpie la tapay el filtroesmeradamente. 4. Limpie la partesuperior d elmotory elfiltro de entrada delaire. 5. Coloque otravezla tapadelmotor y apriete la tapa la perillade modofirme.Asegurase q uelas del motor lengOetas delatapadelmotor est6n situadas enlasranuras delalojamiento d elmotor.
- Page 29 Remueva Uacorrea de Uapoba deUcabezaU 12. Instale la correa y el conjunto del piton Ioco de Uarecortadora. en la recortadora, vuelva a conectar un Observe Uaposbi6n deUcame de controU y resorte del piton Ioco y monte el piton Ioco deUresorte de Hamada deUpiton bco. A al chasis.
- Page 30 Prepare inmediatamente su recortadora para el la gasolina Acideca puede na_ar el sistema de combustible de un motor durante el perido de alma cenamiento al final de cada temporada o alcamenmiento. si la unidad no se va a usar pot 30 dias o mas. RECORTADORA o Vaciar el dep6sito del carburante poniendo en marcha el motor y dejAndolo funcionar...
- Page 31 SOLUCmON DE PROBLEiVIAS =Yea ia secci6n apropiada en ei manual amenos est_ dirigido a un centro de servico Sears. PROBLEI_IA CAUSA CORRECCm6N 1. Filtro de aire sucio. No a[cranca 1. Limpb/cambb eUfHtro de aire. 2. Sin combustible. 2. Uene eUestanque de combus tibie.
- Page 32 CRAFTSMAN WEED TRIMMER oo MODEL NUMBER 917.773754...
- Page 33 CRAFTSMAN WEED TRmMMERo o MODEL NUMBER 917.773754 PART DESCRiPTiON Engine, Craftsman, Model Number 143=036706 (See Breakdown) 150406 Bolt, Engine Mounting 3/8-16 179466 Pulley, Engine (Includes Setscrew, Key #4) 181701 Cover, Engine, with Screen 174274 Knob, Engine Cover 174030 Stud, Engine Cover...
- Page 34 CRAFTSMAN WEEDTRmMMER oo MODEL NUMBER 917.773754 20 44 47 21 17_78_...
- Page 35 CRAFTSMAN WEED TRmMMERo o MODEL NUMBER 917.773754 PART DESCRIPTmON 174031X615 Chassis Assembly 182133 Line, Trimmer .155 diameter x 18.75 long 173715 Screw, Self-Tapping 5/16-18 x 1 185476 V-Belt 172145X004 Bracket, Idler 166042 Pulley, Idler, V-Groove 173716 Bolt, Hex Head 3/8-16 x 1.25...
- Page 36 CRAFTSMAN 4-CYCLE ENGmNE MODEL NUMBER143,036706 3700 j285 _ 307 • " 305 " 306...
- Page 37 CRAFTS_,_AN 4oCYCLE ENGmNE MODEL NUMBER 143o036706 PART PART DESCRmPTmON DESCRIPTION 37465 Cylinder (Hncludes 6021A Screw, 5/16-18 x 1-7/16" Key Numbers 2, 20 and 150) 35395 Resistor Spark Plug (RJ19LM) 26727 Dowel Pin 31672 Valve Spring 33734 Breather Element 31673 Valve Spring Cap 36557 Breather Assembly 151A 40017...
- Page 38 CRAFTSMAN 4°CYCLE ENGmNE MODEL NUMBER143,036706 KEY PART NO. NO. DESCRIPTION 640315 Carburetor Assembly (Hnciudes Key Number 184 of Engine Parts List) 631615 Throttle Shaft & Lever Assembly 631767 Throttle Return Spring 631184 Dust Sea! Washer 631183 Dust Seal 640070 Throttle Shutter...
- Page 39 Opere una recortadora de rnaieza en sentido diagonaJ a tra- y,s de tes cuestes, r_unea euesta arriba o cuesta abajoo 10 GRADOS !5 GRADOS Utitice este guia, y no recorte en ana cuesta mayor de 15 grados. Una incJinaci6n de 10 grados es una cuesta que aumenta aproximadamente 1.7 pies de altura,...
- Page 40 Your Home For repair - in your home - of all major brand appliances, lawn and garden equipment, or heating and cooling systems, no matter who made it, no matter who sold it! For the replacement parts, accessories owner's manuals that you need to do-it-yourself. For Sears professional installation of home appliances...