Advertisement
Quick Links
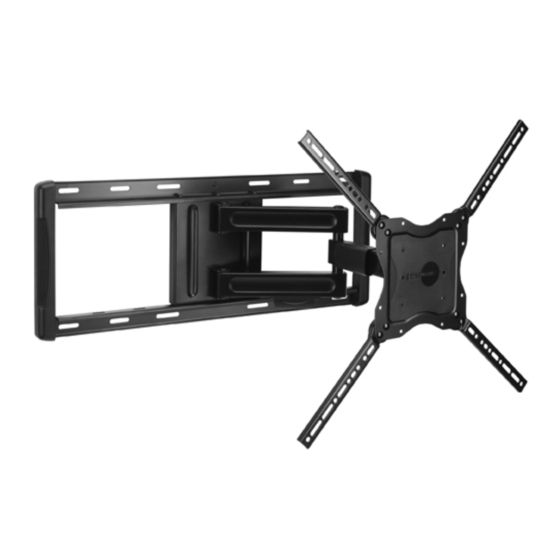
NC125C
Large Cantilever Mount
Max screen size: 52"
Max weight 125 lbs – 56.7 KG
CAUTION: DO NOT EXCEED
MAXIMUM LISTED WEIGHT
CAPACITY. SERIOUS INJURY OR
PROPERTY DAMAGE MAY OCCUR!
OM # OM1100311
PN # NC125C = L27-OM1100311-CON-083111vC
РУКОВОДСТВО ПО ЭКСПЛУАТАЦИИ
Reduce.Reuse.Recycle
VERSION
C
INSTRUCTION MANUAL
MANUAL DE INSTRUCCIONES
MANUEL D'INSTRUCTIONS
BENUTZERHANDBUCH
INSTRUCTIEHANDLEIDING
MANUALE DI ISTRUZIONI
INSTRUKCJA OBSŁUGI
NÁVOD K OBSLUZE
KEZELÉSI KÉZIKÖNYV
ΕΓΧΕΙΡΙΔΙΟ ΟΔΗΓΙΩΝ
MANUAL DE INSTRUÇÕES
BRUGERVEJLEDNING
ASENNUSOPAS
MONTERINGSANVISNING
MANUAL CU INSTRUCŢIUNI
РЪКОВОДСТВО ЗА РАБОТА
JUHEND
LIETOŠANAS PAMĀCĪBA
NAUDOJIMO INSTRUKCIJA
NAVODILA
NÁVOD NA OBSLUHU
TALİMAT KILAVUZU
BRUKSANVISNING
آﺘﻴﺐ اﻟﺘﻌﻠﻴﻤﺎت
说
Advertisement

Related Manuals for Omnimount NC125C


Summary of Contents for Omnimount NC125C
- Page 1 NC125C OM # OM1100311 PN # NC125C = L27-OM1100311-CON-083111vC Large Cantilever Mount VERSION INSTRUCTION MANUAL MANUAL DE INSTRUCCIONES MANUEL D’INSTRUCTIONS BENUTZERHANDBUCH INSTRUCTIEHANDLEIDING MANUALE DI ISTRUZIONI INSTRUKCJA OBSŁUGI NÁVOD K OBSLUZE KEZELÉSI KÉZIKÖNYV ΕΓΧΕΙΡΙΔΙΟ ΟΔΗΓΙΩΝ MANUAL DE INSTRUÇÕES BRUGERVEJLEDNING ASENNUSOPAS MONTERINGSANVISNING MANUAL CU INSTRUCŢIUNI РЪКОВОДСТВО...
- Page 2 ESPAÑOL Descargo de responsabilidad. OmniMount Systems, Inc. ha puesto el máximo esfuerzo para que este manual sea preciso y completo. No obstante, no garantiza que la información aquí incluida cubra todos los detalles, condiciones o variantes. Tampoco prevé todas las posibles contingencias relacionadas con la instalación o el uso de este producto. La información que contiene este documento queda sujeta a cambio sin aviso previo o compromiso alguno.
- Page 3 NEDERLANDS Vrijwaring – Het is de bedoeling van OmniMount Systems, Inc. dat deze handleiding zo nauwkeurig en volledig mogelijk is. OmniMount Systems, Inc. beweert echter niet dat de informatie in deze handleiding alle details, omstandigheden of variaties omvat. Evenmin wordt in dit document rekening gehouden met elke mogelijke onvoorziene gebeurtenis in verband met de installatie of het gebruik van dit product. De informatie in dit document kan zonder voorafgaande kennisgeving of verplichting hiertoe worden gewijzigd.
- Page 4 PORTUGUÊS Limitação de responsabilidade – A OmniMount Systems, Inc. pretende que o presente manual seja preciso e completo. No entanto, a OmniMount Systems, Inc. não garante que as informações contidas no presente documento cobrem todos os detalhes, condições ou variações, nem prevêem todas as contingências possíveis relacionadas com a instalação ou utilização deste produto. As informações contidas no presente documento estão sujeitas a alteração sem qualquer tipo de aviso ou obrigação.
- Page 5 SLOVENSKA Izjava o omejitvi odgovornosti – Podjetje OmniMount Systems, Inc., si je prizadevalo, da bi bil ta priročnik natančen in popoln. Vendar OmniMount Systems, Inc., ne jamči, da informacije v tem priročniku obravnavajo vse podrobnosti, pogoje ali odstopanja. Prav tako ne more predvideti sleherne možne okoliščine v povezavi z namestitvijo ali uporabo tega izdelka. Informacije, ki jih ta dokument vsebuje, se lahko spremenijo brez predhodnega obvestila ali kakršne koli obveznosti.
- Page 6 Ansvarsfraskrivelse – OmniMount Systems, Inc. har til hensikt å gjøre denne brukermanualen presis og fullstendig. OmniMount Systems, Inc. påstår imidlertid ikke at informasjonen heri dekker alle detaljer, forhold eller variasjoner. Det har heller ikke ansvar for alle mulige uforutsette hendelser i forbindelse med montering eller bruk av dette produktet. Informasjonen i dette dokumentet kan endres uten varsel. OmniMount Systems, Inc.
-
Page 7: Maximum Weight Capacity
WEIGHT CAPACITY MAXIMUM WEIGHT CAPACITY POUNDS (LBS) / KILOGRAMS (KG) MAXIMUM SCREEN SIZE COMPLETE UNIT 125 (LBS) / 56.7 (KG) 52 in. CAUTION! CAUTION! MAXIMUM WEIGHT CAPACITY MAXIMUM SCREEN SIZE 52” 125 lbs 56.7 kg USE WITH FLAT PANELS EXCEEDING THE MAXIMUM WEIGHT CAPACITY OF THIS PRODUCT MAY RESULT IN PRODUCT FAILURE CAUSING POSSIBLE INJURY AND OR PROPERTY DAMAGE. -
Page 8: Tools Needed
TOOLS NEEDED HARDWARE SCREWS/HARDWARE FOR FLAT PANEL (Monitor Kit L-U-vD) SCREWS / HARDWARE FOR FLAT PANEL (Monitor Kit L-U-vD) Part # Description Philips screws M4 x 15mm Philips screws M4 x 30mm Philips screws M5 x 15mm Philips screws M5 x 30mm Philips screws M6 x 15mm Philips screws M6 x 30mm Philips screws M8 x 15mm... - Page 9 CONTENTS Contents Description Part # Wall Plate Arm Assembly M6 Washer M6 Button Head Cap Screw Flat Panel Plate Front Arm Cable Management Cover Front Arm Cable Management Cover Screws Bottom Arm Cable Management Cover Tilt Adjustment Tension Screws Extension Adapters Wall Template...
- Page 10 STEP - 01 Set aside until later step Guarde aparte para un paso posterior Mettre de côté pour une étape ultérieure Bis zu einem späteren Schritt zur Seite legen Leg opzij voor later Conservare queste parti per un passaggio successivo Odłożyć...
- Page 11 TV MOUNTING OPTIONS 200mm (7-7/8”) 100mm (3-15/16”) PG: 12-13 200mm (7-7/8”) PG: 14-15 600mm (23-5/8”) 400mm (15-3/4”) 300mm (11-13/16”) PG: 14-15 400mm (15-3/4”) 300mm (11-13/16”) PG: 14-15...
- Page 12 TV MOUNTING OPTION A...
- Page 13 TV MOUNTING OPTION A 10mm 15mm 20mm 25mm 30mm HAND TIGHTEN ONLY APRIETE A MANO SOLAMENTE CONTINUE INSTALLATION ON PAGE 16 CONTINÚE LA INSTALACIÓN EN LA PÁGINA 16...
- Page 14 TV MOUNTING OPTIONS B-D...
- Page 15 TV MOUNTING OPTIONS B-D 10mm 15mm 20mm 25mm 30mm HAND TIGHTEN ONLY APRIETE A MANO SOLAMENTE Note: M4 screws (Part M-A, M-B) not recommended for hole patterns greater than 400mm x 400mm. Nota: Tornillos M4 (Parte M-A, M-B) no son recomendables para patrones de agujeros mayores a los 400x400mm.
-
Page 16: Wood Stud Installation
WOOD STUD INSTALLATION Find stud and mark edge and center locations Wood Stud Ubique el panel y marque las ubicaciones de los bordes y el centro. Panel de madera Poutre de bois Repérez l'emplacement d'une poutre, puis marquez l'emplacement des bords et du centre de cette poutre. Holzbalken Suchen Sie einen Balken und markieren Sie Seiten und Mitte. - Page 17 WOOD STUD INSTALLATION Drill pilot holes Wood Stud Realice el agujero piloto Panel de madera Percez le trou de guidage Poutre de bois Bohren Sie die Vorbohrung Holzbalken Boor een montagegat Houten dragers Trapanare il foro pilota Montante in legno Wywierć...
- Page 18 WOOD STUD INSTALLATION Mount wall plate/arm assembly to wood studs and level Instale la placa de pared o el brazo en los montantes de madera y nivele Fixez la plaque murale/le bras aux poteaux de cloison en bois et réalisez les ajustements nécessaires Montieren sie die wandplatte mit dem arm an den holzbalken und richten sie sie aus Bevestig de wandplaat/arm aan de houten dragers en zorg dat alles waterpas is Montare il gruppo piastra/braccio a muro sui montanti in legno e mettere in bolla...
- Page 19 SOLID CONCRETE INSTALLATION Use wall plate to mark mounting location Use la placa de pared para marcar el lugar donde se realizará la instalación Utilisez la plaque murale pour marquer l'emplacement de montage Verwenden Sie die Wandplatte, um die Montagestelle zu markieren Gebruik de wandplaat om de montageplaats af te tekenen Utilizzare la piastra a muro per segnare la posizione di montaggio Użyj płyty ściennej do oznaczenia miejsca montażu...
- Page 20 SOLID CONCRETE INSTALLATION Drill pilot hole Solid Concrete Realice el agujero piloto Concreto sólido Percez le trou de guidage Béton massif Bohren Sie die Vorbohrung Beton Boor een montagegat Massief beton Trapanare il foro pilota Calcestruzzo pieno Wywierć otwór pilotowy Beton zwykły Vyvrtejte vodicí...
- Page 21 SOLID CONCRETE INSTALLATION Mount wall plate/arm assembly to solid concrete and level instale la placa de pared o el brazo en la pared de hormigón y nivele Fixez la plaque murale/le bras au béton massif et réalisez les ajustements nécessaires Montieren sie die wandplatte mit dem arm an der betonwand und richten sie sie aus Bevestig de wandplaat/arm aan de het massieve beton en zorg dat alles waterpas is Montare il gruppo piastra/braccio a muro sul calcestruzzo e mettere in bolla...
- Page 22 STEP - 03 Reinstall Vuelva a instalar Réinstaller Neu installieren Herinstalleren Reinstallare Zamocować ponownie Reinstalovat Helyezze be újra Επανεγκαταστήστε Reinstalar Genmonter Asenna uudelleen Installera om Reinstalare Преинсталирай Paigaldage uuesti. Instal ē t atk ā rtoti Sumontuoti iš naujo Znova namestite Opätovne nainštalovať...
- Page 23 STEP - 04 Hang with monitor attached Cuelgue con el monitor adherido. Accrochez avec le moniteur installé. Mit dem befestigten Monitor aufhängen. Hang op terwijl de monitor is bevestigd. Appendere con lo schermo attaccato. Powieś z przymocowanym monitorem. Zavěste s připevněným monitorem. Függessze fel a monitorral együtt.
- Page 24 STEP - 05 Level Nivel Niveau Wasserwaage Waterpas Livellare Poziomnica Vodováha Szintező Αλφάδι Nível Vaterpas Vesivaaka Pass Nivelă Ниво Lood Līmenis Lygis Vodna tehtnica Vodováha Уровень Aynı Seviyeye Getir Vater ﻣﻴﺰان 调...
- Page 25 STEP - 06 Adjust to Desired Location or Tilt Ajuste a la inclinación o ubicación deseada Ajustez à la position désirée ou inclinez An die gewünschte Position anpassen oder neigen Stel in op de gewenste plaats of kantel Regolare la posizione o l'inclinazione come desiderato Dopasuj do żądanego położenia lub nachylenia Upravte polohu tak, abyste dosáhli požadovaného umístění...
- Page 26 STEP - 07 Route Cables Tienda los cables Installez les câbles Verlegen Sie die Kabel Plaats de kabels Inserire i cavi Poprowadź kable Natáhněte kabely Vezesse el a kábeleket. Δρομολόγηση καλωδίων Dispor os cabos Føringskabler Reititä kaapelit Lägg kablar Direcţionaţi cablurile Маршрутни...
-
Page 27: International Warranty Information
Esta garantía se aplica a los residentes de los Estados Unidos que realizaron la compra en un distribuidor autorizado de OmniMount. Esta garantía cubre los productos OmniMount de los defectos de materiales y de mano de obra por un periodo de 5 años. OmniMount, a su exclusivo criterio, reparará o reemplazará el producto o componente defectuoso. En caso de que no se sigan las instrucciones de Omnimount para el cuidado del producto la garantía quedará... - Page 28 .اﻻﺗﺼﺎل ﻟﻠﻤﺴﺎﻋﺪة، ﻓﺎﻟﺮﺟﺎء ﺑﺤﺎﺟﺔ آﻨﺖ إذا 您 吗 请 OmniMount Systems, Inc. 8201 South 48th Street Phoenix, AZ 85044-5355 1-800-MOUNT-IT (1-800-668-6848) www.omnimount.com All trademarks are the property of their respective companies. OmniMount is a registered trademark of OmniMount Systems, Inc. © 2010...