Eton SOLARLINK FR600 Owner's Manual
Self-powered digital am/fm/sw/noaa/s.a.m.e. weather radio with flashlight, siren, solar power and cell phone charger
Hide thumbs
Also See for SOLARLINK FR600:
- Owner's manual (69 pages) ,
- Owner's manual (18 pages) ,
- Owner's manual (33 pages)

Related Manuals for Eton SOLARLINK FR600


Summary of Contents for Eton SOLARLINK FR600
- Page 1 SOLARLINKFR600 Self-powered Digital AM/FM/SW/NOAA/S.A.M.E. Weather Radio with Flashlight, Siren, Solar Power and Cell Phone Charger Owner’s manual...
-
Page 3: Do You Need Help
DO YOU NEED HELP? If you need help, please contact us, Monday-Friday, 8:00 a.m.-4:30 p.m., North American Pacific Time. 1-800-872-2228 from the U.S; 1-800-637-1648 from Canada; 650-903-3866, worldwide; FAX: 650-903-3867; web site, www.etoncorp.com; Etón Corporation, 1015 Corporation Way, Palo Alto, CA 94303, USA WARNING •... -
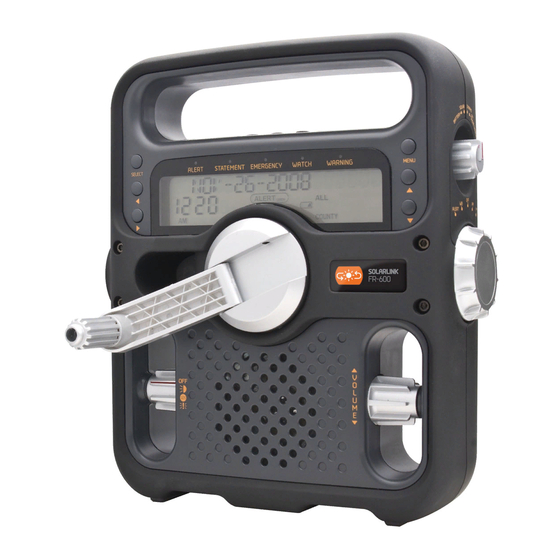
Page 4: Location Of Controls
LOCATION OF CONTROLS 1) Snooze: 5 Min Snooze 2) Alarm ON/OFF: activate/deactivate alarm function 3) ALERT ON/OFF:open/close alert bell 4) Select Button 5) Direction Buttons 6) Flashlight 7) Hand Crank 8) Multifunctional Knob 9) Alert Indicator Light 10) Statement Indicator Light 11) Emergency Indicator Light 12) Watch Indicator Light 13) Warning Indicator Light... - Page 5 22) Audio Jack 23) Battery Compartment POWERING THE FR600 The FR600 can be powered in a variety of ways including 3 AA batteries, the internal rechargeable Nickel-Metal-Hydride battery, the solar panel, an AC adapter/charger and a USB cord with a mini- USB plug on one end and a regular USB on the other, plugged in to a computer (turned on) or an AC adapter with a USB socket.
- Page 6 SOLARLINKFR600 OWNER’S MANUAL Note: The Power Supply Knob and the Band Selecting Knob are on the right side of the radio. The Power Supply Knob is on top and the Band Selecting Knob is on the bottom. The radio is turned OFF with the Band Selecting Knob placed in the OFF position.
- Page 7 SOLARLINKFR600 OWNER’S MANUAL sunlight for 8 to 10 hours to get a full charge. After charging, if you take it out of the sunlight, be sure to select DYNAMO with the Power Supply Knob. USING AN AC ADAPTER/CHARGER OR USB CORD TO PLAY THE RADIO OR TO RECHARGE THE Ni-MH BATTERY To purchase an AC adapter/charger (not included), order part# FR500-ACA-US by calling 1-800-793-6542.
-
Page 8: Volume Control
SOLARLINKFR600 OWNER’S MANUAL the other end into a computer’s USB socket (with the computer turned on) or an AC adapter with a USB socket. Operating from a USB cord has the same characteristics as an AC adapter, with the following exceptions. If the USB cord is plugged in with the rechargeable battery and/ or AA batteries connected, if there is a failure of the USB power source, power will be taken from the rechargeable battery if DY-... -
Page 9: Setting The Date
If you decide to stop cranking for whatever reason, please wait at least 5 seconds before beginning to crank again. Not following these instructions may cause damage to your cell phone for which Eton disclaims any liability and will not be held liable for any actual or consequential damages related to this matter. -
Page 10: Setting The Clock
SOLARLINKFR600 OWNER’S MANUAL SETTING THE CLOCK 1. Revolve the <Band Selecting Knob> to the “OFF” position. 2. With the radio turned off press the <MENU> button shortly to enter the setting menu. 3. Press <> or <> shortly to select “SET UP---TIME” option. 4. -
Page 11: Setting The Alarm Time
SOLARLINKFR600 OWNER’S MANUAL 1. SETTING THE ALARM TIME 1. Revolve the <Band Selecting Knob> to the “OFF” position. 2. With the radio turned off press the <MENU> button shortly to enter the setting menu. 3. Press <> or <> shortly to select “SET UP ALARM--ALM” option. 4. -
Page 12: Snooze Button
3. SNOOZE BUTTON When the alarm activates, pressing the <SNOOZE> button shortly deactivates it for 5 minutes (“ play), then it starts again. BROADCAST RECEPTION 1. Select the power supply mode. 2. Select the band: FM Band: Revolve the <Band Selecting Knob> to “FM” position. AM Band: Revolve the <Band Selecting Knob>... - Page 13 5. Save stations: While receiving the approving station, press <MENU> shortly once, “MEMORY” appears in the display. Press <> or <> shortly to select the address for saving. Then press <SELECT> shortly to save the station. (Note: FM: 20 memories; AM: 10 memories; SW: 10 memories.) 6.
- Page 14 OPTIMIZING SHORTWAVE RECEPTION Shortwave enables listening to broadcasts over vast distances including other countries and continents. The following information will help you get the best results. • During the day, frequencies above 13 MHz are usually best. • At night, frequencies below 13 MHz are usually best. •...
- Page 15 RECEPTION OF WEATHER FREQUENCIES To hear your local weather station, pull up the antenna, turn on the radio and select WB with the band selector. Turn up the volume and press the buttons to hear all 7 weather channels. You’ll probably only hear one channel, but if you hear a weather broadcast on more than one, select the strongest.
-
Page 16: Setting Alert Mode
4) Press <SELECT> shortly once to enter the weather setting mode. 5) Press <> or <> shortly to select the strongest weather channel (CH1~7). 6) After setting, press <SELECT> shortly to save. SETTING ALERT MODE 1) Revolve the <Band Selecting Knob> to “OFF” position. 2) Press <MENU>... - Page 17 Your radio can be set for one (SINGL) to 23 (MULTI) codes, or can be set to receive ALL coded information sent from any transmitter, if your within range. When you set codes, it will only pick up alerts when you’re in that county or within reception distance of the signal. To set codes: 1) Revolve the <Band Selecting Knob>...
- Page 18 12) The first digit of six flashes, use or to set it and press to enter the next number, doing this again and again until all six digits are entered. 13) Press <SELECT> to choose another code number (1-23) and when your finished press <SELECT>...
-
Page 19: Multifunction Knob
SOLARLINKFR600 OWNER’S MANUAL ALERT Before using the ALERT function, set the radio to the strongest weather band station. After setting, revolve the <Band Selecting Knob> to “ALERT” position. The alert indicator light will be on. OPEN / CLOSE THE ALERT BELL While the alert bell is ringing, you can press the <ALERT-ON/OFF>... -
Page 20: Warranty Registration
WARRANTY REGISTRATION To ensure full warranty coverage or product updates, registration of your product should be completed as soon as possible after purchase or receipt. You may use one of the following options to register your product: 1. By visiting our website at http://www.etoncorp.com. 2. - Page 21 SOLARLINKFR600 OWNER’S MANUAL WARRANTY – If your product is still in warranty and the Etón service representative determines warranty service is needed, a return authorization will be issued and instructions will be given. DO NOT ship your radio back without obtaining the return authorization. NON-WARRANTY –...
-
Page 23: Avez-Vous Besoin D'aide
AVEZ-VOUS BESOIN D’AIDE? Si vous avez besoin d’aide, veuillez nous contacter, Du Lundi au Vendredi, 8:00 à.- 16:30., Fuseau horaire du Pacifique Amérique du Nord. 1-800-872-2228 depuis les U.S.A; 1-800-637-1648 depuis le Canada; 650-903-3866, ailleurs dans le monde; FAX: 650-903-3867; site Internet, www.etoncorp.com; Etón Corporation, 1015 Corporation Way, Palo Alto, CA 94303, USA AVERTISSEMENT •... -
Page 24: Emplacement Des Commandes
EMPLACEMENT DES COMMANDES 1) SNOOZE (Répétition d’alarme) : Snooze de 5 Min 2) ALARME Marche/Arrêt:Activer/Désactiver la fonction alarme 3) ALERTE Marche/Arrêt: lance/ferme la sonnerie d’alerte 4) Bouton de sélection 5) Bouton de direction 6) Flash 7) Manivelle 8) Molette multifonctionnelle 9) Indicateur lumineux d’alerte 10) Indicateur lumineux d’état 11) Indicateur lumineux d’urgence... - Page 25 22) Prise audio 23) Compartiment des piles ALIMENTER LE FR600 Vous pouvez utiliser plusieurs types d’alimentations avec le FR600, dont : 3 piles AA, la batterie rechargeable interne nickel-hydrure métallique, le panneau solaire, un adaptateur/chargeur secteur, un câble USB pourvu d’une fiche mini USB et d’une fiche USB normale branchée sur un ordinateur (allumé) ou sur un adaptateur secteur...
- Page 26 GUIDE DE L’UTILISATEUR DU SOLARLINKFR600 REMARQUE: Le Bouton de Sélection de la Bande de Fréquences et le Bouton de Sélection de l’Alimentation sont positionnés sur le côté droit de la radio. Le Bouton de Sélection de l’Alimentation est situé au-dessus du Bouton de Sélection de la Bande de Fréquences.
- Page 27 GUIDE DE L’UTILISATEUR DU SOLARLINKFR600 RECHARGER LA BATTERIE Ni-MH AVEC LE PANNEAU SOLAIRE Rechargez la radio avec le panneau solaire équivaut à re- charger sa batterie rechargeable Ni-MH. Éteignez la radio en actionnant le Bouton de Sélection de la Bande de Fréquences. Positionnez le Bouton de Sélection de l’Alimentation sur SOLAR (solaire).
- Page 28 GUIDE DE L’UTILISATEUR DU SOLARLINKFR600 Éteignez la radio en actionnant le Bouton de Sélection de la Bande de Fréquences. Branchez l’adaptateur/chargeur secteur (non fourni) dans la prise gauche, marquée « DC IN 5V » sous le capuchon en caoutchouc droit présent au dos de la radio. Posi- tionnez le Bouton de Sélection de l’Alimentation sur DYNAMO.
-
Page 29: Contrôle Du Volume
GUIDE DE L’UTILISATEUR DU SOLARLINKFR600 Si le câble USB est branché et que la batterie rechargeable est également branchée ou que des piles AA sont installées dans la radio, en cas de coupure de l’alimentation USB, la radio est alimen- tée par sa batterie rechargeable si DYNAMO est sélectionné... -
Page 30: Réglage De La Date
5 secondes avant de recommencer à tourner la manivelle. Ne pas suivre ces instructions peut endommager votre téléphone portable pour lequel Eton se déclare non responsable et ne sera pas tenu responsable pour tout dommages réel ou consécutif relatif à ce cas. -
Page 31: Réglage De L'horloge
6. Appuyez brièvement sur <> ou <> pour régler l’option “MOIS-JOUR-ANNÉE” ( “MONTH--DAY--YEAR”). 7. Après réglage, appuyez brièvement sur <SELECT> pour sauvegarder. RÉGLAGE DE L’HORLOGE 1. Tournez la <Molette de sélection de bande> sur la position Arrêt (“OFF”). 2. Appuyez brièvement sur le bouton <MENU> pour entrer dans le menu de configuration. - Page 32 REMARQUE: L’horloge affiche l’heure sur 12 heures, avec les indications « AM » le matin et « PM » l’après-midi. RÉGLAGE DE L’ALARME QUI EMET UN BIP Cette alarme de radio émet un bip lorsqu’elle est active. 1. RÉGLAGE DE L’HEURE DE L’ALARME 1) Tournez la <Molette de sélection de bande>...
-
Page 33: Activation Et Désactivation De L'alarme
2. ACTIVATION ET DÉSACTIVATION DE L’ALARME Appuyez brièvement sur <ALARM MARCHE/ARRÊT (ON/ OFF)> pour activer ou désactiver l’alarme. Si l’alarme est activée, le symbole de l’alarme “ programmée de déclenchement de l’alarme sont affichés. Quand l’heure programmée est atteinte, l’appareil sonne. Si l’alarme est désactivée, le symbole de l’alarme “... - Page 34 4. Syntonisation de stations: Syntonisation manuelle: Appuyez brièvement sur <> ou <> pour syntoniser. Syntonisation automatique: Appuyez et restez appuyé sur <> ou <> pour syntoniser. REMARQUE: Lors de l’écoute de la FM, dépliez entièrement l’antenne télescopique Lors de la syntonisation de stations AM, l’antenne télescopique n’est pas nécessaire et peut être rabaissée.
- Page 35 6. Rappel des stations: Lors de l’écoute de la radio, appuyez brièvement sur <> ou <>. 7. Pour éteindre: tournez la <molette de sélection de bande> sur la position “OFF”. ÉCOUTE DES ONDES COURTES Pour en savoir plus sur les ondes courtes nous recommandons les deux publications ci-dessous, publiées chaque année et disponibles dans la plupart des librairies.
- Page 36 Rapprochez-vous très près d’une fenêtre et tenez votre radio pour améliorer la réception des ondes courtes. RÉCEPTION DES FRÉQUENCES MÉTÉO Pour écouter votre station locale météo, dépliez l’antenne, allumez la radio et sélectionnez WB avec le sélecteur de bande. Augmentez le volume et appuyez sur les boutons pour entendre les 7 canaux météo.
- Page 37 4) Appuyez brièvement une fois sur <SELECT> pour entrer dans le mode de configuration météo. 5) Appuyez brièvement sur <> ou <> pour sélectionner le canal météo le plus puissant (CH1~7). 6) Après réglage, appuyez brièvement sur <SELECT> pour sauvegarder. RÉGLAGE DU MODE ALERTE 1) Tournez la <molette de sélection de bande>...
- Page 38 RÉGLAGE DES CODES DE RÉGION (COMTÉ) (Codes CLC Au Canada) Le réglage de code de comté est décrit ci-dessous. Un code de comté indique à la radio de ne recevoir qu’une Alerte lorsque le code est programmé dans la radio. Consultez le code des Etats-Unis sur le site Internet suivant: http://www.nws.noaa.gov/nwr/indexnw.htm#sametable Consultez le code CLC Canadien sur:...
- Page 39 4) Appuyez brièvement une fois sur <SELECT> pour entrer dans le mode de configuration du code de comté (MULTI, SINGL ou ALL), qui va clignoter à l’affichage. 5) Si vous ne connaissez pas votre code de comté, sélectionnez ALL avec ou et appuyez sur <SELECT> et puis sur <MENU> pour quitter.
- Page 40 RÉCEPTION DES CODES D’ÉVÈNEMENT Votre radio peut recevoir des informations de type ‘Code d’évènement’ durant les alertes météo. Ces codes sont identifiés sur http://www.nws.noaa.gov/os/eas_codes.shtml. Les alertes météo canadienne sont sur: http://www.msc-smc.ec.gc. ca/cd/brochures/warning_e.cfm#top. SÉLECTION DE DÉSACTIVER (DISABLE)/ ACTIVER (ENABLE) Les modes d’alerte peuvent être sélectionnés pour ne pas apparaître en sélectionnant DISABLE ou pour apparaître en sélec- tionnant ENABLE.
- Page 41 GUIDE DE L’UTILISATEUR DU SOLARLINKFR600 7) Après réglage, appuyez brièvement sur <SELECT> pour sauvegarder. ALERTE Avant d’utiliser la fonction ALERTE, réglez la radio sur la station météo la plus puissante. Après réglage, tournez la <Molette de sélection de bande> sur la position “ALERT”. Le voyant indicateur d’alerte s’éclaire.
-
Page 42: Enregistrement De La Garantie
ENREGISTREMENT DE LA GARANTIE Pour pièces de rechange et main d’oeuvre.Afin d’assurer une couverture complète de la garantie et les mises à jour du produit, l’enregistrement de votre produit doit être effectué le plus tôt possible après l’achat ou la réception. Vous pouvez utiliser une des options suivantes pour enregistrer votre produit: 1. - Page 43 GUIDE DE L’UTILISATEUR DU SOLARLINKFR600 GARANTIE – Si votre produit est toujours sous garantie et si le représentant du service clientele de Etón juge nécessaire une réparation garantie, une autorisation de retour sera délivrée ainsi que les instructions pour l’expédition à un atelier agréé pour la réparation sous garantie.
-
Page 45: Necesita Ayuda
Hora del Pacífico Norteamericano. 1-800-872-2228 en Estados Unidos; 1-800-637-1648 en Canadá; 650-903-3866, para el resto del mundo; FAX: 650-903-3867; sitio web, www. etoncorp.com; Eton Corporation, 1015 Corporation Way, Palo Alto, CA 94303, USA ATENCIÓN • No exponer este aparato a la lluvia ni a la humedad. -
Page 46: Ubicación De Los Controles
UBICACIÓN DE LOS CONTROLES 1) SIESTA: Siesta de 5 min. 2) ALARMA ENCENDIDO/APAGADO: Activa/desactiva la función de alarma 3) ALERTA ENCENDIDO/APAGAFO: abre/cierra el timbre de alerta 4) Botón Seleccionar 5) Botón Dirección 6) Linterna 7) Manivela 8) Botón multifuncional 9) Luz indicadora de alerta 10) Luz indicadora de comunicado 11) Luz indicadora de emergencia 12) Luz indicadora de atención... - Page 47 22) Enchufe para audio 23) Compartimento para baterías ALIMENTACIÓN DEL APARATO MODELO FR600 El aparato modelo FR600 puede alimentarse de diferentes modos; es decir, utilizando 3 pilas de tipo AA, el acumulador interno recargable de níquel-hidruro metálico, su panel solar incorporado, un adaptador de corriente/cargador, un cable USB equipado con un conector mini USB en un extremo y un conector USB estándar...
- Page 48 MANUAL DEL USUARIO DEL SOLARLINKFR600 en el otro que se encuentre conectado a un ordenador (encen- dido), así como utilizando un adaptador de corriente equipado con puerto USB. Todos estos métodos de conexión se describen de manera más detallada a continuación. Nota: El mando de encendido y el de selección de banda se encuentran ubicados en el lado derecho de la radio.
- Page 49 SOLARLINKFR600 MANUAL DEL USUARIO DEL (no junto a una ventana donde reciba claridad ni en la sombra), de manera que la luz del sol incida directamente sobre el panel solar. Al cabo de unos minutos de carga, es posible que pueda utilizar la radio girando el mando de selección de banda mientras se lleva a cabo el proceso de carga.
- Page 50 MANUAL DEL USUARIO DEL SOLARLINKFR600 UTILIZACIÓN DE UN ADAPTADOR DE CORRIENTE/ CARGADOR O CABLE USB PARA HACER FUNCIONAR LA RADIO O RECARGAR EL ACUMULADOR DE Ni-MH Si desea adquirir un adaptador de corriente/cargador (no incluido), solicite la referencia de pieza FR500-ACA-US llamando al número de teléfono 1-800-793-6542.
- Page 51 SOLARLINKFR600 MANUAL DEL USUARIO DEL se interrumpirá la carga del acumulador recargable de Ni-MH. Si se desconecta tanto el acumulador como las pilas, el adaptador de corriente permitirá hacer funcionar la radio seleccionando las posiciones “DYNAMO” (acumulador recargable) o “BATTERY” (pilas) con el mando. Adquiera en cualquier tienda local de componentes electrónicos o a través del Internet un cable USB equipado con un conector mini USB en un extremo y un conector USB estándar en el otro.
- Page 52 5 segundos antes de empezar de nuevo. El no seguir estas instrucciones puede causar el daño de su teléfono móvil y por lo tanto Eton renuncia a cualquier responsabilidad y no se hará responsable por ningún daño como...
- Page 53 COMO AJUSTAR LA FECHA 1. Gire el <Botón de selección de banda> a la posición “OFF” (apagado). 2. Con la radio apagada, pulse brevemente el botón <MENU> para acceder al menú de configuración. 3. Presione <> o <> brevemente para seleccionar la opción “AJUSTAR --- FECHA”.
- Page 54 COMO AJUSTAR EL RELOJ 1. Gire el <Botón de selección de banda> a la posición “OFF” (apagado). 2. Presione el botón <MENU> brevemente para entrar al menú de ajustes. 3. Presione <> o <> brevemente para seleccionar la opción “AJUSTAR --- HORA”. 4.
- Page 55 COMO AJUSTAR LA ALARMA DE TONO La alarma de esta radio pita cuando se activa. 1. COMO AJUSTAR LA HORA DE ALARMA 1. Gire el <Botón de selección de banda> a la posición “OFF” (apagado). 2. Con la radio apagada, pulse brevemente el botón <MENU> para acceder al menú...
- Page 56 2. COMO ACTIVAR Y DESACTIVAR LA ALARMA Presione <ALARMA ENCENDER/APAGAR> brevemente para activar o desactivar la alarma. Cuando la función de alarma esté activada, la pantalla mostrará el símbolo “ AL” y la hora configurada para que suene la alarma. Una vez alcanzada la hora especificada para la alarma, el aparato comenzará...
- Page 57 3. Ajuste el volumen: Gire el <Botón de ajuste del volumen > para ajustar el nivel del volumen. 4. Como sintonizar estaciones: Sintonizado manual: Presione <> o <> brevemente para sintonizar. Sintonizado automático: Presione y sostenga <> o <> para sintonizar. Nota: Cuando escuche FM, extienda la antena telescópica completamente.
- Page 58 ESCUCHAR ONDA CORTA Para aprender más sobre onda corta le recomendamos las dos siguientes publicaciones, las cuales son publicadas anualmente y están disponibles en las principales librerías. Adicionalmente, Internet es una gran fuente de recursos para el aprendizaje sobre onda corta. PASAPORTE AL MUNDO DE LAS BANDAS DE RADIO Publicado por International Broadcasting Services (IBS);...
- Page 59 BANDA MEGAHERTZ (MHz) 120 m 2.300-2.495 MHz 90 m 3.20-3.40 MHz 75 m 3.90-4.05 MHz 60 m 4.750-5.1 MHz 49 m 5.8-6.2 MHz 41 m 7.1-7.60 MHz 31 m 9.4-10 MHz 25 m 11.5-12.2 MHz 22 m 13.57-13.87 MHz 19 m 15.000-15.800 MHz 16 m 17.55-18 MHz...
- Page 60 COMO AJUSTAR PARA RECIBIR ALERTAS DEL CLIMA Las alertas del clima se reciben de tres formas: 1. La luz del indicador de alerta se enciende. 2. Alerta del tiempo aparece en la pantalla. 3. El timbre de alerta suena. Para ajustar el canal de recepción de alertas, use el siguiente método y ajústelo a su canal más fuerte.
- Page 61 3) Presione <> o <> brevemente para seleccionar la opción “ALERT MODE” (modo de alerta). 4) Presione <SELECCIONAR> brevemente una vez para entrar al modo de ajuste del modo de alerta. 5) Presione <> o <> brevemente para seleccionar el modo de alerta (SIREN-Sirena &...
- Page 62 Su radio puede ajustarse para recibir uno de los códigos (SINGL) a 23 (MULTI), o puede recibir la información de TODO la información codificada enviada desde cualquier transmisor, si usted está al alcance. Cuando ajusta los códigos, solo recibirá alertas cuando este en el condado o dentro de la distancia de recepción de la señal.
- Page 63 9) Si esta en SINGL, presione <SELECCIONAR> y luego <MENU> para salir. Si esta en MULTI, continúe con el siguiente paso. 10) Si esta en MULTI y desea entrar más códigos, presione <SELECT>. 11) 01 parpadea. Presione o para ir al ajuste de otro número del código (1-23 parpadea) y presione <SELECT>.
- Page 64 3) Presione <> o <> brevemente para seleccionar la opción “DEFEAT” (derrota). 4) Presione <SELECCIONAR> brevemente una vez para entrar al modo de ajuste DEFEAT. 5) Presione <> o <> brevemente para seleccionar el mensaje de alerta que desea retirar o habilitar. 6) Presione <>...
-
Page 65: Botón Multifunción
(localizado generalmente en/cerca del compartimiento de las baterías): Eton Corporation 1015 Corporation Way Palo Alto, CA 94303 “ enciende la luz blanca (lado... -
Page 66: Garantía Limitada
Para obtener un servicio de reparación de su producto, recomendamos, lo primero, que usted se ponga en contacto con un representante del servicio de reparación de Eton, llamando al 800-872-2228 EE.UU., 800-637-1648 Canadá ó (650) 903-3866 para determinar el problema y su solución. Si se requiriera un servicio adicional, el personal técnico le instruirá... - Page 67 SOLARLINKFR600 MANUAL DEL USUARIO DEL NO GARANTÍA – Si su producto ya no se encuentra en garantía y requiere de servicio de reparación, nuestro personal técnico le referirá a la instalación de reparación más cercana y que mejor sea capaz de hacerse cargo de la reparación. Para el servicio de reparación fuera de Norteamérica, por favor refiérase a la información del distribuidor incluida en el momento de compra/recibo del producto.
- Page 68 Etón Corporation Corporate Headquarters 1015 Corporation Way Palo Alto, California 94303 USA tel +1 650-903-3866 tel +1 800-872-2228 fax +1 650-903-3867 Etón Canada 1 Yonge Street, Suite 1801 Toronto, Ontario M5E 1W7 Canada tel +1 416-214-6885 v. 020311 Designed by Etón Corporation and assembled in China. © Copyright 2011 Etón Corporation. All rights reserved.