Table of Contents
Advertisement
Instruction
Manual
J€:RAFTSMA#°J
34cc/2.1 cu.in. 4-Cycle
GASOLINE
WEEDWAOKER
®
Model No.
358.796121
•
Safety
•
Assembly
•
Operation
•
Maintenance
•
Parts List
•
Espar_ol
For Occasional
Use Only
WARNING:
Read and follow all Safety
Rules and Operating
Instructions
before first use of this product.
For answers
to your questions
about this product:
Call 7 am-7
pm, Mon.-Sat.,
or 10 am-7
pm, Sun.
1-800-235-5878
_Hoo,s
listed are Central
Time)
Sears, Roebuck
and Co., Hoffman
Estates,
IL 60179 U.S.A.
530165093
4/20/04
Advertisement
Table of Contents

Related Manuals for Craftsman WEEDWACKER 358.796121


Summary of Contents for Craftsman WEEDWACKER 358.796121
- Page 1 Instruction Manual J€:RAFTSMA#°J 34cc/2.1 cu.in. 4-Cycle GASOLINE WEEDWAOKER ® Model No. 358.796121 • Safety • Assembly • Operation • Maintenance • Parts List • Espar_ol For Occasional Use Only WARNING: Read and follow all Safety Rules and Operating Instructions before first use of this product. For answers to your questions about this product:...
- Page 2 Back Cover FULL TWO YEAR WARRANTY ON CRAFTSMAN ® GAS POWERED WEEDWACKER ® LINE TRIMMER. For two years from the date of purchase, when this Craftsman Gas Powered Weedwacker Line Trimmer is maintained, lubricated, and tuned up according the operating...
- Page 3 OPERATOR SAFETY ,_LWARNING: When using gar- • Dress properly. Always wear safety dening appliances, basic safety pre- glasses similar protection cautions must always be followed to when operating, or performing main- reduce the risk of fire and serious tenance, on your unit (safety glasses injury.
- Page 4 • Keep o thers away w hen m aking car- equipped with a temperature limiting buretor adjustments. muffler and spark arresting screen • Useonlyrecommended Craftsman which meets the requirements of Cali- fornia Codes 4442 and 4443. All U.S. accessories and replacement parts.
- Page 5 ADDITIONAL BLOWER/VACUUM SAFETY SAFETY RULES FOR OPTIONAL ATTACHMENTS _,WARNING: Inspect area before starting unit. Remove all debris and '_WARNING: For each optional hard objects such as rocks, glass, attachment used, read entire opera- wire, etc. that can ricochet, be thrown, tors manual before use and follow all or otherwise cause injury or damage...
- Page 6 _WARNING:The blade c ontin- ues tospin after t he throttle isre- leased orengine isturned o ff.The 411WARNING: Inspect the area to coasting blade c an throw objects or be cultivated before starting the unit. seriously cut y ou ifaccidentally Remove all debris and hard and sharp touched.
- Page 7 thrown, orotherwise cause i njury o r damage during operation. dIIWARNING: To prevent serious • Do not u se acutting blade that i sbent, injury, do not use more than one boom warped, cracked, broken ordamaged extension with a pole pruner attach- inany other way.
- Page 8 • Direct material discharge away f rom • Never operate thesnowthrower near glass e nclosures, automobiles, etc. glassenclosures, automobiles trucks. • Do not r un engine athigh s peed while not r emoving snow. • Never attempt touse the snowthrow- erona roof.
- Page 9 ATTACHING THE SHOULDER _WARNING: Make sure the lock- STRAP ing/release button is locked in the pri- '_WARNING: Proper shoulder mary hole and the knob is securely tightened before operating the unit. strap adjustments must be made with All attachments are designed to be the engine completely stopped before used in the primary hole.
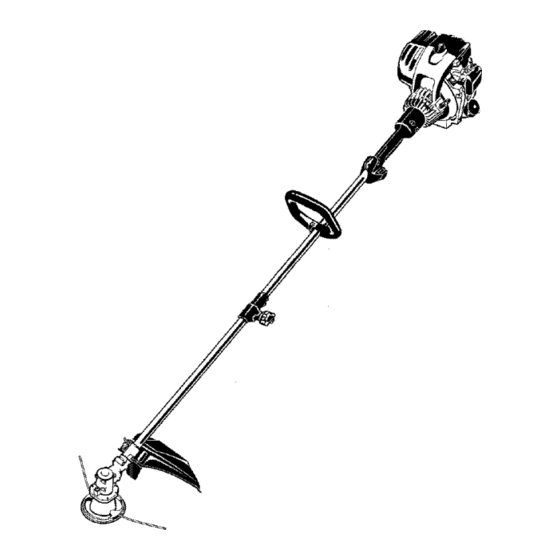
- Page 10 KNOW Y OUR TRIMMER READ THIS iNSTRUCTiON MANUAL AND SAFETY RULES BEFORE OPERATING YOUR UNIT. Compare the illustrations with your unit to familiarize yourself with the location of the various controls and adjustments. Save this manual for future reference. Assist Handle Trimmer Head Coupler...
- Page 11 CAUTION: Air cooled engines hotter than automotive engines. 1 ounce ---.,__ use of non-synthetic multi-viscosity oils (5W30, 10W30, etc.) in tempera- tures above 40"F (4"C) will result in 0.5 ounce __ higher than normal oil consumption. When using a multi-viscosity oil, 1.
- Page 12 Check oil level before each use. Add HOW TO STOP YOUR UNIT oil if needed. Fill to FULL line on dip- • To stop the engine, move the ON/ stick. Change oil after first 4 hours of OFF switch to the OFF position. use, then every 8 hours of operation •...
- Page 13 5=Pull starter rope handle sharply until Edger ....358.792403 engine runs. Cultivator .... 358.792410 6=Once t he engine starts, allow itto Blower ....358.792421 run amaximum of10seconds at Brusbcutter ..358.792443 FULL CHOKE. Then, slowly move Pruner ....358.792450 thered choke l ever tothe HALF CHOKE position.
- Page 14 damage the trimmer head, become _WARNING: Make sure the lock- entangled in the line, or be thrown ing/release button is locked in the pri- causing a serious hazard. mary hole and the knob is securely • The tip of the line does the cutting. tightened before operating the unit.
- Page 15 SWEEPING - The fanning action of the Scalping rotating line can be used to blow away loose debris from an area. Keep the line parallel to and above the area surface and swing the tool from side to side. Sweeping MOWING - Your trimmer is ideal for mowing...
- Page 16 hold waste. Contact Sears Service for • Once each year, replace the spark plug and air filter. A new spark plug information regarding safe disposal/re- and clean/new air filter assure proper cycling facilities. air-fuel mixture and help your engine Change oil while engine is OFF, but run better and last longer.
- Page 17 After 50 hours of use, we rec- Reinstall the spark plug boot. LINE REPLACEMENT Insert both ends of your line • Always use Craftsman replacement through the proper holes in the line. side of the cutting head. Choose the line size best suited for the job at hand.
- Page 18 all.WARNING: Perform the follow- ingsteps a fter e ach u se: CAUTION: Storing unit in • Allow engine tocool before storing ortransporting. • Store u nit a nd fuel i nawell venti- lated a rea where f uel v apors cannot reach s parks oropen f lames from water heaters, electric motors or switches,...
- Page 19 TROUBLESHOOTING TABLE _,WARNING: Always stop unit and disconnect spark plug before perform- ing all of the recommended remedies below except remedies that require operation of the unit. CAUSE REMEDY TROUBLE Engine will not 1. Move ON/OFF switch to ON position, 1.
- Page 20 YOUR WARRANTY RIGHTS AND OB- mends that you retain all receipts cover- LIGATIONS: EMISSION CONTROL ing maintenance on your small off-road WARRANTY COVERAGE IS APPLI- engine, but Sears cannot deny warranty CABLE TO CERTIFIED ENGINES solely for the lack of receipts or for your PURCHASED IN CALIFORNIA IN 1995...
- Page 21 e. Miscellaneous Items Used Maintenance Above Systems Any Warranted Part which is not • Vacuum, temperature, posi- scheduled for replacement as re- tion, time sensitive valves quired maintenance or which is and switches scheduled only for regular inspec- • Connectors and assemblies tion to the effect of "repair or re- Length of Coverage...
- Page 22 ON ENGINE EMISSIONS COM- running time for which the engine is PLIANCE LABEL certified to be emissions compliant, After July 1, 2000, certain Craftsman assuming proper maintenance in ac- engines will be certified to meet the cordance with the operating...