Table of Contents
Advertisement
Quick Links
HOME CINEMA COMMAND
MODEL
HT-CN300W
OPERATION MANUAL
Thank you for purchasing this SHARP product. To obtain the best
performance from this product, please read this manual carefully.
It will guide you in operating your SHARP product.
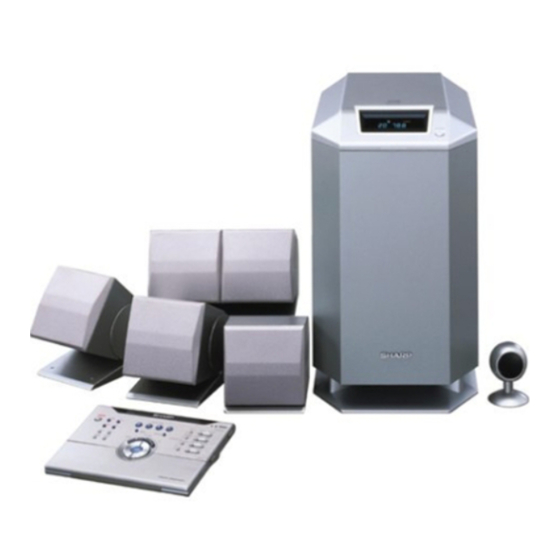
HT-CN300W Home Cinema Command consisting of HT-CN300W (main
unit), CP-CN300WF (front speakers), CP-CN300WC (centre speaker)
and CP-CN300WR (surround speakers).
Advertisement
Table of Contents
Troubleshooting

Related Manuals for Sharp HT-CN300W


Summary of Contents for Sharp HT-CN300W
-
Page 1: Operation Manual
Thank you for purchasing this SHARP product. To obtain the best performance from this product, please read this manual carefully. It will guide you in operating your SHARP product. HT-CN300W Home Cinema Command consisting of HT-CN300W (main HOME CINEMA COMMAND unit), CP-CN300WF (front speakers), CP-CN300WC (centre speaker) and CP-CN300WR (surround speakers). -
Page 2: Table Of Contents
Special notes Contents HT-CN300W Warning: Page „ General Information z When the ON/STAND-BY button is set at STAND-BY position, mains voltage is still present inside the unit. When the ON/STAND-BY button is set at STAND-BY Accessories ............2 position, the unit may be brought into operation by the timer mode or remote Precautions . -
Page 3: Accessories
Accessories HT-CN300W Please confirm that the following accessories are included. (RADPA6006BGZZ) Remote control 1 AC adaptor for remote control "AA" size battery (UM/SUM-3, R6, HP-7 or similar) 2 White Green Front (left): Centre: Front (right): 5 m (15') 5 m (15') 5 m (15') Labels for remote control 1 FM/AM loop aerial 1... -
Page 4: Precautions
Do not expose the unit to moisture, to temperatures higher than 60°C (140°F) or to a fire or other type of accident causing damage. SHARP will not be held responsible extremely low temperatures. -
Page 5: Controls And Indicators
Controls and indicators HT-CN300W „ Remote control Reference page 1. On/Stand-by Button ........13 2. - Page 6 Controls and indicators (continued) HT-CN300W „ Main unit (with subwoofer) 1. Memory Indicator 2. Timer Play Indicator 3. Sleep Indicator 4. Extra Bass Indicator 5. Digital Theatre System Indicator 6. FM Stereo Mode Indicator 7. FM Stereo Receiving Indicator 8. Dolby Pro Logic II Indicator 9.
- Page 7 HT-CN300W „ Front/Centre/Surround speakers Reference page 1. Full-Range Speaker Front Side 2. Angle Adjusting Lever ........15 3.
-
Page 8: Speaker Connections
Speaker connections HT-CN300W Centre Front speaker Front speaker speaker (right) (left) Black Black Black Green White Main unit (with subwoofer) Green White Surround speaker (right) Surround speaker (left) Black Black Blue Grey Blue Grey 02/7/11 HT-CN300W_A_2.fm... -
Page 9: Aerial Connection
Aerial connection HT-CN300W The speaker terminals on the main unit, the tube and plugs of the speaker lead, and Connect the FM/AM loop aerial to speaker labels are distinguished by colour. the ANTENNA socket. Connect the speaker and the unit by matching the colours. Connect the speaker wires to the speakers first, then to the unit. -
Page 10: Connecting Other Equipment
Connecting other equipment HT-CN300W To enjoy images or music, connect other equipment to the main unit with the supplied video cable for TV or you can purchase commercially available cables. Only one video cable is supplied with this unit. Optical digital audio cable S-video cable Coaxial digital audio cable DVD player... -
Page 11: Connecting The Tv
HT-CN300W „ Connecting the DVD player Caution: Use the video cable or the S-video cable for receiving images. The S-video cable can Turn off all other equipment before making this connection. realise clearer images. For audio, connect with the optical digital cable or the coaxial digital cable. - Page 12 Connecting other equipment (continued) HT-CN300W „ Connecting the VCR (VIDEO 1) „ Connecting the tape deck, etc. (AUX) Audio cable Video cable Audio cable To video To audio To audio output sockets output socket output sockets Tape deck, etc. To video To audio input socket input sockets...
-
Page 13: Connecting To The Ac Socket
Connecting to the AC socket HT-CN300W „ Setting the AC voltage selector „ Plugging in the remote control Check the setting of the AC voltage selector located on the rear panel before Before connecting: plugging the unit into a wall socket. If necessary, adjust the selector to correspond to Check the setting of the AC voltage selector located on the AC adaptor. -
Page 14: Demonstration Mode
Connecting to the AC socket (continued) HT-CN300W „ Setting the FM/AM span selector „ Demonstration mode The first time the unit is plugged in, the unit will enter the demonstration mode. You will see words scroll. To cancel the demonstration mode: When the unit is in the power stand-by mode (demonstration mode), press the X- BASS button. -
Page 15: Speaker Installation
Placing the speaker system HT-CN300W The best surround effect will be achieved by placing each speaker at the same The supplied speakers may be placed beside or near the TV as they are magnetically distance from the listening position. shielded. However, colour variation may occur, depending on the type of the TV. It is recommended to arrange the speakers as shown below. -
Page 16: Installing The Speakers On The Wall
Mark Recess Caution: Check the stability of the ceiling or wall fully. Sharp is not liable for accidents caused by insufficient stability of the ceiling or wall, or improper mounting. Wall surface The speaker may fall due to unstable mounting. -
Page 17: Remote Control
Preparing the remote control HT-CN300W „ Battery installation „ Test of the remote control You can operate the remote control with batteries in areas where the AC power lead Point the remote control directly at the remote sensor. cannot reach. The remote control can be used within the range shown below: Turn the remote control over and place it on a soft cloth. -
Page 18: Operation Buttons On The Remote Control
Operation buttons on the remote control HT-CN300W This remote control allows you to operate the main unit and other Sharp equipment. ON/ (STAND-BY) By memorising remote control operations (learn function), you can operate various Sets the power to "ON" or "STAND-BY". -
Page 19: Main Unit
„ Operation buttons for other equipment main unit The remote control is set at the factory to operate the Sharp's DVD, TV and VCR. To operate Sharp products or other companies' equipment that cannot be controlled by the default remote control, you can memorise their remote control operations (learn function) (see page 20). -
Page 20: Operation Buttons On The Remote Control
Memory 1 buttons: Switches the input to TV or VCR. The remote control is set at the factory to operate the Sharp's DVD, TV and VCR. VCR CH To operate Sharp products or other companies' equipment that cannot be controlled Switches up the VCR channels. -
Page 21: Memorising The Remote Control Buttons
Memorising the remote control buttons HT-CN300W You can assign only one function to each button. If you assign two functions to the button, the newer one will be memorised (learn function). Within 10 seconds, press down for more than 2 seconds the desired button on the remote control supplied with other „... - Page 22 Memorising the remote control buttons (continued) HT-CN300W „ Initialising the remote control buttons Memorising operations in the Memory 1 buttons for other equipment: Set the MEMORY 1/2 selector switch to MEMORY 1 and perform steps 2 - 6 in You can delete memorised functions and restore the buttons to the factory settings. "Memorising operations in the Memory 2 buttons for other equipment"...
-
Page 23: Setting The Clock
Setting the clock HT-CN300W By setting the unit on time, you can use it both as a clock and as a timer. Press the button to adjust the hour and then press the ENTER button. z Press the button once to advance the time by 1 hour. Hold it down to advance continuously. -
Page 24: Display Control
Display control Sound control HT-CN300W „ Volume control Press the VOLUME button to increase the volume and the VOLUME button for decreasing. Main unit ..29 30 MAXIMUM TV screen „ Bass control „ To change the display brightness (2 levels) When the X-BASS button is pressed, the unit will enter the extra bass mode which emphasises the bass frequencies. -
Page 25: Enjoy Surround Sound (Sound Mode)
Enjoy Surround Sound (sound mode) HT-CN300W The sound effect is activated when the Dolby Digital and DTS signals below are sent from the digitally connected DVD player, etc. When using other 2ch systems (analogue, etc.), Dolby Pro Logic II function is activated. DVD player Dolby Digital Dolby Digital or DTS signals... - Page 26 Enjoy Surround Sound (sound mode) (continued) HT-CN300W Dolby Digital and DTS: Acoustic effect The input signal is recognised automatically and the unit's indicator appears. Standard Dolby Pro Logic II: The maximum of 5.1ch surround sound z The indicator appears on the display of the main unit when the 2ch signals are is reproduced to provide three- entered to extend them to the 5.1ch surround sound.
-
Page 27: Sound Mode
HT-CN300W „ Sound mode „ To enjoy with dynamic sound To enjoy in the standard mode During playback, press the DYNAMIC SOUND button. Main unit Each press of this button changes the mode in the order of "MOVIE" "MUSIC" During playback, press the STANDARD button. "NIGHT". -
Page 28: Listening To The Radio
Listening to the radio HT-CN300W Press the ON/ (STAND-BY) button to turn the power on. Press the TUNER/BAND button repeatedly to select the desired frequency band (FM ST, FM or AM). Press the button to tune in to the desired station. Manual tuning: Press the button as many times as required to tune in to the desired... -
Page 29: Listening To A Memorised Station
Listening to a memorised station HT-CN300W Within 30 seconds, press the MEMORY button to store that station in memory. If the "MEMORY" and preset number indicators go out before the station is memorised, repeat the operation from step 2. Repeat steps 1 - 4 to set other stations, or to change a preset station. When a new station is stored in memory, the station previously memorised will be erased. -
Page 30: Speaker Settings
Speaker settings HT-CN300W Speaker settings are displayed on the TV screen only when the unit is set to DVD or VIDEO (see page 23). Within 10 seconds, press the button to select their sizes. Note: The settings appear only when the TV is connected with a video cable. They will not appear when the TV is connected with an S-video cable. - Page 31 HT-CN300W „ Speaker delay setting Measure the distance between each speaker and the listening position, and set the speaker delay. When some of the speakers are at a different distance from the listening point, you can select speaker delay to make it seem as though the speaker distances are the same.
-
Page 32: Speaker Settings
Speaker settings (continued) HT-CN300W Speaker type Adjustable range Front speaker (Left) - 6 dB + 6 dB Centre speaker - 6 dB + 6 dB Front speaker (Right) - 6 dB + 6 dB Surround speaker (Right) - 6 dB + 6 dB Surround speaker (Left) - 6 dB... -
Page 33: Timer And Sleep Operation
Timer and sleep operation HT-CN300W „ Setting the timer Timer operation is possible only when the tuner function is selected. Before setting timer: Set the unit on time (page 22). If it is not on time, you cannot use the timer function. Press the ON/ (STAND-BY) button to turn the power on. -
Page 34: Setting The Sleep Timer
Timer and sleep operation (continued) HT-CN300W When the preset time is reached: z Playback starts automatically and the volume increases gradually. Press the ENTER button. z The unit will enter the power stand-by mode one hour after the timer playback starts. -
Page 35: Troubleshooting Chart
Many potential problems can be resolved by the owner without calling a service technician. If something is wrong with this product, check the following before calling your Symptom Possible cause Reference authorised SHARP dealer or service centre. page z Move the unit away from any Radio makes unusual noise „ Operation consecutively. -
Page 36: Error Indicators And Warnings
Error indicators and warnings Troubleshooting chart (continued) HT-CN300W When you load an unplayable disc or fail to perform operations properly, the following „ TV image messages are displayed on the unit and the TV screen. Display Meaning Symptom Possible cause Reference z The surround system does not operate properly. -
Page 37: Specifications
HT-CN300W As part of our policy of continuous improvement, SHARP reserves the right to make design and specification changes for product improvement without prior notice. The performance specification figures indicated are nominal values of production units. There may be some deviations from these values in individual units. - Page 38 MEMO...
- Page 39 MEMO...
- Page 40 SHARP CORPORATION TINSE0016BGZZ 02H Y HK 2...