Table of Contents
Advertisement
Advertisement
Table of Contents

Related Manuals for Pro-Form CROSSWALK ADVANCED 525s


Summary of Contents for Pro-Form CROSSWALK ADVANCED 525s
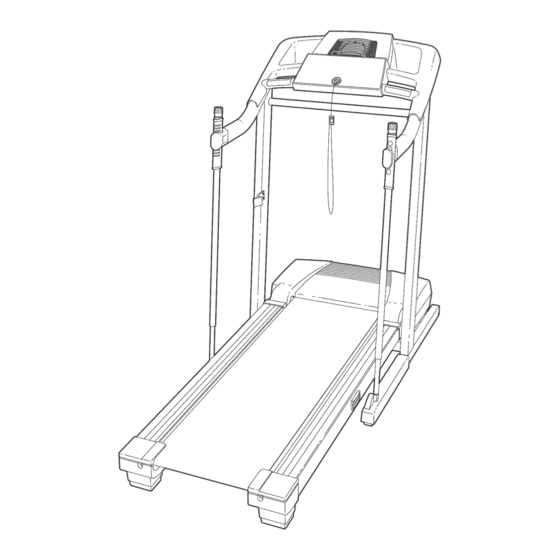
- Page 1 Model No. 831.295040 Seria! No. User's Manual Serial Number Decal o Assembly Operation Maintenance * Part List and Drawing Ak CAUTION Read all precautions and instruc- tions in this manual before using this equipment. Save this manual for future reference. Sears, Roebuck and Co., Hoffman...
- Page 2 TABLE OF CONTENTS iMPORTANT PRECAUTIONS ..............BEFORE YOU BEGIN ..............ASSEMBLY ................OPERATHON AND ADJUSTMENT ............HOW TO FOLD AND MOVE THE TREADMHLL ..........TROUBLESHOOTHNG ..............CONDHTHONHNGGUHDELHNES ............... ORDERHNG REPLACEMENT PARTS ..........Back Cover FULL 90 DAY WARRANTY ............Back Cover Note: An EXPLODED DRAWING and a PART LiST are attached in the center of this manual,...
- Page 3 iMPORTANT PRECAUTIONS WARN [NG: To reduce the r sk ofburns, f re, eleet.c s hook, orinjury t opereons, read t he following important precautions and information before operating the treadmill. 1. it is the responsibility of the owner to ensure Failure to use a property functioning surge that all users of this treadmill...
- Page 4 22. Never insert any object into any opening, authorized service representative. Servicing other than the procedures in this manual =3. D ANGER: Always unplug the power should bepe_ormed byanautho.,ed set- cord immediately after use, before cJeaning vice representative onJyo the treadmill, and before performing the maintenance and adjustment...
- Page 5 BEFORE YOU BEGIN Thank you for selecting the new PROFORM ®CROSS- using the treadmill, if you have questions after reading WALK ADVANCED 525s treadmill, The CROSSWALK this manual, call 1-800-4-MY-HOME ®(1-800-469-4663), ADVANCED 525s treadmill combines advanced tech- To help us assist you, please note the product model...
- Page 6 Assemblyrequirestwo persons.Setthetreadmill ina cleared areaandremove allpacking materials, Donot dispose ofthepacking materials u ntilassembly i s compbted, Note:Theunderside o fthetreadmill walking beltiscoated withhighoperformance lubricant, During shipping, a small a mount o f lubricant maybetransferred t othetopofthewalking beltortheshipping carton, T hisis a normal condition anddoesnotaffecttreadmill performance, if thereis lubricant ontopofthewalking belt,simply wipeoff thelubricant witha softclothanda mild,nonoabrasive cleaner, Assembly...
- Page 7 With the help of another person, carefully lower the Uprights (69) as shown, Note: it may be helpful to place one foot on one of the Extension Legs (109, 109) as you tip the Uprights, Make sure that the Extension Legs remain in the Uprights.
- Page 8 HoUd t heConsobBase(47)neartheLeftHandrail (71), Attach theendof theground wireontheConsobBase Ground totheindicated small h ob intheLeftHandrail withthe Wire SHver Ground Screw(75), Small SettheConsole Base(47)ontheLeftandRight Handrails ( 71,72), Slidea Handrail Washer ( 100)anda Plastic Spacer (115)ontoa 2"Screw (117), a ndinsert t hePlastic Spacer a ndtheScrewintotheholeinthebottom ofthe RightHandrail (72)asshown, S tartthe Screwintothe ConsoleBase, b ut do not tightenit yet.
- Page 9 Touch the Right Handrail (72} to discharge any static. insert the end of the Upright Wire (42) into the socket in the bottom of the ConsoUe Base (47), The connector shouJd sJide easily into the socket and snap into place, ff the connector does not slide easily and snap into place, turn the connector and then insert it, Press the Upright Wire (42) into the slot in the underside...
- Page 10 11,Press thelowerendofoneoftheSkiPoles (103)onto theBallJoint(68)ontheRightExtension L eg(109), Press theupperendintotheRightSkiPoleRest(105), Note:itmaybehelpful t otwistthehandle oftheSkiPole asyouinsert i t intotheSkiPoleRest, Attach theotherSkiPole(notshown) t otheleftsideof thetreadmill asdescribed a bove, 12, Make sure that aH parts are properly tightened before you use the treadmill Note: Extra hardware may be included, Keep the included allen wrenches in a secure place, The large allen wrench is used to adjust the walking belt (see page 25), To protect the floor or carpet, place a mat under the treadmill,...
- Page 11 OPERATmON AND ADJUSTMENT THE PRE-LUBRmCATED WALKmNG BELT an equipment-grounding conductor and a grounding plug, Plug the power cord into a surge suppressor, Your treadmHUfeatures a waUking beUtcoated with high- and plug the surge suppressor into an appropriate performance Uubrbant, IMPORTANT: Never apply sil- outlet that is properly installed...
- Page 12 CONSOLE DmAGRAM '-'-'3 ,.,:5 3 '4.31 ,-.- I/2HZ e OALS. PULSE TIME DISTANCE PAOEO SPEED © © STOP Note: if there is a thin sheet of Key -- --Clip plastic on the console, remove it. Four speed programs are also offered, Each program automatically controls the speed of the treadmill as it guides you through an effective workout, console,...
- Page 13 HOW TO TURN ON THE POWER walking belt as desired by pressing the Speed + and - buttons, Each time a button is pressed, the speed setting will change by 0,1 mph; if a button Hug in the power cord (see page 11), is held down, the speed setting will change in in- crements of 0,5 mph, Stand on the foot rails of the treadmHk...
- Page 14 Time dispJay--When if the displayed heart rate appears to be too high the manuaU mode or the ":":'31 or too low, or if your heart rate is not displayed, lift iFUT.com mode is se- / LH2 your hands off the pulse sensors for a few sec- bcted, this dispUay wHU onds, Then, place your hands on the pulse sensors TIME...
- Page 15 Press the Start button or the Speed + button to The program wili continue until the speed setting for the last period is shown in the Current Period start the program. column and no time remains in the Time display, A moment after the button is pressed, the tread- The walking belt wiii then slow to a stop, mHU wHU automatbaHy adjust to the first speed set-...
- Page 16 HOW TO CONNECT YOUR PORTABLE STEREO HOVV TO CONNECT THE TREADMmLL TO YOUR CD PLAYER, VCR, OR COMPUTER Note: if your stereo has an RCA-type AUDIO OUT jack, see instruction A below, if your stereo has a 3.5mm LINE OUT jack, see instruction B.
- Page 17 HOW TO CONNECT YOUR HOME STEREO HOW TO CONNECT YOUR COMPUTER Note: If your stereo has an unused LmNEOUT jack, Note: If your computer has a 3.5ram LINE OUT jack, see instruction A below, mfthe UNE OUT jack is see instruction A.
- Page 18 HOW TO CONNECT YOUR VCR B, Hug one end of the audio cable into the jack be- neath the console, Hug the other end of the cable Note: if your VCR has an unused AUDIO OUT jack, into the included adapter, Hug the adapter into an see instruction A below, if the AUDIO OUT jack is RCA Y-adapter (available at electronics stores),...
- Page 19 if the speed setting is too high or too low, you can manually override the setting at any time by PROGRAMS pressing the Speed buttons on the console, However, when the next "chirp" is heard, the speed wit1 change to the next setting of the CD To use iFUT,com CDs or videocassettes, the treadmHU or video program.
- Page 20 When the on-screen countdown ends, the program HOWTO USE PROGRAMS DmRECTLY FROM wiii begin and the walking belt wiii begin to move, WEB SmTE Hold the handrails, step onto the walking belt, and begin walking, During the program, an electronic "chirping"...
- Page 21 THE mNFORMATmONMODE SKin POLE TROUBLESHOOTmNG The consob features an information mode that keeps if the ski poles do not slide easily, or if they make a track of the totaUnumber of hours that the treadmHUhas squeaking noise, apply the included lubricant to the been operated and the totaUnumber of miles that the arms in the locations shown below, Slide the ski poles up and down several times to spread the lubricant,...
- Page 22 HOW TO FOLD AND MOVE THE TREADMILL HOW TO FOLD THE TREADMmLL FOR STORAGE Before folding the treadmill, adjust the incline to the towest position, ff this is not done, the treadmill may be per- manently damaged. Next, unplug the power cord. CAUTmON: You must be able to safely tift 45 pounds (20 kg) to raise, tower, or move the treadmill.
- Page 23 HOW TO LOWER THE TREADMmLL FOR USE 1, HoHdthe upper end of the treadmHHwith your right hand, Press the storage Hatchto the Heft.Pivot the treadmHHdown until the frame and foot rail are past the storage Hatch, Latch 2, HoHdthe treadmHHfirmHywith both hands, and Howerthe tread° mHH to the floor, Do not drop the treadmill frame to the floor.
- Page 24 TROUBLESHOOTmNG Most treadmill problems can be solved by following the simple steps below. Find the symptom that applies, and follow the steps listed, mf f urther assistance is needed, call toll-free 1-800-4-MY-HOME ® (1-800-489-4883). PROBLEM: The power does not turn on SOLUTmON: a, Make sure that the power cord is plugged into a surge suppressor, and that the surge suppressor is plugged into a properly grounded outlet (see page 11 ), Use only a single-outlet surge suppres-...
- Page 25 PROBLEM: The walking belt slows when walked on SOLUTION: a, Use only a single-outlet surge suppressor that meets all of the specifications described on page 11, if the walking belt is overtightened, treadmill perfor- mance may decrease and the walking belt may be- come damaged, Remove the key and UNPLUG THE POWER COBB, Using the allen wrench, turn both rear roller adjustment bolts counterclockwise,...
- Page 26 CONDiTiONiNG GUiDELiNES ergy, Only after the first few minutes does your body WARNING: Before beginning t. s begin to use stored fat calories for energy, if your goal is to burn fat, adjust the speed and incline of the tread= or any exercise program, consult...
- Page 27 SUGGESTED STRETCHES The correct form for several basic stretches is shown at the right, Move slowly as you stretch--never bounce, 1. Toe Touch Stretch Stand with your knees bent slightly and slowly bend forward from your hips, Allow your back and shoulders to relax as you reach down toward your toes as far as possible, Hold for 15 counts, then relax, Repeat 3 times, Stretches: Hamstrings, back of knees and back,...
- Page 28 PART LiST--Model No. 831.295040 Rogo4A Qty. Description Qty. Description Qty. Description Hood UsoUator Sensor Clip 3/4" Screw Book HoUder Rear Roller Motor BeUt Consob Base Adjustable Bolt Motor Tension BoUt 1/2" Screw Right Rear Endcap 3/8" Washer Hood Screw/ Allen Wrench Motor Star Washer Endcap Screw Left Rear Endcap...
- Page 29 3 64 ¢...
- Page 30 Your Home For repair - in your home - of all major brand appliances, lawn and garden equipment, or heating and cooling systems, no matter made it, no matter sold For the replacement parts, accessories, and user's manuals that you need to do-it-yourself. For Sears professional installation of home appliances...