Brother DA-9270 Instruction Manual
Twin needle (three needle) feed off the arm double chain stitcher
Hide thumbs
Also See for DA-9270:
- Parts manual (75 pages) ,
- Manual del instrucción (34 pages) ,
- Specifications (5 pages)

Related Manuals for Brother DA-9270


Summary of Contents for Brother DA-9270
- Page 1 INSTRUCTION MANUAL DA-9270 Please read this manual before using the machine. Please keep this manual within easy reach for quick reference. TWIN NEEDLE (THREE NEEDLE) FEED OFF THE ARM DOUBLE CHAIN STITCHER...
-
Page 2: Safety Instructions
Furthermore, do not drink the oil under shock. any circumstances, as it can cause vom- iting and diarrhoea. Keep the oil out of the reach of children. DA-9270... -
Page 3: Maintenance And Inspection
Wait until cations to the machine will not be cov- the motor stops fully before starting ered by the warranty. work. ¡ When carrying out inspection, adjust- ment and maintenance ¡ When replacing consumable parts such as the looper DA-9270... -
Page 4: Warning Labels
Operate with safety devices. Direction of operation Turn off main switch before threading, changing bobbin and needle, cleaning etc. Safety devices q Finger guard w Thread take-up cover e Pulley cover, etc. <Rear view> DA-9270... -
Page 5: Table Of Contents
Presser foot pressure adjustment ..11 7-3. Adjusting the stitch length ....12 7-4. Puller feed adjustment (Machines with puller) ........... 12 8. CLEANING ............. 14 8-1. Daily cleaning ........14 8-2. Changing the lubricating oil (every three months) ......14 DA-9270... -
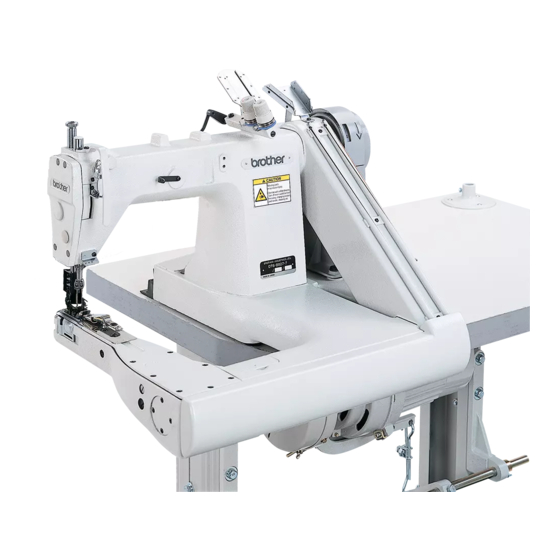
Page 6: Names Of Major Parts
Upper thread arm guide y Lapper Safety device u Thread take-up cover i Finger guard o Pulley cover 2. MACHINE SPECIFICATIONS BROTHER INDUSTRIES, LTD. DA-9270-1 Specifications MADE IN JAPAN Optional device Specifications Applications Light materials Light - medium Medium... -
Page 7: Work Table And Motor
..../ .., , , , , ..... ../ 50Hz 3100 3600 4000 Sewing speed (rpm) 60Hz 3100 3600 4000 DA-9270... -
Page 8: Installation
Furthermore, check that the pulley cover base parallel to the bed. (If it is not parallel, the pulley Parallel cover may touch the machine pulley.) DA-9270... -
Page 9: Ground Wire Connections
(The attachment location is indicated by a ground sym- 3. Pass the ground wire through the hole in the table. 4. Connect the ground wire to the motor in accordance with the instructions in the instruction manual for the To motor motor. DA-9270... -
Page 10: Installing The Pulley Cover
3. Push the belt downward, and then install pulley cover B to pulley cover A with the three screws 4. If the machine is being used with the puller attached, install the puller belt cover with the two screws DA-9270... -
Page 11: Belt Tension Adjustment
9.8 N. 20 - 30mm 4-5. Cotton stand 1. Assemble the cotton stand while referring to the cot- ton stand instruction manual. 2. Install the cotton stand to the cotton stand mounting hole in the work table with the nut DA-9270... -
Page 12: Lubrication
* If the oil level drops to the lower reference line, be Upper sure to add more oil. reference After lubrication is completed, tighten the cover line screws Lower reference line DA-9270... -
Page 13: Checking The Machine Pulley Rotating Direction
1. Turn the pulley until needle holder is raised to the highest position. 2. Loosen needle set screws , hold needles with their long grooved side facing front, insert them into needle holder all the way, and fasten the needle with needle set screws DA-9270... -
Page 14: Threading The Lower Threads
Turn off the power switch before threading the upper thread, otherwise the machine may operate if the treadle is pressed by mistake, which could result in injury. Pass the upper threads as shown in the figure below. 50 - 60mm DA-9270... -
Page 15: Sewing
3. Release the presser lifter pedal. 4. The machine starts running when treadle is stepped down. 5. After sewing the work, move the work to thread cutter to make blank stitches, and cut the thread with it. DA-9270... -
Page 16: Thread Tension
Becomes stronger weaker work positively and keep the work from slipping. Becomes stronger * In case of Machines with puller the puller pressure can Becomes weaker be adjusted as appropriate to the work by turning presser adjusting screw DA-9270... -
Page 17: Adjusting The Stitch Length
The more your turn the pulley toward yourself, the smaller will be the feed. * Adjust the puller feed after seeing the finished Smaller stitches of the work (Refer to page 13). Larger DA-9270... - Page 18 Fabric with high elasticity Fabric with low elasticity Correct Feed direction Feed direction Neither non-alignment nor sewing wrinkles. Neither non-alignment nor sewing wrinkles. Insufficient Non-aligned, and wrinkled. Non-aligned, and wrinkled. Excessive Non-aligned, and very wavy. Non-aligned, and very wavy. DA-9270...
-
Page 19: Cleaning
3. Fill the machine with oil until the oil level reaches the top reference line on the oil gauge. (Refer to page 7.) 4. Close the puller top cover and secure it with the eight Upper reference screws line DA-9270... -
Page 20: Standard Adjustments
, and after checking that the needles are in the centers of the needle holes , tighten the needle bar clamp screw 6. Insert the rubber plug 7. Install the presser foot with the screw DA-9270... -
Page 21: Needle And Looper Timing Adjustment
9. Close the belt cover plate , and then tighten the two screws 10. Install the presser foot, needle plate and feed dogs. 2.1 - 2.3mm Looper forward travel Looper backward travel DA-9270... -
Page 22: Timing Of Loopers Running Clear Of Needles
6. Tighten the set screw NOTE: For some materials and threads, the best results can be obtained if the needle guard and the needle are 0.2mm touching slightly when the stitch length is adjusted to the actual stitch length. DA-9270... -
Page 23: Feed Dog Height Adjustment
0.8 mm above the top of the needle plate when feed dog is at the highest position. Adjust the height of feed dog by turning feed bar eccen- 0.8mm tric shaft 0.8mm Feed dog Needle plate DA-9270... -
Page 24: Upper Thread Take-Up Thread Guide Adjustment
1. Insert screwdriver through the adjusting hole in the lower thread take-up base, and loosen two set screws 2. Raise lower thread take-up until it is 7 mm up from thread take-up base 3. After the adjustment, retighten two set screws curely. DA-9270... -
Page 25: Installing The Lapper
1. Turn the pulley toward yourself until the mark on tim- Reference line ing collar meets the reference line. 2. Loosen two set screws , and turn the pulley toward yourself until the needle bar is lowered all the way down. 3. Retighten set screws DA-9270... -
Page 26: Troubleshooting
Is the thread release shaft position incorrect? Adjust the thread release shaft position correctly. ¡ Are the needle eyes too small for threads? Refer to the section on “Needles and threads”. ¡ Are the loopers damaged? Replace loopers with good ones. DA-9270... - Page 27 If the needle breaks, search for all pieces until the whole of the needle is found again. ¡ Furthermore, we recommend that through steps be taken to ac- count for such needles to comply with product liability regula- tions. DA-9270...
-
Page 28: Instruction Manual
INSTRUCTION MANUAL BROTHER INDUSTRIES, LTD. 15-1, Naeshiro-cho, Mizuho-ku, Nagoya 467-8561, Japan. Phone: 81-52-824-2177 Printed in Japan 118-927 S92927-102 2002.03. B (1)