Table of Contents
Advertisement
Quick Links
Advertisement
Table of Contents

Related Manuals for Stanton SCS.3m


Summary of Contents for Stanton SCS.3m
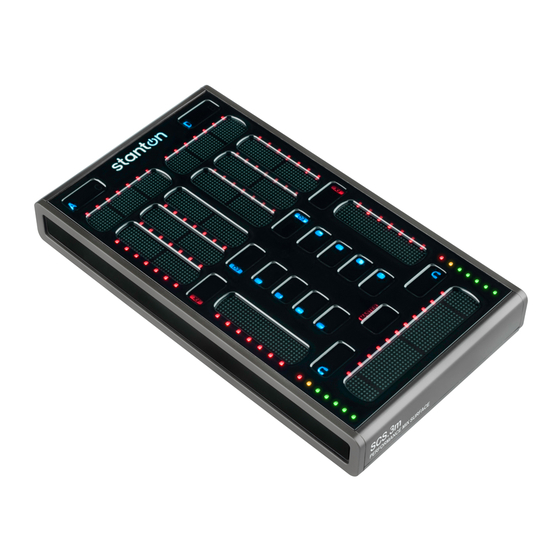
- Page 1 SCS.3m MIX CONTROL SURFACE MASTER User Manual...
-
Page 2: Important Safety Instructions
Please read the warranty. • The warranty will be void if any unauthorized service by the user is detected. • If service is required, please contact Stanton Tech at +1 954.316.1500 (Option 3) WARNINg To reduce the risk of electric shock, do not expose this apparatus to rain or moisture. Ensure that the apparatus is not exposed to splashing and that no objects filled with liquids, such as vases, are placed on the apparatus. -
Page 3: Table Of Contents
Contents Contents Introduction ......................... 1 1.1. Welcome to the SCS.3m .................... 1 1.2. Overview ........................1 1.3. Unpacking ........................2 Connecting the SCS.3m ....................3 2.1. Connect USB ....................... 3 2.2. Connect Power ......................3 2.3. Connect Other Devices ....................4 2.4. - Page 4 - Setting Up a Native Instrument’s Audio Interface ............61 - Setting Up a Different Audio Interface ................62 - Setting Your Outputs ..................... 63 Traktor LE MIDI Interface Configuration ..............63 Registration Card ....................... 65 Stanton Warranty ......................66...
-
Page 5: Introduction
Introduction Welcome to the SCS.3m! Thank you for purchasing the SCS.3m. The SCS.3m (Stanton Control System 3 mixer) is an innovative multi-touch controller that provides real-time performance controls. The SCS.3m allows you to control any software mixer in a DJ, VJ, or DAW application, and has been specifically designed to integrate with the included Traktor LE software to allow you to start mixing in... -
Page 6: Unpacking
In addition to the above items, remember that to take advantage of the SCS.3m full potential you will need a Mac or PC computer (with Internet connection) to run Native Instruments’ Traktor LE and Stanton’s DaRouter software, and preferably an audio interface. Let’s get started by hooking up the SCS.3m into your setup. -
Page 7: Connecting The Scs.3M
Connecting the SCS.3m Connecting the SCS.3m Before you connect power, you will need to remove the SCS.3m Back Panel: To open back, first look for 2 knobs and turn them so that they are oriented vertically. When booth knobs are turned, remove the back by pulling the bottom of the panel up. -
Page 8: Connect Other Devices
Connect Other Devices Connect Other Devices Thanks to the SCS.3m integrated USB hub and the wire management options, you are able to easily connect up to 4 peripheral devices. These can be additional SCS.3d controllers, other USB controllers, flash storage, or any other USB peripheral. (Figure 2.4) SCS.3d SCS.3m SCS.3d... -
Page 9: Scs.3M Setups
SCS.3m Setups SCS.3m Setups SCS.3m The SCS.3m can be used on its own for basic transport and DJ mixing controls for playing songs in any mobile environment. (Figure 2.5) Figure 2.5 Multiple SCS.3m’s Multiple SCS.3m’s can be used to gain more channel control for applications such as Ableton Live, for example. -
Page 10: Scs.3M Description
SCS.3m Description SCS.3m Description SCS.3m – Traditional Mixer Comparisons The SCS.3m was created to give you control of most common mixer functionality. You can see that the layout on the SCS.3m is symmetrical and that we are emulating a 2-channel mixer, similar to a typical 10”... -
Page 11: Channel Fader
Channel Fader 3.1.3 Channel Fader The Channel Faders (also called line faders, upfaders, etc.) control the volume of their associated channel before the signal gets to the Crossfader. The touch sensitive strips on the SCS.3m act just like the Channel Faders on a traditional mixer, allowing you to adjust the volume of the channel. -
Page 12: Top Panel Functional Groups
Top Panel Functional groups Top Panel Functional groups The SCS.3m has 10 functional groups. (Figure 3.5) MASTER Figure 3.5 Let’s read a brief description of each of them. -
Page 13: Deck Switch
Deck Switch 3.2.1 Deck Switch The Deck Switch button allows for each side of the SCS.3m to be switched between 2 virtual decks. Each side can be toggled independently, thus allowing 4 channels to be controlled in a conventional 2-channel design. (Figure 3.6) In each Deck Switcher, there is a backlit letter (either A and C, or B and D) to indicate which virtual channel that side of the SCS.3m is controlling. -
Page 14: Slider Section
Slider Section 3.2.2 Slider Section The slider section features 4 virtual sliders, which can be toggled to control EQ or FX (or any other MIDI assignable control). (Figure 3.8) The value of each slider is shown on the LEDs next to it. If you switch the Slider Section to a different mode (for instance, from EQ to FX mode), the SCS.3m will remember your settings and restore them when you switch back. -
Page 15: Eq/Fx Mode Switches
EQ/FX Mode Switches 3.2.3 EQ/FX Mode Switches These buttons will toggle the Slider Section and Button Section between EQ controls and FX controls. Allows for 4 buttons and 4 sliders per channel. When switching modes the Button and Slider section automatically update to their last setting. (Figure 3.10) MASTER MASTER Figure 3.10... -
Page 16: Button Section
Button Section 3.2.5 Button Section The Button Section consists of four buttons with multicolor feedback for control of on screen buttons or triggers. These can be assigned to EQ kills, FX engage, or other MIDI assignable features. (Figure 3.12) The buttons next to each Channel Fader can be assigned to anything you want. -
Page 17: Master/Monitor Mode Button
Master/Monitor Mode Button 3.2.7 Master/Monitor Mode Button When the Master Button is engaged, the Channel Faders and Crossfader temporarily become controls for monitor volume, master volume, and monitor mix. The VU meters also display the master levels for checking a clean output signal from your computer. To enter “Master”... -
Page 18: Channel Level Meter
Channel Level Meter 3.2.9 Channel Level Meter The Channel Level Meter indicates the volume of each channel like a traditional DJ mixer. (Figure 3.17) MASTER Figure 3.17 3.2.10 Channel Strip The Slider, Button, Mode Switchers, Channel Fader, Level Meter, and Monitor Button all constitute a traditional channel strip. -
Page 19: Rear Panel
Rear Panel Rear Panel The SCS.3m has 4 USB type “A” sockets. Two of them are located in the Rear Panel (Figure 3.19), USB TYPE A USB TYPE A Figure 3.19 The other 2 are located in the Inner Rear Panel. (Figure 3.20) USB TYPE A Figure 3.20 These USB jacks can be used to connect additional SCS.3 controllers, mass storage devices... -
Page 20: Inner Rear Panel
Inner Rear Panel 3.3.1 Inner Rear Panel When the back panel is off, you will see the following sockets within the Inner Rear Panel (Figure 3.21): (2) USB type “A” sockets (1) USB type “B” socket (1) 8 mm 12 VDC power supply socket USB TYPE A USB TYPE B 8mm 12 VDC... -
Page 21: Installing And Configuring Darouter And Traktor Le
Installing and Configuring DaRouter and Traktor LE Installing and Configuring DaRouter and Traktor LE Downloading DaRouter and Traktor LE Go to www.stantondj.com/scs3m/install - and follow the instructions to download the Traktor LE software and DaRouter software. Then, just follow the installation instructions provided in their related wizards. - Page 22 Installing DaRouter on Windows To install SCS.3 DaRouter click Next. (Figure 4.3) Figure 4.3 Choose the Installation Type (Figure 4.4) Figure 4.4 Select I accept the agreement and click Next. (Figure 4.5) Figure 4.5...
- Page 23 Installing DaRouter on Windows The following messages will appear. Read the SCS.3 DaRouter Warning and click OK. (Figure 4.6) Figure 4.6 Select No, not this time and click Next. (Figure 4.7) Figure 4.7 Select Install the software automatically and click Next. (Figure 4.8) Figure 4.8...
- Page 24 Installing DaRouter on Windows Click Continue Anyway. (Figure 4.9) Figure 4.9 10. Click Finish to close Bome’s Virtual MIDI Port wizard. (Figure 4.10) Figure 4.10...
- Page 25 Installing DaRouter on Windows 11. Click Next. (Figure 4.11) Figure 4.11 12. Click Finish to exit DaRouter Setup Wizard. (Figure 4.12) Figure 4.12...
-
Page 26: Installing Traktor Le
Installing Traktor LE on Windows 4.2.2 Installing Traktor LE Double click the Traktor folder. (Figure 4.13) Figure 4.13 Double click the Traktor Setup file. (Figure 4.14) Figure 4.14 If the following Security Warning message appears, click Run. (Figure 4.15) Figure 4.15... - Page 27 Installing Traktor LE on Windows To start Traktor installation, click Next. (Figure 4.16) Figure 4.16 Read the License Agreement, check its related box, and click Next. (Figure 4.17) Figure 4.17 Select a Setup Type and click Next. (Figure 4.18) Figure 4.18...
- Page 28 Installing Traktor LE on Windows If you are using the Audio 8 DJ or Audio 4 DJ audio interfaces, select the proper options, and click Next. If you are using any other audio interface just click Next. (Figure 4.19) Figure 4.19 Click Next to begin Traktor configuration.
-
Page 29: Activating Traktor Le
Activating Traktor LE on Windows 4.2.3 Activating Traktor LE To launch Traktor LE, double click the icon located in your desktop or go to Start\Programs\Native Instruments\Traktor\ and double click the Traktor icon. After launching Traktor LE, the following window will appear. Click Activate. (Figure 4.22) Figure 4.22 If the following message appears, click OK. - Page 30 Activating Traktor LE on Windows Please provide information about your musical profile and click OK. (Figure 4.25) Figure 4.25 Enter the serial number from the enclosed Traktor LE Serial Number Card and click Activate. (Figure 4.26) Figure 4.26 All selected products have been activated. Click Exit. (Figure 4.27) Figure 4.27 You have successfully installed and activated Traktor LE in your Windows computer.
-
Page 31: Installing On Mac
Installing DaRouter on Mac Installing on Mac Now we will briefly describe how to install DaRouter and Traktor LE in your Macintosh® computer. 4.3.1 Installing DaRouter Double click the DaRouter compressed file. (Figure 4.28) Figure 4.28 Double click DaRouter installer. (Figure 4.29) Figure 4.29 To begin the SCS.3 DaRouter installation process, click Continue. - Page 32 Installing DaRouter on Mac Read the License Agreement and click Continue. (Figure 4.31) Figure 4.31 If the following message appears click Agree. (Figure 4.32) Figure 4.32 Click Install. (Figure 4.33) Figure 4.33...
- Page 33 Installing DaRouter on Mac The software was successfully installed. Click Close. (Figure 4.34) Figure 4.34 To launch Stanton SCS.3m DaRouter, double click the icon located in your desktop or go to your Applications folder and double click the Stanton SCS.3m DaRouter’s icon.
-
Page 34: Installing Traktor Le
Installing Traktor LE on Mac 4.3.2 Installing Traktor LE Double click the Traktor folder. (Figure 4.35) Figure 4.35 Double click the Traktor installer. (Figure 4.36) Figure 4.36 To start Traktor installation click Continue. (Figure 4.37) Figure 4.37 Read the License Agreement and click Continue. (Figure 4.38) Figure 4.38... - Page 35 Installing Traktor LE on Mac If the following message appears click Agree. (Figure 4.39) Figure 4.39 Click Install to perform a standard installation. (Figure 4.40) Figure 4.40 Click Restart to finish installing this software. (Figure 4.41) Figure 4.41...
-
Page 36: Activating Traktor Le
Activating Traktor LE on Mac 4.3.3 Activating Traktor LE To launch Traktor, double click the icon located in your desktop or go to your Applications folder and double click the Traktor’s icon. To activate Traktor, click Activate. (Figure 4.42) Figure 4.42 Please log in using your e-mail address and password. -
Page 37: Configuring Darouter
Configuring DaRouter All selected products have been activated. Click Exit. (Figure 4.45) Figure 4.45 Configuring DaRouter When you run the SCS.3 DaRouter, you will get the following screen…(Figure 4.46) To use DaRouter with your SCS.3m and Traktor LE, select the “SCS.3m LE” preset from the Active Preset drop-down. - Page 38 Configuring DaRouter The Preset Section (Figure 4.47) • Active Preset – tells you the currently selected preset. This is a drop-down box that can be used to select any presets that are either loaded by default, or have been manually loaded by the user.
- Page 39 Configuring DaRouter The Activity Monitor (Figure 4.49) The Activity Monitor lets you know what is happening with DaRouter. There are 3 symbols here, an arrow, a square, and another arrow. The first arrow lights up blue to let you know when DaRouter is receiving MIDI data from your controllers.
-
Page 40: Configuring Traktor Le
Now that we have the window open, you will have 2 options available – your setup and device. For your setup, select Stanton. For the device, select SCS.3m LE. Once you have done that, click Apply. The configuration should at this point automatically place the SCS.3m into a Traktor LE specific mode. -
Page 41: Using The Scs.3M With Traktor Le
Using the SCS.3m with Traktor LE Using the SCS.3m with Traktor LE A Traktor Tour In this quick tour, we will briefly describe Traktor LE’s Decks, Mixer, and Browser sections. 5.1.1 Decks (Figure 5.1) Figure 5.1 Track Cover Icon: Displays the cover art of the loaded track. Track-Info: Displays information about the loaded track. -
Page 42: Mixer
Mixer Key-Lock: Activates or deactivates the Key Lock feature. 10. Pitch Adjust: Increases and decreases the tempo of the playing track incrementally. 11. Transport Controls: Playback and Current Cue Point control. Play and Cue functionality are explained later in this manual. 12. -
Page 43: Browser
Browser Cue button: • Pre-listen to a track over the internal Traktor Mixer. • If Tick is activated, click the Cue button to make the beat-tick audible on that deck. Pan button: Controls the channel balance between the left and the right stereo channels. Automatic Crossfade Buttons: •... - Page 44 Browser Browser Tree: • Track Collection: contains all Tracks imported to your Collection. They are automatically sorted by Artist, Release, Label, or Genre. • Playlists: contains all your Traktor Playlists. • Explorer: browse your hard drive for music tracks. This can be useful in finding tracks that have not been imported.
-
Page 45: Controller Overview
Controller Overview Controller Overview The SCS.3m has two basic operational modes called EQ and FX modes. Therefore, when you press the EQ or the FX button, the functionality of the sliders above them and the buttons located in the middle of the mixer section will change accordingly. -
Page 46: Mixer Section
Mixer Section Mixer Section 5.3.1 Faders The faders on the SCS.3m are dual use, depending on whether the MASTER button is activated or not. When the MASTER button is blue, the SCS.3m is running in what we will call “normal mode” meaning that the faders control what you would expect them to (the channel volumes and crossfader). -
Page 47: Mode Buttons
Mode Buttons Mode Buttons In the middle of the SCS.3m, there are 2 “Mode Buttons” per side (4 buttons total). They are labeled EQ and FX. (Figure 5.7) MASTER Figure 5.7 These Mode Buttons not only affect the performance of the sliders above them, but also the buttons in the middle of the Mixer Section. -
Page 48: Eq Mode
EQ Mode 5.4.1 EQ Mode Pressing the EQ button puts the channel into EQ mode, and lights the EQ button red so you know what mode it is in. As you would expect, this mode allows you to adjust the EQ on the selected deck. But EQ mode also gives you access to “Transport”... -
Page 49: Fx Mode
FX Mode 5.4.2 FX Mode In Traktor LE, there are 3 built-in effects available to you, and a separate FX send on each channel (FX 1 and 2). You enter FX mode by pressing the FX Preset button. It will light red to let you know the channel is in FX mode. -
Page 50: Your First Dj Mix
Your First DJ Mix Your First DJ Mix A Quick Mix This section will walk you through doing your first mix. It can be followed step by step, but it might be a good idea to read through it once first so you can get your head around the process. 6.1.1 Loading a Song into a Deck There are many ways to load a song into a specific deck in Traktor LE. -
Page 51: Using A Cue Point
Using a Cue Point Using the top slider in EQ mode, move the red play marker to the first beat in the song, then press the CUE button to lock in that cue point. (Figure 6.2) Figure 6.2 Once the cue point is set, do the same thing with the song in Deck B. 6.1.3 Using a Cue Point Now that the cue point has been set, there are different behaviors you might see depending on how... - Page 52 Sync’ing Two Decks You should now hear the song that is playing in Deck A. Now, let’s look for a place to bring in the song in Deck B. Typically, there are 3 points in a song that are “mix friendly.” These are commonly at the beginning, middle, and end of the song.
-
Page 53: Fading Between Two Decks
Fading between Two Decks So reach over and press the SYNC button, and these 2 songs should align to the same tempo. You can do this by either pressing the 2nd button next to the Deck B channel fader on the SCS.3m, or you can use the mouse and click the button in Traktor LE. -
Page 54: Using The Eqs
Using the EQs With the song in Deck B playing and Deck A stopped, try holding one finger on the right edge of the crossfader, and tap the other on the left end. (Figure 6.8) When you do this, you will hear the song in Deck B quickly cut in and out when you tap on the crossfader. -
Page 55: Using The Effects (Fx)
Using the Effects (FX) The EQ is broken down into 3 frequency ranges – Low, Mid, and High. The sliders above the EQ button are laid out like this… (Figure 6.10) MASTER Figure 6.10 Make sure that the channel you are using is set to EQ by pressing the EQ button and making sure it lights up red. - Page 56 Using the Effects (FX) Now that you’ve learned how to mix 2 songs together, try adding effects to your mix! Effects can add a lot to a song when used properly. Along with the FX modules in Traktor, you can also use filter as a dedicated effect.
- Page 57 Using the Effects (FX) Now that we have an effect selected let’s engage it by pressing the FX On/Off Toggle button. (Figure 6.13) MASTER MASTER Figure 6.13 With the effect engaged, we can now control its intensity by modifying the Wet/Dry amount. Use a more “Wet”...
- Page 58 Using the Effects (FX) The second fader changes FX control. This will modify the main parameter for the effect. For delay the parameter controls the length of the delay, shorter delays will create more of a stuttering effect where as a long delay will create a sound more like a large room echo. Use the second slider to play with the FX parameter.
-
Page 59: Next Steps
For more information on importing, managing a collection and beat grids read the Traktor manual on your hard drive. Go to the Stanton website to check for new mappings for the SCS.3m and check the forums for user created mappings at http://forums.stantondj.com Add a SCS.3d to your setup for more advance and expanded control over Traktor LE or... -
Page 60: Using The Scs.3M With Other Midi Applications
Using the SCS.3m with other MIDI Applications Using the SCS.3m with other MIDI Applications In addition to the Traktor LE specific mode, the SCS.3m can also be used as a powerful MIDI controller for any MIDI compatible application. The SCS.3m works in three modes, Automatic mode for standard MIDI use cases, Application feedback mode for applications with MIDI output and complete flat mode for running DaRouter presets. - Page 61 Selecting Built-in Preset Depending on your application, different presets will be desired. For instance if you are using Ableton Live, all sliders with sweep feedback might be desired such as the configuration for preset 3. Below is a table of all the built-in presets and their functionality: Button Preset # Button State Absolute Sliders...
-
Page 62: Midi Learn
MIDI Learn MIDI Learn Now that you have configured the SCS.3m, you can use MIDI learn to assign any of the controls into your software application. Almost all audio applications support MIDI learn now, for more information on MIDI learn in your favorite application consult its user manual. Advanced Control of Built-in Presets The built-in presets can be completely reconfigured and saved through MIDI messages. -
Page 63: Troubleshooting
I do not have an internet connection and am unable to download any software associated with SCS.3m. If you are unable to connect to the Internet, Stanton will provide you with the needed software and documentation free of charge. Call Stanton Support at +1 954.316.1500 (Option 3) and it will be shipped out to you. -
Page 64: Specifications
Specifications Specifications Control Specifications (physical): 17 Buttons 11 Sliders 2 Level Meters Control Specifications (banked in firmware): 39 Sliders 36 Buttons 6 Level Meters MIDI Specifications: Standard note messages for each control Relative control change movement message for each slider Absolute position control change messages for each slider Multiple feedback modes for LED chains (single LED, sweep, boost/cut, spread) Multicolor (blue, red, purple) control and dim control for LEDs... -
Page 65: Appendix
APPENDIX Audio Interface Configuration APPENDIX Audio Interface Configuration The content of this Appendix is organized in four brief sections: • Configuring your audio interface • Setting up a Native Instrument’s audio interface • Setting up a different audio interface • Setting your outputs Configuring Your Audio Interface Setting up the audio in Traktor is easy, but considering that there is not any “standard”... -
Page 66: Setting Up A Different Audio Interface
ASIO4ALL (www.asio4all.com). Be sure to check to see if your soundcard is compatible before installing any 3rd party driver, and remember that Stanton or Native Instruments does not support these drivers (you’ll have to contact the driver publishers for support). -
Page 67: Setting Your Outputs
APPENDIX Audio Interface Configuration Setting Your Outputs Go to Preferences\Output Routing. • Mixing Mode: select Internal. • Output Monitor: is the output for your headphones. • Output Master: is the main left and right stereo output that goes to your speakers. •... - Page 68 APPENDIX Traktor LE MIDI Interface Configuration Click the Preferences button (located in the top right corner of the program) and then click MIDI Setup. Figure A.5 On this page, you will see MIDI input and output devices. Your MIDI device will show up differently depending on what operating system you are using.
-
Page 69: Registration Card
Save your shipping boxes and all packaging materials! For the fastest and safest product return to Stanton, please use the original shipping carton and packaging materials. Stanton cannot be responsible for any damages incurred during the shipping... -
Page 70: Stanton Warranty
Any returns to a non-authorized dealer or to an authorized Stanton dealer not in the same country as the merchandise was intended to be sold or as set forth above will void this warranty. - Page 71 Notes...
- Page 72 SCS, SC System, DaScratch, DaRouter, and StanTouch are registered trademarks of the Stanton Group. All other trademarks are property of their respective owners, who are in no way affiliated with Stanton DJ or SC System products. All information included in the User Manual is subject to change without notice.