
Related Manuals for First Alert HS-4705-400


Summary of Contents for First Alert HS-4705-400
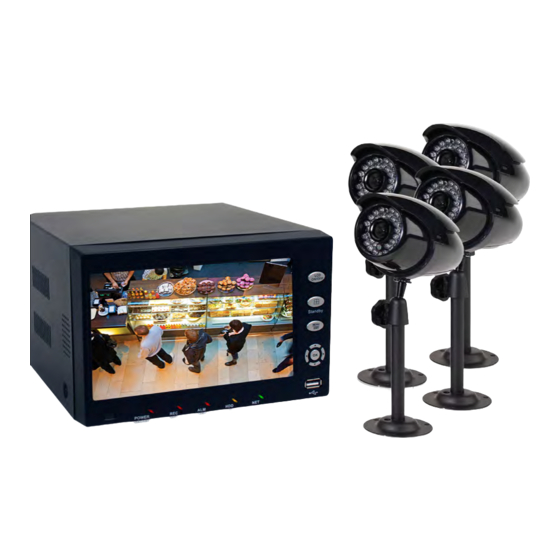
- Page 1 7” LCD with built-in DVR USER’S MANUAL Model advanced video HS-4705-400 4 Channels/4 Cameras H.264 compression mobile phone/ web ready night vision indoor/outdoor 400 TVL cameras...
- Page 2 & remote access First Alert has been helping families and businesses stay safe for over 50 years. By having a First Alert Security System, you’re taking the first step in protecting your home or business from damage • 500GB SATA hard drive installed...
-
Page 3: Table Of Contents
ntroductIon ntroductIon table of contents table of contents ectIon escrIptIon ectIon escrIptIon umber umber Advanced Operation Introduction Alarm 22-23 Safety Alarm Setup 22-23 Product Overview E-mail Setup What is in the Box System Info and System Update DVR Controls System Maintain Front Panel Upgrade Firmware Back Panel... -
Page 4: Safety
RJ45 Ethernet Cable We, First Alert / BRK Brands, Inc. declare under our sole responsibility that the device to which this declaration relates: Complies with Part 15 of the FCC Rules. Operation is subject to the following two conditions: (1) this device may not cause harmful interference, and (2) this device must accept any interference received, including interference that may cause undesired operation. -
Page 5: Product Overview
roduct vervIeW roduct vervIeW dvr controls dvr controls anel ront anel unctIon ontrol escrIptIon LCD ON/OFF Turns LCD Display on or off Function 1: Press and hold to enter/exit standby mode. Function 2: Standby/Window Switch between Quad view and CHN 1-4 single channel view. MENU/EXIT Press to open/close the main menu unctIon... -
Page 6: Front Panel
roduct vervIeW roduct vervIeW mouse and virtual keypad remote control emote ontrol ouse ontrols Remote Control Operation Mouse Operation with this DVR The remote control is the secondary input device for navigating the system’s he mouse is the primary input device for navigating system menus. interface. -
Page 7: Camera Power Connections
To power the system On/Off, connect the power cable to the DC 12V port on the rear panel. Flip the toggle switch on in the back view angle. Make sure the lens is upright relative to the subject. Tighten the thumb bolt. First Alert cameras can be either ceiling or of the DVR. -
Page 8: Live View Screen
nItIal etup nItIal etup system operation system operation Live View Screen The Live View Screen is the home or main viewing screen. It shows live video of all current assWord etup cameras connected to the DVR. You can double-click a channel at any time to view it in single-channel mode. -
Page 9: Camera Display Setup
nItIal etup nItIal etup system operation system operation amera Isplay etup anguage Setting Up Cameras for Viewing and Recording Setting Up Language/Date/Time Use the Display Setup menu to customize channel titles, show/hide the date and time in live viewing and playback, and enable/ Set the system language, date and time, passwords, and configure audio and disable preview channels. -
Page 10: Basic Operation
asIc peratIon asIc peratIon recording recording Recording Schedule (TIMER RECORD) Example asIc etup You want your system to record continuously on all channels from 9 AM to 5 PM Monday to Use the BASIC SETUP menu to configure language, date and time settings, Friday. -
Page 11: Playback
asIc peratIon asIc peratIon playback HDD management Backup layback Use the FILE LIST sub-menu to find recorded video on your system and copy it to a USB flash drive (not included). PLAYBACK Mode NOTE: The system is compatible with most major brands of USB flash drives, with Playback and Record Search capacities from 256 MB to 4 GB. -
Page 12: Advanced Operation
dvanced peratIon dvanced peratIon alarm alarm Hard Drive and USB Options continued: Use TAMPER ALARM to set the system to notify you when a camera has been blocked by something. When a Tamper Alarm is triggered, in the Live Formatting the USB Flash Drive View Screen you will see a red【B】in the Channel with an alarm warning. -
Page 13: System Maintain
dvanced peratIon dvanced peratIon system ...ptz ystem nfo and ystem pdate System Information: Pan/Tilt/Zoom (PTZ) Setup: PTZ Inputs Con guration View system information, including the firmware version, MAC address, and NOTE: Consult the instruction manual of your PTZ camera for complete serial number of the system. -
Page 14: Step 4: Configure The Cruise Setting Of Your Ptz Camera
dvanced peratIon emote ccess network setup etWork etup emote ccess Pan/Tilt/Zoom (PTZ) Setup Continued: Use the NETWORK SETUP menu to configure your network and DNS settings for remote access. If you are only going to access In the PTZ Senior Control screen you can set or control the following for each PRESET defined: the DVR locally from a computer attached to the same router as the DVR, you only SET PRESET: Saves any PRESET functions changed with this screen. -
Page 15: Upnp (Universal Plug And Play)
emote ccess emote ccess network setup network setup To configure Static IP settings in the DVR: DDNS (Dynamic Domain Name Service) Select STATIC IP from the TYPE drop down box in the NETWORK SETUP A DDNS account allows you to set up a web site address that points back to your Local Network so you can access the DVR over Menu. -
Page 16: Port Forwarding
emote ccess emote ccess network setup network setup Next configure DDNS settings in the DVR From the Network Setup menu, enter Primary or Secondary DNS from the WAN Install the program and launch it. settings of your router in the DNS field Once Simple Port Forwarding has launched, select your Click DDNS SETTINGS. -
Page 17: Remote Surveillance
Remote Access Remote Access network setup remote surveillance Step 3: Test Port Forwarding emote urveIllance In the Checklist Screen, test if the ports are working by clicking on the “Do it now” button in item “(7) Test that the ports now work.”. -
Page 18: Using Remote Surveillance
Remote Access Remote Access remote surveillance remote surveillance Remote Surveillance Main Screen: Configuring ActiveX Control in Internet Explorer 8: Upon login, the Remote Surveillance main screen appears in your browser. Open Internet Explorer 8 Click on Tools Select Internet Options in the pull-down menu Click on the Security Tab Select Trusted Sites Click on the Sites button... -
Page 19: Live Viewing Tab
Remote Access Remote Access remote surveillance remote surveillance Live Viewing Tab: Playback Tab By default, Remote Surveillance opens in Live Viewing mode (split-screen). Use the Replay menu to search and playback recorded video on your system. To use Live Viewing: Click LIVE at the top of the main screen. -
Page 20: Setup Tab
Remote Access emote ccess remote surveillance remote surveillance Search Setup Tab Use the calendar and drop-down menus to search for recorded video on your system. Use the SETUP tab to configure the settings of your system from a remote location. NOTE: If the Main Menu is open on the Click <... -
Page 21: Mobile Phone
emote ccess obIle hone remote surveillance setup and control SETTING obIle hone You can check and change the parameter settings as configured in the DVR BANDWIDTH: Set the bandwidth in kbps (128k, 192k, MAINTENANCE Mobile Setup 256k, 384k, 512k, 1024k) that you want to allocate for You can check and change the parameter settings as Mobile allows you to send alerts to your cellular phone running Windows Mobile traffic based on internet bandwidth available. -
Page 22: Symbian (S60 3Rd Or Later) Os Phones
obIle hone obIle hone setup and control setup and control Step 5: Network Parameters Symbian (S60 3rd or later) OS Phones When you login for the first time, go to the “Settings” tab and Your DVR can be configured to be viewed remotely on your smartphone running the Symbian OS using the MEye software. configure the network parameters Step 4: Launch Program first. -
Page 23: Android 1.5 Mobile Os Phones
obIle hone obIle hone setup and control setup and control Android 1.5 Mobile OS Phones Step 7: Main Interface and Controls • Snapshot default save path is: C:\Data\Images. Your DVR can be configured to be viewed remotely using a smartphone running the Android mobile OS using the MEye software. • Button Definitions: Note, you must have a PTZ camera(s) connected for PTZ functions to operate. -
Page 24: Apple Iphone On 3G Networks Os Phones
obIle hone obIle hone setup and control setup and control Apple iPhone on 3G Networks Your DVR can be configured to be viewed remotely on your iPhone or iPad Step 4: Network Parameters using the MEye software. System requirements: iPhone or iPad 2.0 or greater When you login for the first time, go to the “Settings”... -
Page 25: Blackberry Os 5.0 Phones (Curve 8900, Bold 9700, Tour 9630)
obIle hone obIle hone setup and control setup and control Step 7: Main Interface and Controls Blackberry OS 5.0 Phones (Curve 8900, Bold 9700, Tour 9630) • Snapshot default save path is phone’s default gallery directory. Your DVR can be configured to be viewed remotely using a smartphone running the BlackBerry mobile OS version 5.0 using the • Button Definitions: MEye software. -
Page 26: Appendix
ppendIx ppendIx hard drive specifications rIve emoval and nstallatIon echnIcal pecIfIcatIons Remove four screws evIce HDD Installation pecIfIcatIon arameter Language English/ Chinese To install or replace the hard drive in the DVR: CAUTION: TO REDUCE THE RISK OF ELECTRIC SHOCK. 16 Bit Graphic menu (OSD Menu) ystem UNPLUG ALL POWER SOURCES, INCLUDING CAMERAS FROM... -
Page 27: Faq's (Frequently Asked Questions)
ppendIx ppendIx FAQ’s faQ , Question: Why is there no audio when playing back? Answer: • Audio settings not correct: open audio-video item and check the audio to see if it is closed in playback interface Tech Services: 800-323-9005 If your problem is not listed below, please call our toll-free number for more support. Question: Why is my system time not correct? Question: Why is the DVR not working after starting? Answer:... -
Page 28: Troubleshooting
BRK Brands, Inc., (“BRK”) the maker of First Alert® brand products warrants that for a period of one year from the date of purchase • Confirm that all cables are connected correctly (the “Warranty Period”), this product will be free from defects in material and workmanship. BRK, at its sole option, will repair or • Confirm that the power adapter is securely connected to the back... - Page 29 BRK Brands, Inc. ©2012 a Jarden Corporation Company (NYSE:JAH) 3901 Liberty Street Road, Aurora, IL 60504-8122 Phone: 630-851-7330 Tech Services: 800-323-9005 www.brkelectronics.com M08-0399-002...