Table of Contents
Advertisement
Quick Links
- 1 Emotiva Usp-1 Preamplifier Audiophile 2 Channel Preamplifier Features
- 2 Usp-1 Front Panel Layout
- 3 Usp-1 Rear Panel Layout
- 4 Bass Management - Low Pass/High Pass Filters
- 5 Connecting to Audio Source Units
- 6 Connecting to Amplifiers and Speakers
- 7 Usp-1 Technical Specifications
- Download this manual
Advertisement
Table of Contents

Related Manuals for Emotiva USP-1


Summary of Contents for Emotiva USP-1
- Page 2 ...
-
Page 3: Table Of Contents
A Note for the Cable Television (CATV) Installer Antenna Grounding Outside the House Thank You for Your USP-1 Purchase Unpacking the USP-1 Inventory Emotiva USP-1 Preamplifier Audiophile 2 Channel Preamplifier Features USP-1 Front Panel Layout USP-1 Rear Panel Layout USP-1 Remote Changing the Battery Bass Management –... - Page 4 Problems with the whole A/V System USP-1 Technical Specifications Emotiva Disclosure Limited Warranty Service Assistance for the USP-1 Front Panel Diagram (Full Page) Back Panel Diagram (Full Page) 4 ...
-
Page 5: Safety Precautions
The Emotiva USP-1 Preamplifier should be situated so that its location or installation position does not interfere with proper ventilation. The Emotiva USP-1 Preamplifier should not be situated on a bed, sofa, rug or similar surface that may block any ventilation openings; or placed in a built-in installation such as a bookcase, cabinet, or closed equipment rack that may impeded the flow of air through ventilation openings. -
Page 6: Nec (National Electrical Code) Standards
Grounding or Polarization - Precautions should be taken so that the grounding or polarization means of the component is not defeated. For questions regarding service, please contact: Emotiva Audio Corporation 131 Southeast Parkway Court Franklin, TN 37064 Tel - (615) 790-6754 | (877) EMO-TECH | Fax - (615) 791-6287 www.emotiva.com... -
Page 7: Thank You For Your Usp-1 Purchase
The Emotiva USP-1 Preamplifier features an array of leading edge technologies and all the features necessary to perform the functions expected of a high end stereo preamplifier. At Emotiva, we believe in creating home audio products that are easy to use while delivering unparalleled performance. -
Page 8: Emotiva Usp-1 Preamplifier
Emotiva USP-1 Preamplifier Audiophile 2 Channel Preamplifier Features • Precision low noise phono input with moving magnet or moving coil capability • Seven stereo inputs with precision instrumentation grade relay switching • Microprocessor controlled pure analog signal path • Full remote control operation •... -
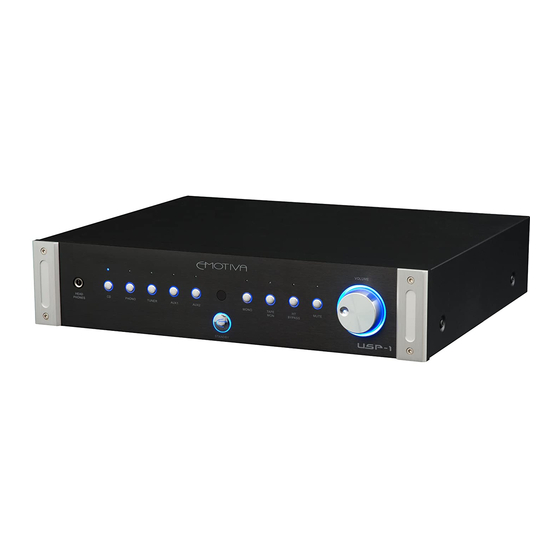
Page 9: Usp-1 Front Panel Layout
USP-1 Front Panel Layout (for larger image, see page 24) * Input Indicator LEDs LEDs above each selectable button illuminate when the labeled function is engaged. All of the labeled indicators are available as remote commands. When receiving commands, the COM/RECV LED illuminates as well. - Page 10 Any selected input will pass through to the Tape Monitor outputs except when the tape monitor is selected. When the Tape Monitor is not selected, the selected input is sent to the main outputs as well as the tape monitor outputs channels. When the Tape Monitor is selected, the Tape Monitor input is sent to the main output channels.
-
Page 11: Usp-1 Rear Panel Layout
Allows a mono to mono 3.5mm cable to remotely trigger another device on and off, along with the USP- 1. Current is limited to 500mA, which is sufficient to trigger two devices. For triggering more devices, you may want to use a separate triggering device, like the Emotiva ET-3. 2. PHONO INPUT Section (clockwise from top left) •... - Page 12 AUDIO OUTPUT SECTION 6. Low Pass Filter Frequency Control Rotary knob for selecting the low pass frequency, which can be set from 50Hz to 250Hz, with a slope fixed at 12dB/Octave. 7. Balanced Subwoofer Output Balanced (XLR) subwoofer connection, with low pass frequency controlled by the rotary knob directly above it (6.).
-
Page 13: Usp-1 Remote
The USP-1 remote is powered by 2 AAA batteries. To add fresh batteries, press in the battery cover tab, remove the battery cover, exchange the batteries and orient the negative and positive ends as indicated by the images in the battery compartment. Emotiva recommends using alkaline batteries. 13 ... -
Page 14: Bass Management - Low Pass/High Pass Filters
Bass Management – Low Pass/High Pass Filters The USP-1 offers a full range speaker connection, as well as offering a bass management system that allows you to optimize your sound when using a powered subwoofer. Bass Management Close-up: 1. Low Pass filter frequency control 2. - Page 15 Low Pass/High Pass Outputs Recommended for users with speakers that do not have the capability to produce low bass tones (below 80Hz). Bookshelf speakers, smaller ‘satellite’, and home theater style speakers may be incapable of producing lower bass tones, either by design or simple size limitations. To optimize the performance of the speakers, and to maximize the power output of the connected amplifier, use the High Pass outputs for your left and right speakers and adjust the High Pass filter frequency control (4) to select the cut-off frequency.
-
Page 16: Connecting To Audio Source Units
Connecting Audio Source Units The USP-1 can connect to up to seven different audio devices, using standard RCA analog connectors. PHONO Connects to a turntable using standard RCA type connectors. Connect the Left output on the turntable to the Left input of the PHONO INPUT section on the USP-1, and the Right output to the Right input of the PHONO INPUT section of the USP-1. -
Page 17: Connecting To Amplifiers And Speakers
TAPE This ‘loop’ connects an external recording device to the USP-1 preamplifier via RCA outputs and inputs. While this traditionally has been a cassette player or DAT player, this connection could also be a hard drive based recording device as long as the input and output connections are analog RCA audio connections. -
Page 18: Troubleshooting Guide
Troubleshooting Guide The Emotiva USP-1 is expertly designed and built to provide years of trouble-free performance. Most problems that occur can usually be solved by checking your connections or making sure that the audio and video components connected to the USP-1 are on and fully operational. The following information will help you deal with common problems you may experience during initial use of your unit. -
Page 19: Remotely Connected External Amplifier(S) Do Not Turn Off With Usp-1
Try moving the speaker cables away from any power cords. Try just one speaker, connecting it to different channels and see if an amplifier channel is bad. • If you are still having a problem, remember that Emotiva’s technical support staff will assist you. Other Probable Causes of Speaker Noise •... -
Page 20: Problems With The Whole A/V System
If you are having more complex problems in your overall home entertainment system (not just with the USP-1 preamplifier/processor), please contact Emotiva directly for professional installation assistance. These professionals have years of experience with a wide range of home entertainment and products and can offer you assistance in troubleshooting and rectifying problems. -
Page 21: Usp-1 Technical Specifications
USP-1 Technical Specifications Preamp Audio Section Phono Input: Moving Coil - 240 Ohm Moving Magnet - 47kOhm Input Impedance Line In: 47K Ohm +/-5% Signal-to-Noise Ratio (rel 2V out): >116dB (ref 2V) Distortion: < 0.005% 20Hz - 20kHz with 80kHz measurement bandwidth Frequency Response: 5Hz - 80kHz, with less than 0.05dB of deviation Line Out Freq. -
Page 22: Emotiva Disclosure
Emotiva Disclosure © Copyright 2009 Emotiva Audio Corporation All Rights Reserved. Emotiva reserves the right to make improvements to its products at any time. Therefore, the specifications of the product and the specific details of this manual are subject to change at any time. -
Page 23: Limited Warranty
Emotiva offers the following warranty to owners of the USP-1. Emotiva Audio warrants the USP-1 to be free of defects in materials and workmanship for a period of FIVE YEARS from the original date of purchase. The following items are excluded from, or will void this warranty: 1) Damage to the USP-1 caused during shipment and handling. -
Page 24: Front Panel Diagram (Full Page)
24 ... -
Page 25: Back Panel Diagram (Full Page)
25 ... - Page 26 ...