Advertisement
Quick Links
Universal Garage Door
Remote Control
1. INTRODUCTION
Congratulations on your purchase of the Skylink
Door Remote Control. This is a kit with a universal remote control and
TM
Smart Button
. In this kit, you will find the following:
Remote Control
(Battery included)
2. RECEIVER INSTALLATION
Unplug the power cord of your garage door opener before installation to
ensure power is not connected.
DO NOT let children use the gargae door Transmitter without adult
supervision.
WARNING
Children can injure themselves or others by the garage door.
DO NOT use remote to control the door without safety beams.
1. Open up the "Easy Clip
TM
" and place it underneath
the existing 2 wires of the wall button / wall
console.
2. Ensure a pair of the wall button ribbon wires
are placed properly inside the channels of the
TM
"Easy Clip
".
NOTE:
Ensure the ribbon wires
are not twisted but laid
flat inside the clip.
If your wall button ribbon wires
are not the same kind as shown
in the diagram, please refer
below (4) or visit our website
www.skylinkhome.com or
contact us for more information.
3. Press and lock the clip by
snapping it together. The
included Crimper helps you
lock the "Easy Clip
TM
". Close
the cover and press down
to lock the cover using this
Crimper until you hear a "click".
TM
4. If the "Easy Clip
" cannot clip with the wires from your wall button, cut
off the "Easy Clip
TM
" then connect two wires from the Smart Button
GB-318 to the wall button.
a) Disconnect the existing wall button from the wall.
b) Connect the 2 wires from the Smart Button
GB-318 to your existing wall button. Polarity does
not matter, so simply pick one wire from the Smart
TM
Button
GB-318 and connect it to one of the
screw terminals on your wall button. Connect
the 2nd wire to the other screw terminal.
c) Reconnect the wall button back.
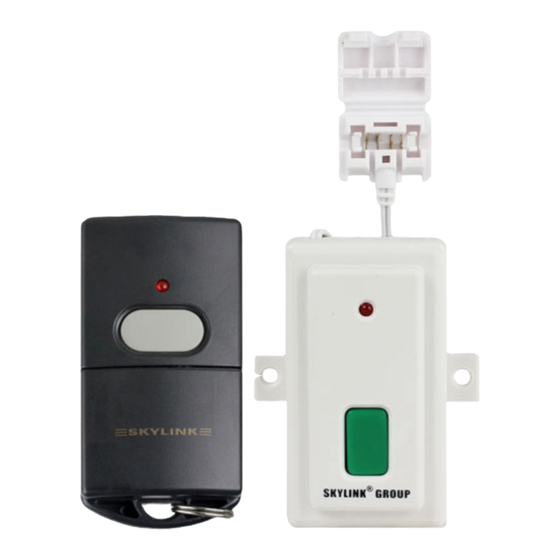
Model GBRM
®
GBRM Universal Garage
Crimper
Garage Door
Receiver
TM
Smart Button
GB-318
Double Sided Tape
Easy Clip
Wall Button
Ribbon Wires
Press / lock
Ribbon Wires
TM
2. RECEIVER INSTALLATION (CONT)
5. If the wall button wires are hidden inside the
wall, please connect the "Easy Clip
the exposed wires attached to the
terminals of the garage door
opener.
6. Power up the garage door opener, the red LED on the Smart Button
GB-318 should keep flashing slowly within 2 minutes.
If the Smart Button
Smart Button
TM
GB-318 has been connected to the wall button's
wires for 2 minutes, your garage door opener is probably too
old. However, the Smart Button
plug in an adapter (purchased separately). Please
contact Skylink
®
to purchase the adapter.
TM
Rating of the transformer:
12V DC, 100mA
Diameter of DC plug : 3.5mm
7. Secure the Smart Button
Note: Do not cut the antenna! Straighten up the antenna to improve
signal reception.
Note: After installation of the "Easy Clip
Smart Button
TM
GB-318 to another place, please open the "Easy Clip
gently unlocking the two buckles with a screw driver, and remove it from
the wires. Do not re-use the "Easy Clip
3. PROGRAM TRANSMITTER G6M TO RECEIVER GB-318
You need to do the programming in order to add the transmitter to a receiver.
TM
Smart Button
GB-318 can learn up to 10 remote controls.
To add remote controls, follow the instructions below:
1. Press the learn button on the side of the Smart Button
2. Once the learn button is pressed, the LED will
flash quickly. Release the learn button.
3. Within 30 seconds, press the button on the transmitter
that you want to program to the receiver.
4. Once the remote control is programmed, the LED
will flash slowly, in the same way as it flashes
in standby mode.
5. You may now operate the garage door opener
with this new remote control.
TM
If the red LED flashes slowly, the Smart Button
is in standby mode. When a valid remote control signal is
received, it will open / close the garage door.
Press the programmed button on the remote control
TM
or Smart Button
GB-318, it will open / close the
garage door.
Note: After connecting this NEW Remote Control to
your wall button, your existing remote control will still
work with this connection.
TM
" to
TM
GB-318's red LED does not flash after the
TM
GB-318 will still work if you
TM
GB-318 properly with the mounting accessories.
TM
", if you want to re-install the
TM
", refer to Step 4 to re-install it.
4. OPERATION
TM
TM
Antenna
TM
" by
TM
GB-318.
LED
Learn
Button
TM
Smart Button
GB-318
GB-318
LED
OPEN /
CLOSE
Button
Advertisement

Related Manuals for SkyLink GBRM Guide


Summary of Contents for SkyLink GBRM Guide
- Page 1 Remote Control Model GBRM 1. INTRODUCTION 2. RECEIVER INSTALLATION (CONT) 5. If the wall button wires are hidden inside the Congratulations on your purchase of the Skylink ® GBRM Universal Garage wall, please connect the “Easy Clip ” to Door Remote Control. This is a kit with a universal remote control and...
- Page 2 - know more about features and applications to section 3 for how to program a transmitter to the receiver. - download documents, i.e. user’s instructions - order Skylink products 7. BATTERY or if you have difficulty getting products to work, please: 1.