Table of Contents
Advertisement
Advertisement
Table of Contents
Troubleshooting

Related Manuals for Mio DigiWalker C310


Summary of Contents for Mio DigiWalker C310
- Page 1 www.miogps.com...
- Page 2 English Revision: R00 (US version) Feb. 2006 Trademarks All brand and product names are trademarks or registered trademarks of their respective companies. Note The information in this manual is subject to change without notice.
-
Page 3: Table Of Contents
English Table of Contents Precautions and Notices............... iii Getting Started ................. 1 1.1 Understanding Hardware Features ............1 Front and Side Components ..............1 Back Components ................2 Top Components.................. 3 Bottom Components................3 1.2 Performing the Initial Start Up .............. 4 1.3 Connecting to AC Power and Charging the Battery...... - Page 4 MP3 Playback Control................ 23 4.4 Using Play Lists .................. 24 Creating a Play List ................24 Opening a Play List ................25 4.5 Equalizer..................... 26 ActiveSync and Mio Sync ..............29 5.1 ActiveSync..................29 Compatibility ..................29 Installing ActiveSync................30 Using ActiveSync................32 5.2 Mio Sync.....................
-
Page 5: Precautions And Notices
English Precautions and Notices For your own safety, do not operate the controls of the product while driving. Use this product prudently. The product is intended to be used only as a navigation aid. It is not for precise measurement of direction, distance, location or topography. - Page 6 English A car holder is needed when using the device in a car. Be sure to place the device in an appropriate place, so as not to obstruct the driver’s view, or deployment of airbags. Do not mount where the driver’s Do not place unsecured field of vision is blocked.
-
Page 7: Getting Started
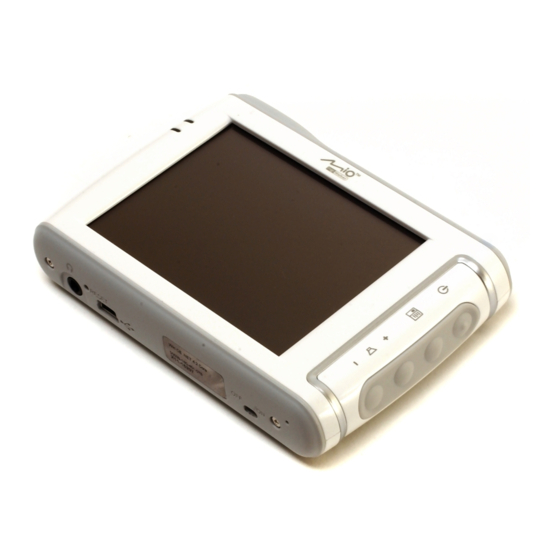
English Getting Started 1.1 Understanding Hardware Features NOTE: Depending upon the specific model purchased, the color of your device may not exactly match the device shown in this manual. Front and Side Components Component Description Charge Indicator Glows bright amber to indicate that the battery is c harging, and turns green when the battery is fully charged. -
Page 8: Back Components
English Volume Control When in the map screen: Zooms in or out the map. When not in the map screen: Adjusts the volume level of your device Back Components Component Description External Antenna This connector (under rubber dust cover) allows use of an optional external antenna with magnetic mount, which may Connector be positioned on top of the car for better signal reception in... -
Page 9: Top Components
English Top Components Component Description Receives signals from the GPS satellites overhead. Make sure GPS antenna that it has a clear view of the sky. Accepts a SD (Secure Digital) or MMC (MultiMediaCard) card SD/MMC Slot for accessing data such as MP3 music. Bottom Components Component Description... -
Page 10: Performing The Initial Start Up
English 1.2 Performing the Initial Start Up 1. Using a pointed pen, slide the ON/OFF switch to the ON position. CAUTION: Always leave the ON/OFF switch in the ON position for normal operation. 2. Your device will automatically turn on. Connect the AC adapter as described in the next section. -
Page 11: Connecting To Ac Power And Charging The Battery
English 5. Fully charge the battery before using your device for the first time. 1.3 Connecting to AC Power and Charging the Battery When charging the battery for the very first time, you should charge it for at least 8 hours. -
Page 12: Using Your Device In A Vehicle
English CAUTION: For optimal performance of the lithium battery, take note of the following: Do not charge the battery where the temperature is high (e.g. in direct sunlight). There is no need to fully discharge the battery before charging. You can charge the battery before it is discharged. -
Page 13: Connecting The Car Charger
English Connecting the Car Charger The car charger supplies power to your device when you are using the device in a car. CAUTION: To protect your device against sudden surges in current, connect the car charger only after the car engine has been started. 1. -
Page 15: Operating Basics
English Operating Basics 2.1 Turning On and Off Use the power button ( ) to turn on and off your device. When you press the power button to turn off the unit, your device actually enters a suspend state and the system stops operating. -
Page 16: Main Menu
Description Information Address Allows you to specify an address as your See the manual destination. supplied on the Mio Map DVD. My Places Allows you to use a stored place as your destination Food, Fuel, Allows you to search a facility from the device database. -
Page 17: Inserting A Sd/Mmc Card
English 2.4 Inserting a SD/MMC Card Your device has a SD/MMC slot where you can insert an optional Secure Digital or MultiMediaCard storage card. To use a SD/MMC card, insert it into the slot, with the connector pointing to the slot and its label facing the front of the device. -
Page 19: Device Settings
English Device Settings You can customize the device settings such as backlight, volume, date and time. Once you change the settings, your new settings will remain until you change them again. 3.1 Using Device Settings To open the Device Settings menu, first tap the button from the My Places Settings or Map, Look &... -
Page 20: Backlight
English 3.2 Backlight 1. Tap the button on the Settings screen. Device Settings 2. Tap the Backlight button. 3. Move the knob along the track bar to adjust the backlighting. To darken the screen, move the knob to the left. To lighten the screen, move the knob to the right. -
Page 21: Volume
English 3.3 Volume 1. Tap the button on the Settings screen. Device Settings 2. Tap the Volume button. 3. Move the knob along the track bar to adjust the volume. To decrease the volume, move the knob to the left. To increase the volume, move the knob to the right. -
Page 22: Screen
English 3.4 Screen You can calibrate the touch screen if it is not responding accurately to your taps. 1. Tap the Device Settings button on the Settings screen. 2. Tap the button. Screen 3. Tap to start the calibration. 4. Tap and hold the centre of the target. -
Page 23: Power
English 5. When the target moves to another position, tap and hold the centre of the new target. Repeat each time to complete the calibration process. 6. When completed, tap button to return to the Device Settings screen. 7. Tap the button to go back to the Settings screen. -
Page 24: Date&Time
English You can set a timer to automatically turn off your device when it is idle for a set period of time. The options include Never, 30 minutes, 20 minutes, and 10 minutes. 4. Tap the button to save the changes and go back to the Device Settings screen. - Page 25 English 4. To change the date, tap the down arrow in the Date item. A calendar pops up. Tap the left arrow on the calendar to go to the earlier month and year or the right arrow to the later month and year. Alternatively, you can tap the month or year on top of the calendar to directly change the month or year.
-
Page 26: Switch Language
English 3.7 Switch Language NOTE: To change the language of the Mio Map navigation software, use Settings of Mio Map. (See section 6.5 for information.) To change the language for Device Settings and MP3 Player menus: 1. Tap the button on the Settings screen. -
Page 27: Mp3 Player
English MP3 Player This chapter tells you how to play MP3 files on your device. 4.1 Starting and Exiting MP3 Player The MP3 Player program turns your device into an MP3 player. It features: Playback of MP3 files Basic playback controls such as play, pause, stop, next and previous 17 preset equalizer audio profiles Playback includes single selection playback, repeat, single repeat, sampling playback, normal sequence and random sequence. -
Page 28: Preparing The Mp3 Files For You Device
English The Mio Map navigation software is still running in the background. Whenever Mio Map needs to pronounce voice guidance or alert, the MP3 playback will pause. The playback resumes after the voice guidance or alert ends. NOTE: If you’re using your device as a MP3 player indoors and don’t want to be interrupted by the GPS signal status message, access Settings Prompts and uncheck the “Unreliable... -
Page 29: Mp3 Playback Control
English MP3 Playback Control You can control the MP3 Player via control buttons. See the table below for details: Control Button Name Description Play/Pause Play or pause the playback. Stop Stop the playback. Previous/ Play the previous or next file. Next Volume Increase or decrease the volume. -
Page 30: Using Play Lists
English Repeated playback of all files in random order Help Introduce the function and operation of each icon. Tap an icon to see a description line at the bottom of the screen. 4.4 Using Play Lists By default, the program automatically loads all MP3 files in the play list. You can also create your own play lists for future use. -
Page 31: Opening A Play List
English Select all songs. Back Add the selected song(s) to the play list Deselect the and return to the previous screen. selected song(s). Add the selected song(s) to the play list. 3. Repeat the same procedure for the other songs to be added. 4. -
Page 32: Equalizer
English Back Open the selected play list. Delete the selected play list. Delete all the play lists except the selected one. 4. To return to the control panel, tap 4.5 Equalizer The MP3 Player provides 17 preset audio profiles. Tap to open the equalizer panel. - Page 33 English to save your selection and return to the control panel. Tap to cancel your selection and return to the control panel. To select the Default profile, tap...
-
Page 35: Activesync And Mio Sync
This chapter tells you how to use the Application CD for installing ActiveSync This chapter tells you how to use the Application CD for installing ActiveSync and Mio Sync. The two programs are required for data transfer between your and Mio Sync. The two programs are required for data transfer between your device and a computer. -
Page 36: Installing Activesync
English Installing ActiveSync 1. Turn on your computer and insert the Application CD into the CD-ROM drive of your computer. 2. The autorun screen should appear. Select the desired language. 3. Select and follow the onscreen instructions to finish the Install ActiveSync installation. - Page 37 English 4. Depending on the version of your operating system, you may be asked to restart your computer during the installation process. 5. When prompted, connect the mini-USB end of the USB cable to the bottom of your device and the other end to a USB port on your computer. 6.
-
Page 38: Using Activesync
English Using ActiveSync Once ActiveSync is installed on your computer, you can use it to transfer files (i.e. MP3 files) between your device and your computer. CAUTION: Be discreet when you delete files from your device. Deleting files of which the function is unknown can cause programs or features to malfunction. -
Page 39: Mio Sync
English 5.2 Mio Sync Mio Sync allows you to copy the Microsoft Outlook Contacts information from your computer to your device. You can then use the address of a contact as your destination. Installing Mio Sync 1. Turn on your computer and insert the Application CD into the CD-ROM drive of your computer. -
Page 40: Using Mio Sync
1. Connect your device to your computer via the USB cable. Make sure that ActiveSync is up and running. 2. Start Mio Sync by clicking the shortcut button on the Windows desktop. 3. Click Use the items on desktop to replace mobile device’s. -
Page 41: Troubleshooting And Maintenance
English Troubleshooting and Maintenance Troubleshooting and Maintenance This chapter gives solutions to common problems you may encounter. It also provi des guidelines on taking care of your device. NOTE: If you encounter a problem you cannot solve, contact an authorized service center for assistance. -
Page 42: Troubleshooting
English Wait for 1 minute. 4. Your device turns on. 6.2 Troubleshooting Power Problems Power does not turn on when using battery power The remaining battery power may be too low to run your device. Connect the AC adapter to your device and to AC power. Then, turn on your device. Screen Problems Screen is off If the screen does not respond even after you press the power button, try the... -
Page 43: Connection Problems
English Screen freezes Reset your system. Screen is hard to read Make sure that the backlight of the display is on. Move to a location with more light. Inaccurate response to taps Recalibrate the touch screen. (See section 3.4 for instructions.) Connection Problems Cable Connection Problems Make sure that your device and your computer are both turned on before trying... -
Page 44: Maintaining Your Device
English 6.3 Maintaining Your Device Taking good care of your device will ensure trouble-free operation and reduce the risk of damage to your device. Keep your device away from excessive moisture and extreme temperatures. Avoid exposing your device to direct sunlight or strong ultraviolet light for extended periods of time. -
Page 45: Regulatory Information
English Regulatory Information NOTE: Marking labels located on the exterior of your device indicate the regulations that your model complies with. Please check the marking labels on your device and refer to the corresponding statements in this chapter. Some notices apply to specific models only. 7.1 Regulations Statements Class B Regulations Federal Communications Commission Radio Frequency Interference... -
Page 46: European Notice
English Increase the separation between the equipment and receiver. Connect the equipment into an outlet on a circuit different from that to which the receiver is connected. Consult the dealer or an experienced radio/TV technician for help. Any changes or modifications not expressly approved by the manufacturer could void the user’s authority to operate the equipment. -
Page 47: Safety Precautions
English EN6100-3-2: Limits for harmonic current emissions EN6100-3-3: Limitation of voltage fluctuation and flicker in low-voltage supply system EN60950 / IEC 60950: Product Safety The manufacturer cannot be held responsible for modifications made by the User and the consequences thereof, which may alter the conformity of the product with the CE Marking. -
Page 48: About The Battery
English About the Battery Use a specified charger approved by the manufacturer. CAUTION: This unit contains a non-replaceable internal Lithium Ion battery. The battery can burst or explode, releasing hazardous chemicals. To reduce the risk of fire or burns, do not disassemble, crush, puncture, or dispose of in fire or water.