Mio DigiWalker C320 User Manual
Mio digiwalker c320: user guide
Hide thumbs
Also See for DigiWalker C320:
- Manual (93 pages) ,
- User manual (54 pages) ,
- Quick manual (24 pages)
Table of Contents
Advertisement
Advertisement
Table of Contents
Troubleshooting

Related Manuals for Mio DigiWalker C320


Summary of Contents for Mio DigiWalker C320
- Page 1 User’s Manual...
- Page 2 All brand and product names are trademarks or registered trademarks of their respective companies. Disclaimer Specifications and manuals are subject to change without notice. Mio Technology assumes no liability for damage incurred directly or indirectly from errors, omissions, or discrepancies between the device and the manuals.
-
Page 3: Table Of Contents
Table of Contents Precautions and Notices ...v Getting Started...1 1.1 Understanding Hardware Components... 1 Top Components... 1 Bottom Components ... 1 Front Components ... 2 Back Components... 3 Left-Side Components ... 3 1.2 Performing the Initial Start Up ... 4 1.3 Connecting to AC Power and Charging the Battery... - Page 4 Shutting Down Your Device ... 41 6.2 Troubleshooting ... 42 Power Problems ... 42 Screen Problems... 42 Connection Problems... 43 GPS Problems... 43 6.3 Maintaining Your Device ... 44 Regulatory Information ...45 7.1 Regulations Statements ... 45 Class B Regulations... 45...
- Page 5 About Charging ... 47 About the AC Adapter ... 47 About the Battery ... 47...
-
Page 7: Precautions And Notices
GPS is operated by the United States government, which is solely responsible for the performance of GPS. Any change to the GPS system can affect the accuracy of all GPS equipments. GPS satellite signals do not typically pass through solid materials such as brick, concrete, or lead-coated safety glass. - Page 8 A device holder is needed when using the device in a car. Be sure that you place the device in an appropriate place, so as not to obstruct the driver’s view, or deployment of airbags. Do not mount where the driver’s field of vision is blocked.
-
Page 9: Getting Started
Getting Started 1.1 Understanding Hardware Components NOTE: Depending upon the specific model purchased, the color of your device may not exactly match the device shown in this manual. Top Components Component Power Button Bottom Components Component Mini-USB Connector Description Turns on and off the device. (Pressing briefly or for a long duration makes a difference. -
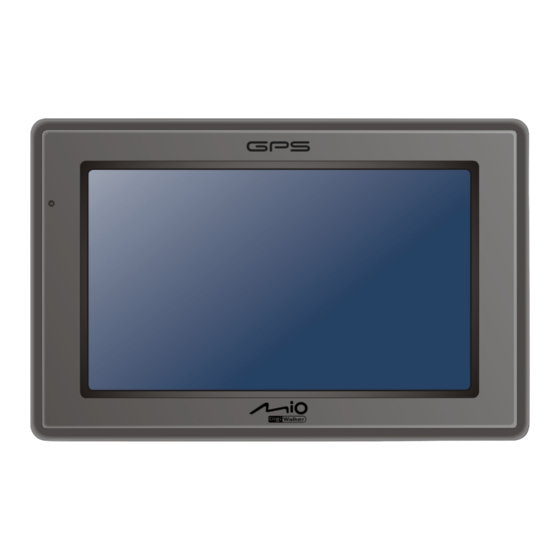
Page 10: Front Components
Cradle Connector Front Components Component Touch Screen Charge Indicator Connects to the cradle (purchased separately). Description Displays the output of your device. Tap the screen with your fingertip to select menu commands or enter inform Glows bright amber to indicate that the battery is charging, and turn s green when the battery is fully charged. -
Page 11: Back Components
Back Components Ref Component External GPS This connector (under rubbe dust cover) allows use of an Antenna optional external GPS antenna with magnetic mount, which may nnector be positioned on top of the with poor reception. Speaker Sends out music, sounds and voice. -
Page 12: Performing The Initial Start Up
Component SD/S DHC/MMC Slot Headph Connector Performing the Initial Start Up 1. For the initial start up, press the power button for 5 seconds to tur device. NOTE: Fo r normal operation, briefly press the power button to tu Your device turns on. Immediately charge your next section. - Page 13 4. The “Date/Time” screen appears. Tap the appropriate arrow button to select the time zone, date, and time. Then, tap the button. 5. The Home screen appears. You can now use your device.
-
Page 14: Connecting To Ac Power And Charging The Battery
1.3 Connecting to AC Power and Charging the Battery When charging the battery for the very first time, you should charge it for at least 8 hours. 1. Slide and click the connector converter onto the AC adapter. 2. Connect the adapter cable to the bottom of your device. 3. -
Page 15: Charging The Battery Via The Usb Cable
1.4 Charging the Battery via the USB Cable 1. Turn on the computer. 2. Connect the mini-USB end of the USB cable to the bottom of your device and the other end to a USB port on your computer. 3. If your device is on, the screen as shown below appears. Whenever your device is connected to a computer, you will not be able to use it. -
Page 16: Using Your Device In A Vehicle
CAUTION: Select an appropriate location for mounting the device in a vehicle. Never place the device where the driver’s field of vision is blocked. Make sure that the GPS antenna has a clear view of the sky. If the car’s windshield is tinted with a reflective coating, an external antenna (optional) may be needed to route the antenna to the top of the vehicle through a window. -
Page 17: Operating Basics
1.6 Operating Basics Turning On and Off For normal operation, turn off the device by briefly pressing the power button. The device enters a suspended state. When you next briefly press the power button, the system resumes. You will either be back to where you left off or see the Home screen. NOTE: The screen you see after resuming depends on the program you were using when you suspended the device. -
Page 18: Home Screen
Touch the screen once with your fingertip to open items or select onscreen buttons or options. Drag Hold your fingertip on the screen and drag up/down/left/right or across the screen. Tap and hold Tap and hold your fingertip until an action is complete, or a result or menu is shown. -
Page 19: Inserting A Sd/Sdhc/Mmc Card
1.7 Inserting a SD/SDHC/MMC Card Your device has a slot where you can insert an optional SD/SDHC/MMC storage card. To use a storage card, insert it into the slot, with the connector pointing to the slot and its label facing the front of the device. To remove a card, first make sure that no application is accessing the card, then slightly push the top edge of the card to release it and pull it out of the slot. -
Page 21: Audio
Audio 2.1 Starting and Exiting Audio Audio features: Playback of MP3/WAV/WMA files Basic playback controls such as play, pause, stop, next and previous Playback includes single selection playback, repeat, single repeat, sampling playback, normal sequence and random sequence. 11 preset equalizer audio profiles Play list support Background playback Lyrics display... -
Page 22: Preparing The Audio Files For Your Device
The control panel appears on the screen where you can easily control the player by tapping the control buttons. To exit the program, tap 2.2 Preparing the Audio Files for Your Device Before using the program, have the files (.mp3, .wav, or .wma) ready on either your device’s My Flash Disk\My Audio folder or on a storage card. -
Page 23: Playback Controls
The information area displays the current status including the play/pause/stop status, the elapsed time, the power status, the playback mode, the volume level, and the properties of the current song such as the artist (if available with the file), filename, total length, and stereo/mono information. NOTE: During the playback, the screen will automatically blank out if you haven’t tapped the screen within the preset time (30 seconds by default).The screen will restore when you... - Page 24 Control Button Playback Mode Lyrics Minimize Play List Equalizer Settings Exit Name Switches to the next mode: Repeated playback of the current file. Repeated playback of all files in the current play list in sequence. Playback of all files in the current play list in random order.
-
Page 25: Displaying Lyrics
2.5 Displaying Lyrics The program allows you to display the real-time lyrics on the screen while playing songs. This feature is especially handy for you to sing along with the songs. Preparing the Lyrics Files for your Device To display the lyrics, you need to have the lyrics files (.lrc) ready on your device’s \My Flash Disk\My Audio\Lyric\ folder or the \My Audio\Lyric\ folder on your storage card. -
Page 26: Using The Play Lists
2.6 Using the Play Lists You can create your own play lists for future use. Creating a Play List 1. Tap on the control panel to open the play list screen. The screen shows the current play list. Play the selected file. -
Page 27: Opening A Play List
4. To save the play list, tap 5. The keyboard screen appears where you can change the default name of the play list. Rename the play list if you want. Tap 6. To return to the control panel, tap Opening a Play List To open one of the play lists that you have created: 1. -
Page 28: Equalizer
3. Tap the play list you want to open and tap Back Rename the Open the selected play list. selected play list. Delete the selected play list. Delete all play lists. 4. To return to the control panel, tap 2.7 Equalizer The program provides 11 preset audio profiles. -
Page 29: Settings
to save your selection and return to the control panel. To select the Default profile, tap 2.8 Settings on the control panel. The Settings screen appears. NOTE: To know the function of each button, you can tap list to display a description line on the right side of the screen. Tap the check box (√) to turn on the power saving mode. -
Page 31: File Manager
File Manager 3.1 Starting and Exiting File Manager File Manager allows you to transfer multimedia files between your device and a storage card. on the Home screen to start the program. File Manager The File Manager screen shows specific folders of your device in the left column and the folder(s)/file(s) of the storage card, if inserted, in the right column. -
Page 32: Transferring Files
NOTE: The left column shows only “specific” folders in the My Flash Disk of your device. “Specific” folders refer to pre-defined data folders for multimedia programs (such as My Audio folder for the Audio program). Other folders are not accessible within the File Manager program. - Page 33 4. If the source file is in a folder of the storage card, tap twice the folder in the right column to open the folder. Or, tap the folder and then tap the folder. If you want to select all folders, tap 5.
-
Page 34: From Your Device To The Storage Card
From Your Device to the Storage Card Use the same method as described in the previous sub-section to copy files from your device to the storage card except that the direction is from the left column to ) the right column. 3.3 Managing Folders and Files In addition to copying files, File Manager provides the below functions: Rename... -
Page 35: Settings
Settings 4.1 Starting and Exiting Settings You can customize the system settings such as backlight brightness, volume, an language. Once you change the settings, the new settings will remain until you change them again. Tap the button on the Home screen. The Settings menu appears as shown Settings below. -
Page 36: Backlight
To exit Settings, tap The fo owing sections 4.2 Backlight 1. Tap the button on the Home screen. Settings 2. Tap the button. Backli Move the knob along the trac darken the backlight, m ove the knob to the right. to save the changes. -
Page 37: Volume
4.3 Volume 1. Tap the button on the Home screen. Settings 2. Tap the button. Volume 3. Move the knob along the track bar to adjust the volume. To decrease the volume, move the knob to the left. To increase the volume, move the knob to the right. -
Page 38: Screen
4.4 Screen You can calibrate the touch screen if it is not responding accurately to your taps. 1. Tap the button on the Home screen. Settings 2. Tap the button. Screen 3. Tap to start the calibration. 4. Tap and hold the centre of the target. -
Page 39: Power
5. When the target moves to another position, tap and hold the centre of the new target. Repeat each time to complete the calibration process. 6. When completed, tap 4.5 Power To check the remaining power level of your battery and/or set up the power saving feature: 1. -
Page 40: Date/Time
4. Tap to save the changes. 4.6 Date/Time 1. Tap the button on the Home screen. Settings 2. Tap the button. Date/Time 3. To change the time zone, tap the arrow in the “Time Zone” item. - Page 41 4. To change the date, tap the down arrow in the “Date” item. A calendar pops up. Tap the left arrow on the calendar to go to the earlier month and year or the right arrow to the later month and year. Alternatively, you can tap the month or year on top of the calendar to directly change the month or year.
-
Page 42: Language
4.7 Language 1. Tap the button on the Home screen. Settings 2. Tap the button. Language 3. Tap the up/down arrow button to select the desired language. 4. Tap to save the changes. -
Page 43: Restore
4.8 Restore To restore the settings to factory default values: 1. Tap the button on the Home screen. Settings 2. Tap the button. Restore 3. Tap... -
Page 45: Poi Loader
POI Loader 5.1 Installing POI Loader POI Loader allows you to import additional POI (Point of Interest) data to an SD card for the MioMap program to use. When MioMap starts, it will load the POI data from the SD card and show the additional locations in the function. -
Page 46: Excel File Format Example
In the “Name” field, give the location use the format Name@Speed, where speed limit must be the same as the default unit of MioMap. Excel File Format Example Enter longitu de in the first column, latitude in the second column third column . - Page 47 Browse NOTE: You can only specify the folder, not the file. All valid files in the selected folder will be loaded. The pull-down menu lists all e. You should not select , which Mio Device...
-
Page 48: Using The Imported Pois With Your Device
7. Click Next 8. When completed, a message appears telling you the total number of files that have been imported. Click CAUTION: Before disconnecting the cable, you must click the device icon in the task bar and click “Safely remove xxx” (where xxx is the name of your device). If you are transferring data, disconnecting the cable without following the correct removal procedure can result in data loss. -
Page 49: Troubleshooting And Maintenance
Troubleshooting and Maintenance Troubleshooting and Maintenance 6.1 Restart and Shut Down Occasionally, you may need to reset your device. For example, you should reset your system when it stops respo Restarting Your Device To restart your device, press the power button for 5 seconds until t Selection”... -
Page 50: Troubleshooting
Shutting down puts the device in a running programs before shutting butto n for 5 seconds. The Home screen appears. .2 Troubleshooting NOTE: If you encount assistance. Power Problems Power does not turn on The remaining batte battery. Screen Problems Screen responds slowly Make sure that your... -
Page 51: Connection Problems
Make sure that the device is facing a clear view of the sky. Note that the GPS reception can be affected by: Bad weather Dense overhead obstacles (e.g. trees and tall buildings) Other wireless device in the car Reflective car window tint and heated screens. -
Page 52: Maintaining Your Device
6.3 Maintaining Your Device ing good care of your device will ensure trouble-free operation and reduce t risk of damage to your device. Keep your device away from excessive moisture and extreme temperatures. Avoid exposing your device to direct sunlight or strong ultraviolet light for extended periods of time. -
Page 53: Regulatory Information
Regulatory Information NOTE: Marking labels located on the exterior of your device indicate the regulations that your model complies with. Please check the marking labels on your device and refer to the corresponding statements in this chapter. Some notices apply to specific models only. 7.1 Regulations Statements Class B Regulations Federal Communications Commission Radio Frequency Interference... - Page 54 provide reasonable protection against harmful interference in a residential installation. This equipment generates, uses, and can radiate radio frequency energy and, if not installed and used in accordance with the instructions, ma cause harmful interference to radio communications. However, there is no guarantee that interference will not occur in a particular installation.
-
Page 55: Safety Precautions
7.2 Safety Precautions Prolonged listening of music in maximum volume can damage the ears. The use of headphones other than those recommended/supplied can cause hearing impairment due to excessive sound pressure. About Charging Use only the charger supplied with your device. Use of another type will result in malfunction and/or danger. - Page 56 Important instructions (for service personnel only) Caution: Risk of explosion if battery is replaced by an incorrect type. Dispose of used batteries according to the instructions. Replace only with the same or equivalent type recommended by the manufacturer. The battery must be recycled or disposed of properly. Use the battery only in the specified equipment.