Electrolux EHD6671P Installation And Operating Instructions Manual
Ceramic glass induction hob
Hide thumbs
Also See for EHD6671P:
- Installation and operating instructions manual (28 pages) ,
- Installation and operating instructions manual (36 pages)

Related Manuals for Electrolux EHD6671P


Summary of Contents for Electrolux EHD6671P
- Page 1 Installation and Operating Instructions EHD6671P 822 924 857-B-280405-03...
- Page 2 Dear Customer, Please read these user instructions carefully and keep them to refer to later. Please pass the user instructions on to any future owner of the appliance. The following symbols are used in the text: Safety instructions Warning! Notes that concern your personal safety.
-
Page 3: Table Of Contents
Contents Operating Instructions ............. Safety instructions . -
Page 4: Operating Instructions
Operating Instructions Safety instructions Please comply with these instructions. If you do not, any damage resulting is not covered by the warranty. This appliance conforms with the following EU Directives: – 73/23/EEC dated 19.02.1973 Low Voltage Direc- tive – 89/336/EEC dated 03.05.1989 EMC Directive in- clusive of Amending Directive 92/31/EEC –... -
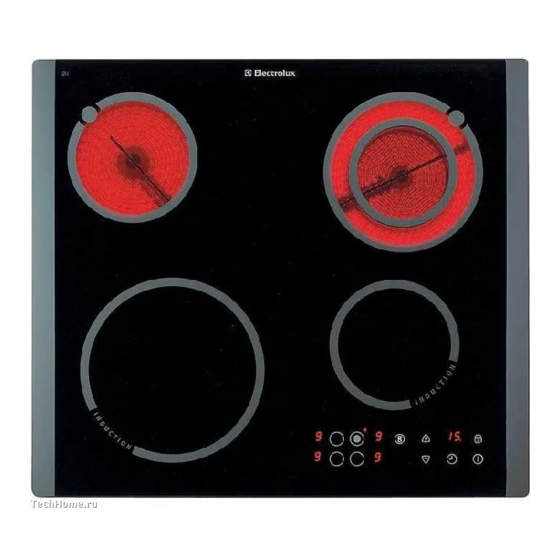
Page 5: Description Of The Appliance
Description of the Appliance Cooking surface layout Single cooking zone Induction cooking zone 2300W with power function 3200W Control panel layout Heat setting selection Power function On/Off with power indicator Double ring cooking zone 700/1700W 1200W Control panel Cooking zone indicators Timer function Timer display Timer... -
Page 6: Touch Control Sensor Fields
Touch Control sensor fields The appliance is operated using Touch Control sen- sor fields. Functions are controlled by touching sen- sor fields and confirmed by displays and acoustic signals. Touch the sensor fields from above, without covering other sensor fields. Sensor field On / Off Increase settings... -
Page 7: Operating The Appliance
Operating the appliance Use the induction cooking zones with suitable cookware. Switching the appliance on and off Control panel Switch on Touch Switch off Touch After switching on, within approx. 10 seconds a heat setting or a function must be set, other- wise the appliance automatically switches it- self off. -
Page 8: Using The Automatic Warm-Up Function
Using the automatic warm-up function All cooking zones are equipped with an automatic warm-up function. The automatic warm-up function sets the cooking zone to the highest setting for a certain period of time and then automatically switch- es back to the cooking setting that was originally set. Step Control panel Setting the level... -
Page 9: Locking/Unlocking The Control Panel
Locking/unlocking the control panel The control panel, with the exception of the “On/Off” sensor field, can be locked at any time in order to prevent the settings being changed e.g. by wiping over the panel with a cloth. Control panel Switch on Touch Switch off... -
Page 10: Switching The Power Function On And Off
Power Management The cooking zones have a maximum power available to them. If this power range is exceeded by switching on the power function, Power Management reduces the heat setting of another cooking zone. The display for this cooking zone alternates for two minutes between the set heat setting and the maxi- mum possible heat setting. -
Page 11: Using The Timer
Using the timer All cooking zones can use each use one of the two timer functions at the same time. Function Automatic cut-out Countdown timer If a cooking zone is switched off, the timer function set is also switched off. If a heat setting is set on this cooking zone in addition to a countdown timer, the cooking zone is switched off after the time set has... -
Page 12: Setting The Time
Setting the time Step Control panel field Select cooking zone Touch zone selected After a few seconds the pilot light flashes more slowly. The time is set. The time counts down. Switching off the timer function Step Control panel field Select cooking zone Touch for the cooking zone... -
Page 13: Safety Cut-Out
Safety cut-out Cooking surface • If after switching on the cooking surface, a heat setting is not set for a cooking zone within approx. 10 seconds, the cooking surface automatically switches itself off. • If one or more sensor fields are covered for longer than approx. -
Page 14: Tips On Cooking And Frying
Tips on cooking and frying Information about acrylamides According to the latest scientific research, in- tensive browning of food, especially in prod- ucts containing starch, may present a health risk due to acrylamide. Therefore we recom- mend cooking at low temperatures and not browning foods too much. -
Page 15: Tips On Energy Saving
Tips on energy saving Place cookware on the cooking zone before it is switched on. If possible, always place a lid on the cook- ware. Examples of cooking applications The information given in the following table is for guidance only. Heat Cooking setting... -
Page 16: Cleaning And Care
*Scrapers and cleaners for glass ceramic and stainless steel can be purchased in specialist shops, supermarkets, the parts department of your local Service Force Centre or from www.shop.electrolux.co.uk Remove stubborn residues with a cleaner for glass ceramic or stainless steel. -
Page 17: What To Do If
What to do if … Problem The cooking zones will not switch on or are not functioning The residual heat indicator is not displaying anything The automatic warm up function is not switching itself on Repeated acoustic signal (6x), ap- pliance switches off Acoustic signal sounds and appli- ance switches itself on and then off... -
Page 18: Disposal
If you are unable to remedy the problem by fol- lowing the above suggestions, please contact your local Service Force Centre. Warning! Repairs to the appliance are only to be carried out by qualified service engineers. Considerable danger to the user may result from improper repairs. -
Page 19: Installation Instructions
Installation Instructions Safety instructions The laws, ordinances, directives and standards in force in the country of use are to be followed (safety regulations, proper recycling in accordance with the regulations, etc.) Installation may only be carried out by a qualified electrician. -
Page 20: Electrical Connection Diagram
Electrical Connection Diagram For UK only: 230V...240V~ Sticking on the seal • Clean the worktop in the area of the cut-out sec- tion. • Stick the one-sided self-adhesive sealing tape supplied all the way round the lower edge of the cooking surface along the outer edge of the glass ceramic panel. -
Page 21: Assembly
Assembly... -
Page 25: Rating Plate
Rating Plate... -
Page 26: Warranty Conditions
Warranty conditions Standard guarantee conditions We, Electrolux, undertake that if within 12 months of the date of the purchase this Electrolux appliance or any part thereof is proved to be defective by reason only of faulty workmanship or materials, we will, at... -
Page 27: Service And Spare Parts
Customer Care For general enquiries concerning your Electrolux ap- pliance, or for further information on Electrolux prod- ucts please contact our Customer Care Department by letter or telephone at the address below or visit our website at www.electrolux.co.uk. - Page 28 The Electrolux Group. The world´s No.1 choice. The Electrolux Group is the world´s largest producer of powered appliances for kitchen, cleaning and outdoor use. More than 55 million Electrolux Group products (such as refrigerators, cookers, washing machines, vacuum cleaners, chain saws and lawn mowers) are sold each year to a value of approx. USD 14 billion in more...