Advertisement
Quick Links
®
Skylink
Garage Door
Remote Control
1. INTRODUCTION
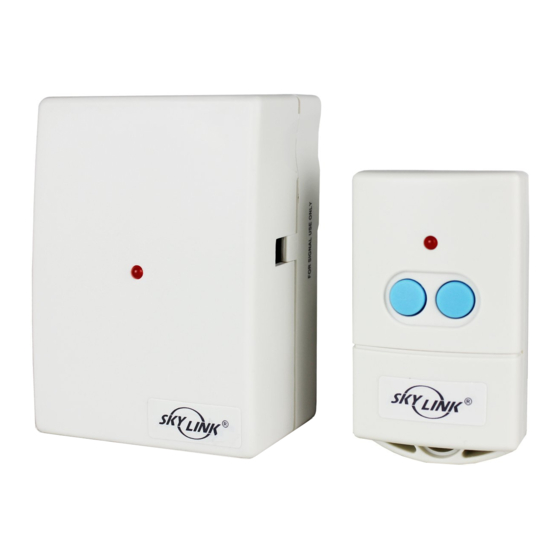
In this package, you will find a keychain transmitter with 12V alkaline battery,
a garage door receiver, a red / black wire, a mounting bracket and a clip.
Mounting
Bracket
Keychain
Transmitter
(Battery inside)
2. INSTALLATION
The following instructions will show you how to install the receiver. After
installing, the keychain transmitter (already programmed to the receiver)
can be used to operate your garage door opener.
You need to locate 2 things inside your garage to install the receiver:
1) the wall-mounted door control;
2) an electrical outlet, select an electrical outlet different from
the one already connected to the power cord of the garage
door opener to reduce the chance of interference. The
further distance between the receiver and the garage door
opener, the less interference between 2 devices.
Note: The length of the red/black wire is 20ft, so the receiver must be
plugged into an electrical outlet that is within 20ft of the wall mounted
door control. If there is no electrical outlet within 20ft of the wall
mounted door control, an extension cord can be used for temporary
installation. Longer wire is available, please contact our customer
service for further information.
Wall Mounted
Door Control
Electrical
Outlet
Unplug the power cord of your garage door opener before
installation to ensure power is not connected.
WARNING
Remove the wall-mounted door control from the wall by removing
1
the screws. Connect the stripped ends of the Red/Black wire to the
2 terminals (2 screws) on the back of the wall mounted door
control. (Polarity does not matter.)
Red /
Black wire
Note: If you see no screws mounting the wall mounted door control,
the screws are probably under-neath the front cover. Remove the
front cover by pressing onto the tabs on top of the cover.
Remove front
cover first
Different wall-mounted door controls
Model 318TR
Garage
Door
Clip
Receiver
Red/Black Wire
Remove power cord of garage
door opener before installation.
Existing
wires
Note: There should be another
pair of wires connected to the 2
terminals already. Do not remove/
disconnect these existing wires.
2. INSTALLATION (CONT)
2
Plug in the connector end of the Red/Black wire to the 318R
receiver. Note the orientation of the male & female connector.
3
Plug the receiver into an electrical outlet inside the garage.
The red light on the receiver should be on after being plugged into an
electrical outlet.
RECEIVER
Note: Alternative wiring options are available, the receiver can be
connected directly to the opener's motor. Please contact customer
service for further information regarding alternative wiring options.
4
Re-connect the power cord of the Garage Door Opener.
5
The Left button on the transmitter has been programmed to operate
the receiver. Activate this button will trigger the receiver therefore
opens the garage door.
3. TROUBLE SHOOTING
Q: Door opener does not react after pressing the button on the transmitter ?
A: - Ensure when the button on the transmitter is pressed, the red light on the
transmitter comes on. Otherwise, check if the battery is inserted properly.
- The left button on the transmitter should be pressed, not the right button
- If the red light on the receiver flashes when you press the left button on
the transmitter, but the door opener does not respond, please ensure the
red/black wire is successfully connected from the receiver to the wall
mounted door control.
- Ensure the wires that are previously connected to the wall mounted
door control are not loose.
- Ensure the code setting on the transmitter is the same as the receiver.
Refer to section 4 to check the code setting.
4.
CHANGE THE OPERATION CODE FOR BOTH
TRANSMITTER AND RECEIVER
It is recommended to randomly set the operation code for your remote
control to avoid interference from other devices. Follow the instructions
below to change the operation code.
Pry off the battery
1
cover of the trans-
mitter with a coin,
as shown.
You will see 9 connectors labeled
from "1" to "9", as shown. (the
connectors setting may not be the
same as shown.)
You can randomly remove some
connectors, leaving some
2
in place.
A connector can be removed with
the clip, as shown.
Existing wires connected
to garage door opener.
(Do not remove)
RED/BLACK WIRE
BATTERY
Advertisement

Related Manuals for SkyLink 318TR


Summary of Contents for SkyLink 318TR
-
Page 1: Remote Control
® Skylink Garage Door Remote Control Model 318TR 1. INTRODUCTION 2. INSTALLATION (CONT) In this package, you will find a keychain transmitter with 12V alkaline battery, Plug in the connector end of the Red/Black wire to the 318R a garage door receiver, a red / black wire, a mounting bracket and a clip. - Page 2 (except battery), due to faulty workmanship or materials, it will be repaired or replaced, without charge. Proof of purchase and a Return Authorization are required. 11. CUSTOMER SERVICE If you would like to order Skylink’s products or have difficulty getting them to work, TRANSMITTER Connector 10 “Removed”...