AT&T MERLIN LEGEND Release 2.0 MLX Queued Call Console Operator's Manual
Hide thumbs
Also See for MERLIN LEGEND Release 2.0 MLX Queued Call Console:
- Quick reference (9 pages) ,
- Operator's manual (152 pages) ,
- Quick reference manual (9 pages)

Related Manuals for AT&T MERLIN LEGEND Release 2.0 MLX Queued Call Console


Summary of Contents for AT&T MERLIN LEGEND Release 2.0 MLX Queued Call Console
- Page 1 AT&T MERLIN LEGEND™ Communications System Release 2.0 MLX Queued Call Console Operator’s Guide...
-
Page 2: Electromagnetic Interference Information
AT&T 555-620-136 Copyright © 1992 AT&T All Rights Reserved Issue 1 Printed in U.S.A. October 1992 Notice Every effort was made to ensure that the Information in this book was complete and accurate at the time of printing. However, Information is subject to change. -
Page 3: Table Of Contents
Contents About This Guide Conventions Commenting on this Guide About Your Queued Call Console Queued Call Console Telephone with DSS MLX-20L Direct Station Selector Console Accessories 1-11 Buttons 1-13 DSS Buttons 1-16 Lights 1-21 Display Contents i... - Page 4 Contents Quick Start Making Calls Answering Calls 2-12 Directing Calls Making Conference Calls Feature Finder Features How to Use Features Account Code Entry Alarm Alarm Clock 4-11 Barge-In 4-12 Camp-On Contents...
- Page 5 Contents Features (continued) 4-14 Directory 4-24 Follow Me 4-26 Headset Features 4-29 Inspect 4-32 Messaging 4-41 Night Service 4-43 Paging 4-46 P a r k 4-48 Pickup 4-50 Position Busy 4-51 Signaling 4-52 Timer 4-53 Volume Contents iii...
- Page 6 Contents Programming SpeciaI Characters System Specifics Contents...
-
Page 7: Important Safety Instructions
The exclamation point in an equilateral triangle is intended to alert the user to the presence of important operating and maintenance (servicing) instructions in the literature accompanying the product. IMPORTANT SAFETY INSTRUCTIONS Always follow these basic safety precautions when using your telephone equipment. - Page 8 Do not use the telephone during electrical storms in your immediate area. There is a remote risk of electrical shock from lightning. Unplug the telephone from the wall outlet before cleaning. Use a damp cloth for cleaning. Do not use liquid or aerosol cleaners on the telephone.
-
Page 9: About This Guide
About This Guide MERLIN LEGEND™ Communications System supports the MLX Queued Call Console. This guide is for operators using the MLX Queued Call Console to perform operator tasks. Some features are customized for your particular system, therefore, if you have any questions about your system, contact your system manager. -
Page 10: Conventions
About This Guide Conventions The following typographical conventions are used in this guide: Bold type is used for telephone buttons. Press Hold. Italic type is used for emphasis and as a substitute for information for which you must supply a specific value. Dial feature code. -
Page 11: Commenting On This Guide
About This Guide Commenting on this Guide We welcome your feedback on this guide. Please use the feedback form on the next page. If the form is missing, send your comments to A. Sherwood, AT&T, 99 Jefferson Road, Rm. # 2A25, Parsippany, NJ 07054. Commenting on this Guide 3... -
Page 12: About Your Queued Call Console
About Your Queued Call Console Your Queued Call Console (QCC) is a MERLIN LEGEND™ Communications System phone console set up for operators. It receives one call at a time in a priority sequence. Each incoming call waits in a holding place (or queue) until you or another operator can handle the call. -
Page 13: Queued Call Console
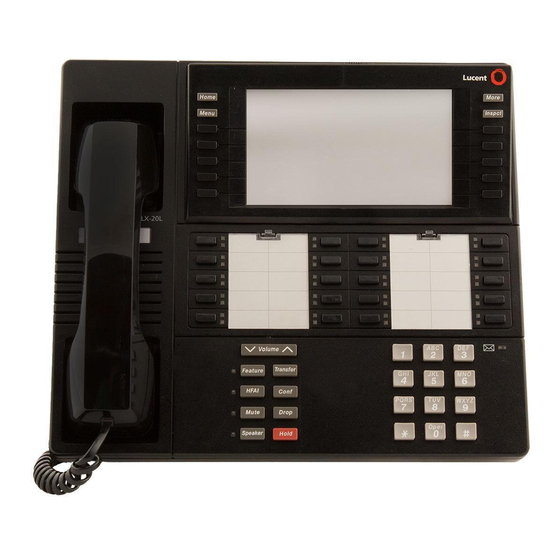
About Your Queued Call Console Queued Call Console Your QCC is an MLX-20L telephone, which has a 7-line display. You can use the QCC alone or with one or two Direct Station Selectors (DSSs). When a DSS is attached to an MLX-20L, it adds extension buttons or other inside calling buttons to your console. - Page 14 About Your Queued Call Console Preprogrammed Buttons All QCC buttons are preprogrammed with features. You cannot change the features on these buttons. However, additional features are available to QCC operators using the QCC’s seven-line display. The QCC display is described later in this chapter.
- Page 15 About Your Queued Call Console Console Equipment You can use your QCC with a headset. An illustration of the QCC (an MLX-20L telephone with one DSS) follows. separate illustration and description of the DSS is included. The console’s buttons are described later in this chapter. 1-4 Queued Call Console...
-
Page 16: Mlx-20L Telephone With Dss
About Your Queued Call Console MLX-20L Telephone with DSS Call and Fixed Feature Buttons (20) -and Button Labeling Card Display Buttons Direct 3 Handset Station Selector Display Screen (DSS) Message Light Volume Control Dedicated Feature Buttons (8) User Cards and Tray MLX-20L Telephone with DSS... -
Page 17: Your Queued Call Console
Your Queued Call Console About Dialpad Button Iabeling card Area on the console used to dial Card labeled with the features assigned telephone numbers. to each button. Direct Station SeIector (DSS) Contrast control (not shown) Device that adds extension buttons or Sliding switch used to brighten or dim the other inside and outside calling buttons to display screen. -
Page 18: Direct Station Selector
About Your Queued Call Console Direct Station Selector Direct Station Selector 1-7... - Page 19 About Your Queued Call Console Fixed buttons Covers 10 additional buttons, including Removable plastic covers to protect Message Status and three Page button labeling cards. The top buttons. The six remaining buttons cover protects the 50 DSS button on the first DSS are reserved for labels, and the lower cover fits over future use.
-
Page 20: Console Accessories
About Your Queued Call Console Console Accessories The communications system supports various headsets and headset amplifiers. This section describes these equipment options. For detailed information about the actual use of the equipment, refer to the equipment’s accompanying documentation. NOTE: Not all consoles allow the use of headset, handset, and speakerphone at the same time. - Page 21 About Your Queued Call Console Amplifiers The headsets described in the previous section work with an MLX-20L telephone when combined with the Modular Amplifier. Ask your system manager for information on this amplifier. 1-10 Console Accessories...
-
Page 22: Buttons
About Your Queued Call Console Buttons You use your console’s Call buttons, fixed feature buttons, and DSS buttons to access the system’s features and services. Call and Fixed Feature Buttons The Call and fixed feature buttons are factory-programmed and labeled for specific functions, as shown in the following illustration and described on the following page. - Page 23 About Your Queued Call Console Position Busy temporarily Letters G through Z prevents most calls from being Letters located on the corner of each Call sent to your console. You and fixed feature button used to enter names into your Personal Directory. continue to receive calls to your extension and calls from co- (Letters A through F appear on the...
-
Page 24: Dss Buttons
Your Queued Call Console About DSS Buttons Your QCC can have one or two attached DSSs. The console’s DSS buttons can be extension buttons or other types of calling buttons. DSS Button Assignments The DSS has 50 buttons arranged in five columns of 10 buttons. - Page 25 About Your Queued Call Console NOTE: The DSS buttons and lights maybe used to show status of pools or trunks, but may not be used to access those pools or trunks. The following illustration shows how your DSS buttons might be programmed and labeled.
- Page 26 About Your Queued Call Console By pressing different Page DSS buttons buttons (1, 2, or 3) with Buttons used to place or direct calls DSS buttons, you can select with one-touch dialing. Each DSS alternate ranges or pages button can represent three numbers. of numbers.
-
Page 27: Lights
About Your Queued Call Console Lights Your console and DSS lights provide the visual cues for handling calls. You use the lights next to the buttons differently, depending on the purpose of the button and the operator function. Console Button Lights Each call or fixed feature button has a red light and a green light next to it. - Page 28 About Your Queued Call Console Meaning Light Steady red Call You are automatically connected to this Call button button when you lift the handset or press Speaker. Alarm A system problem has occurred. See your system manager. The feature is active and the microphone is Headset/Mute muted, you may speak without the caller hearing you.
- Page 29 About Your Queued Call Console DSS Button Lights The red light beside each DSS button provides information as shown in the following table. (The Message Status light must be off when you check this information. ) Meaning Red Light Telephone is not in use and Do Not Extensions Disturb is not activated.
- Page 30 About Your Queued Call Console Meaning Red Light Steady On This trunk is in use. Trunk A call is parked on this button. Park Zone This feature is in use. Group Page and Page All The number of calls in the calling group Calling Group queue is equal to or more than the number your system manager...
- Page 31 About Your Queued Call Console Message Status Lights When a co-worker has a message sent from an operator, the operator uses the Send/Remove Message feature to turn on the message light on that co-worker’s telephone. However, if the message light is already on because of a message sent by a co-worker, the operator does not know, and sending a subsequent Send/Remove Message turns off the message light.
-
Page 32: Display
About Your Queued Call Console Display Your QCC has a 7-line by 24-character display screen and 14 display buttons (4 imprinted buttons and 10 unlabeled buttons). The display assists you in the following ways: provides calling information acts as an alarm, clock, timer, telephone book, and message center lists available features and prompts you as you use them... - Page 33 About Your Queued Call Console 7-Line Display Screen Imprinted Display Buttons Used to select specific display screens: Home, Menu, More, and Inspct (Inspect). Non-Imprinted Display Buttons Used to select the corresponding features and options shown on each screen. Feature Button Used to display the Feature screen to select features you use often.
- Page 34 About Your Queued Call Console Home Screen The Home screen, as shown in the following illustration, is displayed when you’re not using your console’s features. Screen information changes when you receive or make a call and use features. To return to the Home screen at any time, simply press Home.
- Page 35 About Your Queued Call Console Home Screen Line Descriptions Lines 1 and 2 show calling information: — When the console is not in use, Lines 1 and 2 are blank, unless a Posted Message was used to alert others with display telephones. Then, the message appears on Line 1 as a reminder.
- Page 36 Your Queued Call Console About — When you are using a feature, Line 1 shows the feature name and may prompt you to enter information (depending on the feature). 3 shows the date and time and the number of Line calls waiting in queue: —...
- Page 37 About Your Queued Call Console Menu Screen The Menu screen lists features and functions you can use through your display. Calling information is not shown on the Menu screen, but you can make and receive calls while in Menu mode, except when using the Alarm Clock or Personal Directory features.
- Page 38 About Your Queued Call Console NOTE: If your console is set up for system programming and maintenance, Sys Program Maintenance are shown on the right side of the Menu screen. If you have not been trained or are not familiar with these features, see your system manager.
- Page 39 About Your Queued Call Console Inspecting a Call Button The following illustrations show examples of the Inspect screen when it is used to obtain call handling information or information about a conference call on a Call button. In both cases, you press Inspct and then the Call button to display the information.
- Page 40 About Your Queued Call Console Line 3 shows the number of calls waiting in your queue (first number), and the number of calls waiting in the system queue (second number). Line mode. 4 shows that you are in the Inspect Lines 5 through 7 show abbreviated information about the call on each Call button.
- Page 41 About Your Queued Call Console Inspect Conference Screen When you are inspecting a Call button for conference information, the screen lines show the following information: Line 1 shows the number of people on the conference call. Line 2 is blank. Line 3 shows the number of calls waiting in your queue (first number) and the number of calls waiting in the system queue (second number).
- Page 42 About Your Queued Call Console Inspecting a Fixed Feature Button To view fixed feature button information, press Inspct, then press a feature button. Additional information for fixed feature buttons appear as follows. For Start, Headset/Handset Mute, Send/Remove Message, Position Busy, Release, Headset Status, Night Service, Cancel, Join, Headset Auto Ans, or Forced Release the feature name appears on the display.
- Page 43 About Your Queued Call Console Feature Screen The Feature screen provides quick access to the features used most often. As you handle operator tasks, the Feature screen tells you which features are available to help you. The features on this screen change depending on your tasks. Feature Screen Unlike the other display buttons, the Feature button is under the Volume button.
- Page 44 About Your Queued Call Console The following table lists the calling conditions, results, and the corresponding features you see on the Feature screen. Pickup Group and Loudspeaker Page appear on your display only if they are programmed for your system. Y o u r Feature Displayed...
- Page 45 About Your Queued Call Console 1-34 Display...
-
Page 46: Quick Start
Quick Start Quick Start helps you begin using the basic features of your console immediately. To use features not addressed in this section, see Chapter 4. NOTE: You cannot receive or make calls on the QCC when you are programming the Alarm Clock or your Personal Directory, or when the QCC is in maintenance or testing mode or is being used for system programming. -
Page 47: Making Calls
Quick Start Making Calls A steady red light beside a Call button indicates a free line. When you lift the handset, you are automatically connected to this Call button. (If you are using a headset, press a Call button that has its green light off.) To Make Inside Calls 1. - Page 48 Quick Start NOTE: If you do not know the telephone number, directories are available. (See “Directory” in Chapter 4.) If account codes are required on your system, enter it before you make the call. (See your system manager and “Account Code Entry” in Chapter 4.) Making Calls 2-3...
-
Page 49: Answering Calls
Quick Start Answering Calls You can answer a call in two ways: using a handset using a headset If you use a headset, make sure you have the correct headset for your console. Also, verify that your headset is setup correctly and you know how to receive calls through it. -
Page 50: Identifying Call Types
Quick Start Identifying Call Types Before you lift the handset, you can identify an incoming call as follows: by listening for a distinctive ring by scanning the lights on your console or DSS by looking at your display If you’re using a headset, you must press the Call button first before your display shows information about the call. - Page 51 Quick Start In the following examples, there are four returning call types: directed call, a call sent to an inside or outside telephone directed call is “camped on” at the destination telephone held call parked call Depending on how the system is set up, your display may show only extension or trunk numbers, or it may have names associated with extensions or trunk numbers.
- Page 52 Quick Start Call Type You see... You hear... outside call to Display: 2 rings your extension DID-01 Trk813 OUTSIDE Trk801 Console Lights: Slow flashing green light next to Call button incoming call Display: 2 rings on outside FX-NY trunk Trk801 OUTSIDE Trk801 Console Lights:...
- Page 53 Quick Start Call Type You see... You hear... inside call Display: 1 ring returning from Return JACQUES Ext 111 where call was directed Caller: ANITA Ext 103 Console Lights: Slow flashing green light next to call button, slow flashing red light next to DSS button for the extension where you directed the call, and fast flashing red...
- Page 54 Quick Start Call Type You hear... You see... inside call Display: 1 ring returning from where ParkRet ANITA Ext 100 it was parked at Caller: LINDA Ext 103 co-workers (Anita’s phone Console Lights: Slow flashing green light next to Call button and fast flashing red light next to DSS button for returning call outside held call...
- Page 55 Quick Start Calls-In-Queue Alert The Calls-In-Queue Alert causes the console to beep whenever a new call arrives in the QCC queue. This feature can be administered by your system manager so that the beep can indicate each new call arrival, every second call arrival and so forth.
-
Page 56: To Answer A Call
Quick Start To Answer a Call 1. If the red light next to the Call button ringing with the call is not on, press the button next to the flashing green light. The red light shifts to that Call button. 2. -
Page 57: Directing Calls
Quick Start Directing Calls When you direct calls on the QCC (referred to as transferring talk on direct-line consoles), you send calls to inside and outside telephones. When a call you direct to an inside phone goes unanswered after a preset length of time (programmed by your company), the call rings back either at your console or at another QCC, (if your system is setup this way). - Page 58 Quick Start Whether it’s programmed to automatically or manually complete calls that were directed using DSS buttons. — If your system is set up with Automatic Completion, you can use an extension button on a DSS to direct a call quickly to an inside telephone (without pressing Start or Release).
- Page 59 Quick Start To Direct Unannounced Calls with a With Automatic Completion: 1. Look at the light next to the DSS button where you want to direct the call. If the light is on, the co-worker is either on a call or is using the Do Not Disturb feature.
- Page 60 Quick Start To Direct Unannounced Calls without a DSS 1. Press Start. The caller put on hold and you hear a dial tone on your Call button. Source shows fast tlashmg green light. 2. Dial extension or outside number. You may need to enter the dial-out code or pool access code before dialing the outside number.
- Page 61 Quick Start 3. Stay on the line until the person answers and announce the call. Press Source to return to the original caller, if necessary. The called person put on hold, and Destination shows a fast flashing green light. Press to return to the called person, if necessary.
- Page 62 Quick Start NOTE: Announced calls must be manually completed. There are never parties on Source and Destination at the same time. If a party is on hold at either button, the other party is on a Call button. Release only disconnects you from a 3-party conference.
- Page 63 Quick Start Handling Unsuccessfully Directed Calls Unsuccessfully directed calls occur when one of the following happens: The call you directed to an extension is not answered and it returns to you or another operator for further handling. The extension you’re calling is busy. You dial an extension incorrectly.
- Page 64 Quick Start Continue trying to connect the call using one of the following features: — Barge-In for an emergency or if you have been instructed to interrupt. — Camp-On to have a directed call wait a preset length of time for the extension to become available.
- Page 65 Quick Start To Put a Call on Hold Press the Hold button on your console to place a call on hold. NOTE: How your console operates while a call is on hold depends on the type of call. For example: When you receive a call on a Call button and put that call on hold, you’re available to receive another call.
-
Page 66: Making Conference Calls
Quick Start Making Conference Calls Press the Conf button to set up a conference between co- workers and/or outside participants. Number of Participants You can connect up to five people in the same conversation. You can conference one or two outside numbers and up to three extensions, including your own. - Page 67 Quick Start 5. If the person is available, press Conf. All participants, including you, are connected on the Call button you used to begin the conference. If the person is unavailable, hang up (if you are using a handset), press Speaker (if you are using a speakerphone), or press Release (if you are using a headset), and press the Call button to return to the conference participants.
- Page 68 Quick Start Dropping Last Person Called You can also press Drop and then the Call button for the conference to drop the last person added to the conference. You can inspect the conference Call button to see which person is to be dropped (indicated by an asterisk next to the person’s name).
-
Page 69: Disconnecting Calls
Quick Start Disconnecting Calls Calls disconnect when you press Release or Forced Release. Directed calls are completed when you press Release or select camp On from the display. If Automatic Release is programmed for your console, calls disconnect when you press another call button. Making Conference Calls 2-24... -
Page 70: Feature Finder
Feature Finder This section helps you find and use features for these operator tasks: Handling Console Basics Answering and Directing Calls Making Calls Chapter 4 lists features alphabetically with descriptions and step-by-step instructions for programming and use. Feature Finder 3-1... - Page 71 Feature Finder Handling Console Basics S e e . . . If you want to... Send after-hours outside calls to another Night Service telephone(s) Account Code Entry Enter account codes while making or receiving an outside call Use your console as an alarm clock Alarm Clock View the number of system alarms Alarm...
-
Page 72: Answering And Directing Calls
Feature Finder Answering and Directing Calls S e e . . . If you want to... Pickup Answer a co-worker’s ringing telephone from your telephone or pick up a call on hold on a co- worker’s telephone Barge-h Interrupt a co-worker’s call in an emergency or if you’re instructed to interrupt Enter account codes while making or receiving an Account Code Entry outside call... - Page 73 Feature Finder Making Calls S e e . . . If you want to.. . Account Code Entry Enter account males when making an outside call Headset Features Speak to someone privately while using a headset (Headset/Handset Mute) Personal Directory Display or dial numbers you call frequently System Directory Extension Directory...
-
Page 74: Features
Features With your system, you have many features to facilitate your operator tasks besides the various call handling features discussed in Chapter 2. This chapter lists these features alphabetically and provides instruction for using them. Before using these features, a quick review of Appendix B, “System Specifics”... -
Page 75: How To Use Features
Features How to Use Features There are two ways to use features: Select the feature from your display. Several features are offered on your display. Some features can be used from the Home screen and others from the Menu or Feature screens. To use a feature from the display: —... - Page 76 Features The letter H denotes features you can select from the Home screen. The display column is blank if a feature is factory-programmed onto a fixed feature button (for example, Send/Remove Message) you can use the feature via a dedicated feature button (for example, Conf, Drop etc.).
- Page 77 Features Display Screens and Feature Abbreviations Display Display Screen Abbreviation Feature AccountCode Account Code Entry Alarm Alarm Clock Alarm Clock Barge In Barge-In Camp On Camp On Cancel Follow Me CanclFollow Conference Directory Directory Extension Directory Ext Dir Personal Dir Personal Directory System Dir System Directory...
- Page 78 Features Display Display Abbreviation Screen Feature Mute Night Service Paging Loudspkr Pg Loudspeaker Paging Speakerphone Paging Park Pickup Pickup Position Busy Posted Msg Posted Message Signaling Speaker Timer Timer How to Use Features 4-5...
-
Page 79: Account Code Entry
Features Account Code Entry Account codes help your company track telephone use to bill clients, and to forecast and budget costs. You can use account codes for incoming and outgoing calls, if your system is set up for both. If your system has this feature, it can be set up either as required or optional: Required. - Page 80 Features To Enter an Account Code Before a Call 1. Select AccountCode from the Home screen or press Feature and select AccountCode from the Feature screen. 2. Enter the account code, followed by a #. 3. If you’re using a handset: a.
-
Page 81: Alarm
Features Alarm If something is wrong with the system, the red light next to the Alarm button goes on. Report the alarm to your system manager. The red light will stay on until the problem is cleared from your system. If you inspect Alarm when there is a problem, the system shows you the number of alarms that are active. -
Page 82: Alarm Clock
Features Alarm Clock You can use your console as an alarm clock and set it to beep at a particular time to remind you of a meeting, appointment, or other important event. Until canceled, the alarm sounds every day at the set time. You cannot receive calls while you are setting or canceling the alarm. - Page 83 Features To Cancel the Alarm 1. Press Menu. 2. Select Alarm Clock. 3. Select On/Off. Toggle the setting to off, which appears to the left of the line. 4. Press Home. The alarm is canceled and the bell disappears from the Home screen.
-
Page 84: Barge-In
Features Barge-In If a co-worker is on the telephone or using Do Not Disturb, use Barge-In to reach him or her in an emergency or if you have special instructions to interrupt. If your co-worker is not on a call and is using Do Not Disturb, the coworker’s telephone rings. -
Page 85: Camp-On
Features Camp-On Use Camp-On to direct a call to a busy or available inside telephone and have the call wait at the extension for a longer period of time than Release allows. If the telephone is busy, the person you directed the call to hears a tone, signaling that another call is waiting. - Page 86 Features To Camp-On at an Available Extension When you are directing a call to an available extension, you can use Camp-On to give the person more time to answer the call. Do one of the following: Select Camp On from the Home screen Press Feature and select camp on 4-13 Camp-On...
-
Page 87: Directory
Features Directory Three types of directories are available on your console display: Extension Directory Personal Directory System Directory Extension Directory The Extension Directory is a listing of your co-workers’ names and extension numbers programmed by your company. The Extension Directory is offered on the Menu screen. To find a listing, select the directory on your display and search for a specific name. - Page 88 Features To Use the Extension Directory Press Menu. Se!ect Directory. Select Ext Dir. Select appropriate range of letters. If the name you want is not displayed: Select Prev Page to see names on previous page. Select Next Page to see names on next page. If you want to see the number before it is dialed, select Show Number and then select the button next to the name.
-
Page 89: Personal Directory
Features Personal Directory Your console has a Personal Directory that stores, displays, and automatically dials up to 50 personal phone numbers. You can enter your own listings through the Directory option. You can include a dial-out or pool access code as part of the entry to get an outside dial tone automatically. - Page 90 Features 6. Enter punctuation, if necessary: Select Punctuation. See Note. The word "Punctuation” is highlighted when on. Press the display button next to desired character. Select Punctuation again (turns off Punctuation). 7. Select Enter. This saves the name and punctuation entered. 8.
- Page 91 Features NOTE: To correct errors in typing, use Backspace and retype. You may need special characters in your Personal Directory entries-for accessing computers, for telephone banking, or for using certain features offered by your local telephone company. See Appendix A. Valid entries when punctuation is toggled on are: ( ) ' - .
- Page 92 Features To Assign Personal Directory Listings to the Home Screen Page 2 of your Home screen can contain up to six Personal Directory entries. To see Page 3, which can also contain up to six entries, select Next Page from the page 2 screen. Selecting Next Page from the page 3 screen, will bring you to a page with ranges of letters which will help you find the Personal Directory listings you want.
- Page 93 Features NOTE: You must enter listings before you can put them on your Home screen. See “To Enter a Personal Directory Listing” earlier in this section. To Make a Call Using Personal Directory 1. Press Home. 2. Select Directory. 3. Locate listings. If the listing you need is not displayed on the first page of the Directory screen, select Next Page to move to the second page of the Directory.
- Page 94 Features To Change Personal Directory Listings Press Menu. Select Directory. Select Personal Dir. Select Edit Dir. Press the button next to the alphabetical range. Press the button next to the name. If necessary, select Prev Page or Next Page to locate the listing. Choose the item to be changed: Select Replace Name to change name.
-
Page 95: System Directory
Features To Delete Personal Directory Listings Press Menu. Select Directory. Select Personal Dir. Select Delete Entry. Press the button next to the alphabetical range. Press the button next to the name. If necessary, select Prev Page or Next Page to locate the listing. Select Delete to delete the entry or select Cancel to exit without making a change. - Page 96 Features To Use the System Directory Press Menu. Select Directory. Select System Dir. Select appropriate range of letters. If name you want is not displayed: Select Prev Page to see previous listings Select Next Page to see next listings. Select Show Number to see the number associated with the name.
-
Page 97: Follow Me
Features Follow Me You can use the Follow Me feature when a co-worker is meeting with you or working at your desk or to answer incoming calls to your co-worker’s extension while he or she is away. Your co-workers can also forward their calls to your console using the Forward feature from their telephones. - Page 98 Features To Cancel Follow Me One extension at a time: 1. If a red light is not on next to a Call button, press a Call button. 2. Press Feature. 3. Select CanclFollow. 4. Dial the extension, press a DSS button, or use Extension Directory.
-
Page 99: Headset Features
Features Headset Features Your console has three preprogrammed headset buttons: Headset Status turns the headset on and off. Use this button when switching between the handset and headset. Headset Auto Ans (Headset Auto Answer) automatically delivers calls to the headset, eliminating the need to press Call buttons to answer calls. - Page 100 Features To Handle Calls Using the Headset To place a call: 1. Press an available Call button. The red and green lights turn on and you hear a dial tone. 2. Dial a number, press a DSS button, or use your directories to make the call.
- Page 101 Features To Turn off the Headset’s Microphone You can turn off the headset’s microphone during a call using one of the following buttons: Headset Mute (Headset/Handset Mute). Press once. The red light goes on, and the caller cannot hear you. Press again to resume conversation.
-
Page 102: Inspect
Features Inspect Use inspect when you are on a call and you want to inspect other Call buttons. When you press Inspct and a Call button, lines 1 and 2 of your display show detailed information about the Call button you pressed, and lines 5 through 7 show abbreviated information for all Call buttons. - Page 103 Features Inspect also allows you to review your console’s features, showing you what is programmed on your console’s fixed feature buttons or the ranges for your DSS page numbers. You can also use Inspect to view the busy status of the trunk pools in your system or to see information about extensions assigned to DSS buttons.
- Page 104 Features To Use Inspect 1. Press lnspct. want to inspect: 2. Select the button you Press the Call button for a held call (fast light). flashing green Press the Call button for conference call. Press the Call or fixed feature button you want to check.
-
Page 105: Messaging
Features Messaging You can send a message to a co-worker with either Leave Message on your display or Send/Remove Message on your console. You can also receive messages from co-workers and post messages that your co-workers will see on their display telephones when they call you. - Page 106 Features To Use Leave Message When a call is unanswered or busy (you are listening to a ringing or busy signal): 1. Select Leave msg from the Home screen. 2. Read status of message on display: Msg Sent to if message was delivered. Message Box Full if message was not delivered because co-worker’s message box is full.
- Page 107 Features Posted Message Use Posted Message to let co-workers with display phones know when you’re unavailable. The message you post appears on line 1 of your display when you are not active on a call. When a co-worker calls your extension, the Posted Message you’ve chosen appears on his or her display.
- Page 108 Features Code Posted Message Posted Message Code IN CONFERENCE DO NOT DISTURB WITH A CLIENT OUT TO LUNCH WITH A CUSTOMER AT HOME AWAY FROM DESK OUT SICK OUT ALL DAY IN A MEETING Adding or changing messages requires system programming. Blank (not yet programmed) messages are displayed as CUSTM MSG11 CUSTM MSG12, etc.
- Page 109 Features To Cancel a Posted Message 1. Press Menu. 2. Select Posted Msg. The current message appears on line 1 of the screen. 3. Select Cancel. The message disappears. 4. Press Home to exit Posted Message. Send/Remove Message The Send/Remove Message feature is available to operators only.
- Page 110 Features at the light next to the button for your co-worker’s extension before you use the Send/Remove Message feature. See “TO Send Messages Consoles with DSS)”. The message status light on the DSS reflects the status of operator-sent messages only. If a co-worker’s message light is on because a fax is waiting or another co-worker has left a message, the DSS button light is not on, and using Send/Remove Message does not turn the co-worker’s...
- Page 111 Features To Send Messages (Consoles with a DSS) 1. Press Message Status on the DSS. The green light next to Message Status goes on. 2. Check the light next to the DSS button for the person’s extension. If necessary, use Page buttons to locate the extension. 3.
- Page 112 Features To Turn Off Message Lights (Consoles with a DSS) 1. Press Message Status on the DSS. The green light next to Message Status goes on. 2. Check the light next to the DSS button for the person’s extension. You can use Page buttons to locate the extension. 3.
- Page 113 Features To Respond to Messages from Co-Workers 1. Press Menu. 2. Select Messages. The beginning of the first message is displayed. A “greater than” sign (>) tells you that the message is longer than one line. Press More to see the rest of the message. 3.
-
Page 114: Night Service
Features Night Service Night Service is used to send after-hours outside calls to another telephone or telephones and/or calling group. You can send incoming calls to a specific telephone, such as the security office, or these calls can ring a night bell or other alert. - Page 115 Features Overriding Outside Call Restriction on Night Service Your company can program Night Service to restrict the use of telephones for outside calls when Night Service is activated. When this happens, you can override the restriction as follows. 1. Without lifting the handset, press Hold. 2.
-
Page 116: Paging
Features Paging Paging is using your console to broadcast an announcement. You can page in two ways: Speakerphone Paging is heard on all multiline telephones in the system with speakerphones, or, if programmed that way, by selected groups such as departments or work areas. - Page 117 Features To Use Speakerphone Paging 1. Press an available Call button. 2. Lift handset or use the headset. See Note. 3. Dial the Group Page or Page All extension number or press the DSS button. 4. Make the announcement. NOTE: Using the speakerphone for Speakerphone Paging can create a feedback tone.
- Page 118 Features To Use Loudspeaker Paging 1. Press an available Call button. 2. Lift handset or use the headset. 3. Select Loudspkr Pg from the Home screen or press Feature and select Loudspkr Pg from the Feature screen. 4. Enter the Loudspeaker Page access code. 5.
-
Page 119: Park
Features Park When directing a call, you may find that a co-worker can’t be located. Use Park to hold the call and use the Paging feature to announce the call. (See “Paging”.) When you park a call, you put it on hold so that it can be answered from any telephone in the system. - Page 120 Features To Announce a Parked Call 1. Press an available Call button. 2. Lift handset or use the headset. Using the speakerphone for Loudspeaker Paging can create a feedback tone. 3. For Speakerphone Paging: Dial the Group Page or the Page All extension number or press the DSS button.
-
Page 121: Pickup
Features Pickup Use Pickup for temporary call coverage. You can pick up calls ringing or held on individual extensions or trunk lines, or be part of a Pickup group and pick up ringing calls for any member of your group. Individual Pickup Use Individual Pickup when another operator’s or a co- worker’s telephone is ringing and is unanswered. -
Page 122: Group Pickup
Features NOTE: To use Pickup for a trunk, you must dial the trunk number. Pressing a DSS button will not work. Group Pickup Use Group Pickup when your company has organized co- workers into groups. When you are part of a Pickup group, select Pickup Grp from your Home or Feature screen to answer other telephones in your group. -
Page 123: Position Busy
Features Position Busy Use Position Busy when you want to prevent most calls from ringing at your console. When you turn on Position Busy, the only calls that ring at your console are calls made directly to your extension number and calls that are sent to your extension from co-workers using the Forward and Follow Me features. -
Page 124: Signaling
Features Signaling Use Signaling to notify co-workers when they have visitors or to provide them with information or reminders. You can signal multiline telephones only. You and your co-workers can prearrange the signals. For example, you can arrange two beeps for a visitor and three beeps for a reminder. -
Page 125: Timer
Features Timer Your console has a built-in timer to time calls, meetings, breaks, or other activities. When activated, the timer appears on line 3 of the Home screen, in place of the date, and starts counting. It counts to 59 minutes and 59 seconds, then resets to zero and continues counting. -
Page 126: Volume
Features Volume Your phone’s Volume button controls the volume levels for ringing, conversations you hear on the handset, and conversations you hear on the speakerphone. You can set each of these volume levels independently of the others; it will stay as you set it until you change it again. Press the side of the Volume button labeled to raise the volume and the side labeled... - Page 127 Features 4-54 Volume...
-
Page 128: Characters A
Programming Special Characters When you program Personal Directory listings, you are storing a sequence of numbers to be dialed automatically. Some dialing sequences need special characters. For example, you would press Hold to insert a pause (p) after the dial-out code in a dialing sequence so the system is allowed to seize an outside line before dialing the number. -
Page 129: Programming Special Characters
Programming Special Characters Special Characters Table Means... Press... See... Stop, Halts the dialing sequence to allow the Drop system to respond. Pause. Inserts 1.5 second pause in the dialing Hold sequence. Multiple consecutive pauses are allowed. Flash. Sends a switchhook flash. Must be the first Conf entry in the dialing sequence. - Page 130 System Specifics Use the following list to verify that you have the codes and special instructions you need to use the console features. If several operators use the same console, your system manager should complete this list. System Specifics...
- Page 131 System Specifics Automatic Release Account Code Entry Required Automatic/Manual Optional Completion Automatic Completion CalIs-In-Queue Alert Manual Completion (Tone when calls enter personal queue. ) Loudspeaker Page Yes, zones Queue Over Threshold Coverage Yes, give number of Group Coverage calls Receiver in queue for alert Night Service Direct Station Selector...
- Page 132 System Specifics Dial-out code Park Zones Y e s , c o d e _ _ Yes, list extensions _ _ _ _ Pickup Group _ _ _ _ Group Page or Page All QCC Backup Yes, on DSS Page Yes, Calling Group (1, 2, or 3) Group Page extensions...
- Page 133 System Specifics System Specifics...
- Page 134 Index Call buttons 1-11 — 1-12 Account Code Entry 4-6 - Caller identification 1-24 Calling information 1-24 - Alarm 4-8 1-25 Alarm button 1-12 Calls Alarm Clock 4-9 - 4-10 answering 2-4 , 2-11 Amplifiers 1-10 disconnecting 2-24 Announcements (see forwarding 4-24 Paging) 4-43 inspecting call...
- Page 135 Index Extension directory 4-14 - Date 1-25 4-15 Dedicated feature buttons 1-6 Desk stand 1-6 Destination button 1-12, 2-17 Direct Station Selector 1-2, Feature 1-7 — 1-8 button 1-22 Directing calls 2-12 — 2-19 screen 1-32 — 1-33 Camp On 2-19 Features three way abbreviations 4-4 - 4-5...
- Page 136 Index Join button 1-12, 2-16 Hands Free Answer on lntercom(HFAl) 1-6 Headset 1-9 , 2-4 , 4-26 - 4-28 Headset Auto Ans button 1-12 , 2-5 , 2-20 , 4-26 Leave Message Headset Mute button 1-12, button 2-18, 4-32 - 4-33 Lights 4-26 console button 1-1 -...
- Page 137 Index Pickup 4-48 - 4-49 Messaging 4-32 - 4-40 Pool Status, button 1-12 MLX-20L Telephone with Position Busy 1-12, 4-50 Direct Station Posted Message 4-34 - Selector 1-5 4-36 Mute button 1-6 QCC 1-1 Night Service 1-12, 4-41 - Queue 1-1, 1-25 4-42 Queue Over Threshold 2-10 Page All 4-43...
- Page 138 Index User cards and tray 1-6 Send/Remove Message 2-18 4-32, 4-36 -- 4-39 Show Number 4-15, 4-20, 4-23 Signaling 4-51 Volume 1-6 , 4-53 Source button 1-12, 2-16, 2-20 Speakerphone 1-6 , 4-28 paging 4-43 -- 4-44 Split condition 2-20 Start button 1-12, 2-12 Zones, paging 4-43 System alarm 4-8...
- Page 139 Index IN-6 Index...